Note
Access to this page requires authorization. You can try signing in or changing directories.
Access to this page requires authorization. You can try changing directories.
In this quickstart, you set up all the resources in Microsoft Dev Box to enable development teams to self-service their dev boxes. Learn how to create and configure a dev center, select an image for your dev boxes, and create a dev box pool. After you complete this quickstart, developers can use the developer portal to create and connect to a dev box.
A dev box is a daily cloud-based workstation for the developer. It's a virtual machine (VM) preconfigured with the tools and resources the developer needs for a project.
Setting up Microsoft Dev Box has two phases. First, platform engineers set up the necessary Microsoft Dev Box resources in the Azure portal. After this phase, users create and manage their dev boxes in the developer portal. This quickstart shows how to finish the first phase.
The following diagram shows the steps to set up Microsoft Dev Box.

First, create a dev center and a project to organize dev box resources. Next, create a dev box pool to define the network connection and marketplace image, custom image, or dev box definition that dev boxes use. Users who have access to a project can create dev boxes from the pools associated with that project.
If you already set up Microsoft Dev Box and want to learn how to create and connect to dev boxes, see Quickstart: Create a dev box by using the developer portal.
Prerequisites
To complete this quickstart, you need:
| Requirement | Details |
|---|---|
| Azure account | An Azure account with an active subscription. If you don't have an Azure subscription, create a free account before you begin. |
| Permissions | Owner or Contributor role on an Azure subscription or resource group. |
| User licenses | Each user needs a license for Windows 11 Enterprise or Windows 10 Enterprise, Microsoft Intune, and Microsoft Entra ID P1. These licenses are included in: - Microsoft 365 E3, Microsoft 365 E5 - Microsoft 365 A3, Microsoft 365 A5 - Microsoft 365 Business Premium - Microsoft 365 F3* - Microsoft 365 Education Student Use Benefit *Microsoft 365 F3 doesn't include a Windows Enterprise license, but it does include limited Microsoft Entra ID and Intune capabilities |
| Device management | Microsoft Intune. Your organization must use Microsoft Intune for device management. |
| Identity | Microsoft Entra ID. Your organization must use Microsoft Entra ID for identity and access management. |
| Resource provider | Register the Microsoft.DevCenter resource provider. For more information, see Register resource provider. |
Create a dev center
To get started with Microsoft Dev Box, first create a dev center. A dev center in Microsoft Dev Box is a central place to manage projects, set up available dev box images and sizes, and configure networking settings so you can access organizational resources.
Follow these steps to create a dev center and manage your dev box resources:
Sign in to the Azure portal.
In the search box, enter dev centers. In the list of results, select Dev centers.

On the Dev centers page, select Create.

On the Create a dev center pane, on the Basics tab, enter the following values:
Setting Value Subscription Select the subscription in which you want to create the dev center. Resource Group Select an existing resource group, or select Create new and then enter a name for the new resource group. Name Enter a name for your dev center. Location Select the location or region where you want the dev center to be created.
For a list of the currently supported Azure locations with capacity, see Frequently asked questions about Microsoft Dev Box.Attach the environment definition quick start catalog (recommended) Select to attach the quick start catalog to the dev center. Dev Box attaches a quick start catalog that contains predefined environment configurations. You can also create your own catalogs and attach them to the dev center. 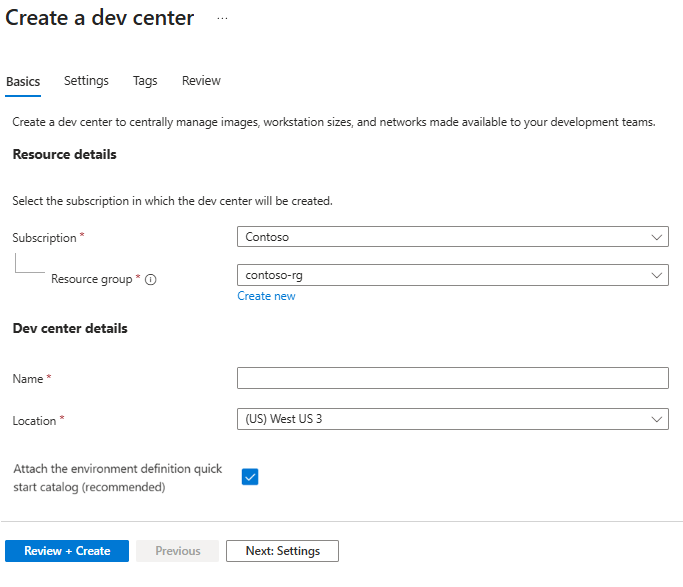
On the Settings tab, enter the following values:
Setting Value Description Project level catalogs Select to enable Project Admins to attach catalogs to projects. Project-level catalogs enable you to provide customizations for each development team. Microsoft hosted network in projects Select to enable Project Admins to specify that dev boxes created from a pool deploy to a Microsoft-hosted network. Microsoft-hosted networks are isolated networks managed by Microsoft. Using a Microsoft hosted network can reduce administrative overhead. Azure Monitor Agent Select to enable all dev boxes in the dev center to install the Azure Monitor Agent. The Azure Monitor Agent collects monitoring data from the dev box and sends it to Azure Monitor. 
(Optional) On the Tags tab, enter a name/value pair that you want to assign.
Select Review + Create.
On the Review tab, select Create.
Track the progress of the dev center creation from any page in the Azure portal by opening the Notifications pane.

When the deployment completes, select Go to resource. Confirm that the dev center page appears.


Create a project
Dev box projects let you manage team-level settings. These settings include giving access to development teams so developers can create dev boxes. Each dev center needs at least one project.
To create and set up a project in a dev box:
Sign in to the Azure portal.
In the search box, enter projects. In the list of results, select Projects.
On the Projects page, select Create.
On the Create a project pane, on the Basics tab, enter the following values:
Setting Value Subscription Select the subscription in which you want to create the project. Resource group Select an existing resource group, or select Create new, then enter a name for the new resource group. Dev center Select the dev center to associate with this project. All settings at the dev center level apply to the project. Name Enter a name for the project. Description Enter a short description of the project. 
On the Dev box settings tab, enter the following values:
Setting Value User customizations Select to enable users to customize their dev boxes on creation. Dev box limits Ensure the checkbox is cleared to let developers create an unlimited number of dev boxes.
Select Enable to limit the number of dev boxes per developer, and enter the maximum number a developer can create.
To learn more about dev box limits, see Tutorial: Control costs by setting dev box limits on a project.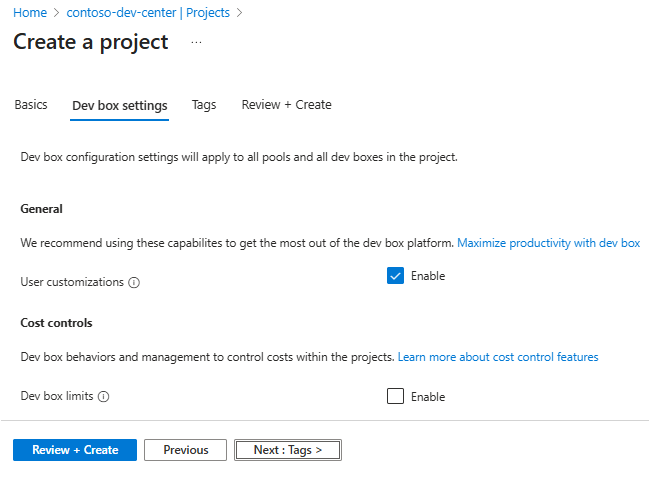
On the Catalogs tab, enter the following values:
Setting Value Deployment environment definitions Select to enable Dev Box to sync deployment environments definitions from a catalog attached to the project. Image definitions Select to enable Dev Box to sync image definitions from a catalog attached to the project. 
(Optional) On the Tags tab, enter a name/value pair to assign.
Select Review + Create.
On the Review tab, select Create.
Check the notifications to confirm the project is created. Select Go to resource.


Create a dev box pool
After you create a project in your dev center, create a dev box pool in the project. A dev box pool is a collection of dev boxes with the same settings, like the image, location, and network connection. Developers who have access to the project can create a dev box from a dev box pool. You must associate at least one dev box pool with your project before users can create a dev box.
When creating a dev box pool, you choose an image source. You can select an image definition, custom image, marketplace image, or dev box definition. Image definitions, custom images, and marketplace images offer greater customization opportunities and greater flexibility by letting you independently select compute size and storage.
Understand image and definition types
Choose from four image options for your dev box pool. For greater customization, use image definitions, custom images, or marketplace images, which let you select compute size and storage separately. The table describes each option and when to use it.
| Type | Description | When to use |
|---|---|---|
| Image definition | YAML-based customization files that define a base image and apply team-specific customizations. Can be built into reusable images. | For team-specific environments with automated software installation and configuration. Best for standardized team setups. |
| Custom image | Your organization's custom images stored in Azure Compute Gallery. | For organization-specific configurations. Allows independent selection of compute size and storage. |
| Marketplace image | Preconfigured images available from Azure Marketplace, such as Windows 11 Enterprise or Visual Studio images. | For standard configurations with common development tools. Offers flexibility to select compute size and storage independently. |
| Dev box definition | Legacy option that bundles a base image with a fixed VM size and storage configuration. | For backward compatibility with existing configurations. Consider migrating to marketplace or custom images for more flexibility. |
- Azure Compute Gallery is a service for managing and sharing custom images across your organization. Learn more at Configure Azure Compute Gallery for Microsoft Dev Box.
- Marketplace images are preconfigured VM images available from the Azure Marketplace. They include common operating systems and development tools.
The following steps show you how to create a dev box pool in a project. When creating a dev box pool, you can select a marketplace image, custom image, or dev box definition. Using images gives you the flexibility to choose the compute size and storage that best fits your needs.
Tip
Use project policies to control the SKUs and images, or other resources such as networks that specific project teams can use. For more information, see Control resource use with project policies in Microsoft Dev Box.
Sign in to the Azure portal.
In the search box, enter projects. In the list of results, select Projects.
Open the project where you want to create the dev box pool.

Select Dev box pools, then select Create.

On the Create a dev box pool pane, on the Basics tab, enter the following values:
Setting Value Display name Enter a name for the pool. The pool name is visible to developers to select when they're creating dev boxes. The name must be unique within a project. Definition Select an image definition, custom image, marketplace image, or existing dev box definition. Compute When you select an image, you can specify the VM size for the dev boxes in this pool. Storage When you select an image, you can specify the storage size for the dev boxes in this pool. Hibernation Shows whether hibernation is supported or not. Region Network connection 1. Select Deploy to a Microsoft hosted network.
2. Select your desired deployment region for the dev boxes. Choose a region close to your expected dev box users for the optimal user experience.Licensing Select this checkbox to confirm that your organization has Azure Hybrid Benefit licenses that you want to apply to the dev boxes in this pool. 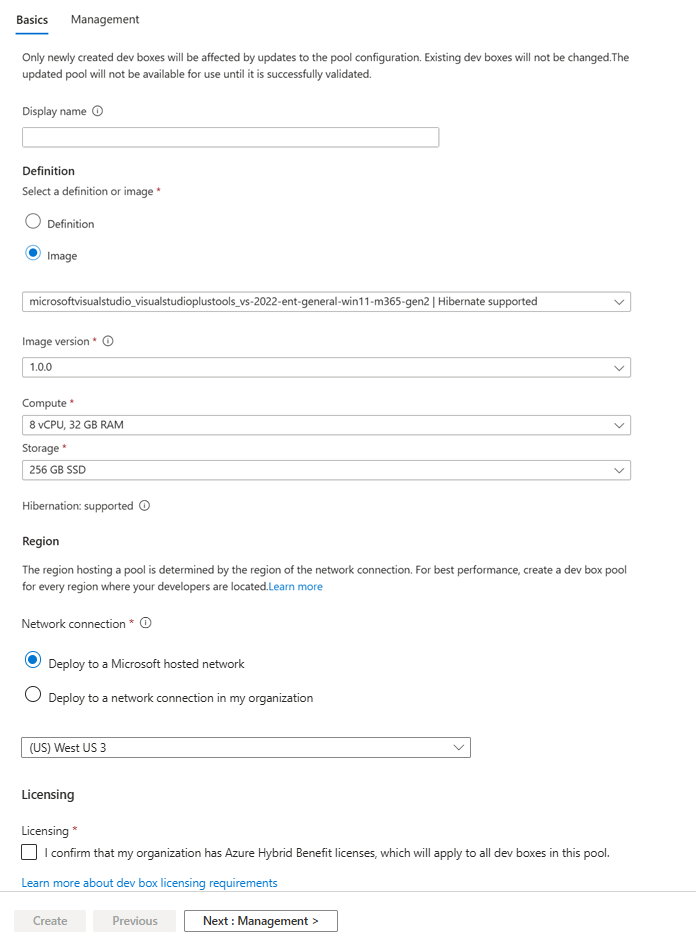
On the Management tab, enter the following values:
Setting Value Roles Dev box Creator Privileges Select Local Administrator or Standard User. Access Enable single sign-on (SSO) Select to enable users to sign in to their dev boxes by using their organizational credentials. Headless connections Select to enable developers to open a dev box in Visual Studio Code without a full desktop experience. Cost controls Auto-stop on schedule Select the checkbox to enable an autostop schedule. You can also configure an autostop schedule after the pool is created. Stop time Select a time to shut down all the dev boxes in the pool. Dev boxes that support hibernation will hibernate at the specified time. Dev Boxes that don't support hibernation shut down. Time zone Select the time zone for the stop time. Hibernate on disconnect Hibernates dev boxes that no one is connected to after a specified grace period. Grace period Hibernates dev boxes that have never been connected to after a specified grace period. 
Select Create.
Check that the new dev box pool appears in the list. You might need to refresh the screen.


The Azure portal deploys the dev box pool and runs health checks to make sure the image and network pass the validation criteria for dev boxes. The following screenshot shows four dev box pools, each with a different status.

Provide access to a dev box project
Before users can create dev boxes from the dev box pools in a project, you need to give users access through role assignments. The Dev Box User role lets users create, manage, and delete their own dev boxes. Grant access at the project level.
Important
Make sure you have enough permissions to the project before adding users.
To assign roles:
Sign in to the Azure portal.
In the search box, enter projects. In the list of results, select Projects.
Select the project you want to give team members access to.

In the left menu, select Access control (IAM).

In the command bar, select Add > Add role assignment.
Assign the following role. For detailed steps, see Assign Azure roles using the Azure portal.
Setting Value Role Select DevCenter Dev Box User. Assign access to Select User, group, or service principal. Members Select the users or groups you want to let access the project. 
Now, the user can view the project and all the pools in it. The user can create dev boxes from any pool and manage those dev boxes from the developer portal.


Note
Microsoft Dev Box supports work and school accounts. It doesn't support the use of guest accounts or personal accounts.
Delegate to project administrators
Microsoft Dev Box lets you delegate project admin tasks to a team member. Project admins help manage projects for their teams. They create and manage dev box pools, set dev box limits, and configure autostop schedules. The DevCenter Project Admin role doesn't let the project admin add users to the project.
To let users manage projects, assign them the DevCenter Project Admin role. Follow the steps in Provide access to a dev box project, but select the DevCenter Project Admin role instead of the Dev Box User role. For more info, see Provide access to projects for project admins.
Important
A user who is assigned the Dev Box User role or the Project Admin role can create a dev box.
Discover more about Microsoft Dev Box
- Find out What's new in Microsoft Dev Box
- Discover what's coming up next in Microsoft Dev Box: Microsoft Dev Box roadmap
- Learn how Microsoft Dev Box impacts developer productivity
Next step
In this quickstart, you set up the Microsoft Dev Box resources that let users create their own dev boxes. To learn how to create and connect to a dev box, go to the next quickstart: