Note
Access to this page requires authorization. You can try signing in or changing directories.
Access to this page requires authorization. You can try changing directories.
You can use variables to store customers' responses and reuse their content later in the conversation.
You can also use variables to create logical expressions that dynamically route the customer down different conversation paths. For example, save a customer's name in a variable called "customerName," and the agent can address the customer by name as the conversation continues.
Variables can also be passed to, and returned from, other topics and Power Automate flows.
Create a variable
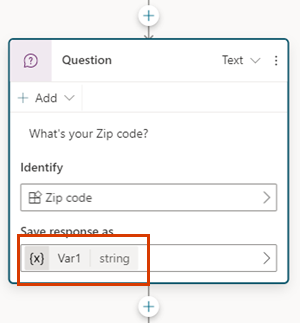
Any node that returns an output, such as a Question node, automatically creates an output variable of the appropriate type.
Tip
Rename nodes to make them easier to identify. Select the node's name field to update the name directly, or select the More icon (…) of the node and select Rename from the menu. You can also rename nodes in the code editor.
It's not possible to rename Trigger nodes and Go to step nodes.
Node names can be up to 500 characters in length.
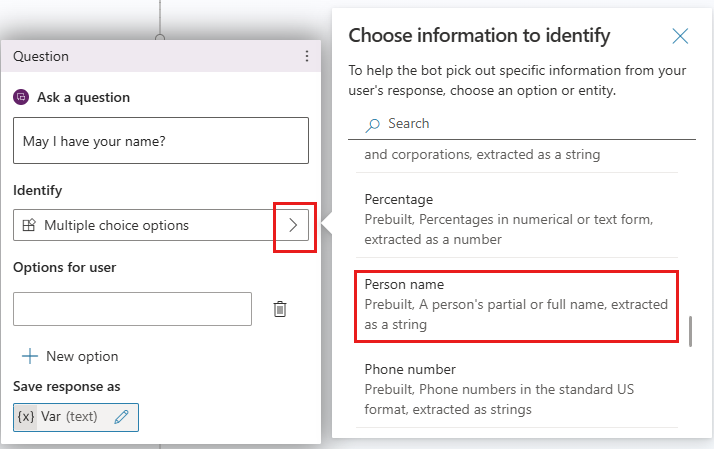
Pick an entity to use
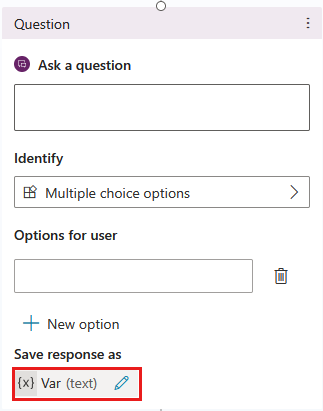
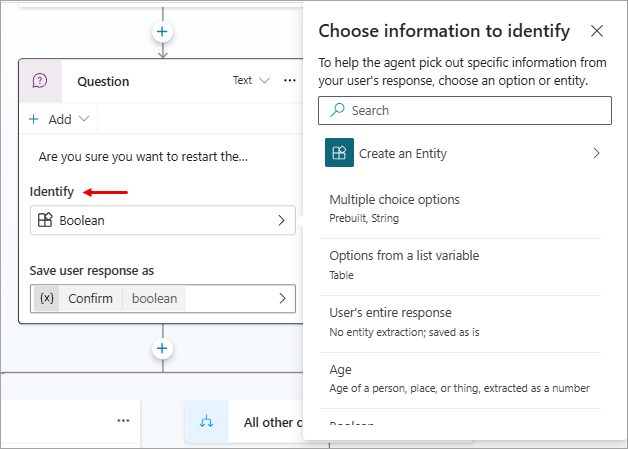
Question nodes are created with multiple-choice options by default. To use a different prebuilt or custom entity, select the Identify box, and then select the desired type of information.
Rename a variable
Variables are automatically assigned a name when you create them. A best practice is to give your variables meaningful names to make their purpose clear to anyone who must maintain your agent.
Select the variable. The Variable properties panel appears.
Under Variable name, enter the desired name for your variable.
Set a variable
Typically you use a Question node to store user input in a variable. However, there might be situations where you want to set the value of a variable yourself. In those cases, use a Set variable value node.
Select the Add node
 icon under the node after which you want to add a Set variable value node.
Select Variable management > Set a variable value. A Set variable value node appears on the canvas.
Select the box under Set variable, and then select Create a new variable. A new variable is created. Its type is unknown until you assign a value to it.

For To value, assign a value using one of the following options:
- Type a literal value.
- Select an existing variable of the same type.
- Use a Power Fx formula. Power Fx formulas are useful for more complex types where literal values can't be used, such as Table and Record types.
Use variables in Action nodes
When you use a variable in an Action node, if its base type matches a parameter type specified for a flow, or for a Bot Framework skill, you can feed it to that parameter. The output from Action nodes generates new variables.
For more context, see the example scenarios in Call an agent flow from a topic and Use input and output variables to pass information.
Use literal values for variable inputs
In nodes where you can set a value for input parameters, you can always enter a literal value instead of selecting another variable as the value.

The node attempts to interpret literal values as a string, a number, or a Boolean. For example, 123 is interpreted as a number. If you want it to be interpreted as a string value instead, you can wrap the value in double quotes, like this: "123".
For some scenarios (for example, scenarios using complex types), you might need to use a Power Fx formula to set a specific type.
Use environment variables for Azure Key Vault secrets
An environment variable can reference a secret in the Key Vault. Secret environment variables are a special case of environment variables with unique considerations.
To create a secret environment variable in the Power Apps portal, you must configure its Key Vault.
To authorize Copilot Studio to read this Key Vault, you must perform the following actions:
Assign the Key Vault Secrets User role to the Microsoft Copilot Studio Service application.
To authorize all agents from the environment to access the secret, create a tag
AllowedEnvironmentson the secret and add the allowed environment IDs separated by commas.To authorize only specific agents from the environment to use this Key Vault, create a tag
AllowedAgentsand put the agent identifier in the format{envId}/{schemaName}. For multiple values, separate the values with commas.If you reach the maximum number of characters but still need to add more agents, add another tag with a descriptive but unique name (for example:
AllowedAgents2).
The secret value is cached in Dialog runtime for five minutes. Unsuccessful reads are cached for 30 seconds.
Warning
By adding the secret in the agent, you might expose the value of this secret. Anyone who can edit the agent in the environment could add a Message node and return the value of the secret environment variables in a message.
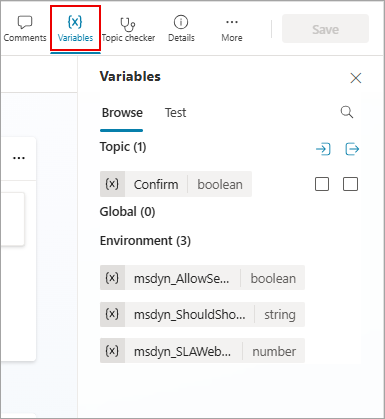
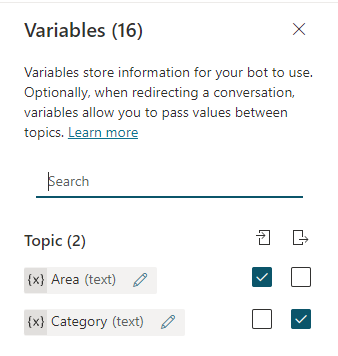
Variables panel
The Variables panel is where you can view all the variables that are available for a topic, regardless of which nodes they're defined or used in. For each variable, you can select whether it can receive its value from other topics, return its value to other topics, or both. You can also select a variable to edit its properties in the Variable properties panel.
To open the Variables panel, select Variables on the topic's menu bar.

Variable properties panel
In the Variable properties panel, you can rename a variable, see where your agent uses it, or convert it to a global variable. You can't convert a global variable back to a topic variable, however. You can also select whether a topic variable can receive values from or pass its value to other topics.
To open the Variable properties panel for a variable, select the desired variable in the Variables panel. You can also open the Variable properties panel from any node that uses variables, by selecting the desired variable.
Pass variables between topics
When you redirect one topic to another, you can pass the values of variables from the originating topic to the destination topic and also return values from the destination topic to the originating topic. Passing variables between topics is especially useful when an earlier topic already collected information that a later topic needs. Your users certainly appreciate not having to answer the same questions more than once.
Receive values from other topics
When a topic defines a variable (for example, in a Question node), the agent asks the user the question to fill in the variable's value. If the agent already acquired the value in an earlier topic, there's no reason to ask the question again. In such cases, you can set the variable to Receive values from other topics. When another topic redirects to this one, it can pass either the value of a variable or a literal value to this variable, and skip the question. The experience for the user talking to the agent is seamless.
In this example, we use two topics, Greeting and Talk to Customer. Both topics ask for the customer's name. However, if the Greeting topic runs first, the Talk to Customer topic skips its question. Instead, it uses the value of the variable passed from the Greeting topic.
Here's the flow of the Talk to Customer topic:

As shown in the test panel, if this topic is triggered first, it asks the user, "What should I call you?" It stores the value in a string variable called customerName. The customerName variable is also set to get its value from other topics. The topic concludes with the message, "I hope you're having a wonderful day, customerName!"
Here's the flow of the Greeting topic:

As shown in the test panel, if this topic is triggered first, it asks the user, "What's your name?" It stores the value in a string variable called customerName. The topic sends the message, "Pleased to meet you, customerName!" It then redirects to the Talk to Customer topic, which sends the message, "I hope you're having a wonderful day, customerName!" Note, however, that the Talk to Customer topic skipped asking for the user's name again. Instead, it used the value of the customerName variable passed from the Greeting topic.
Finally, here's that second conversation again, this time from the perspective of the Talk to Customer topic:

Let's walk through the steps to set up a topic to receive values from other topics. Our example scenario uses the predefined topic Greeting as the source topic, and a new topic Talk to Customer as the destination topic, but the same steps work for any topic that should use a value from an earlier topic when possible.
Set up the destination topic
The destination topic is the topic being redirected to, the one that receives values from other topics. In our example, it's Talk to Customer.
Create a new topic and call it "Talk to Customer."
Add trigger phrases such as "talk to me," "speak with me," "chat with me."
Add a Question node and enter "What should I call you?" for the message.
Under Identify, select the prebuilt entity Person name.
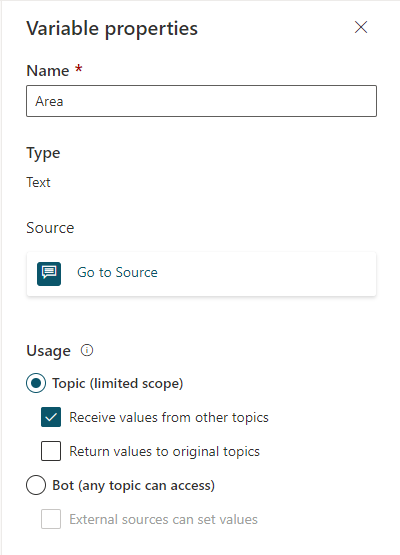
Select the name of the variable. The Variable properties panel opens.
Replace the default name with "customerName", and then select Receive values from other topics.

Add a Message node.
In the message box, enter "I hope you're having a wonderful day, ".
Select the Insert variable icon ({x}), and then select customerName.
Select the space after the variable and enter "!".
Save the topic.
Set up the source topic
The source topic is the topic doing the redirecting, the one that provides the value and passes it to the destination topic. In our example, it's Greeting.
Go to the Greeting topic and delete the default nodes, except for the Trigger node.
Add a Question node and enter "What's your name?" for the message.
Under Identify, select the prebuilt entity Person name.
Replace the default name with "customerNameFromGreeting".
Add a Message node.
In the message box, enter "Pleased to meet you, ".
Select the Insert variable icon ({x}), and then select customerNameFromGreeting.
Select the space after the variable and enter "!".
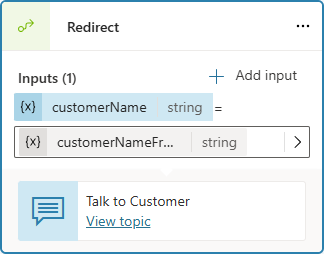
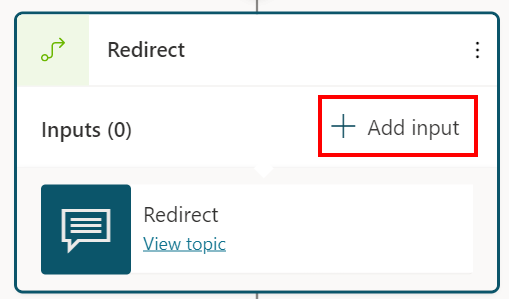
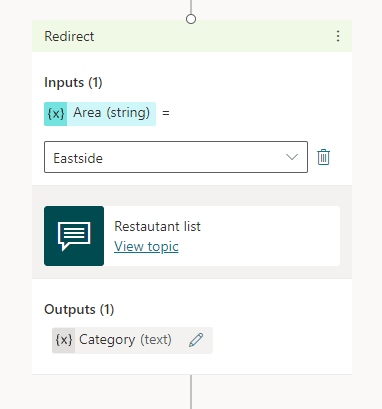
Add a Redirect node, and select the destination topic Talk to Customer.
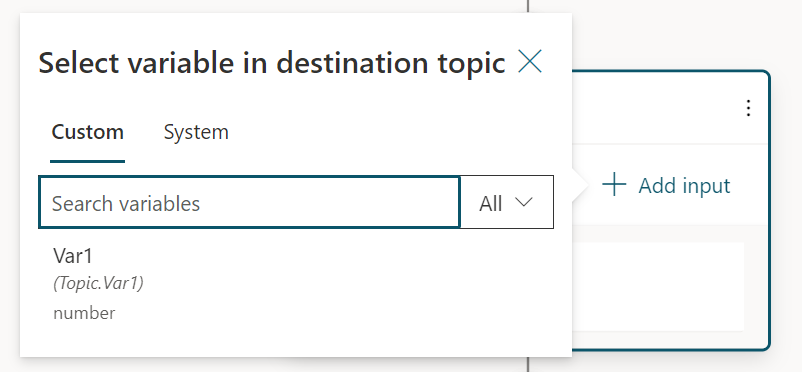
Select Add input, and then select the variable from the destination topic that you want to pass a value to.

Select the > icon, and then select the variable whose value you want to pass, customerNameFromGreeting, in this example.
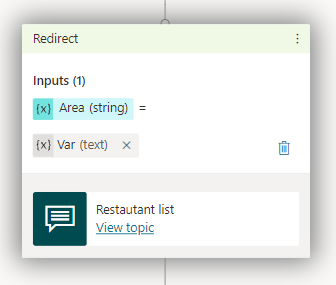
The Redirect node should look like this:
Save the topic.

Return values to original topics
In an agent, a topic is meant to collect a specific piece of information. Multiple other topics can call it and expect it to return the information as a variable. The variable becomes part of the originating topic and can be used like any other variable. Information the agent obtains is thus available across topics, reducing the need for global variables.
Let's continue with the example from the previous section. We ask a new question in the Talk to Customer topic, and then return the answer to the Greeting topic.
Set up the source topic for a returned variable
When you're returning a variable to a topic, the source topic is the topic that provides the value to pass back to the original topic. In this example, the source topic is Talk to Customer.
Go to the source topic.
Add a Question node and enter "What city do you live in?" for the message.
Under Identify, select the prebuilt entity City.
Select the variable to open the Variable properties panel. Name it "customerCity," and then select Return values to original topics.
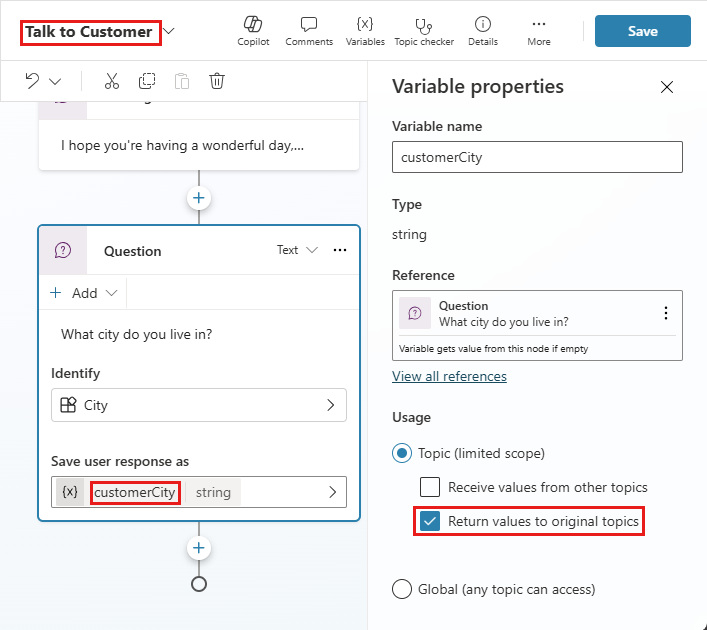
Add a Message node.
Select the Insert variable icon ({x}), and then select customerCity.
After the variable in the message box, enter " must be beautiful this time of year!".
Save the topic.
Set up the destination topic for a returned variable
When you're returning a variable to a topic, the destination topic is the topic that receives values from the current topic. In our example, the destination topic is Greeting.
Go to the destination topic.
The variable you selected in the source topic should appear on the Redirect node as an output variable.

Save the topic.

Parse values
The Parse value node allows you to convert a value of one type, to a value of another type. A common use case for the Parse value node is to convert raw JSON. For example, an agent calls a flow, which in turn calls an API. The API then returns a result. Now you need a way to parse this result and return one or more primitive variables. With the Parse value node, you can send the entire API result as a string, such as the following:
{
    "Name": "Parker",
    "Position": "Product manager",
    "Company": "Contoso",
    "FormerPositions": [{
            "Position": "Customer service representative"
        }
    ]
}
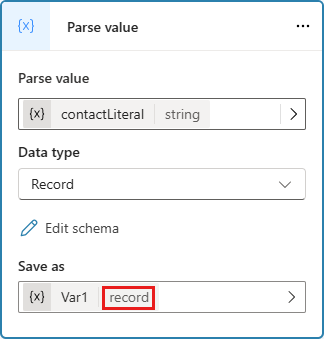
The Parse value node can convert the string variable that you have now into a variable of type Record, for which the Power Fx editor provides IntelliSense code completion and suggestions.
In addition to parsing JSON strings, a key use of the Parse value node is parsing untyped objects at runtime. The most common use case is when you receive an event and you need to parse the event value. Or you might want to parse the System.Activity.ChannelData property, which varies at runtime by channel.
If you need to parse information from an event coming from Teams, refer to the Teams developer documentation to find an example of what the expected event might look like. You can then follow the instructions in this section, using the example event as sample data.
To add a Parse value node to a topic:
Select the Add node
icon under the node after which you want to parse a value, point to Variable management, and select Parse value.Add a Parse value node, and select the variable you want to parse.

Select the data type. In this case choose From Sample Data.

Select Get Schema from Sample JSON, enter the desired JSON example in the editor that opens, and select Confirm.

Finally, select the variable to hold the parsed value. Usually you would create a new variable.

The output variable now has the expected type: record.