Note
Access to this page requires authorization. You can try signing in or changing directories.
Access to this page requires authorization. You can try changing directories.
A pipeline can be used to establish cross-workspace communication between an open workspace and a workspace that restricts inbound public access. For example, you can create a pipeline in an open workspace to access a lakehouse in an inbound restricted workspace. This setup allows the notebook in Workspace 1 to securely access the lakehouse and read Delta tables in Workspace 2 without exposing them to public access.
Step 1: Create the workspaces
You need both an open workspace and a restricted workspace. In this article, the workspaces are referred to as follows:
- The source workspace is the open workspace without public access restriction and is where you create a pipeline.
- The target workspace is the restricted workspace with inbound public access restriction and is where you create the lakehouse.
To create the workspaces, follow these steps:
- Create two workspaces in Fabric. For details, see Create a workspace.
- In the tenant settings, enable workspace-level inbound access protection.
- For the target workspace, set up workspace-level private links.
Step 2: Create a lakehouse in the restricted workspace
Create a lakehouse in the target (restricted) workspace by using the following Create Lakehouse API:
POST https://{workspaceid}.z{xy}.w.api.fabric.microsoft.com/workspaces/{workspaceID}/lakehouses

Step 3: Create a managed private endpoint
Create a managed private endpoint (MPE) in the source (open) workspace. Use the Workspace setting in the portal or the following API:
POST https://{workspaceFQDN}/v1/workspaces/{workspaceID}/managedPrivateEndpoints
Where {workspaceFQDN} is {workspaceID}.z{xy}.w.api.fabric.microsoft.com
For example: POST https://aaaaaaaa000011112222bbbbbbbbbbbb.zaa.w.api.fabric.microsoft.com/v1/workspaces/aaaaaaaa-0000-1111-2222-bbbbbbbbbbbb/managedPrivateEndpoints
The targetPrivateLinkResourceId is the resource ID of the private link in the restricted workspace. To create a managed private endpoint to the target workspace, you need the private link service Resource ID of the target workspace.

You can find this Resource ID in Azure by viewing the Resource JSON for the workspace. Ensure that the workspace ID in the JSON matches the intended target workspace.

The private link service owner for Workspace 2 needs to approve the managed private endpoint request in Azure private link center > Pending connections.
Step 4: Upload a Delta table to the lakehouse
Use Azure Storage Explorer to upload your Delta table folder into the restricted lakehouse's managed storage.
Go to Azure Storage Explorer, select the connection icon in the left menu, and then select ADLS Gen2 container or directory.
Sign in using OAuth.
Enter a display name for the storage and enter the blob container URL in the following format:
https://{workspaceID}.z{xy}.onelake.fabric.microsoft.com/{workspaceID}/{lakehouseID}Where:
workspaceIDis the workspace ID without dashes and{xy}is the first two characters of the workspace ID.
Select Connect. The storage should now be displayed in the explorer view.
Under the Tables folder, upload the Delta table you want to use. This example uses the customers table.


Step 5: Create a Notebook in the restricted workspace
Create a notebook that reads from the table and writes to a new table. To do so, create a notebook in an open workspace using UI.
In the open workspace, create a lakehouse with the same table and a similar notebook using the UI.

Connect the lakehouse in the notebook, and run the script for creating a new table.

df = spark("SELECT * FROM Lakehouse_Open.customers")
display(df)
df.write.mode("overwrite").saveAsTable("Lakehouse_Open.customersnew")
Save the Notebook.
Retrieve the Notebook Definition via API and get the location result
Get Notebook Definition API: GET https://{WorkspaceID w/o (-)}.zxy.w.api.fabric.microsoft.com/{WorkspaceID}/notebooks/getDefinition

Get location API: GET {location}/result
Convert the notebook-content.py from Base64 to JSON, copy the converted content, and then convert it back from JSON to Base64 after updating the following values with values from the restricted lakehouse.
Create a notebook with the definition using the updated request body.


   Create Notebook API: GET https://{WorkspaceID w/o (-)}.zxy.w.api.fabric.microsoft.com/{WorkspaceID}/notebooks

   Get location API: GET {location}/result
Step 6: Create a pipeline in the Open Workspace
In the open workspace, create a pipeline using the Fabric portal or API.
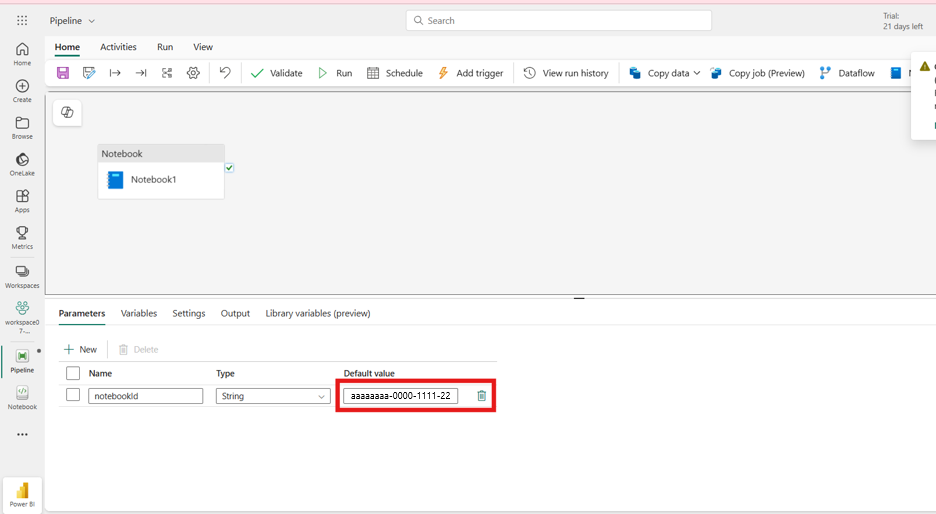
Add a Notebook Activity.
In Settings, create a Connection.

Select the restricted workspace.

Add the Notebook ID as parameter.
@pipeline().parameters.notebookIdIn the pipeline parameters, input the actual notebook ID from the restricted workspace.
Save the pipeline and copy the pipeline ID


Step 7: Run the pipeline via API
Trigger the pipeline using the API, for example using Bruno.
Format for the pipeline Run API Endpoint:
https://{openWsIdWithoutDashes}.zxy.w.api.fabric.microsoft.com/v1/workspaces/{openWsId}/items/{pipelineId}/jobs/instances?jobType=PipelineGet location API: GET {location}
Wait for the run status to complete. You can check the status in the Monitor page in the Microsoft Fabric portal.


Step 8: Verify Table Creation
Open Azure Storage Explorer in the restricted workspace’s lakehouse.
Confirm that the new table was created.
Use the List Tables API to get the lakehouse tables:
List Tables API: GET https://{openWsIdWithoutDashes}.zxy.w.api.fabric.microsoft.com/v1/workspaces/{workspaceId}/items/{lakehouseId}/tables