Note
Access to this page requires authorization. You can try signing in or changing directories.
Access to this page requires authorization. You can try changing directories.
The Global Secure Access client is an essential part of Global Secure Access. It helps organizations manage and secure network traffic on end-user devices. The client routes traffic that needs to be secured by Global Secure Access to the cloud service. All other traffic goes directly to the network. The Forwarding Profiles you set up in the portal decide which traffic the Global Secure Access client routes to the cloud service.
Note
The Global Secure Access client is also available for macOS, Android, and iOS. To learn how to install the Global Secure Access client on these platforms, see Global Secure Access client for macOS, Global Secure Access client for Android, and Global Secure Access client for iOS.
This article describes how to download and install the Global Secure Access client for Windows.
Prerequisites
- A Microsoft Entra tenant onboarded to Global Secure Access.
- A managed device joined to the onboarded tenant. The device must be either Microsoft Entra joined or Microsoft Entra hybrid joined.
- Microsoft Entra registered devices aren't supported.
- The Global Secure Access client requires a 64-bit version of Windows 10 or Windows 11, or an Arm64 version of Windows 11.
- Azure Virtual Desktop single-session is supported.
- Azure Virtual Desktop multi-session isn't supported.
- Windows 365 is supported.
- You need local admin credentials to install or upgrade the Global Secure Access client.
- The Global Secure Access client requires a license. For details, see the licensing section of What is Global Secure Access. If needed, you can buy licenses or get trial licenses.
Download the client
The most current version of the Global Secure Access client is available to download from the Microsoft Entra admin center.
- Sign in to the Microsoft Entra admin center as a Global Secure Access Administrator.
- Browse to Global Secure Access > Connect > Client download.
- Select Download Client.

Install the Global Secure Access client
Automated installation
Organizations can install the Global Secure Access client silently with the /quiet switch, or use Mobile Device Management (MDM) solutions, such as Microsoft Intune, to deploy the client to their devices.
Use Microsoft Intune to deploy the Global Secure Access client
This section explains how to use Intune to install the Global Secure Access client on a Windows 11 client device.
Prerequisites
- A security group with devices or users to identify where to install the Global Secure Access client.
Package the client
Package the installation script into a .intunewin file.
- Save the following PowerShell script to your device. Put the PowerShell script and the Global Secure Access
.exeinstaller into a folder.
Note
The PowerShell installation script installs the Global Secure Access client, sets the IPv4Preferred registry key to prefer IPv4 over IPv6 traffic, and prompts for a reboot for the registry key change to take effect.
Tip
Select to expand the PowerShell script.
PowerShell installation script
# Create log directory and log helper
$logFile = "$env:ProgramData\GSAInstall\install.log"
New-Item -ItemType Directory -Path (Split-Path $logFile) -Force | Out-Null

function Write-Log {
    param([string]$message)
    $timestamp = Get-Date -Format "yyyy-MM-dd HH:mm:ss"
    Add-Content -Path $logFile -Value "$timestamp - $message"
}

try {
    $ErrorActionPreference = 'Stop'
    Write-Log "Starting Global Secure Access client installation."

    # IPv4 preferred via DisabledComponents registry value
    $ipv4RegPath    = "HKLM:\SYSTEM\CurrentControlSet\Services\Tcpip6\Parameters"
    $ipv4RegName    = "DisabledComponents"
    $ipv4RegValue   = 0x20  # Prefer IPv4 over IPv6
    $rebootRequired = $false

    # Ensure the key exists
    if (-not (Test-Path $ipv4RegPath)) {
        New-Item -Path $ipv4RegPath -Force | Out-Null
        Write-Log "Created registry key: $ipv4RegPath"
    }

    # Get current value if present
    $existingValue = $null
    $valueExists = $false
    try {
        $existingValue = Get-ItemPropertyValue -Path $ipv4RegPath -Name $ipv4RegName -ErrorAction Stop
        $valueExists = $true
    } catch {
        $valueExists = $false
    }

    # Determine if we must change it
    $expected = [int]$ipv4RegValue
    $needsChange = -not $valueExists -or ([int]$existingValue -ne $expected)

    if ($needsChange) {
        if (-not $valueExists) {
            # Create as DWORD when missing
            New-ItemProperty -Path $ipv4RegPath -Name $ipv4RegName -PropertyType DWord -Value $expected -Force | Out-Null
            Write-Log ("IPv4Preferred value missing. Created '{0}' with value 0x{1} (dec {2})." -f $ipv4RegName, ([Convert]::ToString($expected,16)), $expected)
        } else {
            # Update if different
            Set-ItemProperty -Path $ipv4RegPath -Name $ipv4RegName -Value $expected
            Write-Log ("IPv4Preferred value differed. Updated '{0}' from 0x{1} (dec {2}) to 0x{3} (dec {4})." -f `
                $ipv4RegName, ([Convert]::ToString([int]$existingValue,16)), [int]$existingValue, ([Convert]::ToString($expected,16)), $expected)
        }
        $rebootRequired = $true
    } else {
        Write-Log ("IPv4Preferred already set correctly: {0}=0x{1} (dec {2}). No change." -f `
            $ipv4RegName, ([Convert]::ToString($expected,16)), $expected)
    }

    # Resolve installer path
    $ScriptRoot = if ($PSScriptRoot) { $PSScriptRoot } else { Split-Path -Parent $MyInvocation.MyCommand.Path }
    $installerPath = Join-Path -Path $ScriptRoot -ChildPath "GlobalSecureAccessClient.exe"
    Write-Log "Running installer from $installerPath"

    if (Test-Path $installerPath) {
        $installProcess = Start-Process -FilePath $installerPath -ArgumentList "/quiet" -Wait -PassThru

        if ($installProcess.ExitCode -eq 1618) {
            Write-Log "Another installation is in progress. Exiting with code 1618."
            exit 1618
        } elseif ($installProcess.ExitCode -ne 0) {
            Write-Log "Installer exited with code $($installProcess.ExitCode)."
            exit $installProcess.ExitCode
        }

        Write-Log "Installer completed successfully."
    } else {
        Write-Log "Installer not found at $installerPath"
        exit 1
    }

    if ($rebootRequired) {
        Write-Log "Reboot required due to registry value creation or update."
        exit 3010  # Soft reboot required
    } else {
        Write-Log "Installation complete. No reboot required."
        exit 0
    }
}
catch {
    Write-Log "Fatal error: $_"
    exit 1603
}
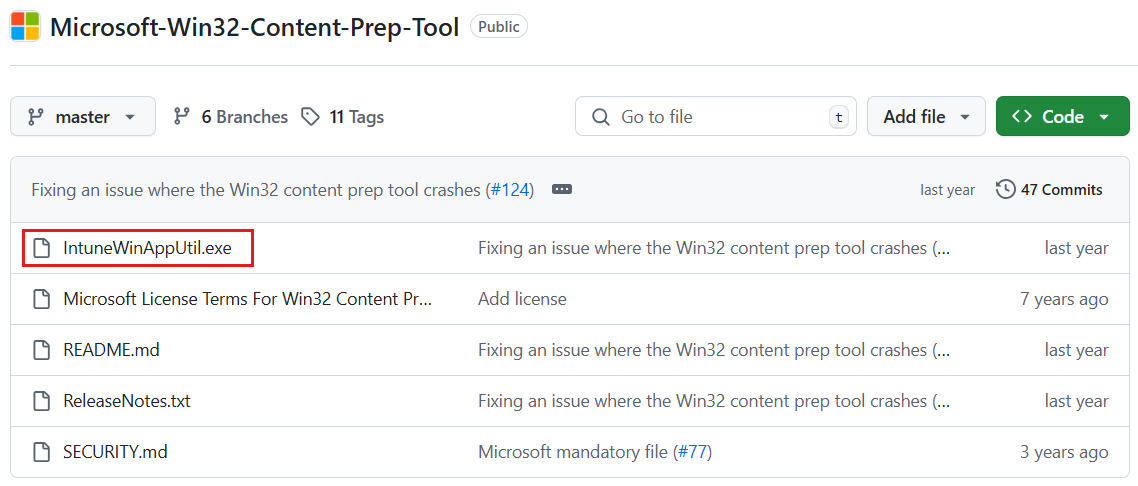
Go to the Microsoft Win32 Content Prep Tool. Select IntuneWinAppUtil.exe.
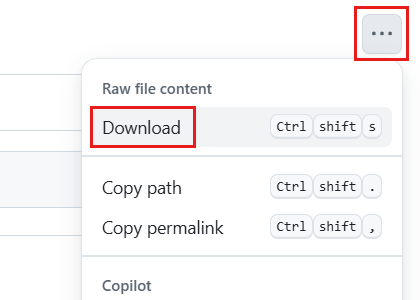
In the top right corner, select More file actions and then select Download.
Navigate to and run
IntuneWinAppUtil.exe. A command prompt opens.Enter the folder path location of the Global Secure Access
.exefile. Select Enter.Enter the name of the Global Secure Access installation
.ps1file. Select Enter.Enter the folder path in which to place the
.intunewinfile. Select Enter.Enter N. Select Enter.

The .intunewin file is ready for you to deploy Microsoft Intune.
Deploy Global Secure Access client with Intune
Reference detailed guidance to Add and assign Win32 apps to Microsoft Intune.
Navigate to https://intune.microsoft.com.
Select Apps > All apps > Add.
On Select app type, under Other app types, select Windows app (Win32).
Select Select. The Add app steps appear.
Select Select app package file.
Select the folder icon. Open the
.intunewinfile you created in the previous section.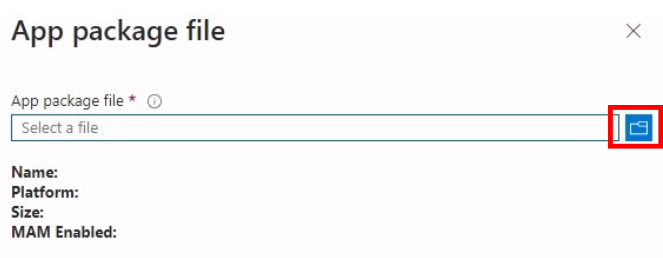
Select OK.
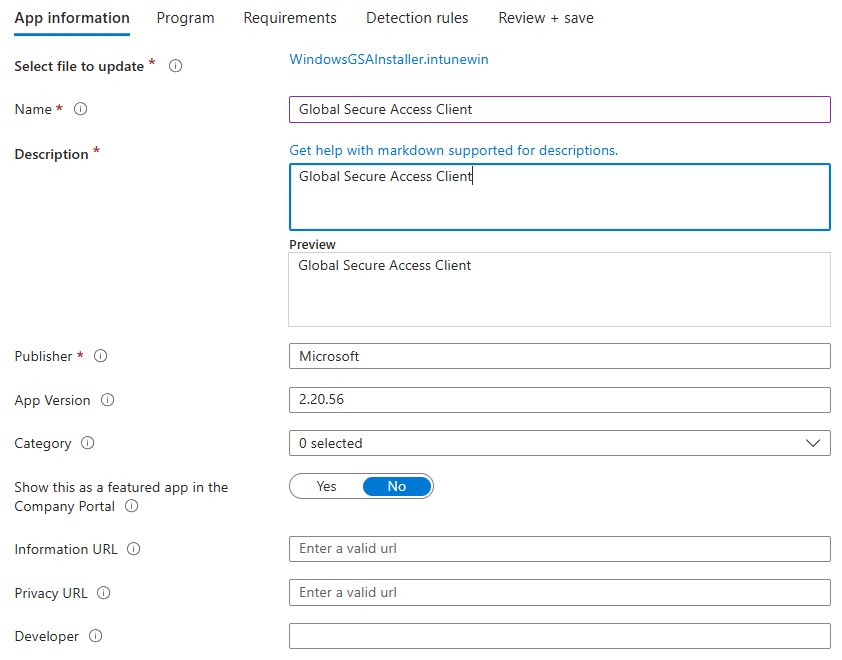
On the App Information tab, configure these fields:
- Name: Enter a name for the client app.
- Description: Enter a description.
- Publisher: Enter Microsoft.
- App Version (optional): Enter the client version.
Use the default values in the remaining fields.
Select Next.
On the Program tab, configure these fields:
- Install command: Use the original name of the
.ps1file forpowershell.exe -ExecutionPolicy Bypass -File OriginalNameOfFile.ps1. - Uninstall command: Use the original name of the
.exefile for"OriginalNameOfFile.exe" /uninstall /quiet /norestart. - Allow available uninstall: Select No.
- Install behavior: Select System.
- Device restart behavior: Select Determine behavior based on return codes.
- Install command: Use the original name of the

| Return code | Code type |
|---|---|
| 0 | Success |
| 3010 | Soft reboot |
| 1618 | Retry |

Select Next.
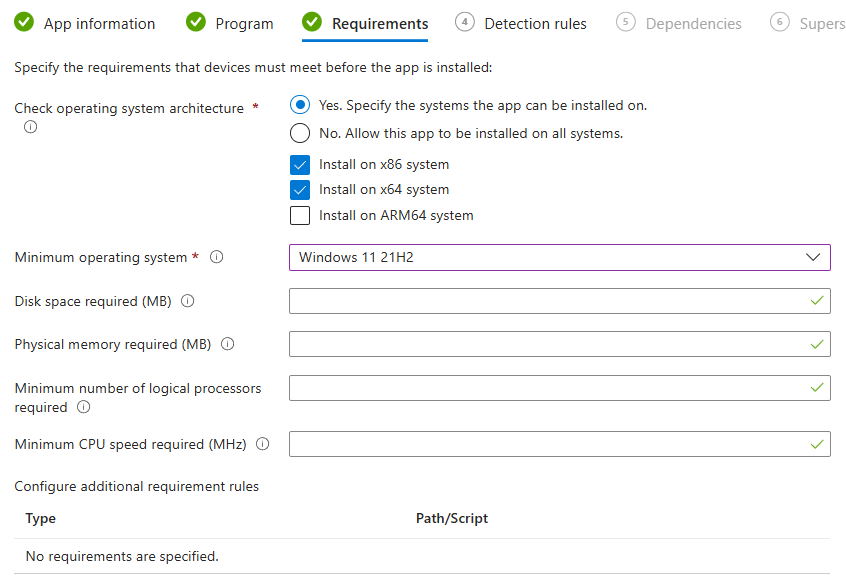
On the Requirements tab, configure these fields:
- Check operating system architecture: Select Yes. Specify the systems the app can be installed on..
- Select the Install on options according to the system type you're deploying to.
- Minimum operating system: Select your minimum requirements.
- Check operating system architecture: Select Yes. Specify the systems the app can be installed on..
Leave the remaining fields blank.

Note
Windows on Arm devices have their own client, which is available at aka.ms/GlobalSecureAccess-WindowsOnArm.
Select Next.
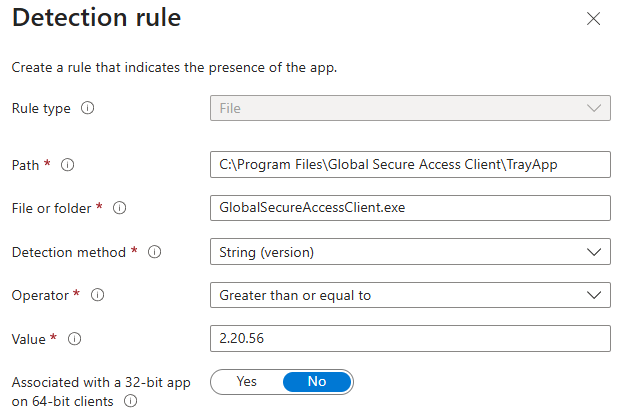
On the Detection rules tab, under Rules format, select Manually configure detection rules.
Select Add.
Under Rule type, select File.
Configure these fields:
- Path: Enter
C:\Program Files\Global Secure Access Client\TrayApp. - File or folder: Enter
GlobalSecureAccessClient.exe. - Detection method: Select String (version).
- Operator: Select Greater than or equal to.
- Value: Enter the client version number.
- Associated with a 32-bit app on 64-bit client: Select No.
- Path: Enter
Select OK. Select Next.
Select Next twice to go to Assignments.
Under Required, select +Add group. Select a group of users or devices. Select Select.
Set the Restart grace period to Enabled to avoid disrupting users with an abrupt device reboot.
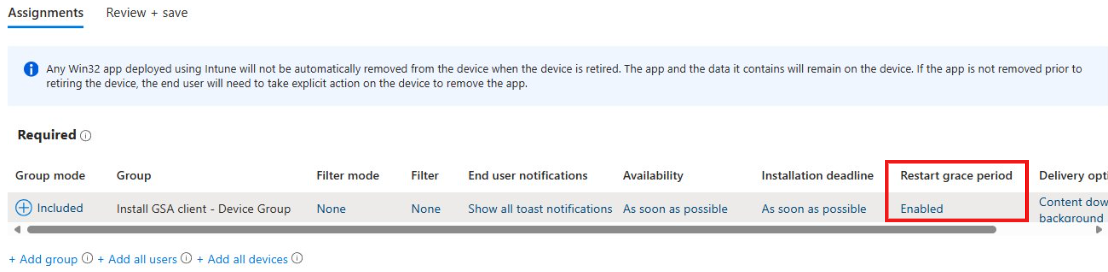
Select Next. Select Create.


Note
Deploying the Global Secure Access client to a virtual machine might suppress the prompt to restart the device. The user won't see the reboot prompt.
Update the client to a newer version
To update to the newest client version, follow the Update a line-of-business app steps. Be sure to update the following settings in addition to uploading the new .intunewin file:
- Client version
- Detection rule value set to the new client version number
In a production environment, it's a good practice to deploy new client versions in a phased deployment approach:
- Leave the existing app in place.
- Add a new app for the new client version, repeating the previous steps.
- Assign the new app to a small group of users to pilot the new client version. It's okay to assign these users to the app with the old client version for an in-place upgrade.
- Slowly increase the membership of the pilot group until you deploy the new client to all desired devices.
- Delete the app with the old client version.
Configure Global Secure Access client settings with Intune
Admins can use remediation scripts in Intune to enforce client-side controls, such as preventing non-admin users from disabling the client or hiding specific buttons.
Important
Set the $gsaSettings to the values your organization requires in both the detection and remediation scripts.
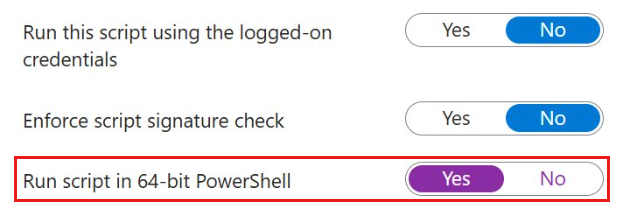
Note
Make sure to configure these scripts to run in 64-bit PowerShell.
Tip
Select to expand the PowerShell scripts.
PowerShell detection script
Detection script
# Check GSA registry keys

$gsaPath = "HKLM:\SOFTWARE\Microsoft\Global Secure Access Client"

$gsaSettings = @{

"HideSignOutButton" = 1

"HideDisablePrivateAccessButton" = 1

"HideDisableButton" = 0

"RestrictNonPrivilegedUsers" = 0

}

$nonCompliant = $false

foreach ($setting in $gsaSettings.GetEnumerator()) {

$currentValue = (Get-ItemProperty -Path $gsaPath -Name $setting.Key -ErrorAction SilentlyContinue).$($setting.Key)

if ($currentValue -ne $setting.Value) {

    Write-Output "Non-compliant: $($setting.Key) is $currentValue, expected $($setting.Value)"

    $nonCompliant = $true

}


}

if (-not $nonCompliant) {

Write-Output "Compliant"

exit 0


} else {

Write-Output "Non-compliant"

exit 1


}
PowerShell remediation script
Remediation script
# Ensure GSA registry keys are present

$gsaPath = "HKLM:\SOFTWARE\Microsoft\Global Secure Access Client"

$gsaSettings = @{

"HideSignOutButton" = 1

"HideDisablePrivateAccessButton" = 1

"HideDisableButton" = 0

"RestrictNonPrivilegedUsers" = 0


}

if (-Not (Test-Path $gsaPath)) {

New-Item -Path $gsaPath -Force | Out-Null


}

foreach ($setting in $gsaSettings.GetEnumerator()) {

Set-ItemProperty -Path $gsaPath -Name $setting.Key -Value $setting.Value -Type DWord -Force | Out-Null

Write-Output "Set $($setting.Key) to $($setting.Value)"


}
Configure settings for Microsoft Entra Internet Access with Intune
Microsoft Entra Internet Access doesn't yet support DNS over HTTPS or Quick UDP Internet Connections (QUIC) traffic. To mitigate this, disable these protocols in users' browsers. The following instructions provide guidance on how to enforce these controls using Intune.
Disable QUIC in Microsoft Edge and Chrome with Intune
To disable QUIC in Microsoft Edge and Chrome with Intune:
In the Microsoft Intune admin center, select Devices > Manage devices > Configuration.
On the Policies tab, select + Create > + New Policy.
In the Create a profile dialog:
- Set the Platform to Windows 10 and later.
- Set the Profile type to Settings catalog.
- Select Create. The Create profile form opens.
On the Basics tab, give the profile a name and description.
Select Next.
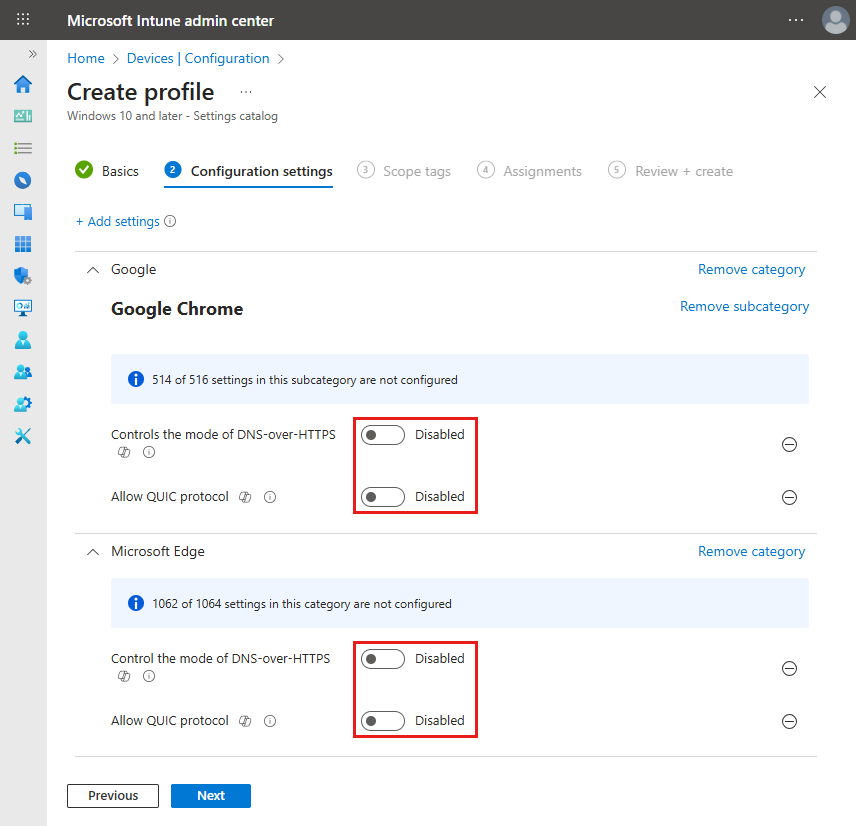
On the Configuration settings tab:
- Select + Add settings.
- In the Settings picker, search for "QUIC".
- From the search results:
- Select Microsoft Edge and select the Allow QUIC protocol setting.
- Next, select Google Google Chrome and select the Allow QUIC protocol setting.
- In the Settings picker, search for "DNS-over-HTTPS".
- From the search results:
- Select Microsoft Edge and select the Control the mode of DNS-over-HTTPS setting.
- Next, select Google Google Chrome and select the Control the mode of DNS-over-HTTPS setting.
- Close the Settings picker.
For Google Chrome, set both toggles to Disabled.
For Microsoft Edge, set both toggles to Disabled.
Select Next twice.
On the Assignments tab:
- Select Add groups.
- Select a group of users or devices to assign the policy.
- Select Select.
Select Next.
On the Review + create tab, select Create.

Configure Firefox browser settings
Admins can use remediation scripts in Intune to disable DNS over HTTPS and QUIC protocols in Firefox browser.
Note
Make sure to configure these scripts to run in 64-bit PowerShell.
Tip
Select to expand the PowerShell scripts.
PowerShell detection script
Detection script
# Define the path to the Firefox policies.json file

$destination = "C:\Program Files\Mozilla Firefox\distribution\policies.json" $compliant = $false

# Check if the file exists

if (Test-Path $destination) { try { # Read the file content $fileContent = Get-Content $destination -Raw if ($fileContent -and $fileContent.Trim().Length -gt 0) { # Parse JSON content $json = $fileContent | ConvertFrom-Json

       # Check if Preferences exist under policies
        if ($json.policies -and $json.policies.Preferences) {
            $prefs = $json.policies.Preferences

            # Convert Preferences to hashtable if needed
            if ($prefs -isnot [hashtable]) {
                $temp = @{}
                $prefs.psobject.Properties | ForEach-Object {
                    $temp[$_.Name] = $_.Value
                }
                $prefs = $temp
            }

            # Initialize compliance flags
            $quicCompliant = $false
            $dohCompliant = $false

            # Check if QUIC is disabled and locked
            if ($prefs.ContainsKey("network.http.http3.enable")) {
                $val = $prefs["network.http.http3.enable"]
                if ($val.Value -eq $false -and $val.Status -eq "locked") {
                    $quicCompliant = $true
                }
            }

            # Check if DNS over HTTPS is disabled and locked
            if ($prefs.ContainsKey("network.trr.mode")) {
                $val = $prefs["network.trr.mode"]
                if ($val.Value -eq 0 -and $val.Status -eq "locked") {
                    $dohCompliant = $true
                }
            }

            # Set overall compliance if both settings are correct
            if ($quicCompliant -and $dohCompliant) {
                $compliant = $true
            }
        }
    }
} catch {
    Write-Warning "Failed to parse policies.json: $_"
}


}

# Output compliance result

if ($compliant) { Write-Output "Compliant" Exit 0 } else { Write-Output "Non-compliant" Exit 1 }
PowerShell remediation script
Remediation script
# Define paths

$distributionDir = "C:\Program Files\Mozilla Firefox\distribution" $destination = Join-Path $distributionDir "policies.json" $backup = "$destination.bak"

# Initialize variable for existing JSON

$existingJson = $null

# Try to read and parse existing policies.json

if (Test-Path $destination) { $fileContent = Get-Content $destination -Raw if ($fileContent -and $fileContent.Trim().Length -gt 0) { try { $existingJson = $fileContent | ConvertFrom-Json } catch { Write-Warning "Existing policies.json is malformed. Starting fresh." } } }

#Create a new JSON structure if none exists

if (-not $existingJson) { $existingJson = [PSCustomObject]@{ policies = [PSCustomObject]@{ Preferences = @{} } } }

# Ensure policies and Preferences nodes exist

if (-not $existingJson.policies) { $existingJson | Add-Member -MemberType NoteProperty -Name policies -Value ([PSCustomObject]@{}) } if (-not $existingJson.policies.Preferences) { $existingJson.policies | Add-Member -MemberType NoteProperty -Name Preferences -Value @{} }

# Convert Preferences to hashtable if needed

if ($existingJson.policies.Preferences -isnot [hashtable]) { $prefs = @{} $existingJson.policies.Preferences.psobject.Properties | ForEach-Object { $prefs[$.Name] = $.Value } $existingJson.policies.Preferences = $prefs }

$prefObj = $existingJson.policies.Preferences $updated = $false

# Ensure QUIC is disabled and locked

if (-not $prefObj.ContainsKey("network.http.http3.enable") -or $prefObj["network.http.http3.enable"].Value -ne $false -or $prefObj["network.http.http3.enable"].Status -ne "locked") {

$prefObj["network.http.http3.enable"] = @{
    Value = $false
    Status = "locked"
}
$updated = $true


}

# Ensure DNS over HTTPS is disabled and locked

if (-not $prefObj.ContainsKey("network.trr.mode") -or $prefObj["network.trr.mode"].Value -ne 0 -or $prefObj["network.trr.mode"].Status -ne "locked") {

$prefObj["network.trr.mode"] = @{
    Value = 0
    Status = "locked"
}
$updated = $true
}

# If any updates were made, back up and write the new JSON

if ($updated) { if (Test-Path $destination) { Copy-Item $destination $backup -Force }

$jsonOut = $existingJson | ConvertTo-Json -Depth 10 -Compress
$utf8NoBomEncoding = New-Object System.Text.UTF8Encoding($false)
[System.IO.File]::WriteAllText($destination, $jsonOut, $utf8NoBomEncoding)
}
Manual installation
To manually install the Global Secure Access client:
- Run the GlobalSecureAccessClient.exe setup file. Accept the software license terms.
- The client installs and silently signs you in with your Microsoft Entra credentials. If the silent sign-in fails, the installer prompts you to sign in manually.
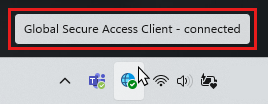
- Sign in. The connection icon turns green.
- Hover over the connection icon to open the client status notification, which should show as Connected.
Client interface
To open the Global Secure Access client interface, select the Global Secure Access icon in the system tray. The client interface provides a view of the current connection status, the channels configured for the client, and access to diagnostics tools.
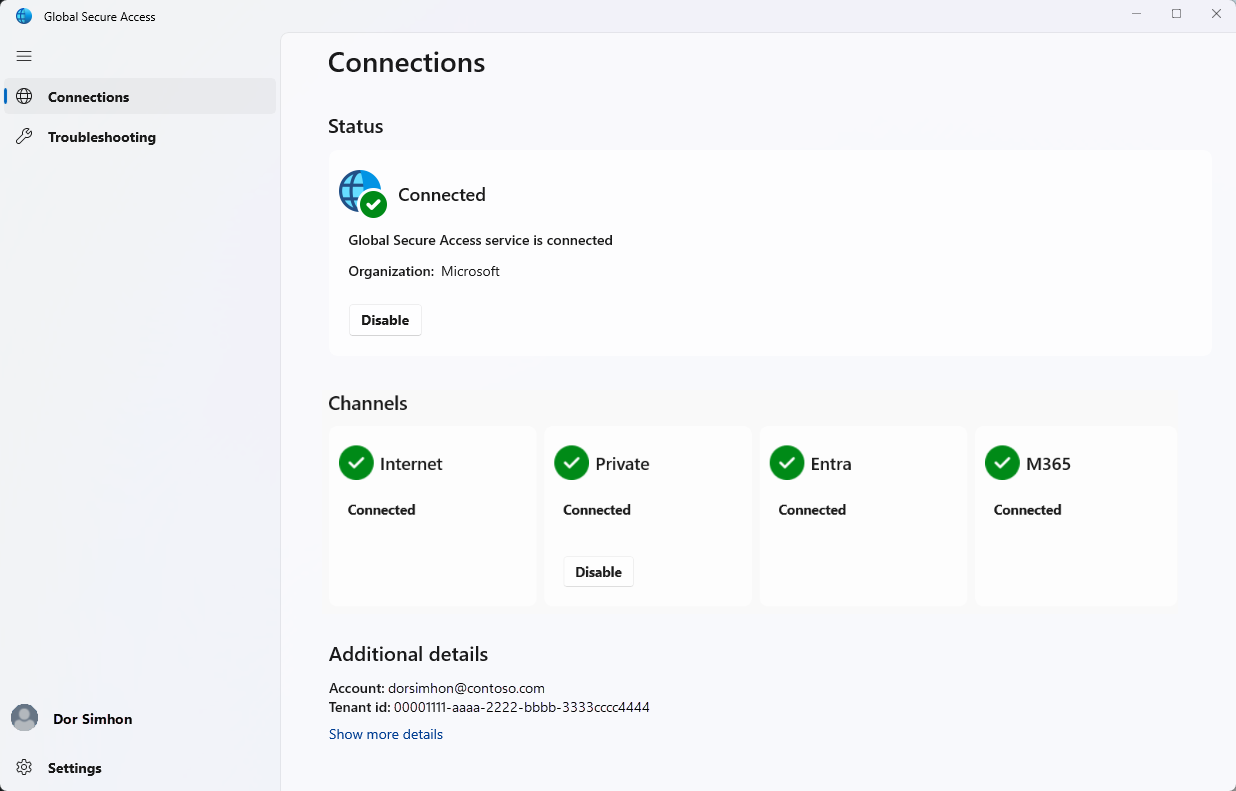
Connections view
In the Connections view, you can see the client Status and the Channels configured for the client. To disable the client, select the Disable button. You can use the information in the Additional details section to troubleshoot the client connection. Select Show more details to expand the section and view more information.
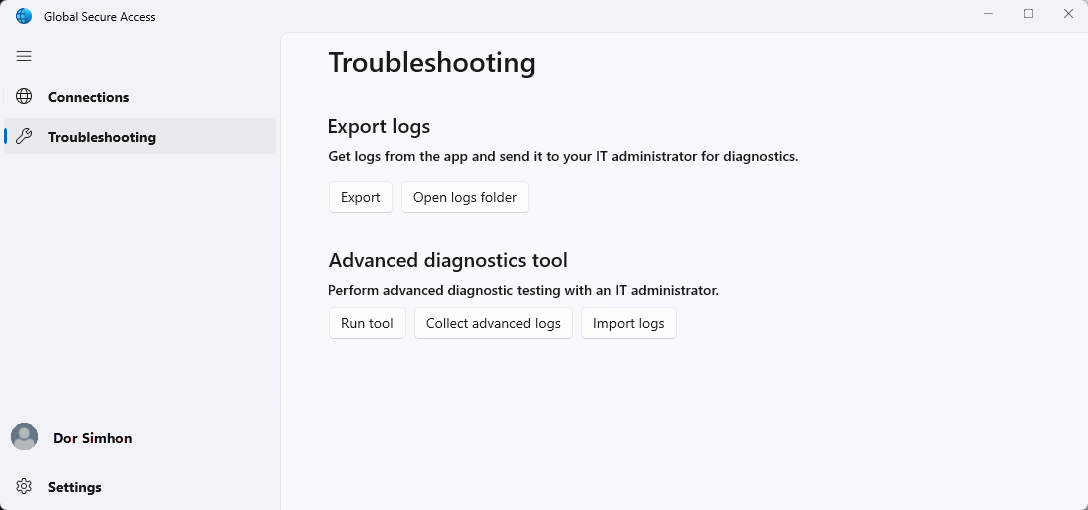
Troubleshooting view
In the Troubleshooting view, you can perform various diagnostic tasks. You can export and share logs with your IT admin. You can also access the Advanced diagnostics tool, which provides an assortment of troubleshooting tools. Note: You can also launch the Advanced diagnostics tool from the client system tray icon menu.
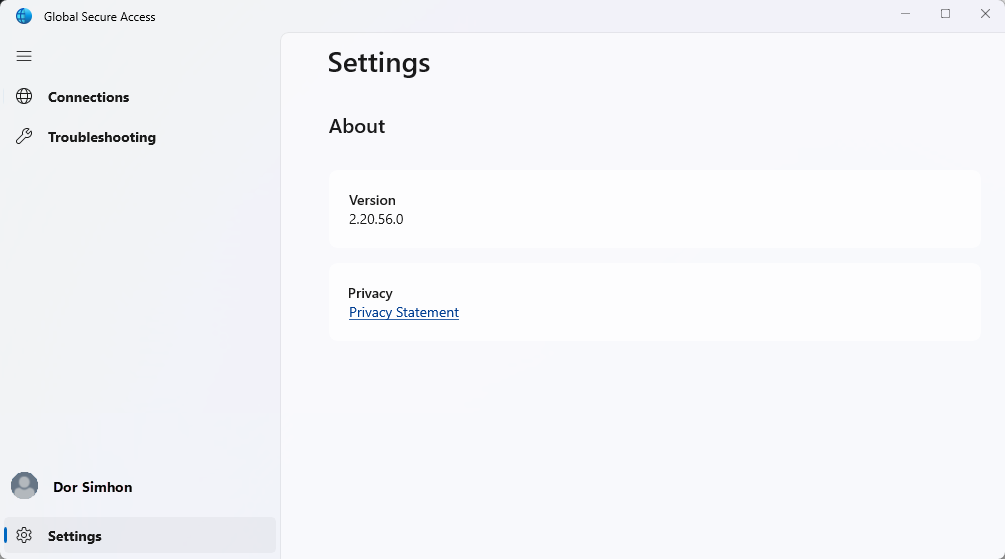
Settings view
Switch to the Settings view to check the installed Version or access the Microsoft Privacy Statement.
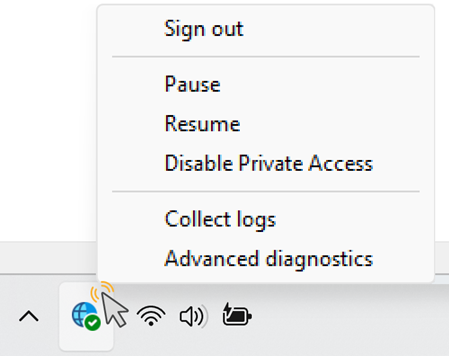
Client actions
To view the available client menu actions, select the Global Secure Access system tray icon.
Tip
The Global Secure Access client menu actions depend on your Client registry keys configuration.
| Action | Description |
|---|---|
| Sign out | Hidden by default. Use the Sign out action when you need to sign in to the Global Secure Access client with a Microsoft Entra user other than the one used to sign in to Windows. To make this action available, update the appropriate Client registry keys. |
| Disable | Select the Disable action to disable the client. The client remains disabled until you either enable the client or restart the machine. |
| Enable | Enables the Global Secure Access client. |
| Disable Private Access | Hidden by default. Use the Disable Private Access action when you wish to bypass Global Secure Access whenever you connect your device directly to the corporate network to access private applications directly through the network rather than through Global Secure Access. To make this action available, update the appropriate Client registry keys. |
| Collect logs | Select this action to collect client logs (information about the client machine, the related event logs for the services, and registry values) and archive them in a zip file to share with Microsoft Support for investigation. The default location for the logs is C:\Program Files\Global Secure Access Client\Logs. You can also collect client logs on Windows by entering the following command in the Command Prompt: C:\Program Files\Global Secure Access Client\LogsCollector\LogsCollector.exe" <username> <user>. |
| Advanced diagnostics | Select this action to open the Advanced diagnostics utility and access an assortment of troubleshooting tools. |
Client status indicators
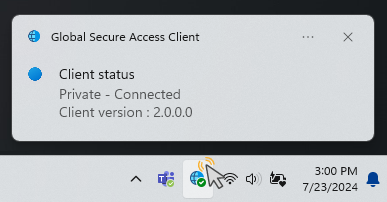
Status notification
Select the Global Secure Access icon to open the client status notification and view the status of each channel configured for the client.
Client statuses in system tray icon
| Icon | Message | Description |
|---|---|---|
| Global Secure Access | The client is initializing and checking its connection to Global Secure Access. | |
| Global Secure Access - Connected | The client is connected to Global Secure Access. | |
| Global Secure Access - Disabled | The client is disabled because services are offline or the user disabled the client. | |
| Global Secure Access - Disconnected | The client failed to connect to Global Secure Access. | |
| Global Secure Access - Some channels are unreachable | The client is partially connected to Global Secure Access (that is, the connection to at least one channel failed: Microsoft Entra, Microsoft 365, Private Access, Internet Access). | |
| Global Secure Access - Disabled by your organization | Your organization disabled the client (that is, all traffic forwarding profiles are disabled). | |
| Global Secure Access - Private Access is disabled | The user disabled Private Access on this device. | |
| Global Secure Access - could not connect to the Internet | The client couldn't detect an internet connection. The device is either connected to a network that doesn't have an Internet connection or a network that requires captive portal sign in. |
Known limitations
For detailed information about known issues and limitations, see Known limitations for Global Secure Access.
Troubleshooting
To troubleshoot the Global Secure Access client, select the client icon in the taskbar and select one of the troubleshooting options: Export logs or Advanced diagnostics tool.
Tip
Administrators can modify the Global Secure Access client menu options by revising the Client registry keys.
For more information on troubleshooting the Global Secure Access client, see the following articles:
- Troubleshoot the Global Secure Access client: advanced diagnostics
- Troubleshoot the Global Secure Access client: Health check tab
Client registry keys
The Global Secure Access client uses specific registry keys to enable or disable different functionalities. Administrators can use a Mobile Device Management (MDM) solution, such as Microsoft Intune or Group Policy to control the registry values.
Caution
Don't change other registry values unless instructed by Microsoft Support.
Restrict nonprivileged users
Administrators can prevent nonprivileged users on the Windows device from disabling or enabling the client by setting the following registry key:
Computer\HKEY_LOCAL_MACHINE\Software\Microsoft\Global Secure Access Client
RestrictNonPrivilegedUsers REG_DWORD
| Data | Description |
|---|---|
| 0x0 | Nonprivileged users on the Windows device can disable and enable the client. |
| 0x1 | Nonprivileged users on the Windows device are restricted from disabling and enabling the client. A UAC prompt requires local administrator credentials for disable and enable options. The administrator can also hide the disable button (see Hide or unhide system tray menu buttons). |
Disable or enable Private Access on the client
This registry value controls whether Private Access is enabled or disabled for the client. If a user is connected to the corporate network, they can choose to bypass Global Secure Access and directly access private applications.
Users can disable or enable Private Access through the system tray menu.
Tip
This option is available on the menu only if it isn't hidden (see Hide or unhide system tray menu buttons) and Private Access is enabled for this tenant.
Administrators can disable or enable Private Access for the user by setting the registry key:
Computer\HKEY_CURRENT_USER\Software\Microsoft\Global Secure Access Client
| Value | Type | Data | Description |
|---|---|---|---|
| IsPrivateAccessDisabledByUser | REG_DWORD | 0x0 | Private Access is enabled on this device. Network traffic to private applications goes through Global Secure Access. |
| IsPrivateAccessDisabledByUser | REG_DWORD | 0x1 | Private Access is disabled on this device. Network traffic to private applications goes directly to the network. |
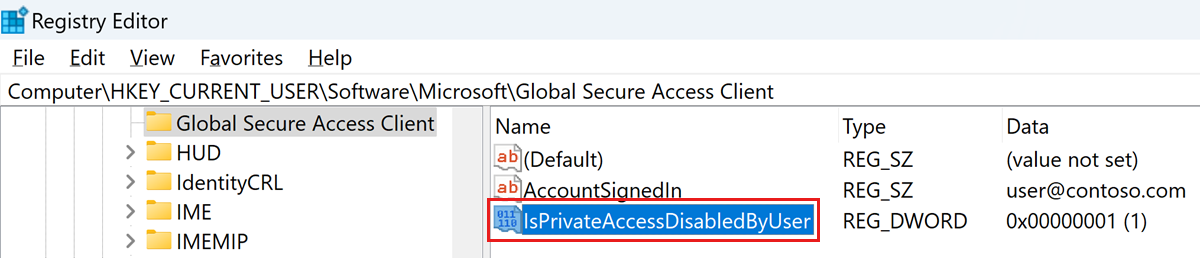
If the registry value doesn't exist, the default value is 0x0, Private Access is enabled.
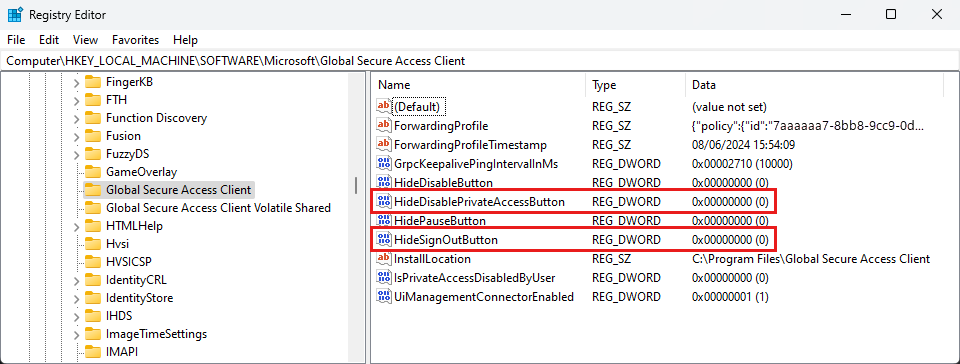
Hide or unhide system tray menu buttons
Administrators can show or hide specific buttons in the client system tray icon menu. Create the values under the following registry key:
Computer\HKEY_LOCAL_MACHINE\SOFTWARE\Microsoft\Global Secure Access Client
| Value | Type | Data | Default behavior | Description |
|---|---|---|---|---|
| HideSignOutButton | REG_DWORD | 0x0 - shown 0x1 - hidden | hidden | Configure this setting to show or hide the Sign out action. This option is for specific scenarios when a user needs to sign in to the client with a different Microsoft Entra user than the one used to sign in to Windows. Note: You must sign in to the client with a user in the same Microsoft Entra tenant to which the device is joined. You can also use the Sign out action to reauthenticate the existing user. |
| HideDisablePrivateAccessButton | REG_DWORD | 0x0 - shown 0x1 - hidden | hidden | Configure this setting to show or hide the Disable Private Access action. This option is for a scenario when the device is directly connected to the corporate network and the user prefers accessing private applications directly through the network instead of through the Global Secure Access. |
| HideDisableButton | REG_DWORD | 0x0 - shown 0x1 - hidden | shown | Configure this setting to show or hide the Disable action. When visible, the user can disable the Global Secure Access client. The client remains disabled until the user enables it again. If the Disable action is hidden, a nonprivileged user can't disable the client. |
For more information, see Guidance for configuring IPv6 in Windows for advanced users.