Note
Access to this page requires authorization. You can try signing in or changing directories.
Access to this page requires authorization. You can try changing directories.
Applies to: Azure Logic Apps (Consumption + Standard)
To run different action paths based on the values of objects, expressions, or tokens, add a switch action to your workflow. This action evaluates the object, expression, or token, chooses the case that matches the result, and runs the action path that you define for that case. When the switch action runs, only one case should match the result.
For example, suppose you want a workflow that runs different action paths based on an option selected in email. In this example, the workflow uses an RSS trigger to check a website's RSS feed for new content. When a new item appears in the RSS feed, the workflow sends email to an approver. Based on whether the approver selects Approve or Reject, the workflow runs different actions.
Tip
Switch actions support only equality operators. If you need other relational operators, such as greater than, use a condition action. To ensure deterministic behavior, cases must contain a unique and static value instead of dynamic tokens or expressions.
Prerequisites
An Azure account and subscription. If you don't have a subscription, sign up for a free Azure account.
To follow the example in this article, create the example Consumption logic app workflow with an Outlook.com account or a work or school account.
When you add the action to send email, find and select this action instead: Send approval email.
Provide the following information:
Parameter Required Value Description To Yes <approver-email-address> The email address for the person who makes the approval decision. To test the example, use your own email address for testing. Subject No <email-subject> The subject for the email approval request. User Options No Approve, Reject Although optional, leave the default values for this example. 
Add a switch action
To change the workflow execution path based on the selected options in the approval email, add a switch action at the end of the sample workflow.
On the designer, follow these general steps to add the Control action named Switch to your workflow.
The Switch action appears with an empty default case. A Switch action requires at least one case plus the default case. You'll add more cases later.
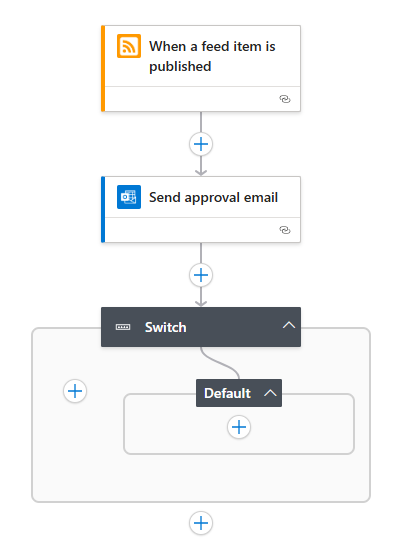
If the Switch action isn't selected so that information pane is open, select the Switch title bar.
On the Parameters tab, select inside the On box, then select the lightning icon to open the dynamic content list. From that list, under Send approval email, select the SelectedOption field.
The SelectedOption field stores the value selected by the approver and determines the case with the actions to run.

To handle the cases where the approver selects Approve or Reject, add a case for each option. Next to the Default case, select the plus (+) sign, then select Add a case.
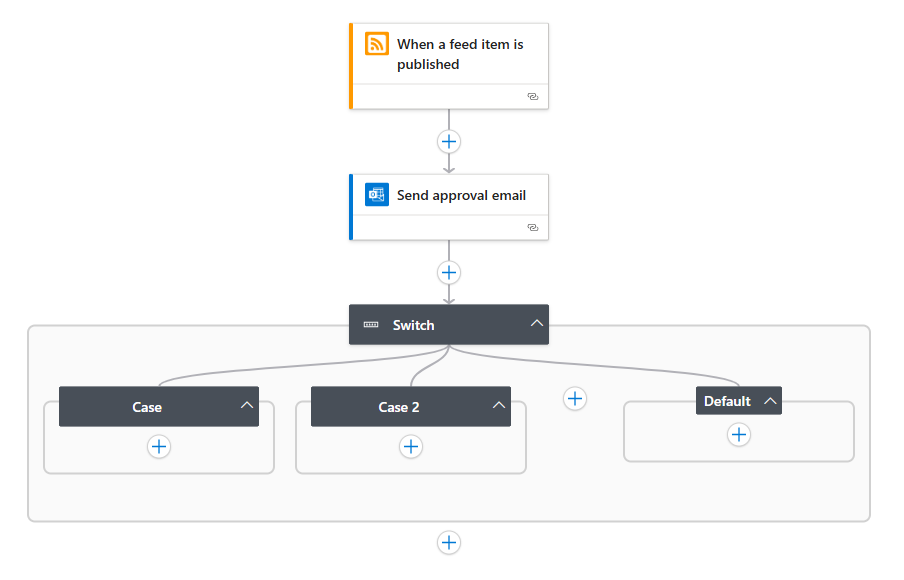
Add these actions to the corresponding cases:
Case # SelectedOption Action Case Approve Add the Outlook Send an email action for sending details about the RSS item only when the approver selected Approve. Case 2 Reject Add the Outlook Send an email action for notifying other approvers that the RSS item was rejected. Default None No action necessary. In this example, the Default case is empty because SelectedOption has only two options. 
Save your workflow.
To test this example, on the designer toolbar, select Run > Run until the trigger detects a new RSS item and sends you an approval email. Select Approve to observe the results.
JSON definition
Now that you created a workflow with the Switch action, review the JavaScript Object Notation (JSON) code definition behind this action.
"Switch": {
   "type": "Switch",
   "expression": "@body('Send_approval_email')?['SelectedOption']",
   "cases": {
      "Case": {
         "actions": {
           "Send_an_email": {}
         },
         "case" : "Approve"
      },
      "Case_2": {
         "actions": {
           "Send_an_email_2": {}
         },
         "case": "Reject"
      }
   },
   "default": {
      "actions": {}
   },
   "runAfter": {
      "Send_approval_email": [
         "Succeeded"
      ]
   }
}
| Label | Description |
|---|---|
"Switch" |
The default name for the Switch action, which you can rename to better describe the action's purpose. |
"type": "Switch" |
Specifies the action type, which is a Switch action. |
"expression" |
In this example, specifies the approver's selected option that the Switch action evaluates against each case as declared later in the definition. |
"cases" |
Defines any number of cases. For each case, "Case_*" is the default name for that case, which you can rename to better describe the case's purpose. |
"case" |
Specifies the case's value, which must be a constant and unique value that the Switch action uses for comparison. If no cases match the switch expression result, the actions in the "default" section are run. |