Note
Access to this page requires authorization. You can try signing in or changing directories.
Access to this page requires authorization. You can try changing directories.
Applies to: Azure Logic Apps (Consumption + Standard)
By default, actions in a logic app workflow run sequentially. To organize actions into separate branches and run those branches at the same time, create parallel branches. You can join those branches later in your workflow.
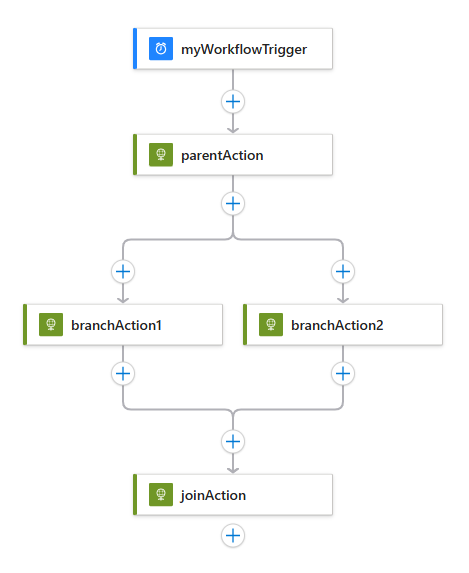
This guide shows how to create parallel branches in a workflow and rejoin those branches, as shown in this example workflow:
Tip
In scenarios where you have a workflow trigger that receives and returns arrays, and you want a separate workflow instance to run for each array item, you can debatch the array as an alternative to branching. On triggers that support this capability, in the designer, you can turn on the Split on setting, which maps to a splitOn property in the trigger definition. Only triggers that can accept and return arrays support this capability. For more information, see Trigger multiple runs on an array.
Prerequisites
An Azure account and subscription. If you don't have a subscription, sign up for a free Azure account.
A logic app workflow that starts with a trigger and the actions that you want. Make sure that your workflow includes the actions between where you want to add a parallel branch.
If you don't have this resource, see the following articles:
Considerations for working with parallel branches
A parallel branch runs only when its
runAfterproperty value matches the parent action's completed status. For example, both the branches branchAction1 and branchAction2 run only when parentAction completes with Succeeded status.Your workflow waits for all parallel branches at the same level to complete before the workflow runs the action that joins these branches.
Add a parallel branch action
In the Azure portal, open your logic app resource.
Based on whether you have a Consumption or Standard logic app, follow the corresponding step:
Consumption
- On the resource sidebar, under Development Tools, select the designer to open the workflow.
Standard
On the resource sidebar, under Workflows, select Workflows.
On the Workflows page, select a workflow.
On the workflow sidebar, under Tools, select the designer to open the workflow.
Between the actions where you want to add a parallel branch, hover over the connecting arrow.
Select the plus sign (+) that appears, and then select Add a parallel branch.

Add the action that you want to run in the parallel branch. In the Add an action pane and search box, find and select the action that you want.

The selected action now appears in the parallel branch:

To add another action to the parallel branch, under the action where you want to add a new action, select the plus (+) sign, and then select Add an action.
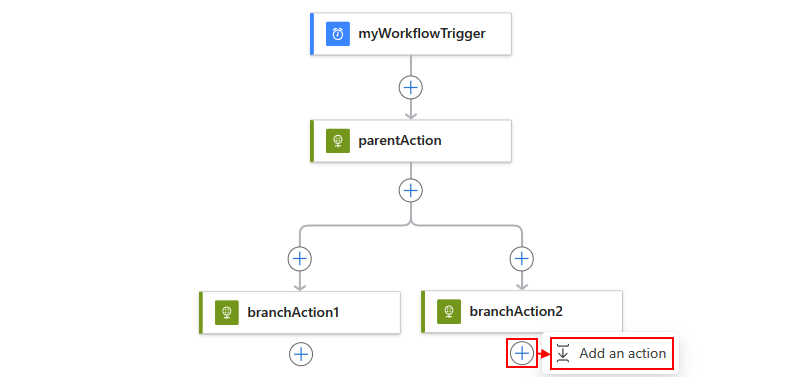
In the Add an action pane and search box, find and select the action that you want.
Your selected action now appears within the current branch:


To merge branches back together, join your parallel branches, as in a following section.
Parallel branch definition (JSON)
In code view, you can define the parallel structure in your logic app workflow's JSON definition instead.
{
  "triggers": {
    "myTrigger": {}
  },
  "actions": {
    "parentAction": {
      "type": "<action-type>",
      "inputs": {},
      "runAfter": {}
    },
    "branchAction1": {
      "type": "<action-type>",
      "inputs": {},
      "runAfter": {
        "parentAction": [
          "Succeeded"
        ]
      }
    },
    "branchAction2": {
      "type": "<action-type>",
      "inputs": {},
      "runAfter": {
        "parentAction": [
          "Succeeded"
        ]
      }
    }
  },
  "outputs": {}
}
Join parallel branches
To merge parallel branches under all the branches, add another action. This action runs only after all the preceding parallel branches finish running.
In the Azure portal, open your logic app and workflow as described in the previous procedure.
Under any of the parallel branches that you want to join, select the plus sign (+), and then select Add an action.

In the Add an action pane and search box, find and select the action you want to use for joining the branches.

On the designer, select the previously added action. After the action's information pane opens, select Settings.
On the Settings tab, under Run after, open the Select actions list. Select the last action in each branch that must finish before the join action runs.
The join action runs only after all the selected actions finish running.
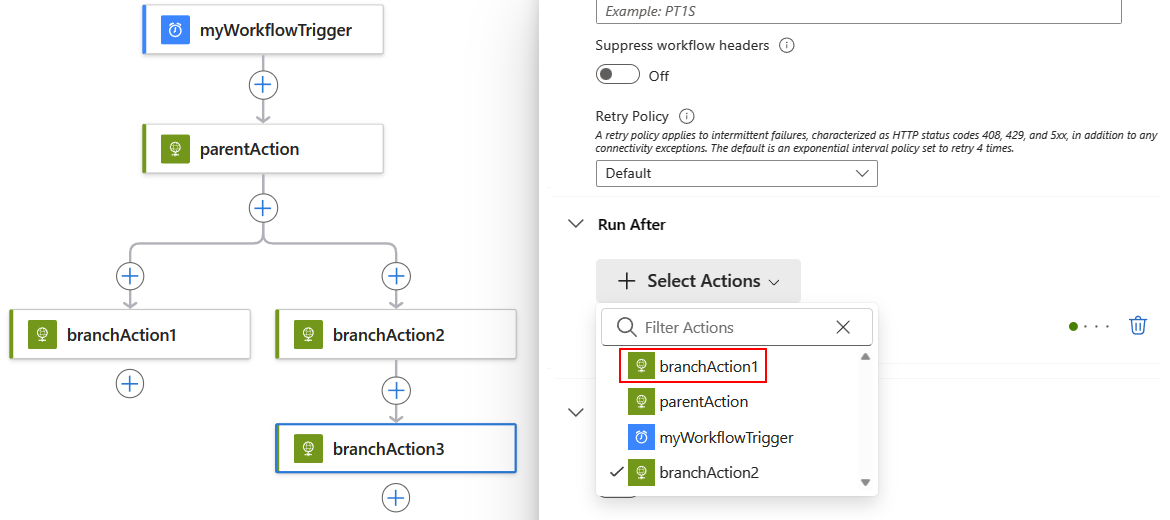
When you finish, the selected action appears under the parallel branches that you want to join:


Join definition (JSON)
In code view, you can define the join action in your logic app workflow's JSON definition instead.
{
  "triggers": {
    "myTrigger": { }
  },
  "actions": {
    "parentAction": {
      "type": "<action-type>",
      "inputs": { },
      "runAfter": {}
    },
    "branchAction1": {
      "type": "<action-type>",
      "inputs": { },
      "runAfter": {
        "parentAction": [
          "Succeeded"
        ]
      }
    },
    "branchAction2": {
      "type": "<action-type>",
      "inputs": { },
      "runAfter": {
        "parentAction": [
          "Succeeded"
        ]
      }
    },
    "joinAction": {
      "type": "<action-type>",
      "inputs": { },
      "runAfter": {
        "branchAction1": [
          "Succeeded"
        ],
        "branchAction2": [
          "Succeeded"
        ]
      }
    }
  },
  "outputs": {}
}