Button 对指示应用程序执行特定任务的点击或单击做出响应。
Button 是所有 Xamarin.Forms 中最基本的交互式控件。 Button 通常显示一个指示命令的短文本字符串,但它也可以显示位图图像或文本和图像的组合。 用户用手指按下 Button 或用鼠标单击它可启动该命令。
处理按钮单击
Button 定义了一个 Clicked 事件;当用户用手指或鼠标指针点击 Button 时,会触发此事件。 当手指或鼠标按钮离开 Button 的图面时,会触发此事件。 Button 必须将其 IsEnabled 属性设置为 true,才能响应点击。
示例中的“基本按钮单击”页面演示了如何在 XAML 中实例化 Button 并处理其 Clicked 事件。 BasicButtonClickPage.xaml 文件包含一个 StackLayout,其中包含 Label 和 Button:
<ContentPage xmlns="http://xamarin.com/schemas/2014/forms"
             xmlns:x="http://schemas.microsoft.com/winfx/2009/xaml"
             x:Class="ButtonDemos.BasicButtonClickPage"
             Title="Basic Button Click">
    <StackLayout>

        <Label x:Name="label"
               Text="Click the Button below"
               FontSize="Large"
               VerticalOptions="CenterAndExpand"
               HorizontalOptions="Center" />

        <Button Text="Click to Rotate Text!"
                VerticalOptions="CenterAndExpand"
                HorizontalOptions="Center"
                Clicked="OnButtonClicked" />

    </StackLayout>
</ContentPage>
Button 往往占用它可使用的所有空间。 例如,如果未将 Button 的 HorizontalOptions 属性设置为 Fill 之外的值,Button 将占用其父级的整个宽度。
默认情况下,Button 是矩形,但你可以使用 CornerRadius 属性为其提供圆角,如下面的按钮外观部分中所述。
Text 属性指定在 Button 中显示的文本。 Clicked 事件设置为名为 OnButtonClicked 的事件处理程序。 此处理程序位于代码隐藏文件 BasicButtonClickPage.xaml.cs 中:
public partial class BasicButtonClickPage : ContentPage
{
    public BasicButtonClickPage ()
    {
        InitializeComponent ();
    }

    async void OnButtonClicked(object sender, EventArgs args)
    {
        await label.RelRotateTo(360, 1000);
    }
}
点击 Button 时,将执行 OnButtonClicked 方法。 sender 参数是负责此事件的 Button 对象。 可以使用此参数访问 Button 对象,或区分共享同一 Clicked 事件的多个 Button 对象。
这个特定的 Clicked 处理程序调用一个动画函数,该函数以 360 度旋转 Label 1000 毫秒。 下面是在 iOS 和 Android 设备上运行的程序,它在 Windows 10 桌面上充当通用 Windows 平台 (UWP) 应用程序:
请注意,OnButtonClicked 方法包括 async 修饰符,因为 await 在事件处理程序中使用。 仅当处理程序的正文使用 await 时,Clicked 事件处理程序才需要 async 修饰符。
每个平台都以自己的特定方式呈现 Button。 在按钮外观部分中,你将了解如何设置颜色,并使 Button 边框对更自定义的外观可见。 Button 实现 IFontElement 接口,因此它包括 FontFamilyFontSize 和 FontAttributes 属性。
在代码中创建按钮
通常在 XAML 中实例化 Button,但你也可以在代码中创建一个 Button。 当应用程序需要基于可使用 foreach 循环进行枚举的数据创建多个按钮时,这可能很方便。
“代码按钮单击”页面演示了如何创建一个在功能上相当于“基本按钮单击”页面的页面,但该页面完全是使用 C# 的:
public class CodeButtonClickPage : ContentPage
{
    public CodeButtonClickPage ()
    {
        Title = "Code Button Click";

        Label label = new Label
        {
            Text = "Click the Button below",
            FontSize = Device.GetNamedSize(NamedSize.Large, typeof(Label)),
            VerticalOptions = LayoutOptions.CenterAndExpand,
            HorizontalOptions = LayoutOptions.Center
        };

        Button button = new Button
        {
            Text = "Click to Rotate Text!",
            VerticalOptions = LayoutOptions.CenterAndExpand,
            HorizontalOptions = LayoutOptions.Center
        };
        button.Clicked += async (sender, args) => await label.RelRotateTo(360, 1000);

        Content = new StackLayout
        {
            Children =
            {
                label,
                button
            }
        };
    }
}
所有操作都在类的构造函数中完成。 由于 Clicked 处理程序只有一条语句较长,因此很简单就能将其附加到事件:
button.Clicked += async (sender, args) => await label.RelRotateTo(360, 1000);
当然,还可以将事件处理程序定义为单独的方法(就像“基本按钮单击”中的 OnButtonClick 方法一样),并将该方法附加到事件:
button.Clicked += OnButtonClicked;
禁用按钮
有时,应用程序处于特定状态,其中特定 Button 单击不是有效操作。 在这些情况下,应将 IsEnabled 属性设置为 false,从而禁用 Button。 经典示例是文件名的 Entry 控件,附带文件打开 Button:只有当某些文本已键入到 Entry 中时,才应启用 Button。
可以使用 DataTrigger 执行此任务,如数据触发器一文中所示。
使用命令接口
应用程序可以在不处理 Clicked 事件的情况下响应 Button 点击。 Button 执行称作命令或发布命令接口的替代通知机制。 这包含两个属性:
ICommand类型的Command(在System.Windows.Input命名空间中定义的接口)Object类型的CommandParameter属性
此方法特别使用与数据绑定连接的情况,尤其是在实现模型-视图-视图模型 (MVVM) 体系结构时。 有关这些主题,可参阅在数据绑定、从数据绑定到 MVVM 和 MVVM 文章。
在 MVVM 应用程序中,视图模型定义了 ICommand 类型的属性,这些属性随后会连接到具有数据绑定的 XAML Button 元素。 Xamarin.Forms 还定义了 Command 和 Command<T> 类,这些类可实现 ICommand 接口并帮助视图模型定义 ICommand 类型的属性。
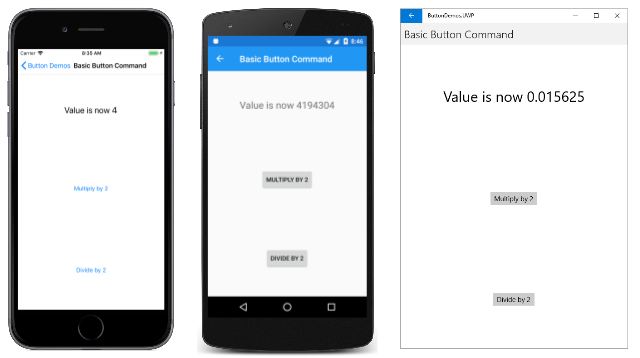
命令设置在命令界面一文中有更详细的介绍,但示例中的“基本按钮命令”页面显示了基本方法。
CommandDemoViewModel 类是一个非常简单的视图模型,它定义了一个类型为 double 的名为 Number 的属性以及两个类型为 ICommand 且分别名为 MultiplyBy2Command 和 DivideBy2Command 的属性:
class CommandDemoViewModel : INotifyPropertyChanged
{
    double number = 1;

    public event PropertyChangedEventHandler PropertyChanged;

    public CommandDemoViewModel()
    {
        MultiplyBy2Command = new Command(() => Number *= 2);

        DivideBy2Command = new Command(() => Number /= 2);
    }

    public double Number
    {
        set
        {
            if (number != value)
            {
                number = value;
                PropertyChanged?.Invoke(this, new PropertyChangedEventArgs("Number"));
            }
        }
        get
        {
            return number;
        }
    }

    public ICommand MultiplyBy2Command { private set; get; }

    public ICommand DivideBy2Command { private set; get; }
}
两个 ICommand 属性在类的构造函数中用两个类型为 Command 的对象初始化。 Command 构造函数包括一个小函数(称为 execute 构造函数参数),该参数将 Number 属性加倍或减半。
BasicButtonCommand.xaml 文件将其 BindingContext 设置为 CommandDemoViewModel 的实例。 Label 元素和两个 Button 元素包含对 CommandDemoViewModel 中的三个属性的绑定:
<ContentPage xmlns="http://xamarin.com/schemas/2014/forms"
             xmlns:x="http://schemas.microsoft.com/winfx/2009/xaml"
             xmlns:local="clr-namespace:ButtonDemos"
             x:Class="ButtonDemos.BasicButtonCommandPage"
             Title="Basic Button Command">

    <ContentPage.BindingContext>
        <local:CommandDemoViewModel />
    </ContentPage.BindingContext>

    <StackLayout>
        <Label Text="{Binding Number, StringFormat='Value is now {0}'}"
               FontSize="Large"
               VerticalOptions="CenterAndExpand"
               HorizontalOptions="Center" />

        <Button Text="Multiply by 2"
                VerticalOptions="CenterAndExpand"
                HorizontalOptions="Center"
                Command="{Binding MultiplyBy2Command}" />

        <Button Text="Divide by 2"
                VerticalOptions="CenterAndExpand"
                HorizontalOptions="Center"
                Command="{Binding DivideBy2Command}" />
    </StackLayout>
</ContentPage>
点击两个 Button 元素时,会执行命令,并且值随数字变化:
与 Clicked 处理程序相比,这种方法的优势在于,涉及该页面功能的所有逻辑都位于视图模型中,而不是代码隐藏文件中,从而更好地将用户界面与业务逻辑分离。
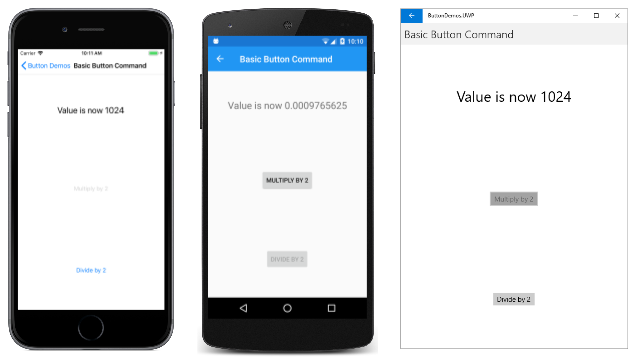
Command 对象还可以控制 Button 元素的启用和禁用。 例如,假设你想将数值范围限制在 210 和 2-10 之间。 可以将另一个函数添加到构造函数(称为 canExecute 参数),如果应启用 Button ,则它返回 true。 对 CommandDemoViewModel 构造函数的修改如下所示:
class CommandDemoViewModel : INotifyPropertyChanged
{
    ···
    public CommandDemoViewModel()
    {
        MultiplyBy2Command = new Command(
            execute: () =>
            {
                Number *= 2;
                ((Command)MultiplyBy2Command).ChangeCanExecute();
                ((Command)DivideBy2Command).ChangeCanExecute();
            },
            canExecute: () => Number < Math.Pow(2, 10));

        DivideBy2Command = new Command(
            execute: () =>
            {
                Number /= 2;
                ((Command)MultiplyBy2Command).ChangeCanExecute();
                ((Command)DivideBy2Command).ChangeCanExecute();
            },
            canExecute: () => Number > Math.Pow(2, -10));
    }
    ···
}
必须调用 Command 的 ChangeCanExecute 方法,以便 Command 方法可以调用 canExecute 方法并确定是否应禁用 Button。 此代码更改后,当数字达到限制时,将禁用 Button:
两个或更多 Button 元素可以绑定到同一个 ICommand 属性。 可以使用 Button 的 CommandParameter 属性来区分 Button 元素。 在这种情况下,需要使用通用 Command<T> 类。 然后,CommandParameter 对象将作为参数传递给 execute 和 canExecute 方法。 命令接口文章的基本命令部分中详细介绍了这种技术。
此示例在其 MainPage 类中也使用此技术。 MainPage.xaml 文件为示例的每个页面包含一个 Button:
<ContentPage xmlns="http://xamarin.com/schemas/2014/forms"
             xmlns:x="http://schemas.microsoft.com/winfx/2009/xaml"
             xmlns:local="clr-namespace:ButtonDemos"
             x:Class="ButtonDemos.MainPage"
             Title="Button Demos">
    <ScrollView>
        <FlexLayout Direction="Column"
                    JustifyContent="SpaceEvenly"
                    AlignItems="Center">

            <Button Text="Basic Button Click"
                    Command="{Binding NavigateCommand}"
                    CommandParameter="{x:Type local:BasicButtonClickPage}" />

            <Button Text="Code Button Click"
                    Command="{Binding NavigateCommand}"
                    CommandParameter="{x:Type local:CodeButtonClickPage}" />

            <Button Text="Basic Button Command"
                    Command="{Binding NavigateCommand}"
                    CommandParameter="{x:Type local:BasicButtonCommandPage}" />

            <Button Text="Press and Release Button"
                    Command="{Binding NavigateCommand}"
                    CommandParameter="{x:Type local:PressAndReleaseButtonPage}" />

            <Button Text="Button Appearance"
                    Command="{Binding NavigateCommand}"
                    CommandParameter="{x:Type local:ButtonAppearancePage}" />

            <Button Text="Toggle Button Demo"
                    Command="{Binding NavigateCommand}"
                    CommandParameter="{x:Type local:ToggleButtonDemoPage}" />

            <Button Text="Image Button Demo"
                    Command="{Binding NavigateCommand}"
                    CommandParameter="{x:Type local:ImageButtonDemoPage}" />

        </FlexLayout>
    </ScrollView>
</ContentPage>
每个 Button 都将其 Command 属性绑定到名为 NavigateCommand 的属性,并将 CommandParameter 设置为与项目中某个页面类对应的 Type 对象。
NavigateCommand 属性的类型是 ICommand,该属性是在代码隐藏文件中定义的:
public partial class MainPage : ContentPage
{
    public MainPage()
    {
        InitializeComponent();

        NavigateCommand = new Command<Type>(async (Type pageType) =>
        {
            Page page = (Page)Activator.CreateInstance(pageType);
            await Navigation.PushAsync(page);
        });

        BindingContext = this;
    }

    public ICommand NavigateCommand { private set; get; }
}
构造函数将 NavigateCommand 属性初始化为 Command<Type> 对象,因为 Type 是 XAML 文件中设置的 CommandParameter 对象的类型。 这意味着 execute 方法具有与这个 CommandParameter 对象对应的 Type 类型的参数。 该函数会实例化页面,然后导航到该页面。
请注意,构造函数最后将其 BindingContext 设置为自身。 XAML 文件中的属性必须绑定到 NavigateCommand 属性。
按下和松开按钮
除了 Clicked 事件,Button 还定义了 Pressed 和 Released 事件。 当手指按下 Button,或者通过将指针放在 Button 上来按下鼠标按钮时,会发生 Pressed 事件。 松开手指或鼠标按钮时,会发生 Released 事件。 通常,Clicked 事件也与 Released 事件同时触发,但是如果手指或鼠标指针在被松开之前离开 Button 的图面,那么可能不会发生 Clicked 事件。
Pressed 和 Released 事件不会经常使用,但它们可用于特殊用途,如“按下和松开按钮”页面所示。 XAML 文件包含一个 Label 和一个 Button ,其中附加了处理程序用来处理 Pressed 和 Released 事件:
<ContentPage xmlns="http://xamarin.com/schemas/2014/forms"
             xmlns:x="http://schemas.microsoft.com/winfx/2009/xaml"
             x:Class="ButtonDemos.PressAndReleaseButtonPage"
             Title="Press and Release Button">
    <StackLayout>

        <Label x:Name="label"
               Text="Press and hold the Button below"
               FontSize="Large"
               VerticalOptions="CenterAndExpand"
               HorizontalOptions="Center" />

        <Button Text="Press to Rotate Text!"
                VerticalOptions="CenterAndExpand"
                HorizontalOptions="Center"
                Pressed="OnButtonPressed"
                Released="OnButtonReleased" />

    </StackLayout>
</ContentPage>
当 Pressed 事件发生时,代码隐藏文件会对 Label 进行动画处理,但当 Released 事件发生时,会暂停旋转:
public partial class PressAndReleaseButtonPage : ContentPage
{
    bool animationInProgress = false;
    Stopwatch stopwatch = new Stopwatch();

    public PressAndReleaseButtonPage ()
    {
        InitializeComponent ();
    }

    void OnButtonPressed(object sender, EventArgs args)
    {
        stopwatch.Start();
        animationInProgress = true;

        Device.StartTimer(TimeSpan.FromMilliseconds(16), () =>
        {
            label.Rotation = 360 * (stopwatch.Elapsed.TotalSeconds % 1);

            return animationInProgress;
        });
    }

    void OnButtonReleased(object sender, EventArgs args)
    {
        animationInProgress = false;
        stopwatch.Stop();
    }
}
结果是,当手指与 Button 接触时,Label 仅旋转,在松开手指时停止:
此类行为在游戏中也有应用:手指按住 Button 可能会使屏幕上的对象朝特定方向移动。
按钮外观
Button 继承或定义了几个影响其外观的属性:
TextColor是Button文本的颜色BackgroundColor是该文本的背景颜色BorderColor是Button周围区域的颜色FontFamily是用于文本的字体系列FontSize是文本的大小FontAttributes指示文本是否为斜体或加粗BorderWidth是边框的宽度CornerRadius是Button的圆角半径CharacterSpacing是Button文本字符之间的间距。TextTransform确定Button文本的大小写。
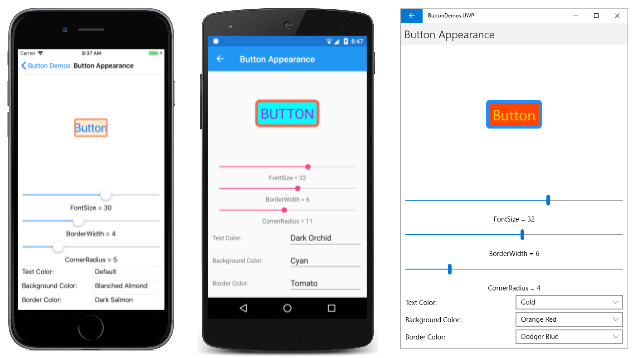
这些属性中的六个(不包括 FontFamily 和 FontAttributes)的效果在“按钮外观”页面中进行了演示。 另一个属性 Image 在通过按钮使用位图部分进行了讨论。
“按钮外观”页面中的所有视图和数据绑定都在 XAML 文件中定义:
<ContentPage xmlns="http://xamarin.com/schemas/2014/forms"
             xmlns:x="http://schemas.microsoft.com/winfx/2009/xaml"
             xmlns:local="clr-namespace:ButtonDemos"
             x:Class="ButtonDemos.ButtonAppearancePage"
             Title="Button Appearance">
    <StackLayout>
        <Button x:Name="button"
                Text="Button"
                VerticalOptions="CenterAndExpand"
                HorizontalOptions="Center"
                TextColor="{Binding Source={x:Reference textColorPicker},
                                    Path=SelectedItem.Color}"
                BackgroundColor="{Binding Source={x:Reference backgroundColorPicker},
                                          Path=SelectedItem.Color}"
                BorderColor="{Binding Source={x:Reference borderColorPicker},
                                      Path=SelectedItem.Color}" />

        <StackLayout BindingContext="{x:Reference button}"
                     Padding="10">

            <Slider x:Name="fontSizeSlider"
                    Maximum="48"
                    Minimum="1"
                    Value="{Binding FontSize}" />

            <Label Text="{Binding Source={x:Reference fontSizeSlider},
                                  Path=Value,
                                  StringFormat='FontSize = {0:F0}'}"
                   HorizontalTextAlignment="Center" />

            <Slider x:Name="borderWidthSlider"
                    Minimum="-1"
                    Maximum="12"
                    Value="{Binding BorderWidth}" />

            <Label Text="{Binding Source={x:Reference borderWidthSlider},
                                  Path=Value,
                                  StringFormat='BorderWidth = {0:F0}'}"
                   HorizontalTextAlignment="Center" />

            <Slider x:Name="cornerRadiusSlider"
                    Minimum="-1"
                    Maximum="24"
                    Value="{Binding CornerRadius}" />

            <Label Text="{Binding Source={x:Reference cornerRadiusSlider},
                                  Path=Value,
                                  StringFormat='CornerRadius = {0:F0}'}"
                   HorizontalTextAlignment="Center" />

            <Grid>
                <Grid.RowDefinitions>
                    <RowDefinition Height="Auto" />
                    <RowDefinition Height="Auto" />
                    <RowDefinition Height="Auto" />
                </Grid.RowDefinitions>

                <Grid.ColumnDefinitions>
                    <ColumnDefinition Width="*" />
                    <ColumnDefinition Width="*" />
                </Grid.ColumnDefinitions>

                <Grid.Resources>
                    <Style TargetType="Label">
                        <Setter Property="VerticalOptions" Value="Center" />
                    </Style>
                </Grid.Resources>

                <Label Text="Text Color:"
                       Grid.Row="0" Grid.Column="0" />

                <Picker x:Name="textColorPicker"
                        ItemsSource="{Binding Source={x:Static local:NamedColor.All}}"
                        ItemDisplayBinding="{Binding FriendlyName}"
                        SelectedIndex="0"
                        Grid.Row="0" Grid.Column="1" />

                <Label Text="Background Color:"
                       Grid.Row="1" Grid.Column="0" />

                <Picker x:Name="backgroundColorPicker"
                        ItemsSource="{Binding Source={x:Static local:NamedColor.All}}"
                        ItemDisplayBinding="{Binding FriendlyName}"
                        SelectedIndex="0"
                        Grid.Row="1" Grid.Column="1" />

                <Label Text="Border Color:"
                       Grid.Row="2" Grid.Column="0" />

                <Picker x:Name="borderColorPicker"
                        ItemsSource="{Binding Source={x:Static local:NamedColor.All}}"
                        ItemDisplayBinding="{Binding FriendlyName}"
                        SelectedIndex="0"
                        Grid.Row="2" Grid.Column="1" />
            </Grid>
        </StackLayout>
    </StackLayout>
</ContentPage>
页面顶部的 Button 的三个 Color 属性绑定到页面底部的 Picker 元素。 Picker 元素中的项是项目中包含的 NamedColor 类中的颜色。 三个 Slider 元素包含对 Button 的 FontSize、BorderWidth 和 CornerRadius 属性的双向绑定。
通过此程序可以你试验所有这些属性的组合:
若要查看 Button 边框,需要将 BorderColor 设置为 Default 以外的值,并将 BorderWidth 设置为正值。
在 iOS 上,你会注意到,大的边框宽度会占用 Button 的内部,并干扰文本的显示。 如果选择将边框与 iOS Button 配合使用,那么你可能希望在 Text 属性的开头和结尾使用空格来保持它的可见性。
在 UWP 上,选择超出 Button 一半高度的 CornerRadius 会引发异常。
按钮可视状态
Button具有一个PressedVisualState,可用于在用户按下时启动视觉更改Button,前提是它已启用。
下面的 XAML 示例显示了如何为 Pressed 状态定义可视化状态:
<Button Text="Click me!"
        ...>
    <VisualStateManager.VisualStateGroups>
        <VisualStateGroup x:Name="CommonStates">
            <VisualState x:Name="Normal">
                <VisualState.Setters>
                    <Setter Property="Scale"
                            Value="1" />
                </VisualState.Setters>
            </VisualState>

            <VisualState x:Name="Pressed">
                <VisualState.Setters>
                    <Setter Property="Scale"
                            Value="0.8" />
                </VisualState.Setters>
            </VisualState>

        </VisualStateGroup>
    </VisualStateManager.VisualStateGroups>
</Button>
指定PressedVisualState按下时Button,其Scale属性将从默认值 1 更改为 0.8。 Normal VisualState 指定在 Button 处于正常状态时,其 Scale 属性将设置为 1。 因此,总体效果是,按下 Button 时,它被重新缩放为稍小的尺寸,而松开 Button 时,它被重新缩放为默认尺寸。
若要详细了解视觉对象状态,请参阅 Xamarin.Forms 视觉对象状态管理器。
创建切换按钮
可以将 Button 子类化,使其向开关一样工作:点击按钮一次可打开按钮,再点击一次可将其关闭。
以下 ToggleButton 类派生自 Button,并定义一个名为 Toggled 的新事件和一个名为 IsToggled 的布尔属性。 这两个属性与 Xamarin.FormsSwitch 定义的属性相同:
class ToggleButton : Button
{
    public event EventHandler<ToggledEventArgs> Toggled;

    public static BindableProperty IsToggledProperty =
        BindableProperty.Create("IsToggled", typeof(bool), typeof(ToggleButton), false,
                                propertyChanged: OnIsToggledChanged);

    public ToggleButton()
    {
        Clicked += (sender, args) => IsToggled ^= true;
    }

    public bool IsToggled
    {
        set { SetValue(IsToggledProperty, value); }
        get { return (bool)GetValue(IsToggledProperty); }
    }

    protected override void OnParentSet()
    {
        base.OnParentSet();
        VisualStateManager.GoToState(this, "ToggledOff");
    }

    static void OnIsToggledChanged(BindableObject bindable, object oldValue, object newValue)
    {
        ToggleButton toggleButton = (ToggleButton)bindable;
        bool isToggled = (bool)newValue;

        // Fire event
        toggleButton.Toggled?.Invoke(toggleButton, new ToggledEventArgs(isToggled));

        // Set the visual state
        VisualStateManager.GoToState(toggleButton, isToggled ? "ToggledOn" : "ToggledOff");
    }
}
ToggleButton 构造函数将处理程序附加到 Clicked 事件,以便它可以更改 IsToggled 属性的值。 OnIsToggledChanged 方法触发 Toggled 事件。
OnIsToggledChanged 方法的最后一行使用两个文本字符串“ToggledOn”和“ToggledOff”调用静态 VisualStateManager.GoToState 方法。 有关此方法以及应用程序如何响应视觉对象状态,可参阅 Xamarin.Forms 视觉对象状态管理器一文。
由于 ToggleButton 调用 VisualStateManager.GoToState,因此类本身不需要包含任何其他设施,即可根据按钮的 IsToggled 状态更改按钮的外观。 这是承载 ToggleButton 对象的 XAML 的责任。
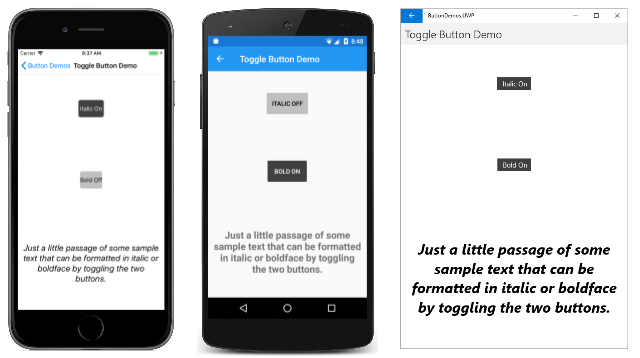
“切换按钮演示”页面提供了 ToggleButton 的两个实例,包括根据视觉对象状态设置按钮的 Text、BackgroundColor 和 TextColor 的视觉状态管理器标记:
<?xml version="1.0" encoding="utf-8" ?>
<ContentPage xmlns="http://xamarin.com/schemas/2014/forms"
             xmlns:x="http://schemas.microsoft.com/winfx/2009/xaml"
             xmlns:local="clr-namespace:ButtonDemos"
             x:Class="ButtonDemos.ToggleButtonDemoPage"
             Title="Toggle Button Demo">

    <ContentPage.Resources>
        <Style TargetType="local:ToggleButton">
            <Setter Property="VerticalOptions" Value="CenterAndExpand" />
            <Setter Property="HorizontalOptions" Value="Center" />
        </Style>
    </ContentPage.Resources>

    <StackLayout Padding="10, 0">
        <local:ToggleButton Toggled="OnItalicButtonToggled">
            <VisualStateManager.VisualStateGroups>
                <VisualStateGroup Name="ToggleStates">
                    <VisualState Name="ToggledOff">
                        <VisualState.Setters>
                            <Setter Property="Text" Value="Italic Off" />
                            <Setter Property="BackgroundColor" Value="#C0C0C0" />
                            <Setter Property="TextColor" Value="Black" />
                        </VisualState.Setters>
                    </VisualState>

                    <VisualState Name="ToggledOn">
                        <VisualState.Setters>
                            <Setter Property="Text" Value=" Italic On " />
                            <Setter Property="BackgroundColor" Value="#404040" />
                            <Setter Property="TextColor" Value="White" />
                        </VisualState.Setters>
                    </VisualState>
                </VisualStateGroup>
            </VisualStateManager.VisualStateGroups>
        </local:ToggleButton>

        <local:ToggleButton Toggled="OnBoldButtonToggled">
            <VisualStateManager.VisualStateGroups>
                <VisualStateGroup Name="ToggleStates">
                    <VisualState Name="ToggledOff">
                        <VisualState.Setters>
                            <Setter Property="Text" Value="Bold Off" />
                            <Setter Property="BackgroundColor" Value="#C0C0C0" />
                            <Setter Property="TextColor" Value="Black" />
                        </VisualState.Setters>
                    </VisualState>

                    <VisualState Name="ToggledOn">
                        <VisualState.Setters>
                            <Setter Property="Text" Value=" Bold On " />
                            <Setter Property="BackgroundColor" Value="#404040" />
                            <Setter Property="TextColor" Value="White" />
                        </VisualState.Setters>
                    </VisualState>
                </VisualStateGroup>
            </VisualStateManager.VisualStateGroups>
        </local:ToggleButton>

        <Label x:Name="label"
               Text="Just a little passage of some sample text that can be formatted in italic or boldface by toggling the two buttons."
               FontSize="Large"
               HorizontalTextAlignment="Center"
               VerticalOptions="CenterAndExpand" />

    </StackLayout>
</ContentPage>
Toggled 事件处理程序是在代码隐藏文件中创建的。 它们负责根据按钮的状态设置 Label 的 FontAttributes 属性:
public partial class ToggleButtonDemoPage : ContentPage
{
    public ToggleButtonDemoPage ()
    {
        InitializeComponent ();
    }

    void OnItalicButtonToggled(object sender, ToggledEventArgs args)
    {
        if (args.Value)
        {
            label.FontAttributes |= FontAttributes.Italic;
        }
        else
        {
            label.FontAttributes &= ~FontAttributes.Italic;
        }
    }

    void OnBoldButtonToggled(object sender, ToggledEventArgs args)
    {
        if (args.Value)
        {
            label.FontAttributes |= FontAttributes.Bold;
        }
        else
        {
            label.FontAttributes &= ~FontAttributes.Bold;
        }
    }
}
下面是在 iOS、Android 和 UWP 上运行的程序:
使用带有按钮的位图
Button 类定义了一个 ImageSource 属性,该属性支持在 Button 上单独显示位图图像或与文本一起显示。 你还可以指定文本和图像的排列方式。
该 ImageSource 属性的类型为 ImageSource,这意味着可以从文件、嵌入的资源、URI 或流加载位图。
注意
虽然 Button 可以加载动态 GIF,但它只会显示 GIF 的第一帧。
Xamarin.Forms 支持的每个平台都允许图像以多种大小存储,以适应应用程序可能运行的各种设备的不同像素分辨率。 这多个位图以这样一种方式进行命名或存储,即操作系统可以选取最适合设备视频显示器分辨率的匹配项。
对于 Button 上的位图,最佳大小通常介于 32 和 64 个设备无关单位之间,具体取决于你想要的大小。 此示例中使用的图像基于 48 个设备无关单位这一大小。
在 iOS 项目中,“资源”文件夹包含此图像的三个大小:
- 存储为 /Resources/MonkeyFace.png 的 48 像素正方形位图
- 存储为 /Resource/MonkeyFace@2x.png 的 96 像素正方形位图
- 存储为 /Resource/MonkeyFace@3x.png 的 144 像素正方形位图
所有三个位图都获得了 BundleResource 的生成操作。
对于 Android 项目,位图都具有相同的名称,但它们存储在“资源”文件夹的不同子文件夹中:
- 存储为 /Resources/drawable-hdpi/MonkeyFace.png 的 72 像素正方形位图
- 存储为 /Resources/drawable-xhdpi/MonkeyFace.png 的 96 像素正方形位图
- 存储为 /Resources/drawable-xxhdpi/MonkeyFace.png 的 144 像素正方形位图
- 存储为 /Resources/drawable-xxxhdpi/MonkeyFace.png 的 192 像素正方形位图
这些位图获得了 AndroidResource 的生成操作。
在 UWP 项目中,位图可以存储在项目中的任意位置,但它们通常存储在自定义文件夹或现有“资产”文件夹中。 UWP 项目包含以下位图:
- 存储为 /Assets/MonkeyFace.scale-100.png 的 48 像素正方形位图
- 存储为 /Assets/MonkeyFace.scale-200.png 的 96 像素正方形位图
- 存储为 /Assets/MonkeyFace.scale-400.png 的 192 像素正方形位图
这些位图都获得了“内容”的生成操作。
你可以使用 Button 的 ContentLayout 属性指定 Text 和 ImageSource 属性在 Button 上的排列方式。 此属性的类型为 ButtonContentLayout,它是 Button 中嵌入的类。 构造函数有两个参数:
ImagePosition枚举的成员:Left、Top、Right或Bottom,表示位图相对于文本的显示方式。- 位图与文本之间的间距
double值。
默认值为 Left 和 10 个单位。 ButtonContentLayout 的两个只读属性(名为 Position 和 Spacing)提供了这些属性的值。
在代码中,可以创建 Button 并设置 ContentLayout 属性,如下所示:
Button button = new Button
{
    Text = "button text",
    ImageSource = new FileImageSource
    {
        File = "image filename"
    },
    ContentLayout = new Button.ButtonContentLayout(Button.ButtonContentLayout.ImagePosition.Right, 20)
};
在 XAML 中,只需指定枚举成员或间距,或者指定这两者,采用逗号分隔的任何顺序:
<Button Text="button text"
        ImageSource="image filename"
        ContentLayout="Right, 20" />
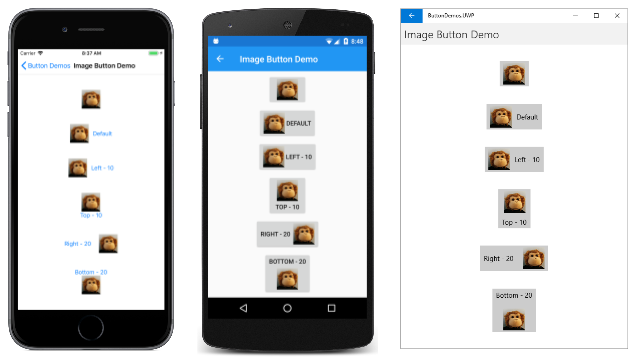
“图像按钮演示”页面使用 OnPlatform 来为 iOS、Android 和 UWP 位图文件指定不同的文件名。 如果要为每个平台使用相同的文件名并避免使用 OnPlatform,你需要将 UWP 位图存储在项目的根目录中。
“图像按钮演示”页面上的第一个 Button 设置了 Image 属性,但没有设置 Text 属性:
<Button>
    <Button.ImageSource>
        <OnPlatform x:TypeArguments="ImageSource">
            <On Platform="iOS, Android" Value="MonkeyFace.png" />
            <On Platform="UWP" Value="Assets/MonkeyFace.png" />
        </OnPlatform>
    </Button.ImageSource>
</Button>
如果 UWP 位图存储在项目的根目录中,可以大大简化此标记:
<Button ImageSource="MonkeyFace.png" />
为了避免 ImageButtonDemo.xaml 文件中大量标记重复,还定义了一个隐式 Style 来设置 ImageSource 属性。 这个 Style 会自动应用于其他五个 Button 元素。 以下是完整 XAML 文件:
<ContentPage xmlns="http://xamarin.com/schemas/2014/forms"
             xmlns:x="http://schemas.microsoft.com/winfx/2009/xaml"
             x:Class="ButtonDemos.ImageButtonDemoPage">

    <FlexLayout Direction="Column"
                JustifyContent="SpaceEvenly"
                AlignItems="Center">

        <FlexLayout.Resources>
            <Style TargetType="Button">
                <Setter Property="ImageSource">
                    <OnPlatform x:TypeArguments="ImageSource">
                        <On Platform="iOS, Android" Value="MonkeyFace.png" />
                        <On Platform="UWP" Value="Assets/MonkeyFace.png" />
                    </OnPlatform>
                </Setter>
            </Style>
        </FlexLayout.Resources>

        <Button>
            <Button.ImageSource>
                <OnPlatform x:TypeArguments="ImageSource">
                    <On Platform="iOS, Android" Value="MonkeyFace.png" />
                    <On Platform="UWP" Value="Assets/MonkeyFace.png" />
                </OnPlatform>
            </Button.ImageSource>
        </Button>

        <Button Text="Default" />

        <Button Text="Left - 10"
                ContentLayout="Left, 10" />

        <Button Text="Top - 10"
                ContentLayout="Top, 10" />

        <Button Text="Right - 20"
                ContentLayout="Right, 20" />

        <Button Text="Bottom - 20"
                ContentLayout="Bottom, 20" />
    </FlexLayout>
</ContentPage>
最后四个 Button 元素利用 ContentLayout 属性来指定文本和位图的位置和间距:
现在,你已经了解了处理 Button 事件和更改 Button 外观的各种方法。

