本文基于“MonoTouch 对话框简介”一文中提供的信息。 其中提供了一个演练,演示如何使用 MonoTouch.Dialog (MT.D) 元素 API 快速开始使用 MT.D 生成应用程序。
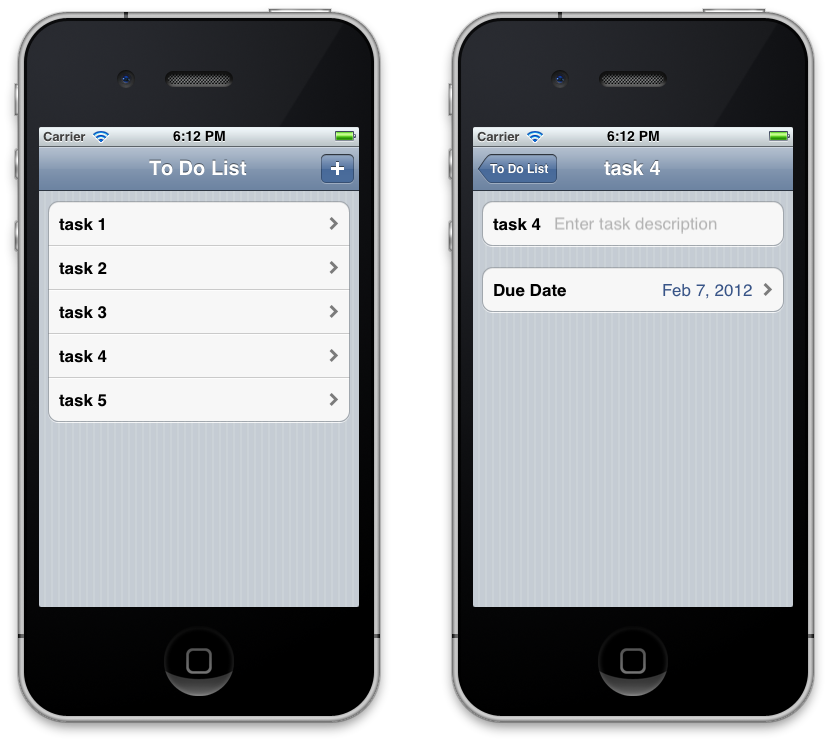
在本演练中,我们将使用 MT.D 元素 API 创建一个显示任务列表的主从样式应用程序。 当用户选择导航栏中的 + 按钮时,将向任务表中添加一个新行。 选择该行会导航到详细信息屏幕,我们可以在其中更新任务说明和截止日期,如下所示:
设置 MT.D
MT.D 与 Xamarin.iOS 一起分发。 若要使用它,请右键单击 Visual Studio 2017 或 Visual Studio for Mac 中 Xamarin.iOS 项目的“引用”节点,然后添加对“MonoTouch.Dialog-1”程序集的引用。 然后,根据需要在源代码中添加 using MonoTouch.Dialog 语句。
元素 API 演练
在 MonoTouch 对话框简介一文中,我们对 MT.D 的不同部分有了深入的了解。 让我们使用元素 API 将其全部放入一个应用程序中。
设置多屏应用程序
为了开始执行屏幕创建过程,MonoTouch.Dialog 将创建一个 DialogViewController,然后添加一个 RootElement。
若要使用 MonoTouch.Dialog 创建多屏应用程序,我们需要:
- 创建
UINavigationController. - 创建
DialogViewController. - 添加
DialogViewController作为UINavigationController.的根 - 将
RootElement添加到DialogViewController. - 将
Sections和Elements添加到RootElement.
使用 UINavigationController
若要创建导航样式的应用程序,我们需要创建一个 UINavigationController,然后将其添加为 AppDelegate 的 FinishedLaunching 方法中的 RootViewController。 为使 UINavigationController 能够与 MonoTouch.Dialog 配合使用,我们将 DialogViewController 添加到 UINavigationController,如下所示:
public override bool FinishedLaunching (UIApplication app, NSDictionary options)
{
    _window = new UIWindow (UIScreen.MainScreen.Bounds);

    _rootElement = new RootElement ("To Do List"){new Section ()};

    // code to create screens with MT.D will go here …

    _rootVC = new DialogViewController (_rootElement);
    _nav = new UINavigationController (_rootVC);
    _window.RootViewController = _nav;
    _window.MakeKeyAndVisible ();

    return true;
}
上面的代码创建 RootElement 的实例并将其传递给 DialogViewController。 DialogViewController 的层次结构顶部始终有一个 RootElement。 在此示例中,RootElement 是使用字符串“To Do List”创建的,该字符串用作导航控制器导航栏中的标题。 此时,运行应用程序会显示如下所示的屏幕:
让我们了解如何使用 MonoTouch.Dialog 的 Sections 和 Elements 层次结构来添加更多屏幕。
创建对话框屏幕
DialogViewController 是 MonoTouch.Dialog 用来添加屏幕的 UITableViewController 子类。 MonoTouch.Dialog 通过将 RootElement 添加到 DialogViewController 来创建屏幕,如前所示。 RootElement 可以包含代表表的各个部分的 Section 实例。
这些部分由元素、其他部分甚至其他 RootElements 组成。 通过嵌套 RootElements,MonoTouch.Dialog 可以自动创建一个导航样式的应用程序,如下所示。
使用 DialogViewController
DialogViewController 是一个 UITableViewController 子类,它采用 UITableView 作为视图。 在此示例中,我们希望每次单击 + 按钮时都将项添加到表中。 由于 DialogViewController 已添加到 UINavigationController,因此我们可以使用 NavigationItem 的 RightBarButton 属性添加 + 按钮,如下所示:
_addButton = new UIBarButtonItem (UIBarButtonSystemItem.Add);
_rootVC.NavigationItem.RightBarButtonItem = _addButton;
当我们先前创建 RootElement 时,我们向它传递了一个 Section 实例,以便可以在用户点击 + 按钮时添加元素。 可以使用以下代码在该按钮的事件处理程序中实现此目的:
_addButton.Clicked += (sender, e) => {
    ++n;

    var task = new Task{Name = "task " + n, DueDate = DateTime.Now};

    var taskElement = new RootElement (task.Name) {
        new Section () {
            new EntryElement (task.Name, "Enter task description", task.Description)
        },
        new Section () {
            new DateElement ("Due Date", task.DueDate)
        }
    };
    _rootElement [0].Add (taskElement);
};
每次点击该按钮时,此代码都会创建新的 Task 对象。 下面显示了 Task 类的简单实现:
public class Task
{
    public Task ()
    {
    }

    public string Name { get; set; }

    public string Description { get; set; }

    public DateTime DueDate { get; set; }
}
任务的 Name 属性用于创建 RootElement 的标题以及名为 n 的计数器变量,该变量针对每个新任务递增。 MonoTouch.Dialog 将元素转换为在添加每个 taskElement 时添加到 TableView 的行。
呈现和管理对话框屏幕
我们使用了 RootElement,以便 MonoTouch.Dialog 会自动为每个任务的详细信息创建新屏幕,并在选择一行时导航到该屏幕。
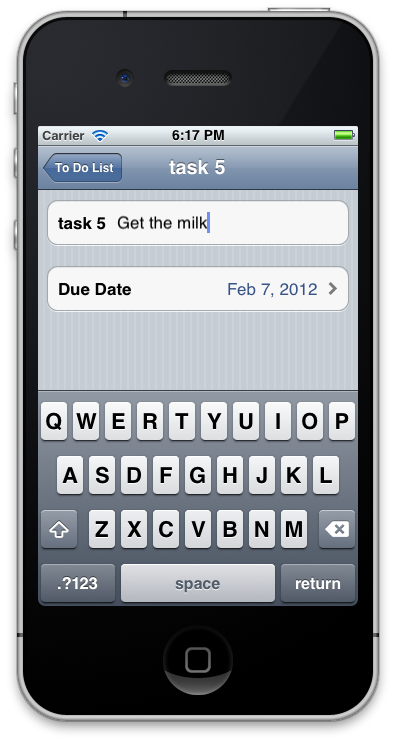
任务详细信息屏幕本身由两部分组成;每个部分包含一个元素。 第一个元素是基于 EntryElement 创建的,为任务的 Description 属性提供可编辑行。 选择该元素时,会呈现用于文本编辑的键盘,如下所示:
第二个部分包含一个 DateElement,可让我们管理任务的 DueDate 属性。 选择日期会自动加载日期选取器,如下所示:
在使用 EntryElement 和 DateElement 的情况下(或对于 MonoTouch.Dialog 中的任何数据输入元素),对值进行的任何更改都会自动保留。 我们可以通过编辑日期,然后在根屏幕和各种任务详细信息之间来回导航(其中保留了详细信息屏幕中的值),来演示这一点。
总结
本文提供了有关如何使用 MonoTouch.Dialog 元素 API 的演练。 其中介绍了使用 MT.D 创建多屏应用程序的基本步骤,包括如何使用 DialogViewController 以及如何添加元素和部分来创建屏幕。 此外,它还演示了如何将 MT.D 与 UINavigationController 配合使用。


