Azure AI 服务 可帮助开发人员和组织构建负责任的应用程序,并准备好使用和自定义 API 和模型。 本文使用 Azure AI 服务执行包括:文本分析、翻译、文档智能、视觉、图像搜索、语音转文本和文本到语音、异常检测以及从 Web API 提取数据等任务。
Azure AI 服务可帮助开发人员创建应用程序,以便查看、听到、说话、理解并开始推理。 Azure AI 服务目录包括五大支柱: 视觉、 语音、 语言、 Web 搜索和 决策。
先决条件
获取 Microsoft Fabric 订阅。 或者,注册免费的 Microsoft Fabric 试用版。
登录 Microsoft Fabric。
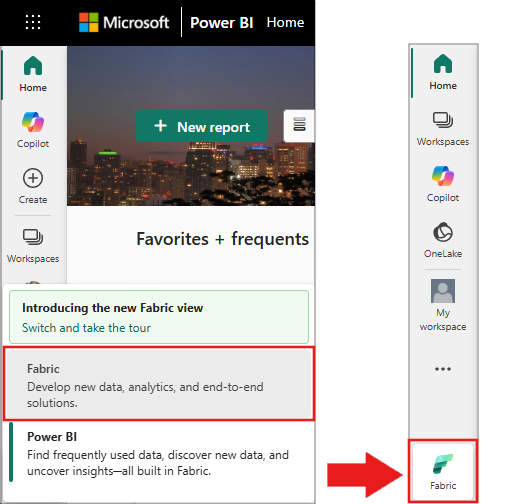
使用主页左下侧的体验切换器切换到 Fabric。
- 创建 笔记本。
- 将笔记本附加到湖屋。 在笔记本中,选择“ 添加” 以添加现有 Lakehouse 或创建新的 Lakehouse。
- 获取 Azure AI 服务密钥。 遵循 快速入门:为 Azure AI 服务创建多服务资源。 复制密钥值,以在下面的代码示例中使用。
准备你的系统
首先导入所需的库并初始化 Spark 会话。
from pyspark.sql.functions import udf, col, lit
from synapse.ml.io.http import HTTPTransformer, http_udf
from requests import Request
from pyspark.ml import PipelineModel
import os
from pyspark.sql import SparkSession

# Start a Spark session.
spark = SparkSession.builder.getOrCreate()
导入 Azure AI 服务库。 在以下代码中,将占位符文本 <YOUR-KEY-VALUE> 替换为自己的键,并为每个服务设置位置值。
from synapse.ml.cognitive import *

# A general Azure AI services key for Text Analytics, Vision, and Document Intelligence (or use separate keys for each service).
service_key = "<YOUR-KEY-VALUE>"  # Replace `<YOUR-KEY-VALUE>` with your Azure AI services key. See prerequisites for details.
service_loc = "eastus"

# A Bing Search v7 subscription key.
bing_search_key = "<YOUR-KEY-VALUE>"  # Replace `<YOUR-KEY-VALUE>` with your Bing Search v7 subscription key. See prerequisites for details.

# An Anomaly Detector subscription key.
anomaly_key = "<YOUR-KEY-VALUE>"  # Replace `<YOUR-KEY-VALUE>` with your Anomaly Detector key. See prerequisites for details.
anomaly_loc = "westus2"

# A Translator subscription key.
translator_key = "<YOUR-KEY-VALUE>"  # Replace `<YOUR-KEY-VALUE>` with your Translator key. See prerequisites for details.
translator_loc = "eastus"

# An Azure Search key.
search_key = "<YOUR-KEY-VALUE>"  # Replace `<YOUR-KEY-VALUE>` with your Azure Search key. See prerequisites for details.
分析文本中的情绪
文本分析 服务提供了多种算法,用于从文本中提取智能见解。 例如,使用服务分析输入文本中的情绪。 服务返回介于 0.0 和 1.0 之间的分数:低分表示负面情绪,高分表示积极情绪。
此代码示例返回三个句子的情绪。
# Create a DataFrame that's tied to its column names
df = spark.createDataFrame(
    [
        ("I am so happy today, it's sunny!", "en-US"),
        ("I am frustrated by this rush hour traffic", "en-US"),
        ("The cognitive services on Spark aren't bad", "en-US"),
    ],
    ["text", "language"],
)

# Run the Text Analytics service with options
sentiment = (
    TextSentiment()
    .setTextCol("text")
    .setLocation(service_loc)
    .setSubscriptionKey(service_key)
    .setOutputCol("sentiment")
    .setErrorCol("error")
    .setLanguageCol("language")
)

# Show the results in a table.
display(
    sentiment.transform(df).select(
        "text", col("sentiment.document.sentiment").alias("sentiment")
    )
)
对健康数据进行文本分析
用于健康的文本分析 从非结构化文本中提取和标记医疗信息,如医生笔记、出院摘要、临床文档和电子健康记录。
此代码示例分析医生笔记中的文本并返回结构化数据。
df = spark.createDataFrame(
    [
        ("20mg of ibuprofen twice a day",),
        ("1tsp of Tylenol every 4 hours",),
        ("6 drops of vitamin B-12 every evening",),
    ],
    ["text"],
)

healthcare = (
    AnalyzeHealthText()
    .setSubscriptionKey(service_key)
    .setLocation(service_loc)
    .setLanguage("en")
    .setOutputCol("response")
)

display(healthcare.transform(df))
将文本翻译为其他语言
翻译器 是基于云的机器翻译服务,是用于构建智能应用的 Azure AI 服务系列认知 API 的一部分。 翻译器可轻松集成到应用、网站、工具和解决方案中。 它允许你以 90 种语言和方言添加多语言体验,并且适用于任何作系统进行文本翻译。
下面的代码示例将输入句子转换为目标语言。
from pyspark.sql.functions import col, flatten

# Create a DataFrame with the sentences to translate
df = spark.createDataFrame(
    [(["Hello, what is your name?", "Bye"],)],
    [
        "text",
    ],
)

# Run the Translator service.
translate = (
    Translate()
    .setSubscriptionKey(translator_key)
    .setLocation(translator_loc)
    .setTextCol("text")
    .setToLanguage(["zh-Hans"])
    .setOutputCol("translation")
)

# Show the translation results.
display(
    translate.transform(df)
    .withColumn("translation", flatten(col("translation.translations")))
    .withColumn("translation", col("translation.text"))
    .select("translation")
)
将文档的信息提取到结构化数据中
Azure AI 文档智能 是 Azure AI 服务的一部分,可让你使用机器学习构建自动化数据处理软件。 使用 Azure AI 文档智能从文档中识别和提取文本、键值对、选择标记、表和结构。 该服务输出结构化数据,其中包括来自原始文件的关系、边界框、置信度分数等。
以下代码分析名片图像并将其信息提取为结构化数据。
from pyspark.sql.functions import col, explode

# Create a DataFrame with the source files
imageDf = spark.createDataFrame(
    [
        (
            "https://mmlspark.blob.core.windows.net/datasets/FormRecognizer/business_card.jpg",
        )
    ],
    [
        "source",
    ],
)

# Run Azure AI Document Intelligence
analyzeBusinessCards = (
    AnalyzeBusinessCards()
    .setSubscriptionKey(service_key)
    .setLocation(service_loc)
    .setImageUrlCol("source")
    .setOutputCol("businessCards")
)

# Show recognition results.
display(
    analyzeBusinessCards.transform(imageDf)
    .withColumn(
        "documents", explode(col("businessCards.analyzeResult.documentResults.fields"))
    )
    .select("source", "documents")
)
分析和标记图像
Azure AI 视觉 分析图像以识别人脸、对象和自然语言说明。
此代码示例使用标记分析图像并对其进行 标记。 标记是图像中对象的单字描述、人员、风景和作。
# Create a DataFrame with image URLs.
base_url = "https://raw.githubusercontent.com/Azure-Samples/cognitive-services-sample-data-files/master/ComputerVision/Images/"
df = spark.createDataFrame(
    [
        (base_url + "objects.jpg",),
        (base_url + "dog.jpg",),
        (base_url + "house.jpg",),
    ],
    [
        "image",
    ],
)

# Run Azure AI Vision to analyze images and extract information.
analysis = (
    AnalyzeImage()
    .setLocation(service_loc)
    .setSubscriptionKey(service_key)
    .setVisualFeatures(
        ["Categories", "Color", "Description", "Faces", "Objects", "Tags"]
    )
    .setOutputCol("analysis_results")
    .setImageUrlCol("image")
    .setErrorCol("error")
)

# Show the description tags.
display(analysis.transform(df).select("image", "analysis_results.description.tags"))
搜索与自然语言查询相关的图像
必应图像搜索 搜索 Web 以检索与用户自然语言查询相关的图像。
此示例使用文本查询查找引号的图像。 它输出与查询相关的图像 URL 列表。
# Number of images Bing returns per query
imgsPerBatch = 10
# List of offsets to page through the search results
offsets = [(i * imgsPerBatch,) for i in range(100)]
# Create a DataFrame of offsets to page through results
bingParameters = spark.createDataFrame(offsets, ["offset"])

# Run Bing Image Search with the text query
bingSearch = (
    BingImageSearch()
    .setSubscriptionKey(bing_search_key)
    .setOffsetCol("offset")
    .setQuery("Martin Luther King Jr. quotes")
    .setCount(imgsPerBatch)
    .setOutputCol("images")
)

# Create a transformer that extracts and flattens the Bing Image Search output into a single URL column
getUrls = BingImageSearch.getUrlTransformer("images", "url")

# Display the full results. Uncomment to use
# display(bingSearch.transform(bingParameters))

# Put both services into a pipeline
pipeline = PipelineModel(stages=[bingSearch, getUrls])

# Show the image URLs returned by the search
display(pipeline.transform(bingParameters))
将语音转换为文本
Azure AI 语音服务将语音音频流或文件转换为文本。 下面的代码示例转录一个音频文件。
# Create a DataFrame with the audio URL in the 'url' column
df = spark.createDataFrame(
    [("https://mmlspark.blob.core.windows.net/datasets/Speech/audio2.wav",)], ["url"]
)

# Run Azure AI Speech to transcribe the audio
speech_to_text = (
    SpeechToTextSDK()
    .setSubscriptionKey(service_key)
    .setLocation(service_loc)
    .setOutputCol("text")
    .setAudioDataCol("url")
    .setLanguage("en-US")
    .setProfanity("Masked")
)

# Show the transcription results
display(speech_to_text.transform(df).select("url", "text.DisplayText"))
将文本转换为语音
文本转语音 是一项服务,可让你构建自然说话的应用和服务。 从 119 种语言和变体中的 270 多个神经语音中进行选择。
下面的代码示例将文本转换为音频文件。
from synapse.ml.cognitive import TextToSpeech

fs = ""
if running_on_databricks():
    fs = "dbfs:"
elif running_on_synapse_internal():
    fs = "Files"

# Create a dataframe with text and an output file location
df = spark.createDataFrame(
    [
        (
            "Reading out loud is fun! Check out aka.ms/spark for more information",
            fs + "/output.mp3",
        )
    ],
    ["text", "output_file"],
)

tts = (
    TextToSpeech()
    .setSubscriptionKey(service_key)
    .setTextCol("text")
    .setLocation(service_loc)
    .setVoiceName("en-US-JennyNeural")
    .setOutputFileCol("output_file")
)

# Check that there are no errors during audio creation
display(tts.transform(df))
检测时序数据中的异常
异常检测器 检测时序数据中的异常情况。 此示例使用异常检测器服务查找整个时序中的异常。
# Create a DataFrame with the point data that Anomaly Detector requires
df = spark.createDataFrame(
    [
        ("1972-01-01T00:00:00Z", 826.0),
        ("1972-02-01T00:00:00Z", 799.0),
        ("1972-03-01T00:00:00Z", 890.0),
        ("1972-04-01T00:00:00Z", 900.0),
        ("1972-05-01T00:00:00Z", 766.0),
        ("1972-06-01T00:00:00Z", 805.0),
        ("1972-07-01T00:00:00Z", 821.0),
        ("1972-08-01T00:00:00Z", 20000.0),
        ("1972-09-01T00:00:00Z", 883.0),
        ("1972-10-01T00:00:00Z", 898.0),
        ("1972-11-01T00:00:00Z", 957.0),
        ("1972-12-01T00:00:00Z", 924.0),
        ("1973-01-01T00:00:00Z", 881.0),
        ("1973-02-01T00:00:00Z", 837.0),
        ("1973-03-01T00:00:00Z", 9000.0),
    ],
    ["timestamp", "value"],
).withColumn("group", lit("series1"))

# Run Anomaly Detector to detect anomalies
anomaly_detector = (
    SimpleDetectAnomalies()
    .setSubscriptionKey(anomaly_key)
    .setLocation(anomaly_loc)
    .setTimestampCol("timestamp")
    .setValueCol("value")
    .setOutputCol("anomalies")
    .setGroupbyCol("group")
    .setGranularity("monthly")
)

# Show results with anomalies marked as True
display(
    anomaly_detector.transform(df).select("timestamp", "value", "anomalies.isAnomaly")
)
从任意 Web API 获取信息
将大型管道中的任何 Web 服务与 Spark 上的 HTTP 配合使用。 以下代码示例使用 世界银行 API 获取有关全球不同国家和地区的信息。
# Use any request from the Python requests library.


def world_bank_request(country):
    return Request(
        "GET", "http://api.worldbank.org/v2/country/{}?format=json".format(country)
    )


# Create a DataFrame that specifies the countries to get data for.
df = spark.createDataFrame([("br",), ("usa",)], ["country"]).withColumn(
    "request", http_udf(world_bank_request)(col("country"))
)

# Improve big data performance by using concurrency.
client = (
    HTTPTransformer().setConcurrency(3).setInputCol("request").setOutputCol("response")
)

# Get the body of the response.


def get_response_body(resp):
    return resp.entity.content.decode()


# Show country details from the response.
display(
    client.transform(df).select(
        "country", udf(get_response_body)(col("response")).alias("response")
    )
)