工作流服务和客户端可以参与事务。 为了使服务操作成为环境事务的一部分,请将 Receive 活动置于 TransactedReceiveScope 活动之内。 由 Send 内的 SendReply 或 TransactedReceiveScope 活动所做的任何调用也将在环境事务中进行。 工作流客户端应用程序可以使用 TransactionScope 活动创建背景事务,并使用背景事务调用服务操作。 本主题指导你创建参与事务的工作流服务和工作流客户端。
警告
如果在事务中加载工作流服务实例并且工作流包含活动 Persist ,则工作流实例将被阻塞,直到事务超时。
重要
每当使用 TransactedReceiveScope 时,建议将工作流中的所有 Receives 置于 TransactedReceiveScope 活动内。
重要
使用TransactedReceiveScope 时,如果消息以不正确的顺序到达,在尝试传递第一条无序消息时,工作流将被中止。 必须确保工作流在空闲时始终处于一致的停止点。 这样,如果工作流中止,则可以从以前的暂留点重启工作流。
创建共享库
创建一个全新的空白 Visual Studio 解决方案。
添加名为
Common的新类库项目。 添加对以下程序集的引用:System.Activities.dll
System.ServiceModel.dll
System.ServiceModel.Activities.dll
System.Transactions.dll
向项目添加新类
PrintTransactionInfoCommon。 此类派生自 NativeActivity,并重载 Execute 方法。using System; using System; using System.Activities; using System.Transactions; namespace Common { public class PrintTransactionInfo : NativeActivity { protected override void Execute(NativeActivityContext context) { RuntimeTransactionHandle rth = context.Properties.Find(typeof(RuntimeTransactionHandle).FullName) as RuntimeTransactionHandle; if (rth == null) { Console.WriteLine("There is no ambient RuntimeTransactionHandle"); } Transaction t = rth.GetCurrentTransaction(context); if (t == null) { Console.WriteLine("There is no ambient transaction"); } else { Console.WriteLine("Transaction: {0} is {1}", t.TransactionInformation.DistributedIdentifier, t.TransactionInformation.Status); } } } }这是一个原生活动,用于显示有关环境事务的信息,并在本主题中使用的服务和客户端工作流中使用。 生成解决方案,使此活动在工具箱的“通用”部分中可用。
实现工作流服务
在
WorkflowService项目中添加一个名为Common的新WCF工作流服务。 若要执行此作,请单击Common项目,选择“添加”、“新建项目...”,在“已安装的模板”下选择“工作流”,然后选择 WCF 工作流服务。
删除默认的
ReceiveRequest和SendResponse活动。将 WriteLine 活动拖放到
Sequential Service活动中。 将文本属性设置为"Workflow Service starting ..."以下示例所示。
选择 TransactedReceiveScope 活动并单击“ 变量 ”按钮。 添加以下变量。

注释
可以删除默认存在的数据变量。 还可以使用现有句柄变量。
将 Receive 活动拖放到 活动的“请求”部分内TransactedReceiveScope。 设置以下属性:
资产 价值 CanCreateInstance True (选中复选框) 操作名称 StartSample 服务合同名称 ITransactionSample 工作流应如下所示:

单击活动中的Receive 链接,然后进行以下设置:

将 Sequence 活动拖放到 TransactedReceiveScope 的“正文”部分内。 在 Sequence 活动内,拖放两个 WriteLine 活动并设置 Text 属性,如下表所示。
活动 价值 第一个 WriteLine “服务:接收已完成” 第二个 WriteLine “Service: Received = ” + requestMessage 工作流现在应如下所示:

将第二个
PrintTransactionInfo活动后面的 WriteLine 活动拖放到 活动的“正文”中TransactedReceiveScope。
将 Assign 活动拖放到
PrintTransactionInfo活动后面,然后根据下表设置其属性。资产 价值 到 replyMessage 价值 “服务:发送回复。” 将 WriteLine 活动拖放到 Assign 活动后面,然后将它的 Text 属性设置为 "Service: Begin reply."
工作流现在应如下所示:

右键单击 Receive 该活动,然后选择“ 创建 SendReply ”并将其粘贴到最后一个 WriteLine 活动之后。 单击活动中的
SendReplyToReceive链接,然后进行以下设置。
将WriteLine活动拖放到
SendReplyToReceive活动之后,并将其Text属性设置为“服务:已发送答复”。将 WriteLine 活动拖放到工作流底部,然后将它的 Text 属性设置为 "Service: Workflow ends, press ENTER to exit."
已完成的服务工作流应如下所示:

实现工作流客户端
向
WorkflowClient项目添加一个名为Common的新WCF工作流应用程序。 若要执行此作,请单击Common项目,选择“添加”、“新建项...”,在“已安装的模板”下选择“工作流”,然后选择“活动”。
将 Sequence 活动拖放到设计图面上。
在 Sequence 活动内拖放一个 WriteLine 活动,然后将它的 Text 属性设置为
"Client: Workflow starting"。 工作流现在应如下所示:
将 TransactionScope 活动拖放到 WriteLine 活动后面。 TransactionScope选择活动,单击“变量”按钮并添加以下变量。

将 Sequence 活动拖放到 TransactionScope 活动的正文内。
在
PrintTransactionInfo内拖放 Sequence 活动将 WriteLine 活动拖放到
PrintTransactionInfo活动后面,然后将它的 Text 属性设置为 “Client: Beginning Send”。 工作流现在应如下所示: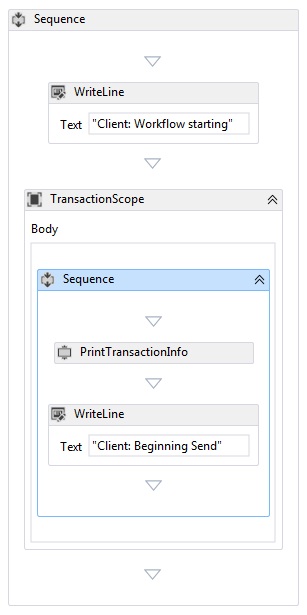
将 Send 活动拖放到 Assign 活动后面,并设置以下属性:
资产 价值 终端配置名称 workflowServiceEndpoint 操作名称 StartSample 服务合同名称 ITransactionSample 工作流现在应如下所示:

单击 “定义...” 链接并进行以下设置:

右键单击 Send 活动并选择“ 创建 ReceiveReply”。 ReceiveReply 活动将自动放在 Send 活动后面。
单击“ReceiveReplyForSend 活动”上的“定义...”链接,然后进行以下设置:

将 WriteLine 活动拖放到 Send 和 ReceiveReply 活动之间,然后将它的 Text 属性设置为 "Client: Send complete."
将 WriteLine 活动拖放到 ReceiveReply 活动后面,然后将它的 Text 属性设置为 "Client side: Reply received = " + replyMessage
将
PrintTransactionInfo活动拖放到 WriteLine 活动后面。将 WriteLine 活动拖放到工作流末尾,然后将它的 Text 属性设置为 "Client workflow ends"。完成的客户端工作流应如下图所示。

生成解决方案。
创建服务应用程序
向解决方案添加新的
Service控制台应用程序项目。 添加对以下程序集的引用:System.Activities.dll
System.ServiceModel.dll
System.ServiceModel.Activities.dll
打开生成的Program.cs文件和以下代码:
      static void Main()
      {
          Console.WriteLine("Building the server.");
          using (WorkflowServiceHost host = new WorkflowServiceHost(new DeclarativeServiceWorkflow(), new Uri("net.tcp://localhost:8000/TransactedReceiveService/Declarative")))
          {
              //Start the server
              host.Open();
              Console.WriteLine("Service started.");

              Console.WriteLine();
              Console.ReadLine();
              //Shutdown
              host.Close();
          };
      }
将以下 app.config 文件添加到项目。
<?xml version="1.0" encoding="utf-8" ?>
<!-- Copyright © Microsoft Corporation.  All rights reserved. -->
<configuration>
    <system.serviceModel>
        <bindings>
            <netTcpBinding>
                <binding transactionFlow="true" />
            </netTcpBinding>
        </bindings>
    </system.serviceModel>
</configuration>
创建客户端应用程序
向解决方案添加新的
Client控制台应用程序项目。 添加对 System.Activities.dll的引用。打开program.cs文件并添加以下代码。
class Program
{

    private static AutoResetEvent syncEvent = new AutoResetEvent(false);

    static void Main(string[] args)
    {
        //Build client
        Console.WriteLine("Building the client.");
        WorkflowApplication client = new WorkflowApplication(new DeclarativeClientWorkflow());
        client.Completed = Program.Completed;
        client.Aborted = Program.Aborted;
        client.OnUnhandledException = Program.OnUnhandledException;
        //Wait for service to start
        Console.WriteLine("Press ENTER once service is started.");
        Console.ReadLine();

        //Start the client
        Console.WriteLine("Starting the client.");
        client.Run();
        syncEvent.WaitOne();

        //Sample complete
        Console.WriteLine();
        Console.WriteLine("Client complete. Press ENTER to exit.");
        Console.ReadLine();
    }

    private static void Completed(WorkflowApplicationCompletedEventArgs e)
    {
        Program.syncEvent.Set();
    }

    private static void Aborted(WorkflowApplicationAbortedEventArgs e)
    {
        Console.WriteLine("Client Aborted: {0}", e.Reason);
        Program.syncEvent.Set();
    }

    private static UnhandledExceptionAction OnUnhandledException(WorkflowApplicationUnhandledExceptionEventArgs e)
    {
        Console.WriteLine("Client had an unhandled exception: {0}", e.UnhandledException);
        return UnhandledExceptionAction.Cancel;
    }
}