你当前正在访问 Microsoft Azure Global Edition 技术文档网站。 如果需要访问由世纪互联运营的 Microsoft Azure 中国技术文档网站,请访问 https://docs.azure.cn。
了解如何使用 用于 .NET 的 Azure SDK 在编制索引期间创建用于内容提取和转换的 AI 扩充管道 。
技能集将 AI 处理添加到原始内容,使其更加统一和可搜索。 了解技能集的工作原理后,可以支持各种转换,从图像分析到自然语言处理,到从外部提供的自定义处理。
在本教程中,你将:
- 在扩充管道中定义对象。
- 构建技能集。 调用 OCR、语言检测、实体识别和关键短语提取。
- 执行管道。 创建和加载搜索索引。
- 使用全文搜索检查结果。
Overview
本教程使用 C# 和 Azure.Search.Documents 客户端库来创建数据源、索引、索引器和技能组。
索引器驱动管道中的每个步骤,从 Azure 存储上的 Blob 容器中的示例数据(非结构化文本和图像)的内容提取开始。
提取内容后,技能组将执行 Microsoft 的内置技能来查找和提取信息。 这些技能包括图像上的光学字符识别 (OCR)、文本的语言检测、关键短语提取和实体识别(组织)。 技能组创建的新信息将发送到索引中的字段。 填充索引后,可以在查询、分类和筛选器中使用这些字段。
Prerequisites
拥有有效订阅的 Azure 帐户。 免费创建帐户。
Note
可在本教程中使用免费搜索服务。 免费层限制为三个索引、三个索引器和三个数据源。 本教程每样创建一个。 在开始之前,请确保服务中有足够的空间来接受新资源。
下载文件
下载示例数据存储库的 zip 文件并提取内容。 了解操作方法。
下载 示例数据文件(混合媒体)
将示例数据上传到 Azure 存储
在 Azure 存储 中,创建新的容器 并将其命名为 混合内容类型。
上传示例数据文件。
获取存储连接字符串,以便可以在 Azure AI 搜索中构建连接。
在左侧选择“访问密钥”。
复制密钥 1 或密钥 2 对应的连接字符串。 连接字符串如以下示例所示:
DefaultEndpointsProtocol=https;AccountName=<your account name>;AccountKey=<your account key>;EndpointSuffix=core.windows.net
Azure AI 服务
内置 AI 扩充由 Azure AI 服务(包括用于自然语言和图像处理的语言服务与 Azure AI 视觉)提供支持。 对于小型工作负载(类似于本教程),可以免费为每个索引器分配 20 个事务。 对于较大的工作负载,将 Azure AI 服务多区域资源附加到技能组以获得标准定价。
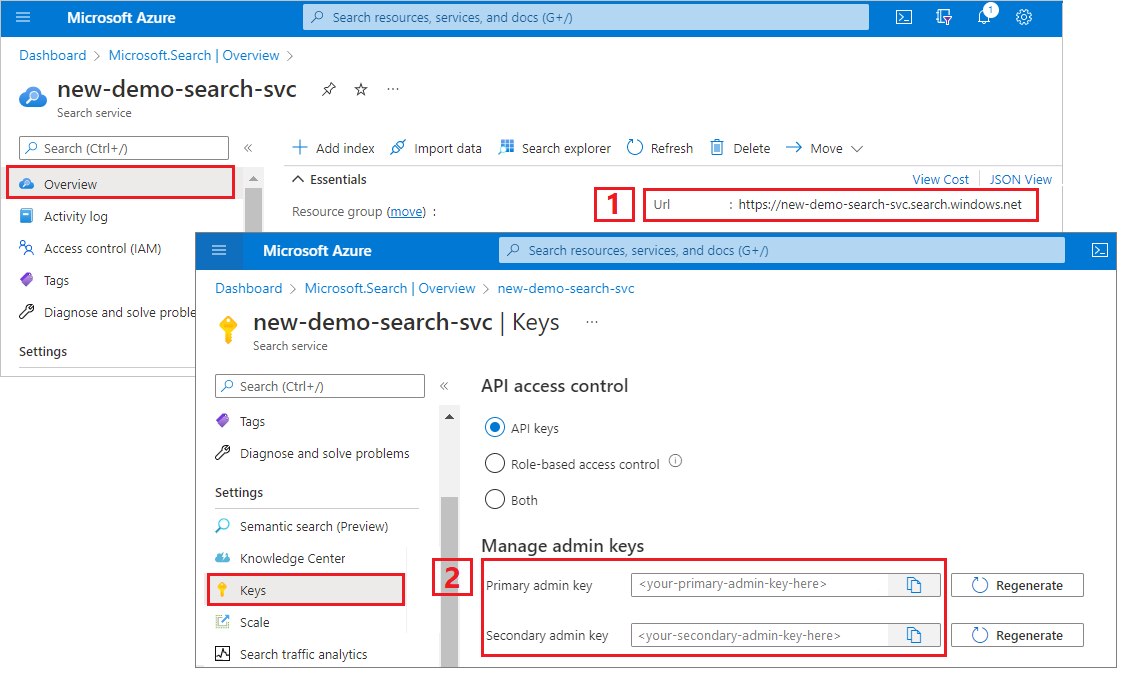
复制搜索服务 URL 和 API 密钥
对于本教程,与 Azure AI 搜索的连接需要终结点和 API 密钥。 可以从 Azure 门户获取这些值。
登录到 Azure 门户,导航到搜索服务“概述”页,然后复制 URL。 示例终结点可能类似于
https://mydemo.search.windows.net。在“设置”“密钥”下,复制管理密钥>。 管理密钥用于添加、修改和删除对象。 有两个可互换的管理密钥。 复制其中任意一个。
配置你的环境
首先打开 Visual Studio 并创建新的控制台应用项目。
安装 Azure.Search.Documents
Azure AI 搜索 .NET SDK 由一个客户端库组成。借助该库,不仅可以管理索引、数据源、索引器和技能组,还能上传和管理文档并执行查询,所有这些操作都无需处理 HTTP 和 JSON 的详细信息。 此客户端库以 NuGet 包的形式分发。
对于此项目,请安装版本 11 或更高版本的 Azure.Search.Documents 以及 Microsoft.Extensions.Configuration 的最新版本。
在 Visual Studio 中,选择“工具”“NuGet 包管理器”>“管理解决方案的 NuGet 包...”
选择最新版本,然后选择“安装”。
重复前面的步骤,安装 Microsoft.Extensions.Configuration 和 Microsoft.Extensions.Configuration.Json。
添加服务连接信息
在解决方案资源管理器中右键单击该项目,并选择“添加”“新建项...”。
将文件命名为“
appsettings.json”,并选择“添加”。将此文件包含在输出目录中。
- 右键单击
appsettings.json并选择“属性”。 - 将“复制到输出目录”的值更改为“如果较新则复制”。
- 右键单击
将以下 JSON 复制到新 JSON 文件中。
{
  "SearchServiceUri": "<YourSearchServiceUri>",
  "SearchServiceAdminApiKey": "<YourSearchServiceAdminApiKey>",
  "SearchServiceQueryApiKey": "<YourSearchServiceQueryApiKey>",
  "AzureAIServicesKey": "<YourMultiRegionAzureAIServicesKey>",
  "AzureBlobConnectionString": "<YourAzureBlobConnectionString>"
}
添加搜索服务信息和 Blob 存储帐户信息。 请注意,可以从上一部分所述的服务预配步骤获取此信息。
对于“SearchServiceUri”,请输入完整的 URL。
添加命名空间
在 Program.cs 中添加以下命名空间。
using Azure;
using Azure.Search.Documents.Indexes;
using Azure.Search.Documents.Indexes.Models;
using Microsoft.Extensions.Configuration;
using System;
using System.Collections.Generic;
using System.Linq;

namespace EnrichwithAI
创建客户端
在 SearchIndexClient 下创建 SearchIndexerClient 和 Main 的实例。
public static void Main(string[] args)
{
    // Create service client
    IConfigurationBuilder builder = new ConfigurationBuilder().AddJsonFile("appsettings.json");
    IConfigurationRoot configuration = builder.Build();

    string searchServiceUri = configuration["SearchServiceUri"];
    string adminApiKey = configuration["SearchServiceAdminApiKey"];
    string azureAiServicesKey = configuration["AzureAIServicesKey"];

    SearchIndexClient indexClient = new SearchIndexClient(new Uri(searchServiceUri), new AzureKeyCredential(adminApiKey));
    SearchIndexerClient indexerClient = new SearchIndexerClient(new Uri(searchServiceUri), new AzureKeyCredential(adminApiKey));
}
Note
客户端连接到搜索服务。 为了避免打开太多连接,应尽可能尝试在应用程序中共享单个实例。 该方法在启用此类共享时是线程安全的。
添加函数以在失败期间退出程序
本教程旨在帮助你了解索引管道的每个步骤。 如果存在阻止程序创建数据源、技能组、索引或索引器的严重问题,程序将输出错误消息并退出,以便你了解并解决该问题。
将 ExitProgram 添加到 Main,以处理需要程序退出的情况。
private static void ExitProgram(string message)
{
    Console.WriteLine("{0}", message);
    Console.WriteLine("Press any key to exit the program...");
    Console.ReadKey();
    Environment.Exit(0);
}
创建管道
在 Azure AI 搜索中,AI 处理是在索引编制(或数据引入)期间发生的。 本演练部分将创建四个对象:数据源、索引定义、技能集和索引器。
步骤 1:创建数据源
SearchIndexerClient 具有可设置为 DataSourceName 对象的 SearchIndexerDataSourceConnection 属性。 此对象提供创建、列出、更新或删除 Azure AI 搜索数据源时所需的所有方法。
通过调用 SearchIndexerDataSourceConnection,新建 indexerClient.CreateOrUpdateDataSourceConnection(dataSource) 实例。 下面的代码创建一个 AzureBlob 类型的数据源。
private static SearchIndexerDataSourceConnection CreateOrUpdateDataSource(SearchIndexerClient indexerClient, IConfigurationRoot configuration)
{
    SearchIndexerDataSourceConnection dataSource = new SearchIndexerDataSourceConnection(
        name: "demodata",
        type: SearchIndexerDataSourceType.AzureBlob,
        connectionString: configuration["AzureBlobConnectionString"],
        container: new SearchIndexerDataContainer("mixed-content-type"))
    {
        Description = "Demo files to demonstrate Azure AI Search capabilities."
    };

    // The data source does not need to be deleted if it was already created
    // since we are using the CreateOrUpdate method
    try
    {
        indexerClient.CreateOrUpdateDataSourceConnection(dataSource);
    }
    catch (Exception ex)
    {
        Console.WriteLine("Failed to create or update the data source\n Exception message: {0}\n", ex.Message);
        ExitProgram("Cannot continue without a data source");
    }

    return dataSource;
}
为了让请求成功,此方法将返回已创建的数据源。 如果请求有问题(如参数无效),此方法将抛出异常。
现在,在 Main 中添加一行,以调用刚刚添加的 CreateOrUpdateDataSource 函数。
// Create or Update the data source
Console.WriteLine("Creating or updating the data source...");
SearchIndexerDataSourceConnection dataSource = CreateOrUpdateDataSource(indexerClient, configuration);
生成并运行解决方案。 由于这是发出的第一个请求,请检查 Azure 门户,确认是否在 Azure AI 搜索中创建了数据源。 在搜索服务的概述页上,检查“数据源”列表中是否包含一个新项。 可能需要等待几分钟让 Azure 门户页刷新。

步骤 2:创建技能集
在此部分中,你将定义一组要应用于数据的扩充步骤。 一个扩充步骤称为一个技能,一组扩充步骤称为技能组 。 本教程对技能集使用以下内置技能:
光学字符识别:用于识别图像文件中的印刷文本和手写文本。
文本合并:用于将字段集合中的文本合并到单个“合并内容”字段中。
语言检测:识别内容的语言。
实体识别:从 Blob 容器中的内容提取组织名称。
文本拆分:用于先将大段内容拆分为较小区块,再调用关键短语提取技能和实体识别技能。 关键短语提取和实体识别接受不超过 50,000 个字符的输入。 有几个示例文件需要拆分才能保留在此限制范围内。
关键短语提取:取出最关键的短语。
在初始处理期间,Azure AI 搜索会破译每个文档,以提取不同文件格式的内容。 源文件中的文本将放入一个生成的 content 字段中(每个文档对应一个字段)。 因此,请将输入设置为 "/document/content",以使用此文本。 图像内容将放入一个生成的 normalized_images 字段中,该字段在技能组中指定为 /document/normalized_images/*。
输出可以映射到索引、用作下游技能的输入,或者既映射到索引又用作输入(在语言代码中就是这样)。 在索引中,语言代码可用于筛选。 文本分析技能使用语言代码作为输入来告知有关断字的语言规则。
若要详细了解技能集的基础知识,请参阅如何定义技能集。
OCR 技能
OcrSkill 会从图像中提取文本。 此技能假定存在“normalized_images”字段。 为了生成此字段,本教程稍后会将索引器定义中的 "imageAction" 配置设置为 "generateNormalizedImages"。
private static OcrSkill CreateOcrSkill()
{
    List<InputFieldMappingEntry> inputMappings = new List<InputFieldMappingEntry>();
    inputMappings.Add(new InputFieldMappingEntry("image")
    {
        Source = "/document/normalized_images/*"
    });

    List<OutputFieldMappingEntry> outputMappings = new List<OutputFieldMappingEntry>();
    outputMappings.Add(new OutputFieldMappingEntry("text")
    {
        TargetName = "text"
    });

    OcrSkill ocrSkill = new OcrSkill(inputMappings, outputMappings)
    {
        Description = "Extract text (plain and structured) from image",
        Context = "/document/normalized_images/*",
        DefaultLanguageCode = OcrSkillLanguage.En,
        ShouldDetectOrientation = true
    };

    return ocrSkill;
}
合并技能
在此部分,你将创建一个 MergeSkill,它用于将文档内容字段与 OCR 技能生成的文本合并。
private static MergeSkill CreateMergeSkill()
{
    List<InputFieldMappingEntry> inputMappings = new List<InputFieldMappingEntry>();
    inputMappings.Add(new InputFieldMappingEntry("text")
    {
        Source = "/document/content"
    });
    inputMappings.Add(new InputFieldMappingEntry("itemsToInsert")
    {
        Source = "/document/normalized_images/*/text"
    });
    inputMappings.Add(new InputFieldMappingEntry("offsets")
    {
        Source = "/document/normalized_images/*/contentOffset"
    });

    List<OutputFieldMappingEntry> outputMappings = new List<OutputFieldMappingEntry>();
    outputMappings.Add(new OutputFieldMappingEntry("mergedText")
    {
        TargetName = "merged_text"
    });

    MergeSkill mergeSkill = new MergeSkill(inputMappings, outputMappings)
    {
        Description = "Create merged_text which includes all the textual representation of each image inserted at the right location in the content field.",
        Context = "/document",
        InsertPreTag = " ",
        InsertPostTag = " "
    };

    return mergeSkill;
}
语言检测技能
LanguageDetectionSkill 会检测输入文本的语言,并报告在请求中提交的每个文档的单一语言代码。 我们会将“语言检测”技能的输出用作“文本拆分”技能的输入的一部分。
private static LanguageDetectionSkill CreateLanguageDetectionSkill()
{
    List<InputFieldMappingEntry> inputMappings = new List<InputFieldMappingEntry>();
    inputMappings.Add(new InputFieldMappingEntry("text")
    {
        Source = "/document/merged_text"
    });

    List<OutputFieldMappingEntry> outputMappings = new List<OutputFieldMappingEntry>();
    outputMappings.Add(new OutputFieldMappingEntry("languageCode")
    {
        TargetName = "languageCode"
    });

    LanguageDetectionSkill languageDetectionSkill = new LanguageDetectionSkill(inputMappings, outputMappings)
    {
        Description = "Detect the language used in the document",
        Context = "/document"
    };

    return languageDetectionSkill;
}
文本拆分技巧
下面的 SplitSkill 将按页面拆分文本,并将页面长度限制为 String.Length 度量的 4,000 个字符。 此算法会尝试将文本拆分为最大为 maximumPageLength 的区块。 在下面的示例中,此算法会尽可能在句子边界断开句子,所以区块大小可能略小于 maximumPageLength。
private static SplitSkill CreateSplitSkill()
{
    List<InputFieldMappingEntry> inputMappings = new List<InputFieldMappingEntry>();
    inputMappings.Add(new InputFieldMappingEntry("text")
    {
        Source = "/document/merged_text"
    });
    inputMappings.Add(new InputFieldMappingEntry("languageCode")
    {
        Source = "/document/languageCode"
    });

    List<OutputFieldMappingEntry> outputMappings = new List<OutputFieldMappingEntry>();
    outputMappings.Add(new OutputFieldMappingEntry("textItems")
    {
        TargetName = "pages",
    });

    SplitSkill splitSkill = new SplitSkill(inputMappings, outputMappings)
    {
        Description = "Split content into pages",
        Context = "/document",
        TextSplitMode = TextSplitMode.Pages,
        MaximumPageLength = 4000,
        DefaultLanguageCode = SplitSkillLanguage.En
    };

    return splitSkill;
}
实体识别技能
设置此 EntityRecognitionSkill 实例是为了识别类别类型 organization。 此外,EntityRecognitionSkill 还可识别类别类型 person 和 location。
请注意,“context”字段设置为包含星号的 "/document/pages/*";也就是说,将对 "/document/pages" 下的每个页面都调用扩充步骤。
private static EntityRecognitionSkill CreateEntityRecognitionSkill()
{
    List<InputFieldMappingEntry> inputMappings = new List<InputFieldMappingEntry>();
    inputMappings.Add(new InputFieldMappingEntry("text")
    {
        Source = "/document/pages/*"
    });

    List<OutputFieldMappingEntry> outputMappings = new List<OutputFieldMappingEntry>();
    outputMappings.Add(new OutputFieldMappingEntry("organizations")
    {
        TargetName = "organizations"
    });

    // Specify the V3 version of the EntityRecognitionSkill
    var skillVersion = EntityRecognitionSkill.SkillVersion.V3;

    var entityRecognitionSkill = new EntityRecognitionSkill(inputMappings, outputMappings, skillVersion)
    {
        Description = "Recognize organizations",
        Context = "/document/pages/*",
        DefaultLanguageCode = EntityRecognitionSkillLanguage.En
    };
    entityRecognitionSkill.Categories.Add(EntityCategory.Organization);
    return entityRecognitionSkill;
}
关键短语提取技能
与刚刚创建的 EntityRecognitionSkill 实例一样,KeyPhraseExtractionSkill 对文档的各个页面都调用。
private static KeyPhraseExtractionSkill CreateKeyPhraseExtractionSkill()
{
    List<InputFieldMappingEntry> inputMappings = new List<InputFieldMappingEntry>();
    inputMappings.Add(new InputFieldMappingEntry("text")
    {
        Source = "/document/pages/*"
    });
    inputMappings.Add(new InputFieldMappingEntry("languageCode")
    {
        Source = "/document/languageCode"
    });

    List<OutputFieldMappingEntry> outputMappings = new List<OutputFieldMappingEntry>();
    outputMappings.Add(new OutputFieldMappingEntry("keyPhrases")
    {
        TargetName = "keyPhrases"
    });

    KeyPhraseExtractionSkill keyPhraseExtractionSkill = new KeyPhraseExtractionSkill(inputMappings, outputMappings)
    {
        Description = "Extract the key phrases",
        Context = "/document/pages/*",
        DefaultLanguageCode = KeyPhraseExtractionSkillLanguage.En
    };

    return keyPhraseExtractionSkill;
}
生成并创建技能集
使用已创建的技能来生成 SearchIndexerSkillset。
private static SearchIndexerSkillset CreateOrUpdateDemoSkillSet(SearchIndexerClient indexerClient, IList<SearchIndexerSkill> skills,string azureAiServicesKey)
{
    SearchIndexerSkillset skillset = new SearchIndexerSkillset("demoskillset", skills)
    {
        // Azure AI services was formerly known as Cognitive Services.
        // The APIs still use the old name, so we need to create a CognitiveServicesAccountKey object.
        Description = "Demo skillset",
        CognitiveServicesAccount = new CognitiveServicesAccountKey(azureAiServicesKey)
    };

    // Create the skillset in your search service.
    // The skillset does not need to be deleted if it was already created
    // since we are using the CreateOrUpdate method
    try
    {
        indexerClient.CreateOrUpdateSkillset(skillset);
    }
    catch (RequestFailedException ex)
    {
        Console.WriteLine("Failed to create the skillset\n Exception message: {0}\n", ex.Message);
        ExitProgram("Cannot continue without a skillset");
    }

    return skillset;
}
将以下行添加到 Main。
// Create the skills
Console.WriteLine("Creating the skills...");
OcrSkill ocrSkill = CreateOcrSkill();
MergeSkill mergeSkill = CreateMergeSkill();
EntityRecognitionSkill entityRecognitionSkill = CreateEntityRecognitionSkill();
LanguageDetectionSkill languageDetectionSkill = CreateLanguageDetectionSkill();
SplitSkill splitSkill = CreateSplitSkill();
KeyPhraseExtractionSkill keyPhraseExtractionSkill = CreateKeyPhraseExtractionSkill();

// Create the skillset
Console.WriteLine("Creating or updating the skillset...");
List<SearchIndexerSkill> skills = new List<SearchIndexerSkill>();
skills.Add(ocrSkill);
skills.Add(mergeSkill);
skills.Add(languageDetectionSkill);
skills.Add(splitSkill);
skills.Add(entityRecognitionSkill);
skills.Add(keyPhraseExtractionSkill);

SearchIndexerSkillset skillset = CreateOrUpdateDemoSkillSet(indexerClient, skills, azureAiServicesKey);
步骤 3:创建索引
本部分通过指定要在可搜索索引中包含的字段以及每个字段的搜索特性,来定义索引架构。 字段具有某种类型,并可以采用特性来确定字段的使用方式(可搜索、可排序,等等)。 索引中的字段名称不一定要与源中的字段名称完全匹配。 在稍后的步骤中,我们将在索引器中添加字段映射以连接源-目标字段。 针对此步骤,请使用搜索应用程序相关的字段命名约定来定义索引。
本演练使用以下字段和字段类型:
| 字段名 | 字段类型 |
|---|---|
id |
Edm.String |
content |
Edm.String |
languageCode |
Edm.String |
keyPhrases |
列表<Edm.String> |
organizations |
列表<Edm.String> |
创建 DemoIndex 类
此索引的字段是使用模型类进行定义。 模型类的每个属性都具有一些特性,这些特性决定了相应索引字段的与搜索相关的行为。
接下来,将把模型类添加到新 C# 文件中。 右键单击项目,并依次选择“添加”>“新项...”。选择“类”,并将文件命名为 DemoIndex.cs,然后选择“添加”。
请务必指明要使用 Azure.Search.Documents.Indexes 和 System.Text.Json.Serialization 命名空间中的类型。
将下面的模型类定义添加到 DemoIndex.cs 中,并将它添加到要在其中创建索引的同一命名空间中。
using Azure.Search.Documents.Indexes;
using System.Text.Json.Serialization;

namespace EnrichwithAI
{
    // The SerializePropertyNamesAsCamelCase is currently unsupported as of this writing.
    // Replace it with JsonPropertyName
    public class DemoIndex
    {
        [SearchableField(IsSortable = true, IsKey = true)]
        [JsonPropertyName("id")]
        public string Id { get; set; }

        [SearchableField]
        [JsonPropertyName("content")]
        public string Content { get; set; }

        [SearchableField]
        [JsonPropertyName("languageCode")]
        public string LanguageCode { get; set; }

        [SearchableField]
        [JsonPropertyName("keyPhrases")]
        public string[] KeyPhrases { get; set; }

        [SearchableField]
        [JsonPropertyName("organizations")]
        public string[] Organizations { get; set; }
    }
}
至此,已定义模型类。返回到 Program.cs,可以轻松创建索引定义了。 此索引的名称为 demoindex。 如果已存在同名的索引,则会删除该索引。
private static SearchIndex CreateDemoIndex(SearchIndexClient indexClient)
{
    FieldBuilder builder = new FieldBuilder();
    var index = new SearchIndex("demoindex")
    {
        Fields = builder.Build(typeof(DemoIndex))
    };

    try
    {
        indexClient.GetIndex(index.Name);
        indexClient.DeleteIndex(index.Name);
    }
    catch (RequestFailedException ex) when (ex.Status == 404)
    {
        //if the specified index not exist, 404 will be thrown.
    }

    try
    {
        indexClient.CreateIndex(index);
    }
    catch (RequestFailedException ex)
    {
        Console.WriteLine("Failed to create the index\n Exception message: {0}\n", ex.Message);
        ExitProgram("Cannot continue without an index");
    }

    return index;
}
在测试期间,你可能会发现要多次尝试创建索引。 因此,请先检查要创建的索引是否已存在,再尝试创建索引。
将以下行添加到 Main。
// Create the index
Console.WriteLine("Creating the index...");
SearchIndex demoIndex = CreateDemoIndex(indexClient);
添加以下 using 语句以解析消歧引用。
using Index = Azure.Search.Documents.Indexes.Models;
若要了解有关索引概念的详细信息,请参阅创建索引 (REST API)。
步骤 4:创建并运行索引器
到目前为止,我们已创建数据源、技能集和索引。 这三个组件组成某个索引器,该索引器将每个片段集成到单个多阶段的操作中。 若要在索引器中将这些组件捆绑在一起,必须定义字段映射。
先处理 fieldMapping,再处理技能集;将数据源中的源字段映射到索引中的目标字段。 如果两端的字段名称和类型相同,则无需映射。
先处理技能集,再处理 outputFieldMapping;引用不存在的 sourceFieldName,直到文档破解或扩充功能创建了它们。 targetFieldName 是索引中的字段。
除了将输入挂钩到输出外,还可以使用字段映射来平展数据结构。 有关详细信息,请参阅如何将扩充字段映射到可搜索索引。
private static SearchIndexer CreateDemoIndexer(SearchIndexerClient indexerClient, SearchIndexerDataSourceConnection dataSource, SearchIndexerSkillset skillSet, SearchIndex index)
{
    IndexingParameters indexingParameters = new IndexingParameters()
    {
        MaxFailedItems = -1,
        MaxFailedItemsPerBatch = -1,
    };
    indexingParameters.Configuration.Add("dataToExtract", "contentAndMetadata");
    indexingParameters.Configuration.Add("imageAction", "generateNormalizedImages");

    SearchIndexer indexer = new SearchIndexer("demoindexer", dataSource.Name, index.Name)
    {
        Description = "Demo Indexer",
        SkillsetName = skillSet.Name,
        Parameters = indexingParameters
    };

    FieldMappingFunction mappingFunction = new FieldMappingFunction("base64Encode");
    mappingFunction.Parameters.Add("useHttpServerUtilityUrlTokenEncode", true);

    indexer.FieldMappings.Add(new FieldMapping("metadata_storage_path")
    {
        TargetFieldName = "id",
        MappingFunction = mappingFunction

    });
    indexer.FieldMappings.Add(new FieldMapping("content")
    {
        TargetFieldName = "content"
    });

    indexer.OutputFieldMappings.Add(new FieldMapping("/document/pages/*/organizations/*")
    {
        TargetFieldName = "organizations"
    });
    indexer.OutputFieldMappings.Add(new FieldMapping("/document/pages/*/keyPhrases/*")
    {
        TargetFieldName = "keyPhrases"
    });
    indexer.OutputFieldMappings.Add(new FieldMapping("/document/languageCode")
    {
        TargetFieldName = "languageCode"
    });

    try
    {
        indexerClient.GetIndexer(indexer.Name);
        indexerClient.DeleteIndexer(indexer.Name);
    }
    catch (RequestFailedException ex) when (ex.Status == 404)
    {
        //if the specified indexer not exist, 404 will be thrown.
    }

    try
    {
        indexerClient.CreateIndexer(indexer);
    }
    catch (RequestFailedException ex)
    {
        Console.WriteLine("Failed to create the indexer\n Exception message: {0}\n", ex.Message);
        ExitProgram("Cannot continue without creating an indexer");
    }

    return indexer;
}
将以下行添加到 Main。
// Create the indexer, map fields, and execute transformations
Console.WriteLine("Creating the indexer and executing the pipeline...");
SearchIndexer demoIndexer = CreateDemoIndexer(indexerClient, dataSource, skillset, demoIndex);
预计索引器处理需要一段时间才能完成。 即使数据集较小,分析技能也会消耗大量的计算资源。 某些技能(例如图像分析)会长时间运行。
Tip
创建索引器会调用管道。 如果访问数据、映射输入和输出或操作顺序出现问题,此阶段会显示这些问题。
探索如何创建索引器
代码将 "maxFailedItems" 设置为 -1,指示索引引擎在数据导入期间忽略错误。 此设置很实用,因为演示数据源中的文档数量很少。 对于更大的数据源,请将值设置为大于 0。
另请注意,"dataToExtract" 设置为 "contentAndMetadata"。 该语句告知索引器从不同的文件格式以及与每个文件相关的元数据中自动提取内容。
提取内容后,可以设置 imageAction,以从数据源中的图像提取文本。 将设置为 "imageAction" 配置的 "generateNormalizedImages" 与 OCR 技能和文本合并技能相结合,指示索引器从图像中提取文本(例如,交通停车标志中的“停”一词),并将它嵌入为内容字段的一部分。 此行为将应用到文档中嵌入的图像(例如 PDF 中的图像),以及数据源(例如 JPG 文件)中的图像。
监视索引
定义索引器后,提交请求时会自动运行索引器。 根据定义的技能,编制索引花费的时间可能会超出预期。 若要确定索引器是否仍在运行,请使用 GetStatus 方法。
private static void CheckIndexerOverallStatus(SearchIndexerClient indexerClient, SearchIndexer indexer)
{
    try
    {
        var demoIndexerExecutionInfo = indexerClient.GetIndexerStatus(indexer.Name);

        switch (demoIndexerExecutionInfo.Value.Status)
        {
            case IndexerStatus.Error:
                ExitProgram("Indexer has error status. Check the Azure Portal to further understand the error.");
                break;
            case IndexerStatus.Running:
                Console.WriteLine("Indexer is running");
                break;
            case IndexerStatus.Unknown:
                Console.WriteLine("Indexer status is unknown");
                break;
            default:
                Console.WriteLine("No indexer information");
                break;
        }
    }
    catch (RequestFailedException ex)
    {
        Console.WriteLine("Failed to get indexer overall status\n Exception message: {0}\n", ex.Message);
    }
}
demoIndexerExecutionInfo 表示索引器的当前状态和执行历史记录。
某些源文件和技能组合常常会出现警告,但这并不一定意味着有问题。 在本教程中,警告是良性的(例如,JPEG 文件中没有文本输入)。
将以下行添加到 Main。
// Check indexer overall status
Console.WriteLine("Check the indexer overall status...");
CheckIndexerOverallStatus(indexerClient, demoIndexer);
搜寻
在 Azure AI 搜索教程控制台应用中,我们通常会在运行返回结果的查询之前添加 2 秒的延迟,但由于扩充需要几分钟才能完成,因此我们将关闭控制台应用并改用其他方法。
最简单的选项是 Azure 门户中的 搜索资源管理器 。 你可以首先运行一个空查询来返回所有文档,或者运行更具有针对性的搜索以返回管道创建的新字段内容。
在 Azure 门户中的搜索服务页中,展开 “搜索管理>索引”。
在列表中找到
demoindex。 它应该有 14 份文档。 如果文档计数为零,则索引器仍在运行,或页面尚未刷新。选择
demoindex。 搜索资源管理器是第一个选项卡。加载第一个文档后,即可开始搜索内容。 若要验证内容是否存在,请通过单击“搜索”来运行未指定的查询。 该查询将返回所有当前已编制索引的文档,让你了解索引包含的内容。
若要获得更易于管理的结果,请切换到 JSON 视图并设置参数以选择字段:
{
    "search": "*",
    "count": true,
    "select": "id, languageCode, organizations"
}
重置并重新运行
在开发的前期试验阶段,设计迭代的最实用方法是,删除 Azure AI 搜索中的对象,并允许代码重新生成它们。 资源名称是唯一的。 删除某个对象后,可以使用相同的名称重新创建它。
本教程的示例代码将检查现有对象并将其删除,使你能够重新运行代码。 也可以使用 Azure 门户来删除索引、索引器、数据源和技能集。
Takeaways
本教程演示了通过创建组件部件(数据源、技能集、索引和索引器)生成扩充索引管道的基本步骤。
其中介绍了内置技能组、技能集定义,以及通过输入和输出将技能链接在一起的机制。 您还了解到,在索引器定义中需要使用 outputFieldMappings,以便将管道中的丰富值路由到 Azure AI 搜索服务中的可搜索索引。
最后,介绍了如何测试结果并重置系统以进一步迭代。 本教程提到,针对索引发出查询会返回扩充的索引管道创建的输出。 此外,本教程还介绍了如何检查索引器状态,以及在重新运行管道之前要删除的对象。
清理资源
在自己的订阅中操作时,最好在项目结束时移除不再需要的资源。 持续运行资源可能会产生费用。 可以逐个删除资源,也可以删除资源组以删除整个资源集。
你可以在 Azure 门户中查找和管理资源,只需使用左侧导航窗格中的“所有资源”或“资源组”链接即可。
后续步骤
熟悉 AI 扩充管道中的所有对象后,接下来让我们更详细地了解技能集定义和各项技能。
了解如何调用 REST API,以便在编制索引期间创建用于内容提取和转换的 AI 扩充管道 。
技能集将 AI 处理添加到原始内容,使其更加统一和可搜索。 了解技能集的工作原理后,可以支持各种转换,从图像分析到自然语言处理,到从外部提供的自定义处理。
在本教程中,你将:
- 在扩充管道中定义对象。
- 构建技能集。 调用 OCR、语言检测、实体识别和关键短语提取。
- 执行管道。 创建和加载搜索索引。
- 使用全文搜索检查结果。
Overview
本教程使用 REST 客户端和 Azure AI 搜索 REST API 来创建数据源、索引、索引器和技能组。
索引器驱动管道中的每个步骤,从 Azure 存储上的 Blob 容器中的示例数据(非结构化文本和图像)的内容提取开始。
提取内容后,技能组将执行 Microsoft 的内置技能来查找和提取信息。 这些技能包括图像上的光学字符识别 (OCR)、文本的语言检测、关键短语提取和实体识别(组织)。 技能组创建的新信息将发送到索引中的字段。 填充索引后,可以在查询、分类和筛选器中使用这些字段。
Prerequisites
拥有有效订阅的 Azure 帐户。 免费创建帐户。
Note
可在本教程中使用免费搜索服务。 免费层限制为三个索引、三个索引器和三个数据源。 本教程每样创建一个。 在开始之前,请确保服务中有足够的空间来接受新资源。
下载文件
下载示例数据存储库的 zip 文件并提取内容。 了解操作方法。
将示例数据上传到 Azure 存储
在 Azure 存储中,创建新容器并将其命名为 cog-search-demo。
获取存储连接字符串,以便可以在 Azure AI 搜索中构建连接。
在左侧选择“访问密钥”。
复制密钥 1 或密钥 2 对应的连接字符串。 连接字符串如以下示例所示:
DefaultEndpointsProtocol=https;AccountName=<your account name>;AccountKey=<your account key>;EndpointSuffix=core.windows.net
Azure AI 服务
内置 AI 扩充由 Azure AI 服务(包括用于自然语言和图像处理的语言服务与 Azure AI 视觉)提供支持。 对于小型工作负载(类似于本教程),可以免费为每个索引器分配 20 个事务。 对于较大的工作负载,将 Azure AI 服务多区域资源附加到技能组以获得标准定价。
复制搜索服务 URL 和 API 密钥
对于本教程,与 Azure AI 搜索的连接需要终结点和 API 密钥。 可以从 Azure 门户获取这些值。
登录到 Azure 门户,导航到搜索服务“概述”页,然后复制 URL。 示例终结点可能类似于
https://mydemo.search.windows.net。在“设置”“密钥”下,复制管理密钥>。 管理密钥用于添加、修改和删除对象。 有两个可互换的管理密钥。 复制其中任意一个。
配置您的 REST 文件
启动 Visual Studio Code 并打开 skillset-tutorial.rest 文件。 请参阅快速入门:如需 REST 客户端的帮助, 请进行全文搜索 。
提供变量的值:搜索服务终结点、搜索服务管理员 API 密钥、索引名称、Azure 存储帐户的连接字符串和 Blob 容器名称。
创建管道
AI 扩充是索引器驱动的。 本演练部分将创建四个对象:数据源、索引定义、技能集和索引器。
步骤 1:创建数据源
调用创建数据源为包含示例数据文件的 Blob 容器提供连接字符串。
### Create a data source
POST {{baseUrl}}/datasources?api-version=2025-09-01  HTTP/1.1
  Content-Type: application/json
  api-key: {{apiKey}}

    {
        "name": "cog-search-demo-ds",
        "description": null,
        "type": "azureblob",
        "subtype": null,
        "credentials": {
            "connectionString": "{{storageConnectionString}}"
        },
        "container": {
            "name": "{{blobContainer}}",
            "query": null
        },
        "dataChangeDetectionPolicy": null,
        "dataDeletionDetectionPolicy": null
    }
步骤 2:创建技能集
调用创建技能组指定将哪些扩充步骤应用于内容。 除非存在依赖项,否则技能会并行执行。
### Create a skillset
POST {{baseUrl}}/skillsets?api-version=2025-09-01  HTTP/1.1
  Content-Type: application/json
  api-key: {{apiKey}}

    {
        "name": "cog-search-demo-ss",
        "description": "Apply OCR, detect language, extract entities, and extract key-phrases.",
        "cognitiveServices": null,
        "skills":
        [
            {
            "@odata.type": "#Microsoft.Skills.Vision.OcrSkill",
            "context": "/document/normalized_images/*",
            "defaultLanguageCode": "en",
            "detectOrientation": true,
            "inputs": [
                {
                    "name": "image",
                    "source": "/document/normalized_images/*"
                }
            ],
            "outputs": [
                {
                    "name": "text"
                }
            ]
            },
            {
            "@odata.type": "#Microsoft.Skills.Text.MergeSkill",
            "description": "Create merged_text, which includes all the textual representation of each image inserted at the right location in the content field. This is useful for PDF and other file formats that supported embedded images.",
            "context": "/document",
            "insertPreTag": " ",
            "insertPostTag": " ",
            "inputs": [
                {
                    "name":"text",
                    "source": "/document/content"
                },
                {
                    "name": "itemsToInsert",
                    "source": "/document/normalized_images/*/text"
                },
                {
                    "name":"offsets",
                    "source": "/document/normalized_images/*/contentOffset"
                }
            ],
            "outputs": [
                {
                    "name": "mergedText",
                    "targetName" : "merged_text"
                }
            ]
            },
            {
            "@odata.type": "#Microsoft.Skills.Text.SplitSkill",
            "textSplitMode": "pages",
            "maximumPageLength": 4000,
            "defaultLanguageCode": "en",
            "context": "/document",
            "inputs": [
                {
                    "name": "text",
                    "source": "/document/merged_text"
                }
            ],
            "outputs": [
                {
                    "name": "textItems",
                    "targetName": "pages"
                }
            ]
            },
            {
            "@odata.type": "#Microsoft.Skills.Text.LanguageDetectionSkill",
            "description": "If you have multilingual content, adding a language code is useful for filtering",
            "context": "/document",
            "inputs": [
                {
                    "name": "text",
                    "source": "/document/merged_text"
                }
            ],
            "outputs": [
                {
                    "name": "languageName",
                    "targetName": "language"
                }
            ]
            },
            {
            "@odata.type": "#Microsoft.Skills.Text.KeyPhraseExtractionSkill",
            "context": "/document/pages/*",
            "inputs": [
                {
                    "name": "text",
                    "source": "/document/pages/*"
                }
            ],
            "outputs": [
                {
                    "name": "keyPhrases",
                    "targetName": "keyPhrases"
                }
            ]
            },
            {
            "@odata.type": "#Microsoft.Skills.Text.V3.EntityRecognitionSkill",
            "categories": ["Organization"],
            "context": "/document",
            "inputs": [
                {
                    "name": "text",
                    "source": "/document/merged_text"
                }
            ],
            "outputs": [
                {
                    "name": "organizations",
                    "targetName": "organizations"
                }
            ]
            },
            {
            "@odata.type": "#Microsoft.Skills.Text.V3.EntityRecognitionSkill",
            "categories": ["Location"],
            "context": "/document",
            "inputs": [
                {
                    "name": "text",
                    "source": "/document/merged_text"
                }
            ],
            "outputs": [
                {
                    "name": "locations",
                    "targetName": "locations"
                }
            ]
            },
            {
            "@odata.type": "#Microsoft.Skills.Text.V3.EntityRecognitionSkill",
            "categories": ["Person"],
            "context": "/document",
            "inputs": [
                {
                    "name": "text",
                    "source": "/document/merged_text"
                }
            ],
            "outputs": [
                {
                    "name": "persons",
                    "targetName": "persons"
                }
            ]
            }
        ]
    }
要点:
请求的正文指定以下内置技能:
Skill Description 光学字符识别 识别图像文件中的文本和数字。 文本合并 创建“合并内容”,该内容重新合并以前分隔的内容,对于嵌入了图像的文档(PDF、DOCX 等)很有用。 图像和文本在文档分解阶段被分离。 合并技能通过将在扩充期间创建的任何已识别的文本、图像描述文字或标记插入到文档中从其中提取图像的同一位置来重新合并它们。 在技能组中处理合并的内容时,此节点包含文档中的所有文本,包括从未经过 OCR 或图像分析的纯文本文档。 语言检测 检测语言并输出语言名称或代码。 在多语言数据集中,语言字段可用于筛选器。 实体识别 从合并的内容中提取人员、组织和位置的名称。 文本拆分 将合并的大量内容拆分为较小区块,然后调用关键短语提取工具。 关键短语提取接受不超过 50,000 个字符的输入。 有几个示例文件需要拆分才能保留在此限制范围内。 关键短语提取 提取出最相关的关键短语。 每个技能会针对文档的内容执行。 在处理期间,Azure AI 搜索会解码每个文档,以从不同的文件格式读取内容。 从源文件中找到的文本将放入一个生成的
content字段(每个文档对应一个字段)。 因此,输入将变为"/document/content"。对于关键短语提取,由于我们使用了文本拆分器技能将较大文件分解成多个页面,因此关键短语提取技能的上下文是
"document/pages/*"(适用于文档中的每个页面),而不是"/document/content"。
Note
输出可以映射到索引、用作下游技能的输入,或者既映射到索引又用作输入(在语言代码中就是这样)。 在索引中,语言代码可用于筛选。 若要详细了解技能集的基础知识,请参阅如何定义技能集。
步骤 3:创建索引
调用创建索引以提供用于在 Azure AI 搜索中创建倒排索引和其他构造的架构。
索引的最大组件是字段集合,其中的数据类型和属性确定了 Azure AI 搜索中的内容和行为。 请确保为新生成的输出准备好字段。
### Create an index
POST {{baseUrl}}/indexes?api-version=2025-09-01  HTTP/1.1
  Content-Type: application/json
  api-key: {{apiKey}}

    {
        "name": "cog-search-demo-idx",
        "defaultScoringProfile": "",
        "fields": [
            {
                "name": "content",
                "type": "Edm.String",
                "searchable": true,
                "sortable": false,
                "filterable": false,
                "facetable": false
            },
            {
                "name": "text",
                "type": "Collection(Edm.String)",
                "facetable": false,
                "filterable": true,
                "searchable": true,
                "sortable": false
            },
            {
                "name": "language",
                "type": "Edm.String",
                "searchable": false,
                "sortable": true,
                "filterable": true,
                "facetable": false
            },
            {
                "name": "keyPhrases",
                "type": "Collection(Edm.String)",
                "searchable": true,
                "sortable": false,
                "filterable": true,
                "facetable": true
            },
            {
                "name": "organizations",
                "type": "Collection(Edm.String)",
                "searchable": true,
                "sortable": false,
                "filterable": true,
                "facetable": true
            },
            {
                "name": "persons",
                "type": "Collection(Edm.String)",
                "searchable": true,
                "sortable": false,
                "filterable": true,
                "facetable": true
            },
            {
                "name": "locations",
                "type": "Collection(Edm.String)",
                "searchable": true,
                "sortable": false,
                "filterable": true,
                "facetable": true
            },
            {
                "name": "metadata_storage_path",
                "type": "Edm.String",
                "key": true,
                "searchable": true,
                "sortable": false,
                "filterable": false,
                "facetable": false
            },
            {
                "name": "metadata_storage_name",
                "type": "Edm.String",
                "searchable": true,
                "sortable": false,
                "filterable": false,
                "facetable": false
            }
        ]
    }
步骤 4:创建并运行索引器
调用创建索引器来驱动管道。 到目前为止创建的三个组件(数据源、技能集、索引)是索引器的输入。 在 Azure AI 搜索中创建索引器是运转整个管道的事件。
此步骤预期需要几分钟时间才能完成。 即使数据集较小,分析技能也会消耗大量的计算资源。
### Create and run an indexer
POST {{baseUrl}}/indexers?api-version=2025-09-01  HTTP/1.1
  Content-Type: application/json
  api-key: {{apiKey}}

    {
        "name": "cog-search-demo-idxr",
        "description": "",
        "dataSourceName" : "cog-search-demo-ds",
        "targetIndexName" : "cog-search-demo-idx",
        "skillsetName" : "cog-search-demo-ss",
        "fieldMappings" : [
            {
                "sourceFieldName" : "metadata_storage_path",
                "targetFieldName" : "metadata_storage_path",
                "mappingFunction" : { "name" : "base64Encode" }
            },
            {
                "sourceFieldName": "metadata_storage_name",
                "targetFieldName": "metadata_storage_name"
            }
        ],
        "outputFieldMappings" :
        [
            {
                "sourceFieldName": "/document/merged_text",
                "targetFieldName": "content"
            },
            {
                "sourceFieldName" : "/document/normalized_images/*/text",
                "targetFieldName" : "text"
            },
            {
                "sourceFieldName" : "/document/organizations",
                "targetFieldName" : "organizations"
            },
            {
                "sourceFieldName": "/document/language",
                "targetFieldName": "language"
            },
            {
                "sourceFieldName" : "/document/persons",
                "targetFieldName" : "persons"
            },
            {
                "sourceFieldName" : "/document/locations",
                "targetFieldName" : "locations"
            },
            {
                "sourceFieldName" : "/document/pages/*/keyPhrases/*",
                "targetFieldName" : "keyPhrases"
            }
        ],
        "parameters":
        {
        "batchSize": 1,
        "maxFailedItems":-1,
        "maxFailedItemsPerBatch":-1,
        "configuration":
            {
                "dataToExtract": "contentAndMetadata",
                "imageAction": "generateNormalizedImages"
            }
        }
    }
要点:
请求的正文包括对以前对象的引用、图像处理所需的配置属性以及两种类型的字段映射。
"fieldMappings"在技能集之前处理,它将数据源中的内容发送到索引中的目标字段。 使用字段映射将未修改的现有内容发送到索引。 如果两端的字段名称和类型相同,则无需映射。"outputFieldMappings"用于技能集执行后由技能创建的字段。 对sourceFieldName中outputFieldMappings的引用在文档破解或扩充创建它们之前并不存在。targetFieldName是索引中的字段,在索引架构中定义。将
"maxFailedItems"参数设置为 -1,指示索引引擎在数据导入期间忽略错误。 这是可接受的,因为演示数据源中的文档很少。 对于更大的数据源,请将值设置为大于 0。"dataToExtract":"contentAndMetadata"语句告知索引器自动从 blob 的内容属性以及每个对象的元数据中提取值。imageAction参数告知索引器从数据源中找到的图像中提取文本。"imageAction":"generateNormalizedImages"配置与 OCR 技能和文本合并技能相结合,告知索引器从图像中提取文本(例如,禁行交通标志中的单词“stop”),并将其嵌入到内容字段中。 此行为既适用于嵌入的图像(如 PDF 中的图像),也适用于独立图像文件(如 JPG 文件)。
Note
创建索引器会调用管道。 如果访问数据、映射输入和输出或操作顺序出现问题,此阶段会显示这些问题。 若要结合代码或脚本更改重新运行管道,可能需要先删除对象。 有关详细信息,请参阅重置并重新运行。
监视索引
提交“创建索引器”请求后,索引编制和扩充立即开始。 根据技能组的复杂性和操作,编制索引可能需要一段时间。
若要确定索引器是否仍在运行,请调用获取索引器状态来检查索引器状态。
### Get Indexer Status (wait several minutes for the indexer to complete)
GET {{baseUrl}}/indexers/cog-search-demo-idxr/status?api-version=2025-09-01  HTTP/1.1
  Content-Type: application/json
  api-key: {{apiKey}}
要点:
在某些情况下经常出现警告,但不一定意味着存在问题。 例如,如果某个 Blob 容器包含映像文件,而管道不处理映像,则会出现一条警告,指出映像未处理。
在此示例中,有一个不包含任何文本的 PNG 文件。 无法对此文件执行所有五个基于文本的技能(语言检测、位置的实体识别、组织、人员和关键短语提取)。 生成的通知将显示在执行历史记录中。
检查结果
创建包含 AI 生成的内容的索引后,请调用搜索文档,以运行一些查询来查看结果。
### Query the index\
POST {{baseUrl}}/indexes/cog-search-demo-idx/docs/search?api-version=2025-09-01  HTTP/1.1
  Content-Type: application/json
  api-key: {{apiKey}}

  {
    "search": "*",
    "select": "metadata_storage_name,language,organizations",
    "count": true
  }
筛选器可帮助你将结果缩小到感兴趣的项:
### Filter by organization
POST {{baseUrl}}/indexes/cog-search-demo-idx/docs/search?api-version=2025-09-01  HTTP/1.1
  Content-Type: application/json
  api-key: {{apiKey}}

  {
    "search": "*",
    "filter": "organizations/any(organizations: organizations eq 'Microsoft')",
    "select": "metadata_storage_name,organizations",
    "count": true
  }
这些查询演示了对 Azure AI 搜索创建的新字段使用查询语法和筛选器的多种方式。 有关更多查询示例,请参阅搜索文档 REST API 中的示例、简单语法查询示例和完整 Lucene 查询示例。
重置并重新运行
在开发的早期阶段,对设计的迭代很常见。 重置和重新运行有助于迭代。
Takeaways
本教程演示了使用 REST API 创建 AI 扩充管道的基本步骤:数据源、技能组、索引和索引器。
其中介绍了内置技能,以及技能组定义,其中显示了通过输入和输出将技能链接在一起的机制。 您还了解到,在索引器定义中需要使用 outputFieldMappings,以便将管道中的丰富值路由到 Azure AI 搜索服务中的可搜索索引。
最后,介绍了如何测试结果并重置系统以进一步迭代。 本教程提到,针对索引发出查询会返回扩充的索引管道创建的输出。
清理资源
在自己的订阅中操作时,最好在项目结束时移除不再需要的资源。 持续运行资源可能会产生费用。 可以逐个删除资源,也可以删除资源组以删除整个资源集。
你可以在 Azure 门户中查找和管理资源,只需使用左侧导航窗格中的“所有资源”或“资源组”链接即可。
后续步骤
熟悉 AI 扩充管道中的所有对象后,接下来更详细地了解技能集定义和各项技能。