你当前正在访问 Microsoft Azure Global Edition 技术文档网站。 如果需要访问由世纪互联运营的 Microsoft Azure 中国技术文档网站,请访问 https://docs.azure.cn。
适用于:![]() IoT Edge 1.5
IoT Edge 1.5
重要说明
IoT Edge 1.5 LTS 是受支持的版本。 IoT Edge 1.4 LTS 的生命周期结束日期为 2024 年 11 月 12 日。 如果使用的是较低的版本,请参阅更新 IoT Edge。
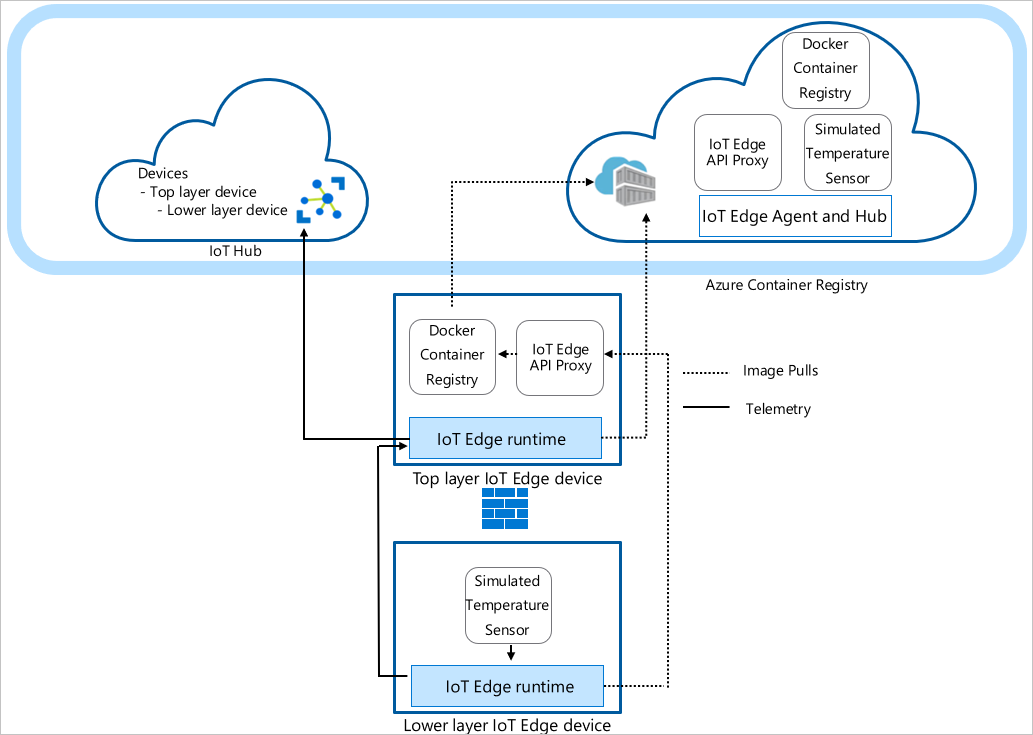
跨分层层组织的网络部署 Azure IoT Edge 节点。 层次结构中的每一层都是一个网关设备,用于处理来自其下一层中设备的消息和请求。 此配置也称为嵌套边缘。
构建设备的层次结构,以便只有顶层与云建立连接,并且下层只能与相邻的上游和下游层通信。 此网络分层是大多数遵循 ISA-95 标准的工业网络的基础。
本教程介绍如何创建 IoT Edge 设备的层次结构、将 IoT Edge 运行时容器部署到设备以及在本地配置设备。 在本教程中,将执行以下任务:
- 创建和定义 IoT Edge 设备层次结构中的关系。
- 在层次结构中的设备上配置 IoT Edge 运行时。
- 在设备层次结构中安装一致的证书。
- 向层次结构中的设备添加工作负载。
- 使用 IoT Edge API 代理模块,通过下层设备中的单个端口安全地路由 HTTP 流量。
提示
本教程包括混合使用手动和自动化步骤来展示嵌套的 IoT Edge 功能。
如果要了解设置 IoT Edge 设备层次结构的完全自动化步骤,请遵循已脚本化的适用于工业 IoT 的 Azure IoT Edge 示例。 这一已编写了脚本的方案将 Azure 虚拟机部署为预配置设备以模拟工厂环境。
如果要深入了解创建和管理 IoT Edge 设备层次结构的手动步骤,请参阅 IoT Edge 设备网关层次结构操作指南。
在本教程中,定义了以下网络层:
顶层:此层的 IoT Edge 设备可直接连接到云。
下层:位于顶层下面的层的 IoT Edge 设备无法直接连接到云。 它们需要通过一个或多个中间 IoT Edge 设备来发送和接收数据。
为简单起见,本教程使用双设备层次结构。 顶层设备表示位于层次结构顶层的设备,它可以直接连接到云。 此设备称为 父设备。 下层设备表示位于层次结构下层的设备,它无法直接连接到云。 根据需要添加更多设备来表示生产环境。 较低层的设备称为 子设备。
注意
子设备可以是下游设备,也可以是嵌套拓扑中的网关设备。
Prerequisites
若要创建 IoT Edge 设备的层次结构,需要:
一台具有 Internet 连接的计算机(Windows 或 Linux)。
Azure 中的免费或标准层 IoT 中心。
Azure Cloud Shell 中的 Bash Shell,它使用安装了 Azure IoT 扩展的 Azure CLI。 本教程使用 Azure Cloud Shell。 若要查看 Azure CLI 模块和扩展的当前版本,请运行 az version。
用于配置层次结构的两个 Linux 设备。 如果没有可用设备,可以使用 IoT Edge Azure 资源管理器模版为层次结构中的每个设备创建 Azure 虚拟机。 此资源管理器模板预安装了 IoT Edge 版本 1.5。 如果要在自己的设备上安装 IoT Edge,请参阅安装 Azure IoT Edge for Linux 或更新 IoT Edge。
若要简化设备之间的网络通信,虚拟机应位于同一虚拟网络上或使用虚拟网络对等互连。
请确保以下端口对于所有设备均为开放入站(最下层设备 443、5671、8883 除外):
- 443:在父边缘中心和子边缘中心之间用于 REST API 调用,并拉取 docker 容器映像。
- 5671、8883:用于 AMQP 和 MQTT。
有关详细信息,请参阅如何使用 Azure 门户向虚拟机开放端口。
提示
在后续步骤中,你要使用 SSH 句柄以及每个虚拟机的 FQDN 或 IP 地址进行配置,因此请记录此信息。 你可以在 Azure 门户上查找 IP 地址和 FQDN。 对于 IP 地址,请导航到虚拟机列表,并记下公共 IP 地址字段。 对于 FQDN,请转到每个虚拟机的概述页面,并查找 DNS 名称字段。 对于 SSH 句柄,请转到每个虚拟机的连接页。
创建 IoT Edge 设备层次结构
IoT Edge 设备构成层次结构的各个层。 本教程会创建包含两个 IoT Edge 设备的层次结构:顶层设备和下层设备。 可根据需要创建更多下游设备。
若要创建和配置 IoT Edge 设备的层次结构,请使用 az iot edge devices create Azure CLI 命令。 此命令可简化层次结构的配置,自动完成并浓缩数个步骤:
- 在 IoT 中心中创建设备
- 设置父子关系以授权设备间的通信
- 将部署清单应用于每个设备
- 为每个设备生成证书链以在它们之间建立安全通信
- 为每个设备生成配置文件
创建设备配置
创建一组嵌套边缘设备,其中包含一个父设备和一个子设备。 在本教程中,我们使用基本的示例部署清单。 有关其他方案示例,请查看配置示例模板。
在使用 az iot edge devices create 命令之前,请为顶层和下层设备定义部署清单。 将 deploymentTopLayer.json 示例文件下载到本地计算机。
顶层设备部署清单定义 IoT Edge API 代理模块,并从下层设备向 IoT 中心声明路由。
将 deploymentLowerLayer.json 示例文件下载到本地计算机。
下层设备部署清单包括模拟温度传感器模块,并将路由声明到顶层设备。 在 systemModules 部分中,运行时模块设置为从 $upstream:443 拉取,而不是 mcr.microsoft.com。 下层设备将 Docker 映像请求发送到端口 443 上的 IoT Edge API 代理模块,因为它无法直接从云中拉取映像。 另一个部署到下层设备的模块(模拟温度传感器模块)也向
$upstream:443发出其映像请求。有关创建下层部署清单的详细信息,请参阅 连接 Azure IoT Edge 设备以创建层次结构。
在 Azure Cloud Shell 中,使用 az iot edge devices create Azure CLI 命令为层次结构中的每个设备创建 IoT 中心和配置捆绑包中的设备。 将尖括号中的占位符文本替换为你自己的值:
占位符 说明 <枢纽名称> IoT 中心的名称。 <配置包输出路径> 要在其中保存配置捆绑包的文件夹路径。 <父设备名称> 顶层父设备 ID 名称。 <parent-deployment-manifest> 父设备部署清单文件。 <父级FQDN或IP> 父设备完全限定的域名 (FQDN) 或 IP 地址。 <子设备名称> 下层子设备 ID 名称。 <child-deployment-manifest> 子设备部署清单文件。 <child-fqdn-or-ip> 子设备完全限定的域名 (FQDN) 或 IP 地址。 az iot edge devices create \ --hub-name <hub-name> \ --output-path <config-bundle-output-path> \ --default-edge-agent "mcr.microsoft.com/azureiotedge-agent:1.5" \ --device id=<parent-device-name> \ deployment=<parent-deployment-manifest> \ hostname=<parent-fqdn-or-ip> \ --device id=child-1 \ parent=parent-1 \ deployment=<child-deployment-manifest> \ hostname=<child-fqdn-or-ip>例如,以下命令会在 IoT 中心创建包含两个 IoT Edge 设备的层次结构。 名为 parent-1 的顶层设备和名为 child-1* 的下层设备。 该命令将每个设备的配置捆绑包保存在输出目录中。 该命令还会生成自签名测试证书,并将其包含在配置捆绑包中。 使用安装脚本在每个设备上安装配置捆绑包。
az iot edge devices create \
   --hub-name my-iot-hub \
   --output-path ./output \
   --default-edge-agent "mcr.microsoft.com/azureiotedge-agent:1.5" \
   --device id=parent-1 \
      deployment=./deploymentTopLayer.json \
      hostname=10.0.0.4 \
   --device id=child-1 \
      parent=parent-1 \
      deployment=./deploymentLowerLayer.json \
      hostname=10.1.0.4
运行命令后,在输出目录中查找设备配置捆绑包。 例如:
PS C:\nested-edge\output> dir

   Directory: C:\nested-edge\output

Mode                 LastWriteTime         Length Name
----                 -------------         ------ ----
-a---           4/10/2023  4:12 PM           7192 child-1.tgz
-a---           4/10/2023  4:12 PM           6851 parent-1.tgz
使用自己的证书和密钥作为参数传递给命令,或创建更复杂的设备层次结构。 有关使用 az 命令创建嵌套设备的详细信息,请参阅 az iot edge devices create。 如果不熟悉如何在网关应用场景下使用证书,请参阅操作指南的证书部分。
在本教程中,你要使用内联参数创建设备和配置捆绑包。 还可以使用 YAML 或 JSON 格式的配置文件。 有关示例配置文件,请参阅示例 sample_devices_config.yaml。
配置 IoT Edge 运行时
除了预配你的设备之外,配置步骤还使用你之前创建的证书在层次结构中的设备之间建立受信任的通信。 这些步骤还会开始建立层次结构的网络结构。 顶层设备会保持 Internet 连接,以便从云中拉取其运行时的映像,而下层设备则会通过顶层设备进行路由,以便访问这些映像。
若要配置 IoT Edge 运行时,请将配置捆绑包应用到设备。 顶层设备和下层设备的配置不同,因此请确保为每个设备使用正确的配置文件。
将每个配置捆绑包存档文件复制到其相应的设备。 可使用 U 盘,这是一种类似于 Azure Key Vault 的服务,或使用安全文件复制等功能。 选择最适合方案的方法之一。
例如,若要将 parent-1 配置捆绑发送到 parent-1 VM 上的主目录,可以使用类似于以下示例的命令:
scp ./output/parent-1.tgz admin@parent-1-vm.westus.cloudapp.azure.com:~在每个设备上,提取配置捆绑包存档。 例如,使用 tar 命令提取 parent-1 存档文件:
tar -xzf ./parent-1.tgz设置安装脚本的执行权限。
chmod +x install.sh在每个设备上,运行具有根权限的安装脚本以应用配置捆绑包:
sudo ./install.sh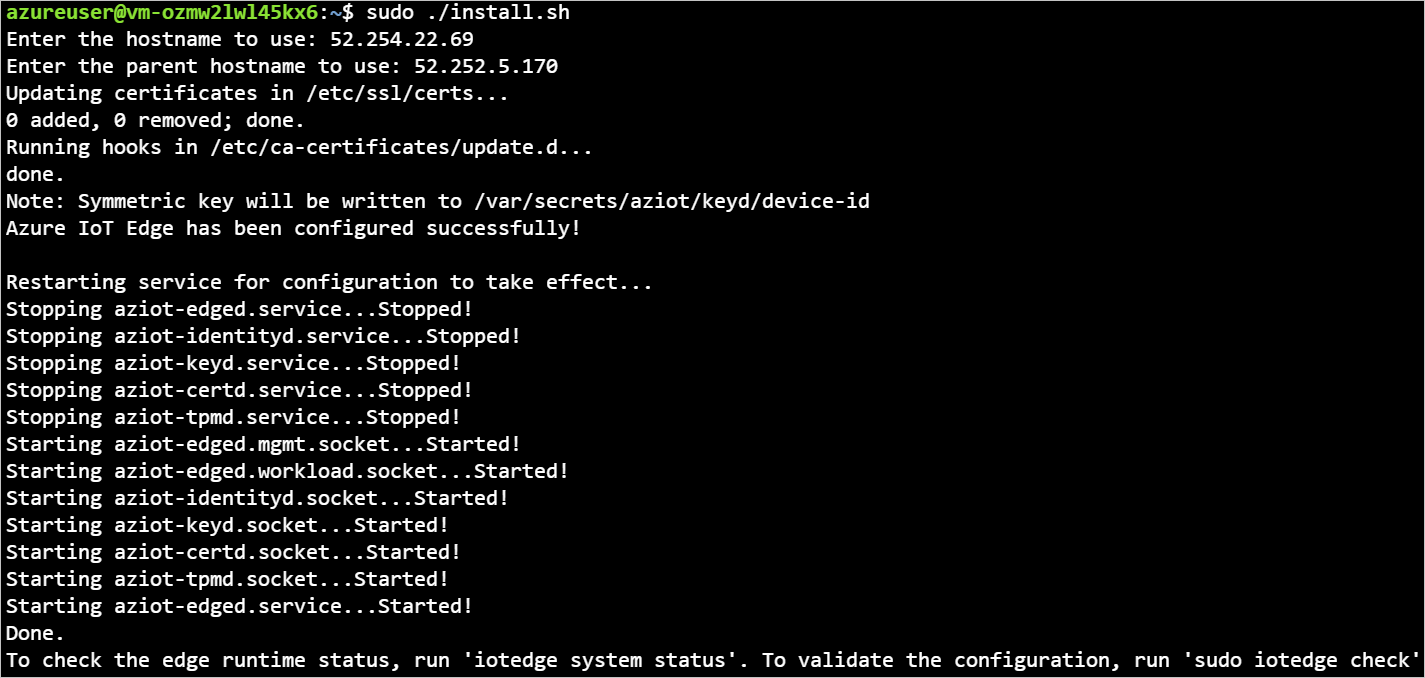
若要查看有关设备配置文件更改的更多详细信息,请参阅 将 Azure IoT Edge 设备连接在一起以创建层次结构。
若要验证设备是否已正确配置,请在设备上运行配置和连接性检查。
sudo iotedge check
admin@child-1-vm:~$ sudo iotedge check

Configuration checks (aziot-identity-service)
---------------------------------------------
√ keyd configuration is well-formed - OK
√ certd configuration is well-formed - OK
√ tpmd configuration is well-formed - OK
√ identityd configuration is well-formed - OK
√ daemon configurations up-to-date with config.toml - OK
√ identityd config toml file specifies a valid hostname - OK
√ host time is close to reference time - OK
√ preloaded certificates are valid - OK
√ keyd is running - OK
√ certd is running - OK
√ identityd is running - OK
√ read all preloaded certificates from the Certificates Service - OK
√ read all preloaded key pairs from the Keys Service - OK
√ check all EST server URLs utilize HTTPS - OK
√ ensure all preloaded certificates match preloaded private keys with the same ID - OK

Connectivity checks (aziot-identity-service)
--------------------------------------------
√ host can connect to and perform TLS handshake with iothub AMQP port - OK
√ host can connect to and perform TLS handshake with iothub HTTPS / WebSockets port - OK
√ host can connect to and perform TLS handshake with iothub MQTT port - OK

Configuration checks
--------------------
√ aziot-edged configuration is well-formed - OK
√ configuration up-to-date with config.toml - OK
√ container engine is installed and functional - OK
√ configuration has correct parent_hostname - OK
√ configuration has correct URIs for daemon mgmt endpoint - OK
√ container time is close to host time - OK
‼ DNS server - Warning
    Container engine is not configured with DNS server setting, which may impact connectivity to IoT Hub.
    Please see https://aka.ms/iotedge-prod-checklist-dns for best practices.
    You can ignore this warning if you are setting DNS server per module in the Edge deployment.
‼ production readiness: logs policy - Warning
    Container engine is not configured to rotate module logs which may cause it run out of disk space.
    Please see https://aka.ms/iotedge-prod-checklist-logs for best practices.
    You can ignore this warning if you are setting log policy per module in the Edge deployment.
‼ production readiness: Edge Agent's storage directory is persisted on the host filesystem - Warning
    The edgeAgent module is not configured to persist its /tmp/edgeAgent directory on the host filesystem.
    Data might be lost if the module is deleted or updated.
    Please see https://aka.ms/iotedge-storage-host for best practices.
‼ production readiness: Edge Hub's storage directory is persisted on the host filesystem - Warning
    The edgeHub module is not configured to persist its /tmp/edgeHub directory on the host filesystem.
    Data might be lost if the module is deleted or updated.
    Please see https://aka.ms/iotedge-storage-host for best practices.
√ Agent image is valid and can be pulled from upstream - OK
√ proxy settings are consistent in aziot-edged, aziot-identityd, moby daemon and config.toml - OK

Connectivity checks
-------------------
√ container on the default network can connect to upstream AMQP port - OK
√ container on the default network can connect to upstream HTTPS / WebSockets port - OK
√ container on the IoT Edge module network can connect to upstream AMQP port - OK
√ container on the IoT Edge module network can connect to upstream HTTPS / WebSockets port - OK
30 check(s) succeeded.
4 check(s) raised warnings. Re-run with --verbose for more details.
2 check(s) were skipped due to errors from other checks. Re-run with --verbose for more details.
在顶层设备上,可以看到包含多个通过检查的输出。 你可能会看到有关日志策略的一些警告,具体取决于网络、DNS 策略。
设备模块部署
在 IoT 中心创建设备时,会将模块部署应用到您的设备。 az iot edge devices create 命令将部署 JSON 文件应用于顶层和下层设备。 部署完成后, 下层设备 使用 IoT Edge API 代理 模块拉取其映像。
除了运行时模块 IoT Edge 代理 和 IoT Edge 中心外, 顶层设备 还获取 Docker 注册表 模块和 IoT Edge API 代理 模块。
Docker 注册表模块指向现有的 Azure 容器注册表。 在本例中,REGISTRY_PROXY_REMOTEURL 指向 Microsoft Container Registry。 默认情况下, Docker 注册表 模块侦听端口 5000。
IoT Edge API 代理模块将 HTTP 请求路由到其他模块,因此较低层设备可以拉取容器映像或将 Blob 推送到存储。 在本教程中,它在端口 443 上进行通信,并配置为将 Docker 容器映像拉取请求发送到端口 5000 上的 Docker 注册表 模块。 Blob 存储上传请求将被发送到 AzureBlobStorageonIoTEdge 模块的 11002 端口。 有关 IoT Edge API 代理模块及其配置方法的详细信息,请参阅模块的操作指南。
若要了解如何在 Azure 门户或 Azure Cloud Shell 中创建如下所示的部署,请参阅 作指南的顶层设备部分。
使用以下命令查看模块的状态:
az iot hub module-twin show --device-id <edge-device-id> --module-id '$edgeAgent' --hub-name <iot-hub-name> --query "properties.reported.[systemModules, modules]"
此命令显示所有 edgeAgent 报告的属性。 监视设备状态的有用属性包括:运行时状态、运行时开始时间、运行时上次退出时间和运行时重启计数。
还可以在 Azure 门户中查看模块的状态。 转到 IoT 中心的 “设备” 部分,查看设备和模块。
查看生成的数据
模拟温度传感器模块生成示例环境数据。 它将发送包含环境温度和湿度、机器温度和压力以及时间戳的消息。
还可以使用 Azure Cloud Shell 查看这些消息:
az iot hub monitor-events -n <iot-hub-name> -d <lower-layer-device-name>
例如:
az iot hub monitor-events -n my-iot-hub -d child-1
{
    "event": {
        "origin": "child-1",
        "module": "simulatedTemperatureSensor",
        "interface": "",
        "component": "",
        "payload": "{\"machine\":{\"temperature\":104.29281270901808,\"pressure\":10.48905461241978},\"ambient\":{\"temperature\":21.086561171611102,\"humidity\":24},\"timeCreated\":\"2023-04-17T21:50:30.1082487Z\"}"
    }
}
疑难解答
iotedge check运行以下命令以验证配置并排查错误。
在嵌套层次结构中运行 iotedge check ,即使下游计算机没有直接 Internet 访问。
从下层运行 iotedge check 时,程序将通过端口 443 从父级拉取映像。
该值 azureiotedge-diagnostics 来自与注册表模块链接的容器注册表。 本教程默认将其设置为 https://mcr.microsoft.com:
| 名称 | 值 |
|---|---|
REGISTRY_PROXY_REMOTEURL |
https://mcr.microsoft.com |
如果使用专用容器注册表,请确保容器注册表中存在所有映像(IoTEdgeAPIProxy、edgeAgent、edgeHub、模拟温度传感器和诊断)。
如果下游设备使用与父设备不同的处理器体系结构,请使用相应的体系结构映像。 使用连接的注册表或为下游设备 config.toml 文件中的 edgeAgent 和 edgeHub 模块指定正确的映像。 例如,如果父设备在 ARM32v7 上运行,并且下游设备在 AMD64 上运行,请在下游设备 config.toml 文件中指定匹配的版本和体系结构映像标记。
[agent.config]
image = "$upstream:443/azureiotedge-agent:1.5.0-linux-amd64"

"systemModules": {
   "edgeAgent": {
      "settings": {
            "image": "$upstream:443/azureiotedge-agent:1.5.0-linux-amd64"
      },
   },
   "edgeHub": {
      "settings": {
            "image": "$upstream:443/azureiotedge-hub:1.5.0-linux-amd64",
      }
   }
}
清理资源
可以删除本文中创建的本地配置和 Azure 资源,以避免收费。
若要删除资源,请执行以下操作:
登录到 Azure 门户,然后选择“资源组”。
选择包含 IoT Edge 测试资源的资源组的名称。
查看包含在资源组中的资源的列表。 若要删除这一切,可以选择“删除资源组”。 如果只需删除部分,可以选择每个资源以单独删除。
Next steps
在本教程中,你已将两个 IoT Edge 设备配置为网关,并设置了一个作为另一个设备的父设备。 然后,你使用 IoT Edge API 代理模块通过网关将容器映像拉取到下游设备上。 要了解详细信息,请参阅代理模块用法操作指南。
要详细了解如何使用网关创建 IoT Edge 设备的层次结构,请参阅以下文章。