你当前正在访问 Microsoft Azure Global Edition 技术文档网站。 如果需要访问由世纪互联运营的 Microsoft Azure 中国技术文档网站,请访问 https://docs.azure.cn。
适用范围:![]() NoSQL
NoSQL
在本教程中,你将在连接到 Azure Cosmos DB for NoSQL 的 Azure Kubernetes 服务 (AKS) 群集上部署引用 ASP.NET Web 应用程序。
Azure Cosmos DB 是一个完全托管的分布式数据库平台,用于使用 NoSQL 或关系数据库进行新式应用程序开发。
AKS 是可用于快速部署和管理群集的托管式 Kubernetes 服务。
重要
- 本文需要 Azure CLI 的最新版本。 有关详细信息,请参阅安装 Azure CLI。 如果你使用的是 Azure Cloud Shell,则表示已安装最新版本。
- 本文还需要 Azure CLI 中最新版本的 Bicep CLI。 有关详细信息,请参阅安装 Bicep 工具。
- 如果在本教程本地运行命令,而不是在 Azure Cloud Shell 中运行命令,请确保使用管理员帐户运行命令。
先决条件
编译 ASP.NET Web 应用程序并创建其容器映像需要以下工具:
概述
本教程使用基础结构即代码 (IaC) 方法将资源部署到 Azure。 你将使用 Bicep,它是一种新的声明性语言,提供与 Azure 资源管理器模板相同的功能。 但是,Bicep 包含更简洁、更易于使用的语法。
Bicep 模块将在目标订阅范围内部署以下 Azure 资源:
- 用于组织资源的资源组
- 用于身份验证的托管标识
- 用于存储容器映像的容器注册表
- AKS 群集
- 用于配置 AKS 的虚拟网络
- Azure Cosmos DB for NoSQL 帐户以及数据库、容器和 SQL 角色
- 用于存储安全密钥的密钥保管库
- (可选)Log Analytics 工作区
本教程使用以下 Azure Cosmos DB 安全性最佳做法:
- 使用基于角色的访问控制 (RBAC) 和托管标识来实现访问控制。 这些功能无需开发人员管理用于保护服务之间通信的机密、凭据、证书和密钥。
- 通过配置虚拟网络服务终结点将 Azure Cosmos DB 访问限制到 AKS 子网。
- 在
disableLocalAuth = true资源中设置databaseAccount以强制 RBAC 作为唯一的身份验证方法。
提示
本教程中的步骤使用 Azure Cosmos DB for NoSQL。 但是,相同概念也适用于 Azure Cosmos DB for MongoDB。
下载 Bicep 模块
从 azure-samples/cosmos-aks-samples GitHub 存储库的 Bicep 文件夹中下载或克隆 Bicep 模块:
git clone https://github.com/Azure-Samples/cosmos-aks-samples.git

cd Bicep/
连接到 Azure 订阅
使用 az sign in 连接到默认 Azure 订阅:
az login
(可选)将 az account set 与特定订阅的名称或 ID 一起使用,以设置活动订阅(如果有多个订阅):
az account set \
  --subscription <subscription-id>
初始化部署参数
使用以下示例中的 JSON 创建 param.json 文件。 将 {resource group name}、{Azure Cosmos DB account name} 和 {Azure Container Registry instance name} 占位符替换为你自己的值。
重要
在以下代码中使用的所有资源名称都应符合 Azure 资源的命名规则和限制。 此外,确保占位符值被一致替换且与 param.json 中的值匹配。
{
  "$schema": "https://schema.management.azure.com/schemas/2019-04-01/deploymentParameters.json#",
  "contentVersion": "1.0.0.0",
  "parameters": {
    "rgName": {
      "value": "{resource group name}"
    },
    "cosmosName" :{
      "value": "{Azure Cosmos DB account name}"
    },
    "acrName" :{
      "value": "{Azure Container Registry instance name}"
    }
  }
}
创建 Bicep 部署
使用以下命令设置 shell 变量。 将 {deployment name} 和 {location} 占位符替换为你自己的值。
deploymentName='{deployment name}'  # Name of the deployment
location='{location}' # Location for deploying the resources
在 Bicep 文件夹中,使用 az deployment sub create 将模板部署到当前订阅范围:
az deployment sub create \
  --name $deploymentName \
  --location $location \
  --template-file main.bicep \
  --parameters @param.json
在部署期间,控制台将输出一条消息,指示部署仍在运行:
/ Running ..
部署可能需要 20 - 30 分钟才能完成。 预配完成后,控制台将输出 JSON,预配状态为 Succeeded:
      }
    ],
    "provisioningState": "Succeeded",
    "templateHash": "0000000000000000",
    "templateLink": null,
    "timestamp": "2022-01-01T00:00:00.000000+00:00",
    "validatedResources": null
  },
  "tags": null,
  "type": "Microsoft.Resources/deployments"
}
还可以在资源组中查看部署状态:

注意
创建 AKS 群集时,会自动创建另一个资源组来存储 AKS 资源。 有关详细信息,请参阅为何使用 AKS 创建两个资源组?。
将 Azure 容器注册表与 AKS 链接在一起
使用以下命令将 Azure 容器注册表实例与 AKS 链接。 将 {Azure Container Registry instance name} 和 {resource group name} 占位符替换为你自己的值。
acrName='{Azure Container Registry instance name}'
rgName='{resource group name}'
aksName=$rgName'aks'
运行 az aks update 以将现有 Azure 容器注册表资源附加到 AKS 群集:
az aks update \
  --resource-group $rgName \
  --name $aksName \
  --attach-acr $acrName
连接到 AKS 群集
若要管理 Kubernetes 群集,请使用 Kubernetes 命令行客户端 kubectl。 如果使用的是 Azure Cloud Shell,则 kubectl 已安装。 若要在本地安装 kubectl,请使用 az aks install-cli:
az aks install-cli
若要配置 kubectl 以连接到 Kubernetes 群集,请使用 az aks get-credentials。 此命令将下载凭据,并将 Kubernetes CLI 配置为使用这些凭据。
az aks get-credentials \
  --resource-group $rgName \
  --name $aksName
将 AKS Pod 连接到 Azure Key Vault
Microsoft Entra Pod 托管标识使用 AKS 基元将 Azure 资源标识托管和 Microsoft Entra ID 中的标识与 Pod 关联到一起。 你将使用这些标识授予对适用于机密存储容器存储接口 (CSI) 驱动程序的 Azure Key Vault 提供程序的访问权限。
使用以下命令查找租户 ID (homeTenantId) 的值:
az account show
使用以下 YAML 模板创建 secretproviderclass.yml 文件。 将 {Tenant Id} 和 {resource group name} 占位符替换为你自己的值。 此外,确保 {resource group name} 的值与 param.json 中的值匹配。
# This is a SecretProviderClass example that uses aad-pod-identity to access the key vault
apiVersion: secrets-store.csi.x-k8s.io/v1
kind: SecretProviderClass
metadata:
  name: azure-kvname-podid
spec:
  provider: azure
  parameters:
    usePodIdentity: "true"
    keyvaultName: "{resource group name}kv"       # Replace resource group name. Bicep generates the key vault name.
    tenantId: "{Tenant Id}"              # The tenant ID of your account. Use the 'homeTenantId' attribute value from  the 'az account show' command output.
将 SecretProviderClass 应用到 AKS 群集
使用 kubectl apply 通过 YAML 安装机密存储 CSI 驱动程序:
kubectl apply \
  --filename secretproviderclass.yml
生成 ASP.NET Web 应用程序
从 azure-samples/cosmos-aks-samples GitHub 存储库的 Application 文件夹中下载或克隆 Web 应用程序源代码:
git clone https://github.com/Azure-Samples/cosmos-aks-samples.git

cd Application/
在 Visual Studio Code 中打开 Application 文件夹。 使用 F5 键或“Debug: Start Debugging”命令运行应用程序。
向 Azure 容器注册表推送 Docker 容器映像
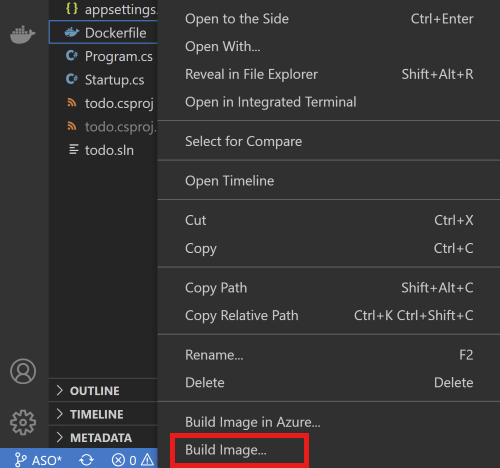
若要从 Visual Studio Code 中的“Explorer”选项卡创建容器映像,请右键单击“Dockerfile”,然后选择“生成映像”。
提示符要求输入用于标记映像的名称和版本时,输入名称 todo:latest。
使用“Docker”窗格将生成的映像推送到 Azure 容器注册表。 你可以在“映像”节点下找到生成的映像。 打开“待办事项”节点,右键单击“最新”,然后选择“推送”。

在提示符中,选择你的 Azure 订阅、Azure 容器注册表资源和映像标记。 映像标记格式应为
{acrname}.azurecr.io/todo:latest。等待 Visual Studio Code 将容器映像推送到 Azure 容器注册表。
准备部署 YAML
使用以下 YAML 模板创建 akstododeploy.yml 文件。 将 {ACR name}、{Image name}、{Version} 和 {resource group name} 占位符替换为你自己的值。
apiVersion: apps/v1
kind: Deployment
metadata:
  name: todo
  labels:
    aadpodidbinding: "cosmostodo-apppodidentity"
    app: todo
spec:
  replicas: 2
  selector:
    matchLabels:
      app: todo
  template:
    metadata:
      labels:
        app: todo
        aadpodidbinding: "cosmostodo-apppodidentity"
    spec:
      containers:
      - name: mycontainer
        image: "{ACR name}/{Image name}:{Version}"   # Update per your environment; for example, myacrname.azurecr.io/todo:latest. Do not add https:// in ACR Name.
        ports:
        - containerPort: 80
        env:
        - name: KeyVaultName
          value: "{resource group name}kv"       # Replace resource group name. Key Vault name is generated by Bicep.
      nodeSelector:
        kubernetes.io/os: linux
      volumes:
        - name: secrets-store01-inline
          csi:
            driver: secrets-store.csi.k8s.io
            readOnly: true
            volumeAttributes:
              secretProviderClass: "azure-kvname-podid"
---

kind: Service
apiVersion: v1
metadata:
  name: todo
spec:
  selector:
    app: todo
    aadpodidbinding: "cosmostodo-apppodidentity"
  type: LoadBalancer
  ports:
  - protocol: TCP
    port: 80
    targetPort: 80
应用部署 YAML
再次使用 kubectl apply 部署应用程序 Pod,并通过负载均衡器公开:
kubectl apply \
  --filename akstododeploy.yml \
  --namespace 'my-app'
测试应用程序
应用程序运行时,Kubernetes 服务将向 Internet 公开应用程序前端。 此过程可能需要几分钟才能完成。
使用 kubectl get 查看负载均衡器公开的外部 IP:
kubectl get services \
  --namespace "my-app"
若要访问应用程序,请在浏览器中打开作为输出接收的 IP 地址。
清理资源
为避免产生 Azure 费用,请在不再需要群集时清理不需要的资源。 使用 az group delete 和 az deployment sub delete 分别删除资源组和订阅部署:
az group delete \
  --resource-group $rgName
  --yes

az deployment sub delete \
  --name $deploymentName