你当前正在访问 Microsoft Azure Global Edition 技术文档网站。 如果需要访问由世纪互联运营的 Microsoft Azure 中国技术文档网站,请访问 https://docs.azure.cn。
了解如何在 Azure 资源管理器模板(ARM 模板)中使用部署脚本。 部署脚本可用于执行 ARM 模板无法执行的自定义步骤。 例如,创建自签名证书。 在本教程中,你将创建一个模板来部署 Azure 密钥保管库,然后使用同一 Microsoft.Resources/deploymentScripts 模板中的资源创建证书,然后将证书添加到密钥保管库。 若要详细了解部署脚本,请参阅 在 ARM 模板中使用部署脚本。
重要
在相同的资源组中创建两个部署脚本资源(存储帐户和容器实例)用于脚本执行和故障排除。 当脚本执行处于终端状态时,脚本服务通常会删除这些资源。 在资源被删除之前,您将为资源持续付费。 若要了解详细信息,请参阅 清理部署脚本资源。
本教程涵盖以下任务:
- 打开快速入门模板
- 编辑模板
- 部署模板
- 调试失败的脚本
- 清理资源
有关涵盖部署脚本的 Learn 模块,请参阅 使用部署脚本扩展 ARM 模板。
先决条件
若要完成本文,需要做好以下准备:
用户分配的托管标识。 此标识用于在脚本中执行特定于 Azure 的操作。 若要创建一个,请参阅 用户分配的托管标识。 部署模板时,需要标识 ID。 标识格式是:
/subscriptions/<SubscriptionID>/resourcegroups/<ResourceGroupName>/providers/Microsoft.ManagedIdentity/userAssignedIdentities/<IdentityID>使用以下 CLI 脚本通过提供资源组名称和标识名称来获取 ID。
echo "Enter the Resource Group name:" &&
read resourceGroupName &&
az identity list -g $resourceGroupName
打开快速入门模板
从 Azure 快速入门模板打开模板,而不是从头开始创建模板。 Azure 快速入门模板是 ARM 模板的存储库。
本快速入门中使用的模板称为 “创建 Azure Key Vault”和“机密”。 该模板创建密钥保管库,然后将机密添加到密钥保管库。
在 Visual Studio Code 中,选择文件>打开文件。
在 文件名中,粘贴以下 URL:
https://raw.githubusercontent.com/Azure/azure-quickstart-templates/master/quickstarts/microsoft.keyvault/key-vault-create/azuredeploy.json选择 “打开 ”以打开该文件。
选择文件>另存为,将文件保存为azuredeploy.json到您的本地计算机。
编辑模板
对模板进行以下更改:
清理模板(可选)
原始模板将机密添加到密钥保管库。 若要简化本教程,请删除以下资源:
Microsoft.KeyVault/vaults/secrets
删除以下两个参数定义:
secretNamesecretValue
如果选择不删除这些定义,则需要在部署期间指定参数值。
配置密钥保管库访问策略
部署脚本将证书添加到密钥保管库。 配置密钥保管库访问策略以授予托管标识的权限:
添加参数以获取托管标识 ID:
"identityId": {
  "type": "string",
  "metadata": {
    "description": "Specifies the ID of the user-assigned managed identity."
  }
},
注释
Visual Studio Code 的资源管理器模板扩展尚无法设置部署脚本的格式。 请勿使用 Shift+Alt+F 设置资源的格式
deploymentScripts,如下所示。添加用于配置密钥保管库访问策略的参数,以便托管标识可以将证书添加到密钥保管库:
"certificatesPermissions": {
  "type": "array",
  "defaultValue": [
    "get",
    "list",
    "update",
    "create"
  ],
  "metadata": {
  "description": "Specifies the permissions to certificates in the vault. Valid values are: all, get, list, update, create, import, delete, recover, backup, restore, manage contacts, manage certificate authorities, get certificate authorities, list certificate authorities, set certificate authorities, delete certificate authorities."
  }
}
将现有密钥保管库访问策略更新为:
"accessPolicies": [
  {
    "objectId": "[parameters('objectId')]",
    "tenantId": "[parameters('tenantId')]",
    "permissions": {
      "keys": "[parameters('keysPermissions')]",
      "secrets": "[parameters('secretsPermissions')]",
      "certificates": "[parameters('certificatesPermissions')]"
    }
  },
  {
    "objectId": "[reference(parameters('identityId'), '2018-11-30').principalId]",
    "tenantId": "[parameters('tenantId')]",
    "permissions": {
      "keys": "[parameters('keysPermissions')]",
      "secrets": "[parameters('secretsPermissions')]",
      "certificates": "[parameters('certificatesPermissions')]"
    }
  }
],
定义了两个策略,一个用于已登录用户,另一个策略用于托管标识。 已登录用户只需要 列表 权限才能验证部署。 为了简化本教程,将相同的证书分配给托管标识和已登录用户。
添加部署脚本
添加部署脚本使用的三个参数:
"certificateName": {
  "type": "string",
  "defaultValue": "DeploymentScripts2019"
},
"subjectName": {
  "type": "string",
  "defaultValue": "CN=contoso.com"
},
"utcValue": {
  "type": "string",
  "defaultValue": "[utcNow()]"
}
添加
deploymentScripts资源:注释
由于内联部署脚本是用双引号括起来的,因此部署脚本内的字符串需要改用单引号括起来。 PowerShell 转义字符是反引号 (
`)。{ "type": "Microsoft.Resources/deploymentScripts", "apiVersion": "2020-10-01", "name": "createAddCertificate", "location": "[resourceGroup().location]", "dependsOn": [ "[resourceId('Microsoft.KeyVault/vaults', parameters('keyVaultName'))]" ], "identity": { "type": "UserAssigned", "userAssignedIdentities": { "[parameters('identityId')]": { } } }, "kind": "AzurePowerShell", "properties": { "forceUpdateTag": "[parameters('utcValue')]", "azPowerShellVersion": "3.0", "timeout": "PT30M", "arguments": "[format(' -vaultName {0} -certificateName {1} -subjectName {2}', parameters('keyVaultName'), parameters('certificateName'), parameters('subjectName'))]", // can pass an argument string, double quotes must be escaped "scriptContent": " param( [string] [Parameter(Mandatory=$true)] $vaultName, [string] [Parameter(Mandatory=$true)] $certificateName, [string] [Parameter(Mandatory=$true)] $subjectName ) $ErrorActionPreference = 'Stop' $DeploymentScriptOutputs = @{} $existingCert = Get-AzKeyVaultCertificate -VaultName $vaultName -Name $certificateName if ($existingCert -and $existingCert.Certificate.Subject -eq $subjectName) { Write-Host 'Certificate $certificateName in vault $vaultName is already present.' $DeploymentScriptOutputs['certThumbprint'] = $existingCert.Thumbprint $existingCert | Out-String } else { $policy = New-AzKeyVaultCertificatePolicy -SubjectName $subjectName -IssuerName Self -ValidityInMonths 12 -Verbose # private key is added as a secret that can be retrieved in the Resource Manager template Add-AzKeyVaultCertificate -VaultName $vaultName -Name $certificateName -CertificatePolicy $policy -Verbose # it takes a few seconds for KeyVault to finish $tries = 0 do { Write-Host 'Waiting for certificate creation completion...' Start-Sleep -Seconds 10 $operation = Get-AzKeyVaultCertificateOperation -VaultName $vaultName -Name $certificateName $tries++ if ($operation.Status -eq 'failed') { throw 'Creating certificate $certificateName in vault $vaultName failed with error $($operation.ErrorMessage)' } if ($tries -gt 120) { throw 'Timed out waiting for creation of certificate $certificateName in vault $vaultName' } } while ($operation.Status -ne 'completed') $newCert = Get-AzKeyVaultCertificate -VaultName $vaultName -Name $certificateName $DeploymentScriptOutputs['certThumbprint'] = $newCert.Thumbprint $newCert | Out-String } ", "cleanupPreference": "OnSuccess", "retentionInterval": "P1D" } }资源
deploymentScripts取决于密钥保管库资源和角色分配资源。 它具有以下属性:-
identity:部署脚本使用用户分配的托管标识在脚本中执行操作。 -
kind:指定脚本的类型。 目前仅支持 PowerShell 脚本。 -
forceUpdateTag:确定是否应执行部署脚本,即使脚本源未更改。 可以是当前时间戳或 GUID。 若要了解详细信息,请参阅 多次运行脚本。 -
azPowerShellVersion:指定要使用的 Azure PowerShell 模块版本。 目前,部署脚本支持版本 2.7.0、2.8.0 和 3.0.0。 -
timeout:指定 ISO 8601 格式中指定的允许的最大脚本执行时间。 默认值为 P1D。 -
arguments:指定参数值。 请以空格分隔这些值。 -
scriptContent:指定脚本内容。 若要运行外部脚本,请改用primaryScriptURI。 有关详细信息,请参阅 “使用外部脚本”。$DeploymentScriptOutputs仅在在本地计算机上测试脚本时才需要声明。 声明变量允许脚本在本地计算机和资源中deploymentScript运行,而无需进行更改。 分配给$DeploymentScriptOutputs的值可用作部署中的输出。 有关详细信息,请参阅 使用 PowerShell 部署脚本的输出 或 使用 CLI 部署脚本的输出。 -
cleanupPreference:指定何时删除部署脚本资源的首选项。 默认值为 Always,这意味着尽管终端状态(成功、失败、已取消),部署脚本资源也会被删除。 在本教程中,使用 OnSuccess ,以便有机会查看脚本执行结果。 -
retentionInterval:指定服务到达终端状态后保留脚本资源的间隔。 当此持续时间到期时,将删除资源。 持续时间基于 ISO 8601 模式。 本教程使用 P1D,这意味着一天。 当cleanupPreference设置为 OnExpiration 时,将使用此属性。 当前未启用此属性。
部署脚本采用三个参数:
keyVaultName和certificateNamesubjectName。 它会创建一个证书,然后将证书添加到密钥保管库。$DeploymentScriptOutputs用于存储输出值。 若要了解详细信息,请参阅 使用 PowerShell 部署脚本的输出 或 使用 CLI 部署脚本的输出。可 在此处找到已完成的模板。
-
若要查看调试过程,请将以下行添加到部署脚本,从而在代码中放置一个错误:
Write-Output1 $keyVaultName正确的命令是
Write-Output,而不是Write-Output1。选择 “文件>保存” 以保存文件。
部署模板
通过选择左上角的 PowerShell 或 Bash (对于 CLI),选择首选环境。 切换时必须重新启动 shell。

选择 “上传/下载文件”,然后选择“ 上传”。 请参阅前面的屏幕截图。 选择在上一个步骤中保存的文件。 上传文件后,可以使用
ls命令和cat命令来验证文件是否已成功上传。运行以下 Azure CLI 或 Azure PowerShell 脚本来部署模板。
echo "Enter a project name that is used to generate resource names:" && read projectName && echo "Enter the location (i.e. centralus):" && read location && echo "Enter your email address used to sign in to Azure:" && read upn && echo "Enter the user-assigned managed identity ID:" && read identityId && adUserId=$((az ad user show --id ${upn}) | jq -r '.id') && resourceGroupName="${projectName}rg" && keyVaultName="${projectName}kv" && az group create --name $resourceGroupName --location $location && az deployment group create --resource-group $resourceGroupName --template-file "$HOME/azuredeploy.json" --parameters identityId=$identityId keyVaultName=$keyVaultName objectId=$adUserId部署脚本服务需要创建用于脚本执行的其他部署脚本资源。 除了实际脚本执行时间外,准备和清理过程最多可能需要一分钟才能完成。
部署失败,因为脚本中使用了无效的命令
Write-Output1。 你将收到一条错误消息,错误内容如下:The term 'Write-Output1' is not recognized as the name of a cmdlet, function, script file, or operable program. Check the spelling of the name, or if a path was included, verify that the path is correct and try again.部署脚本执行结果存储在部署脚本资源中,以便进行故障排除。
调试失败的脚本
登录到 Azure 门户。
打开资源组。 它是项目名称,附加了rg。 资源组中会显示另外两个资源。 这些资源称为 部署脚本资源。
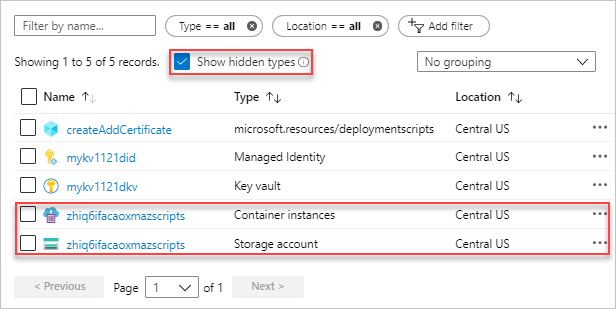
这两个文件都有 azscripts 后缀。 一个是存储帐户,另一个是容器实例。
选择“ 显示隐藏类型 ”以列出
deploymentScripts资源。选择带有 azscripts 后缀的存储帐户。
选择 “文件共享 ”磁贴。 你将看到一个 azscripts 文件夹,其中包含部署脚本执行文件。
选择 azscripts。 你将看到两个文件夹 azscriptinput 和 azscriptoutput。 输入文件夹包含系统 PowerShell 脚本文件和用户部署脚本文件。 输出文件夹包含 executionresult.json 和脚本输出文件。 可以在 executionresult.json中看到错误消息。 输出文件不存在,因为执行失败。
删除该 Write-Output1 行并重新部署模板。
成功运行第二个部署时,脚本服务将删除部署脚本资源,因为该 cleanupPreference 属性设置为 OnSuccess。
清理资源
不再需要 Azure 资源时,通过删除资源组来清理部署的资源。
- 在 Azure 门户中,从左侧菜单中选择 资源组 。
- 在 “按名称筛选 ”字段中输入资源组名称。
- 选择资源组名称。
- 在顶部菜单中选择“删除资源组”。
后续步骤
本教程介绍了如何在 ARM 模板中使用部署脚本。 若要了解如何根据条件部署 Azure 资源,请参阅: