你当前正在访问 Microsoft Azure Global Edition 技术文档网站。 如果需要访问由世纪互联运营的 Microsoft Azure 中国技术文档网站,请访问 https://docs.azure.cn。
gpt-4o-audio-preview 和 gpt-4o-mini-audio-preview 模型将音频模态引入了现有的 /chat/completions API。 音频模型扩展了文本和基于语音的交互和音频分析中的 AI 应用程序的潜力。
gpt-4o-audio-preview 和 gpt-4o-mini-audio-preview 模型中支持的模态包括:文本、音频、文本 + 音频。
下面是一个包含示例用例的受支持模态表:
| 模态输入 | 模态输出 | 示例用例 |
|---|---|---|
| 文本 | 文本 + 音频 | 文本转语音,有声书生成 |
| 音频 | 文本 + 音频 | 音频听录,音频书籍生成 |
| 音频 | 文本 | 音频听录 |
| 文本 + 音频 | 文本 + 音频 | 有声书生成 |
| 文本 + 音频 | 文本 | 音频听录 |
通过使用音频生成功能,可以实现更动态和交互式的 AI 应用程序。 支持音频输入和输出的模型让你能够生成对提示的语音音频响应,并使用音频输入来提示模型。
支持的模型
目前只有 gpt-4o-audio-preview 和 gpt-4o-mini-audio-preview 版本:2024-12-17 支持音频生成。
有关区域可用性的详细信息,请参阅模型和版本文档。
目前,以下语音支持音频输出:Alloy、Echo、Shimmer。
音频文件大小上限为 20 MB。
注释
实时 API 使用与补全 API 相同的基础 GPT-4o 音频模型,但针对低延迟、实时音频交互进行了优化。
API 支持
对音频补全的支持是在 API 版本 2025-01-01-preview 中首次添加的。
部署用于生成音频的模型
若要在 Azure AI Foundry 门户中部署 gpt-4o-mini-audio-preview 模型,请执行以下操作:
- 转到 Azure AI Foundry 门户 ,创建或选择项目。
- 从左窗格中的“我的资产”下选择“模型 + 终结点”。
- 选择 “+ 部署模型>部署基本模型 ”以打开部署窗口。
- 搜索并选择
gpt-4o-mini-audio-preview模型,然后选择“确认”。 - 查看部署详细信息,然后选择“ 部署”。
- 按照向导完成部署模型的步骤。
现在,你已有 gpt-4o-mini-audio-preview 模型的部署,可以在 Azure AI Foundry 门户的 聊天 体验区或聊天补全 API 中与之交互。
使用 GPT-4o 音频生成
若要在 gpt-4o-mini-audio-preview的“聊天”操场中与已部署的 模型聊天,请执行以下步骤:
转到 Azure AI Foundry 门户,选择具有已部署模型的项目。
转到 Azure AI Foundry 中的项目。
从左窗格中选择“游乐场地”。
选择 音频场>试用聊天场。
注释
音频游乐场不支持
gpt-4o-mini-audio-preview模型。 使用本节中所述的 聊天场 。从
gpt-4o-mini-audio-preview下拉列表中选择已部署的模型。开始与模型聊天并收听音频响应。
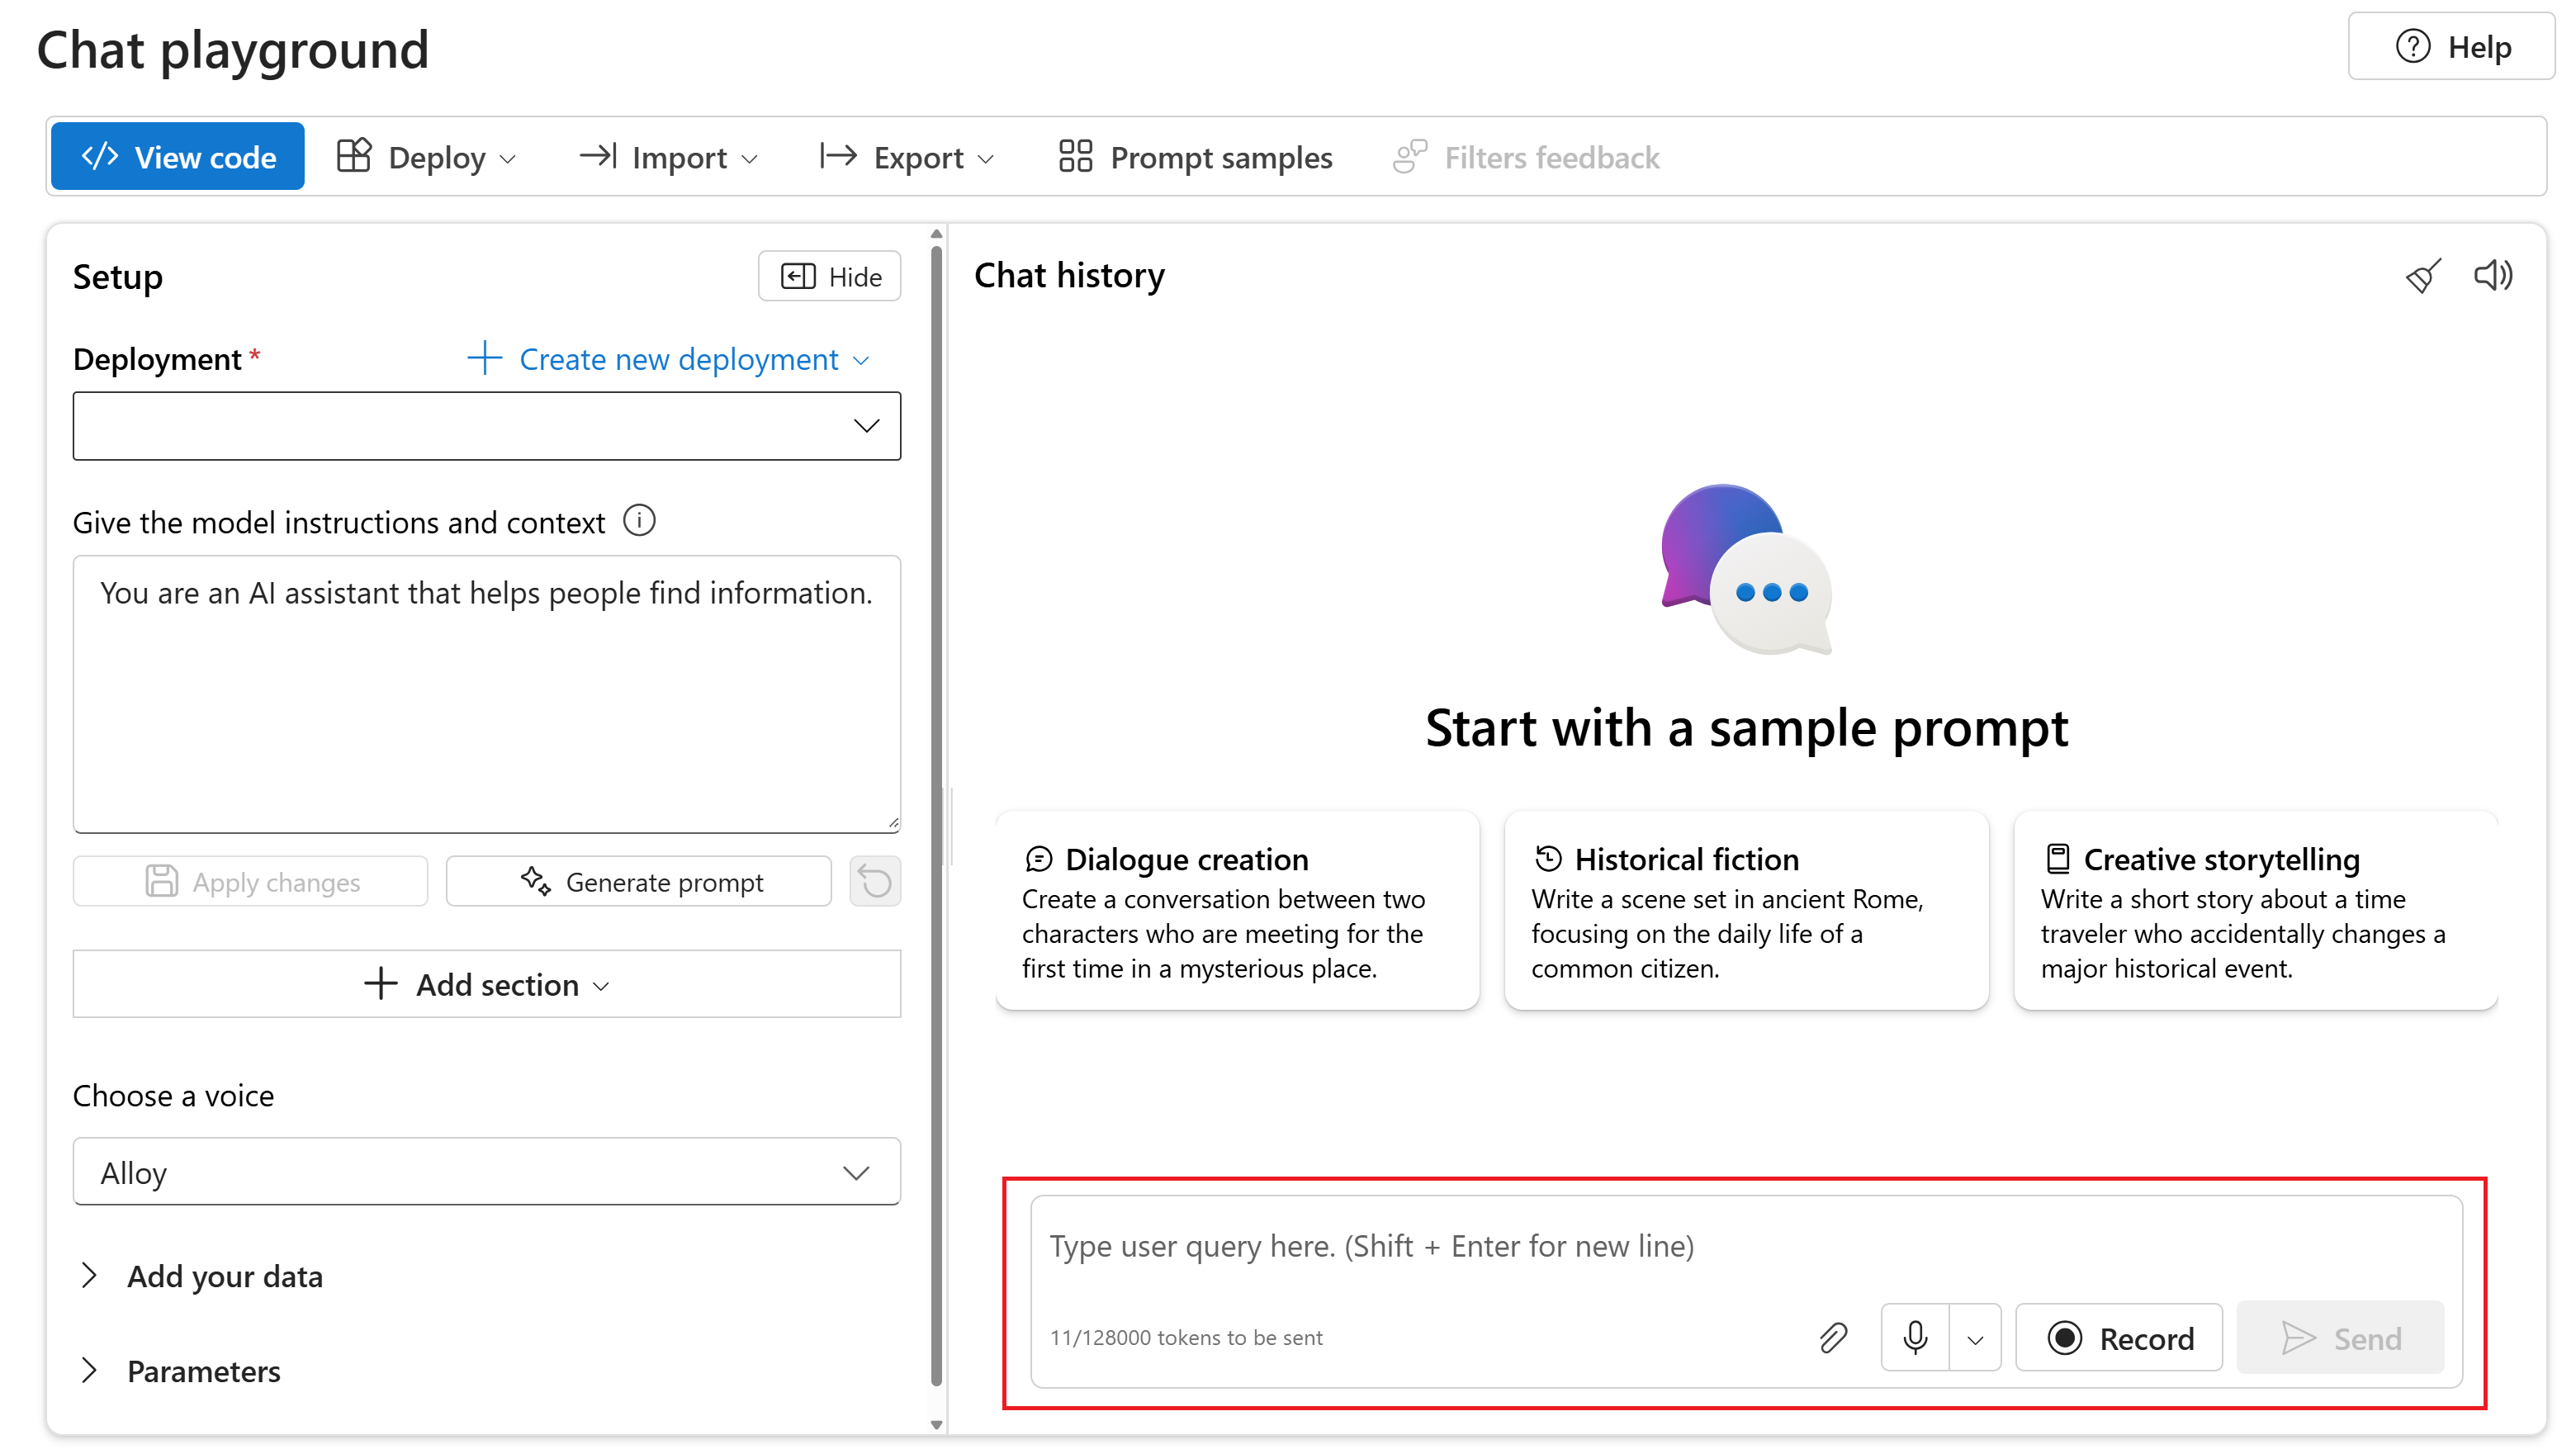
您可以:
- 录制音频提示。
- 将音频文件附加到聊天。
- 输入文本提示。

gpt-4o-audio-preview 和 gpt-4o-mini-audio-preview 模型将音频模态引入了现有的 /chat/completions API。 音频模型扩展了文本和基于语音的交互和音频分析中的 AI 应用程序的潜力。
gpt-4o-audio-preview 和 gpt-4o-mini-audio-preview 模型中支持的模态包括:文本、音频、文本 + 音频。
下面是一个包含示例用例的受支持模态表:
| 模态输入 | 模态输出 | 示例用例 |
|---|---|---|
| 文本 | 文本 + 音频 | 文本转语音,有声书生成 |
| 音频 | 文本 + 音频 | 音频听录,音频书籍生成 |
| 音频 | 文本 | 音频听录 |
| 文本 + 音频 | 文本 + 音频 | 有声书生成 |
| 文本 + 音频 | 文本 | 音频听录 |
通过使用音频生成功能,可以实现更动态和交互式的 AI 应用程序。 支持音频输入和输出的模型让你能够生成对提示的语音音频响应,并使用音频输入来提示模型。
支持的模型
目前只有 gpt-4o-audio-preview 和 gpt-4o-mini-audio-preview 版本:2024-12-17 支持音频生成。
有关区域可用性的详细信息,请参阅模型和版本文档。
目前,以下语音支持音频输出:Alloy、Echo、Shimmer。
音频文件大小上限为 20 MB。
注释
实时 API 使用与补全 API 相同的基础 GPT-4o 音频模型,但针对低延迟、实时音频交互进行了优化。
API 支持
对音频补全的支持是在 API 版本 2025-01-01-preview 中首次添加的。
先决条件
- Azure 订阅 - 免费创建订阅
- Node.js LTS 或 ESM 支持。
- 在受支持的区域之一中创建的 Azure OpenAI 资源。 有关区域可用性的详细信息,请参阅模型和版本文档。
- 然后,你需要使用 Azure OpenAI 资源部署
gpt-4o-mini-audio-preview模型。 有关详细信息,请参阅使用 Azure OpenAI 创建资源和部署模型。
Microsoft Entra ID 先决条件
若要使用 Microsoft Entra ID 进行推荐的无密钥身份验证,你需要:
- 安装使用 Microsoft Entra ID 进行无密钥身份验证所需的 Azure CLI。
- 将
Cognitive Services User角色分配给用户帐户。 你可以在 Azure 门户的“访问控制(IAM)”“添加角色分配”下分配角色。>
设置
创建新文件夹
audio-completions-quickstart,并使用以下命令转到快速入门文件夹:mkdir audio-completions-quickstart && cd audio-completions-quickstart使用以下命令创建
package.json:npm init -y使用以下命令安装适用于 JavaScript 的 OpenAI 客户端库:
npm install openai若要使用 Microsoft Entra ID 进行推荐的无密钥身份验证,请使用以下命令安装 包:
@azure/identitynpm install @azure/identity
检索资源信息
需要检索以下信息才能使用 Azure OpenAI 资源对应用程序进行身份验证:
| 变量名称 | 价值 |
|---|---|
AZURE_OPENAI_ENDPOINT |
从 Azure 门户检查资源时,可在“密钥和终结点”部分中找到此值。 |
AZURE_OPENAI_DEPLOYMENT_NAME |
此值将对应于在部署模型时为部署选择的自定义名称。 Azure 门户中的“资源管理”“模型部署”下提供了此值。> |
OPENAI_API_VERSION |
详细了解 API 版本。 可以在代码中更改版本或使用环境变量。 |
谨慎
若要对 SDK 使用推荐的无密钥身份验证,请确保未设置 AZURE_OPENAI_API_KEY 环境变量。
通过文本输入生成音频
使用以下代码创建
to-audio.js文件:require("dotenv").config(); const { AzureOpenAI } = require("openai"); const { DefaultAzureCredential, getBearerTokenProvider } = require("@azure/identity"); const { writeFileSync } = require("node:fs"); // Keyless authentication const credential = new DefaultAzureCredential(); const scope = "https://cognitiveservices.azure.com/.default"; const azureADTokenProvider = getBearerTokenProvider(credential, scope); // Set environment variables or edit the corresponding values here. const endpoint = process.env.AZURE_OPENAI_ENDPOINT || "AZURE_OPENAI_ENDPOINT"; const deployment = process.env.AZURE_OPENAI_DEPLOYMENT_NAME || "gpt-4o-mini-audio-preview"; const apiVersion = process.env.OPENAI_API_VERSION || "2025-01-01-preview"; const client = new AzureOpenAI({ endpoint, azureADTokenProvider, apiVersion, deployment }); async function main() { // Make the audio chat completions request const response = await client.chat.completions.create({ model: "gpt-4o-mini-audio-preview", modalities: ["text", "audio"], audio: { voice: "alloy", format: "wav" }, messages: [ { role: "user", content: "Is a golden retriever a good family dog?" } ] }); // Inspect returned data console.log(response.choices[0]); // Write the output audio data to a file writeFileSync( "dog.wav", Buffer.from(response.choices[0].message.audio.data, 'base64'), { encoding: "utf-8" } ); } main().catch((err) => { console.error("Error occurred:", err); }); module.exports = { main };使用以下命令登录到 Azure:
az login运行 JavaScript 文件。
node to-audio.js
片刻之后即可获得响应。
通过文本输入生成音频的输出
该脚本会在脚本所在的同一目录中生成名为 dog.wav 的音频文件。 该音频文件包含对提示“金毛寻回犬是好的家犬吗?”的语音响应
通过音频输入生成音频和文本
使用以下代码创建
from-audio.js文件:require("dotenv").config(); const { AzureOpenAI } = require("openai"); const { DefaultAzureCredential, getBearerTokenProvider } = require("@azure/identity"); const fs = require('fs').promises; const { writeFileSync } = require("node:fs"); // Keyless authentication const credential = new DefaultAzureCredential(); const scope = "https://cognitiveservices.azure.com/.default"; const azureADTokenProvider = getBearerTokenProvider(credential, scope); // Set environment variables or edit the corresponding values here. const endpoint = process.env.AZURE_OPENAI_ENDPOINT || "AZURE_OPENAI_ENDPOINT"; const apiVersion = "2025-01-01-preview"; const deployment = "gpt-4o-mini-audio-preview"; const client = new AzureOpenAI({ endpoint, azureADTokenProvider, apiVersion, deployment }); async function main() { // Buffer the audio for input to the chat completion const wavBuffer = await fs.readFile("dog.wav"); const base64str = Buffer.from(wavBuffer).toString("base64"); // Make the audio chat completions request const response = await client.chat.completions.create({ model: "gpt-4o-mini-audio-preview", modalities: ["text", "audio"], audio: { voice: "alloy", format: "wav" }, messages: [ { role: "user", content: [ { type: "text", text: "Describe in detail the spoken audio input." }, { type: "input_audio", input_audio: { data: base64str, format: "wav" } } ] } ] }); console.log(response.choices[0]); // Write the output audio data to a file writeFileSync( "analysis.wav", Buffer.from(response.choices[0].message.audio.data, 'base64'), { encoding: "utf-8" } ); } main().catch((err) => { console.error("Error occurred:", err); }); module.exports = { main };使用以下命令登录到 Azure:
az login运行 JavaScript 文件。
node from-audio.js
片刻之后即可获得响应。
通过音频输入生成音频和文本的输出
该脚本会生成语音音频输入的总结文本。 它还会在脚本所在的同一目录中生成名为 analysis.wav 的音频文件。 该音频文件包含对提示的语音响应。
生成音频并使用多轮聊天补全
使用以下代码创建
multi-turn.js文件:require("dotenv").config(); const { AzureOpenAI } = require("openai"); const { DefaultAzureCredential, getBearerTokenProvider } = require("@azure/identity"); const fs = require('fs').promises; // Keyless authentication const credential = new DefaultAzureCredential(); const scope = "https://cognitiveservices.azure.com/.default"; const azureADTokenProvider = getBearerTokenProvider(credential, scope); // Set environment variables or edit the corresponding values here. const endpoint = process.env.AZURE_OPENAI_ENDPOINT || "AZURE_OPENAI_ENDPOINT"; const apiVersion = "2025-01-01-preview"; const deployment = "gpt-4o-mini-audio-preview"; const client = new AzureOpenAI({ endpoint, azureADTokenProvider, apiVersion, deployment }); async function main() { // Buffer the audio for input to the chat completion const wavBuffer = await fs.readFile("dog.wav"); const base64str = Buffer.from(wavBuffer).toString("base64"); // Initialize messages with the first turn's user input const messages = [ { role: "user", content: [ { type: "text", text: "Describe in detail the spoken audio input." }, { type: "input_audio", input_audio: { data: base64str, format: "wav" } } ] } ]; // Get the first turn's response const response = await client.chat.completions.create({ model: "gpt-4o-mini-audio-preview", modalities: ["text", "audio"], audio: { voice: "alloy", format: "wav" }, messages: messages }); console.log(response.choices[0]); // Add a history message referencing the previous turn's audio by ID messages.push({ role: "assistant", audio: { id: response.choices[0].message.audio.id } }); // Add a new user message for the second turn messages.push({ role: "user", content: [ { type: "text", text: "Very concisely summarize the favorability." } ] }); // Send the follow-up request with the accumulated messages const followResponse = await client.chat.completions.create({ model: "gpt-4o-mini-audio-preview", messages: messages }); console.log(followResponse.choices[0].message.content); } main().catch((err) => { console.error("Error occurred:", err); }); module.exports = { main };使用以下命令登录到 Azure:
az login运行 JavaScript 文件。
node multi-turn.js
片刻之后即可获得响应。
多轮聊天补全的输出
该脚本会生成语音音频输入的总结文本。 然后,它会进行多轮聊天补全,以简要总结语音音频输入。
gpt-4o-audio-preview 和 gpt-4o-mini-audio-preview 模型将音频模态引入了现有的 /chat/completions API。 音频模型扩展了文本和基于语音的交互和音频分析中的 AI 应用程序的潜力。
gpt-4o-audio-preview 和 gpt-4o-mini-audio-preview 模型中支持的模态包括:文本、音频、文本 + 音频。
下面是一个包含示例用例的受支持模态表:
| 模态输入 | 模态输出 | 示例用例 |
|---|---|---|
| 文本 | 文本 + 音频 | 文本转语音,有声书生成 |
| 音频 | 文本 + 音频 | 音频听录,音频书籍生成 |
| 音频 | 文本 | 音频听录 |
| 文本 + 音频 | 文本 + 音频 | 有声书生成 |
| 文本 + 音频 | 文本 | 音频听录 |
通过使用音频生成功能,可以实现更动态和交互式的 AI 应用程序。 支持音频输入和输出的模型让你能够生成对提示的语音音频响应,并使用音频输入来提示模型。
支持的模型
目前只有 gpt-4o-audio-preview 和 gpt-4o-mini-audio-preview 版本:2024-12-17 支持音频生成。
有关区域可用性的详细信息,请参阅模型和版本文档。
目前,以下语音支持音频输出:Alloy、Echo、Shimmer。
音频文件大小上限为 20 MB。
注释
实时 API 使用与补全 API 相同的基础 GPT-4o 音频模型,但针对低延迟、实时音频交互进行了优化。
API 支持
对音频补全的支持是在 API 版本 2025-01-01-preview 中首次添加的。
使用本指南通过适用于 Python 的 Azure OpenAI SDK 开始生成语音。
先决条件
- 一份 Azure 订阅。 免费创建一个。
- Python 3.8 或更高版本。 建议使用 Python 3.10 或更高版本,但至少需要 Python 3.8。 如果未安装合适的 Python 版本,则可以按照 VS Code Python 教程中的说明操作,这是在操作系统上安装 Python 的最简单方法。
- 在受支持的区域之一中创建的 Azure OpenAI 资源。 有关区域可用性的详细信息,请参阅模型和版本文档。
- 然后,你需要使用 Azure OpenAI 资源部署
gpt-4o-mini-audio-preview模型。 有关详细信息,请参阅使用 Azure OpenAI 创建资源和部署模型。
Microsoft Entra ID 先决条件
若要使用 Microsoft Entra ID 进行推荐的无密钥身份验证,你需要:
- 安装使用 Microsoft Entra ID 进行无密钥身份验证所需的 Azure CLI。
- 将
Cognitive Services User角色分配给用户帐户。 你可以在 Azure 门户的“访问控制(IAM)”“添加角色分配”下分配角色。>
设置
创建新文件夹
audio-completions-quickstart,并使用以下命令转到快速入门文件夹:mkdir audio-completions-quickstart && cd audio-completions-quickstart创建虚拟环境。 如果已安装 Python 3.10 或更高版本,则可以使用以下命令创建虚拟环境:
py -3 -m venv .venv .venv\scripts\activate激活 Python 环境意味着当通过命令行运行
python或pip时,你将使用应用程序的.venv文件夹中包含的 Python 解释器。 可以使用deactivate命令退出 python 虚拟环境,并在需要时重新激活它。小窍门
建议你创建并激活一个新的 Python 环境,用于安装本教程所需的包。 请勿将包安装到你的全局 Python 安装中。 安装 Python 包时,请务必使用虚拟或 Conda 环境,否则可能会中断 Python 的全局安装。
使用以下命令安装适用于 Python 的 OpenAI 客户端库:
pip install openai若要使用 Microsoft Entra ID 进行推荐的无密钥身份验证,请使用以下命令安装 包:
azure-identitypip install azure-identity
检索资源信息
需要检索以下信息才能使用 Azure OpenAI 资源对应用程序进行身份验证:
| 变量名称 | 价值 |
|---|---|
AZURE_OPENAI_ENDPOINT |
从 Azure 门户检查资源时,可在“密钥和终结点”部分中找到此值。 |
AZURE_OPENAI_DEPLOYMENT_NAME |
此值将对应于在部署模型时为部署选择的自定义名称。 Azure 门户中的“资源管理”“模型部署”下提供了此值。> |
OPENAI_API_VERSION |
详细了解 API 版本。 可以在代码中更改版本或使用环境变量。 |
通过文本输入生成音频
使用以下代码创建
to-audio.py文件:import requests import base64 import os from openai import AzureOpenAI from azure.identity import DefaultAzureCredential, get_bearer_token_provider token_provider=get_bearer_token_provider(DefaultAzureCredential(), "https://cognitiveservices.azure.com/.default") # Set environment variables or edit the corresponding values here. endpoint = os.environ['AZURE_OPENAI_ENDPOINT'] # Keyless authentication client=AzureOpenAI( azure_ad_token_provider=token_provider, azure_endpoint=endpoint, api_version="2025-01-01-preview" ) # Make the audio chat completions request completion=client.chat.completions.create( model="gpt-4o-mini-audio-preview", modalities=["text", "audio"], audio={"voice": "alloy", "format": "wav"}, messages=[ { "role": "user", "content": "Is a golden retriever a good family dog?" } ] ) print(completion.choices[0]) # Write the output audio data to a file wav_bytes=base64.b64decode(completion.choices[0].message.audio.data) with open("dog.wav", "wb") as f: f.write(wav_bytes)运行该 Python 文件。
python to-audio.py
片刻之后即可获得响应。
通过文本输入生成音频的输出
该脚本会在脚本所在的同一目录中生成名为 dog.wav 的音频文件。 该音频文件包含对提示“金毛寻回犬是好的家犬吗?”的语音响应
通过音频输入生成音频和文本
使用以下代码创建
from-audio.py文件:import base64 import os from openai import AzureOpenAI from azure.identity import DefaultAzureCredential, get_bearer_token_provider token_provider=get_bearer_token_provider(DefaultAzureCredential(), "https://cognitiveservices.azure.com/.default") # Set environment variables or edit the corresponding values here. endpoint = os.environ['AZURE_OPENAI_ENDPOINT'] # Keyless authentication client=AzureOpenAI( azure_ad_token_provider=token_provider, azure_endpoint=endpoint, api_version="2025-01-01-preview" ) # Read and encode audio file with open('dog.wav', 'rb') as wav_reader: encoded_string = base64.b64encode(wav_reader.read()).decode('utf-8') # Make the audio chat completions request completion = client.chat.completions.create( model="gpt-4o-mini-audio-preview", modalities=["text", "audio"], audio={"voice": "alloy", "format": "wav"}, messages=[ { "role": "user", "content": [ { "type": "text", "text": "Describe in detail the spoken audio input." }, { "type": "input_audio", "input_audio": { "data": encoded_string, "format": "wav" } } ] }, ] ) print(completion.choices[0].message.audio.transcript) # Write the output audio data to a file wav_bytes = base64.b64decode(completion.choices[0].message.audio.data) with open("analysis.wav", "wb") as f: f.write(wav_bytes)运行该 Python 文件。
python from-audio.py
片刻之后即可获得响应。
通过音频输入生成音频和文本的输出
该脚本会生成语音音频输入的总结文本。 它还会在脚本所在的同一目录中生成名为 analysis.wav 的音频文件。 该音频文件包含对提示的语音响应。
生成音频并使用多轮聊天补全
使用以下代码创建
multi-turn.py文件:import base64 import os from openai import AzureOpenAI from azure.identity import DefaultAzureCredential, get_bearer_token_provider token_provider=get_bearer_token_provider(DefaultAzureCredential(), "https://cognitiveservices.azure.com/.default") # Set environment variables or edit the corresponding values here. endpoint = os.environ['AZURE_OPENAI_ENDPOINT'] # Keyless authentication client=AzureOpenAI( azure_ad_token_provider=token_provider, azure_endpoint=endpoint, api_version="2025-01-01-preview" ) # Read and encode audio file with open('dog.wav', 'rb') as wav_reader: encoded_string = base64.b64encode(wav_reader.read()).decode('utf-8') # Initialize messages with the first turn's user input messages = [ { "role": "user", "content": [ { "type": "text", "text": "Describe in detail the spoken audio input." }, { "type": "input_audio", "input_audio": { "data": encoded_string, "format": "wav" } } ] }] # Get the first turn's response completion = client.chat.completions.create( model="gpt-4o-mini-audio-preview", modalities=["text", "audio"], audio={"voice": "alloy", "format": "wav"}, messages=messages ) print("Get the first turn's response:") print(completion.choices[0].message.audio.transcript) print("Add a history message referencing the first turn's audio by ID:") print(completion.choices[0].message.audio.id) # Add a history message referencing the first turn's audio by ID messages.append({ "role": "assistant", "audio": { "id": completion.choices[0].message.audio.id } }) # Add the next turn's user message messages.append({ "role": "user", "content": "Very briefly, summarize the favorability." }) # Send the follow-up request with the accumulated messages completion = client.chat.completions.create( model="gpt-4o-mini-audio-preview", messages=messages ) print("Very briefly, summarize the favorability.") print(completion.choices[0].message.content)运行该 Python 文件。
python multi-turn.py
片刻之后即可获得响应。
多轮聊天补全的输出
该脚本会生成语音音频输入的总结文本。 然后,它会进行多轮聊天补全,以简要总结语音音频输入。
gpt-4o-audio-preview 和 gpt-4o-mini-audio-preview 模型将音频模态引入了现有的 /chat/completions API。 音频模型扩展了文本和基于语音的交互和音频分析中的 AI 应用程序的潜力。
gpt-4o-audio-preview 和 gpt-4o-mini-audio-preview 模型中支持的模态包括:文本、音频、文本 + 音频。
下面是一个包含示例用例的受支持模态表:
| 模态输入 | 模态输出 | 示例用例 |
|---|---|---|
| 文本 | 文本 + 音频 | 文本转语音,有声书生成 |
| 音频 | 文本 + 音频 | 音频听录,音频书籍生成 |
| 音频 | 文本 | 音频听录 |
| 文本 + 音频 | 文本 + 音频 | 有声书生成 |
| 文本 + 音频 | 文本 | 音频听录 |
通过使用音频生成功能,可以实现更动态和交互式的 AI 应用程序。 支持音频输入和输出的模型让你能够生成对提示的语音音频响应,并使用音频输入来提示模型。
支持的模型
目前只有 gpt-4o-audio-preview 和 gpt-4o-mini-audio-preview 版本:2024-12-17 支持音频生成。
有关区域可用性的详细信息,请参阅模型和版本文档。
目前,以下语音支持音频输出:Alloy、Echo、Shimmer。
音频文件大小上限为 20 MB。
注释
实时 API 使用与补全 API 相同的基础 GPT-4o 音频模型,但针对低延迟、实时音频交互进行了优化。
API 支持
对音频补全的支持是在 API 版本 2025-01-01-preview 中首次添加的。
先决条件
- 一份 Azure 订阅。 免费创建一个。
- Python 3.8 或更高版本。 建议使用 Python 3.10 或更高版本,但至少需要 Python 3.8。 如果未安装合适的 Python 版本,则可以按照 VS Code Python 教程中的说明操作,这是在操作系统上安装 Python 的最简单方法。
- 在受支持的区域之一中创建的 Azure OpenAI 资源。 有关区域可用性的详细信息,请参阅模型和版本文档。
- 然后,你需要使用 Azure OpenAI 资源部署
gpt-4o-mini-audio-preview模型。 有关详细信息,请参阅使用 Azure OpenAI 创建资源和部署模型。
Microsoft Entra ID 先决条件
若要使用 Microsoft Entra ID 进行推荐的无密钥身份验证,你需要:
- 安装使用 Microsoft Entra ID 进行无密钥身份验证所需的 Azure CLI。
- 将
Cognitive Services User角色分配给用户帐户。 你可以在 Azure 门户的“访问控制(IAM)”“添加角色分配”下分配角色。>
设置
创建新文件夹
audio-completions-quickstart,并使用以下命令转到快速入门文件夹:mkdir audio-completions-quickstart && cd audio-completions-quickstart创建虚拟环境。 如果已安装 Python 3.10 或更高版本,则可以使用以下命令创建虚拟环境:
py -3 -m venv .venv .venv\scripts\activate激活 Python 环境意味着当通过命令行运行
python或pip时,你将使用应用程序的.venv文件夹中包含的 Python 解释器。 可以使用deactivate命令退出 python 虚拟环境,并在需要时重新激活它。小窍门
建议你创建并激活一个新的 Python 环境,用于安装本教程所需的包。 请勿将包安装到你的全局 Python 安装中。 安装 Python 包时,请务必使用虚拟或 Conda 环境,否则可能会中断 Python 的全局安装。
使用以下命令安装适用于 Python 的 OpenAI 客户端库:
pip install openai若要使用 Microsoft Entra ID 进行推荐的无密钥身份验证,请使用以下命令安装 包:
azure-identitypip install azure-identity
检索资源信息
需要检索以下信息才能使用 Azure OpenAI 资源对应用程序进行身份验证:
| 变量名称 | 价值 |
|---|---|
AZURE_OPENAI_ENDPOINT |
从 Azure 门户检查资源时,可在“密钥和终结点”部分中找到此值。 |
AZURE_OPENAI_DEPLOYMENT_NAME |
此值将对应于在部署模型时为部署选择的自定义名称。 Azure 门户中的“资源管理”“模型部署”下提供了此值。> |
OPENAI_API_VERSION |
详细了解 API 版本。 可以在代码中更改版本或使用环境变量。 |
通过文本输入生成音频
使用以下代码创建
to-audio.py文件:import requests import base64 import os from openai import AzureOpenAI from azure.identity import DefaultAzureCredential # Set environment variables or edit the corresponding values here. endpoint = os.environ['AZURE_OPENAI_ENDPOINT'] # Keyless authentication credential = DefaultAzureCredential() token = credential.get_token("https://cognitiveservices.azure.com/.default") api_version = '2025-01-01-preview' url = f"{endpoint}/openai/deployments/gpt-4o-mini-audio-preview/chat/completions?api-version={api_version}" headers= { "Authorization": f"Bearer {token.token}", "Content-Type": "application/json" } body = { "modalities": ["audio", "text"], "model": "gpt-4o-mini-audio-preview", "audio": { "format": "wav", "voice": "alloy" }, "messages": [ { "role": "user", "content": [ { "type": "text", "text": "Is a golden retriever a good family dog?" } ] } ] } # Make the audio chat completions request completion = requests.post(url, headers=headers, json=body) audio_data = completion.json()['choices'][0]['message']['audio']['data'] # Write the output audio data to a file wav_bytes = base64.b64decode(audio_data) with open("dog.wav", "wb") as f: f.write(wav_bytes)运行该 Python 文件。
python to-audio.py
片刻之后即可获得响应。
通过文本输入生成音频的输出
该脚本会在脚本所在的同一目录中生成名为 dog.wav 的音频文件。 该音频文件包含对提示“金毛寻回犬是好的家犬吗?”的语音响应
通过音频输入生成音频和文本
使用以下代码创建
from-audio.py文件:import requests import base64 import os from azure.identity import DefaultAzureCredential # Set environment variables or edit the corresponding values here. endpoint = os.environ['AZURE_OPENAI_ENDPOINT'] # Keyless authentication credential = DefaultAzureCredential() token = credential.get_token("https://cognitiveservices.azure.com/.default") # Read and encode audio file with open('dog.wav', 'rb') as wav_reader: encoded_string = base64.b64encode(wav_reader.read()).decode('utf-8') api_version = '2025-01-01-preview' url = f"{endpoint}/openai/deployments/gpt-4o-mini-audio-preview/chat/completions?api-version={api_version}" headers= { "Authorization": f"Bearer {token.token}", "Content-Type": "application/json" } body = { "modalities": ["audio", "text"], "model": "gpt-4o-mini-audio-preview", "audio": { "format": "wav", "voice": "alloy" }, "messages": [ { "role": "user", "content": [ { "type": "text", "text": "Describe in detail the spoken audio input." }, { "type": "input_audio", "input_audio": { "data": encoded_string, "format": "wav" } } ] }, ] } completion = requests.post(url, headers=headers, json=body) print(completion.json()['choices'][0]['message']['audio']['transcript']) # Write the output audio data to a file audio_data = completion.json()['choices'][0]['message']['audio']['data'] wav_bytes = base64.b64decode(audio_data) with open("analysis.wav", "wb") as f: f.write(wav_bytes)运行该 Python 文件。
python from-audio.py
片刻之后即可获得响应。
通过音频输入生成音频和文本的输出
该脚本会生成语音音频输入的总结文本。 它还会在脚本所在的同一目录中生成名为 analysis.wav 的音频文件。 该音频文件包含对提示的语音响应。
生成音频并使用多轮聊天补全
使用以下代码创建
multi-turn.py文件:import requests import base64 import os from openai import AzureOpenAI from azure.identity import DefaultAzureCredential # Set environment variables or edit the corresponding values here. endpoint = os.environ['AZURE_OPENAI_ENDPOINT'] # Keyless authentication credential = DefaultAzureCredential() token = credential.get_token("https://cognitiveservices.azure.com/.default") api_version = '2025-01-01-preview' url = f"{endpoint}/openai/deployments/gpt-4o-mini-audio-preview/chat/completions?api-version={api_version}" headers= { "Authorization": f"Bearer {token.token}", "Content-Type": "application/json" } # Read and encode audio file with open('dog.wav', 'rb') as wav_reader: encoded_string = base64.b64encode(wav_reader.read()).decode('utf-8') # Initialize messages with the first turn's user input messages = [ { "role": "user", "content": [ { "type": "text", "text": "Describe in detail the spoken audio input." }, { "type": "input_audio", "input_audio": { "data": encoded_string, "format": "wav" } } ] }] body = { "modalities": ["audio", "text"], "model": "gpt-4o-mini-audio-preview", "audio": { "format": "wav", "voice": "alloy" }, "messages": messages } # Get the first turn's response, including generated audio completion = requests.post(url, headers=headers, json=body) print("Get the first turn's response:") print(completion.json()['choices'][0]['message']['audio']['transcript']) print("Add a history message referencing the first turn's audio by ID:") print(completion.json()['choices'][0]['message']['audio']['id']) # Add a history message referencing the first turn's audio by ID messages.append({ "role": "assistant", "audio": { "id": completion.json()['choices'][0]['message']['audio']['id'] } }) # Add the next turn's user message messages.append({ "role": "user", "content": "Very briefly, summarize the favorability." }) body = { "model": "gpt-4o-mini-audio-preview", "messages": messages } # Send the follow-up request with the accumulated messages completion = requests.post(url, headers=headers, json=body) print("Very briefly, summarize the favorability.") print(completion.json()['choices'][0]['message']['content'])运行该 Python 文件。
python multi-turn.py
片刻之后即可获得响应。
多轮聊天补全的输出
该脚本会生成语音音频输入的总结文本。 然后,它会进行多轮聊天补全,以简要总结语音音频输入。
gpt-4o-audio-preview 和 gpt-4o-mini-audio-preview 模型将音频模态引入了现有的 /chat/completions API。 音频模型扩展了文本和基于语音的交互和音频分析中的 AI 应用程序的潜力。
gpt-4o-audio-preview 和 gpt-4o-mini-audio-preview 模型中支持的模态包括:文本、音频、文本 + 音频。
下面是一个包含示例用例的受支持模态表:
| 模态输入 | 模态输出 | 示例用例 |
|---|---|---|
| 文本 | 文本 + 音频 | 文本转语音,有声书生成 |
| 音频 | 文本 + 音频 | 音频听录,音频书籍生成 |
| 音频 | 文本 | 音频听录 |
| 文本 + 音频 | 文本 + 音频 | 有声书生成 |
| 文本 + 音频 | 文本 | 音频听录 |
通过使用音频生成功能,可以实现更动态和交互式的 AI 应用程序。 支持音频输入和输出的模型让你能够生成对提示的语音音频响应,并使用音频输入来提示模型。
支持的模型
目前只有 gpt-4o-audio-preview 和 gpt-4o-mini-audio-preview 版本:2024-12-17 支持音频生成。
有关区域可用性的详细信息,请参阅模型和版本文档。
目前,以下语音支持音频输出:Alloy、Echo、Shimmer。
音频文件大小上限为 20 MB。
注释
实时 API 使用与补全 API 相同的基础 GPT-4o 音频模型,但针对低延迟、实时音频交互进行了优化。
API 支持
对音频补全的支持是在 API 版本 2025-01-01-preview 中首次添加的。
先决条件
- Azure 订阅 - 免费创建订阅
- Node.js LTS 或 ESM 支持。
- 全局安装的 TypeScript。
- 在受支持的区域之一中创建的 Azure OpenAI 资源。 有关区域可用性的详细信息,请参阅模型和版本文档。
- 然后,你需要使用 Azure OpenAI 资源部署
gpt-4o-mini-audio-preview模型。 有关详细信息,请参阅使用 Azure OpenAI 创建资源和部署模型。
Microsoft Entra ID 先决条件
若要使用 Microsoft Entra ID 进行推荐的无密钥身份验证,你需要:
- 安装使用 Microsoft Entra ID 进行无密钥身份验证所需的 Azure CLI。
- 将
Cognitive Services User角色分配给用户帐户。 你可以在 Azure 门户的“访问控制(IAM)”“添加角色分配”下分配角色。>
设置
创建新文件夹
audio-completions-quickstart,并使用以下命令转到快速入门文件夹:mkdir audio-completions-quickstart && cd audio-completions-quickstart使用以下命令创建
package.json:npm init -y使用以下命令将
package.json更新为 ECMAScript:npm pkg set type=module使用以下命令安装适用于 JavaScript 的 OpenAI 客户端库:
npm install openai若要使用 Microsoft Entra ID 进行推荐的无密钥身份验证,请使用以下命令安装 包:
@azure/identitynpm install @azure/identity
检索资源信息
需要检索以下信息才能使用 Azure OpenAI 资源对应用程序进行身份验证:
| 变量名称 | 价值 |
|---|---|
AZURE_OPENAI_ENDPOINT |
从 Azure 门户检查资源时,可在“密钥和终结点”部分中找到此值。 |
AZURE_OPENAI_DEPLOYMENT_NAME |
此值将对应于在部署模型时为部署选择的自定义名称。 Azure 门户中的“资源管理”“模型部署”下提供了此值。> |
OPENAI_API_VERSION |
详细了解 API 版本。 可以在代码中更改版本或使用环境变量。 |
谨慎
若要对 SDK 使用推荐的无密钥身份验证,请确保未设置 AZURE_OPENAI_API_KEY 环境变量。
通过文本输入生成音频
使用以下代码创建
to-audio.ts文件:import { writeFileSync } from "node:fs"; import { AzureOpenAI } from "openai/index.mjs"; import { DefaultAzureCredential, getBearerTokenProvider, } from "@azure/identity"; // Set environment variables or edit the corresponding values here. const endpoint: string = process.env.AZURE_OPENAI_ENDPOINT || "AZURE_OPENAI_ENDPOINT"; const deployment: string = process.env.AZURE_OPENAI_DEPLOYMENT_NAME || "gpt-4o-mini-audio-preview"; const apiVersion: string = process.env.OPENAI_API_VERSION || "2025-01-01-preview"; // Keyless authentication const getClient = (): AzureOpenAI => { const credential = new DefaultAzureCredential(); const scope = "https://cognitiveservices.azure.com/.default"; const azureADTokenProvider = getBearerTokenProvider(credential, scope); const client = new AzureOpenAI({ endpoint: endpoint, apiVersion: apiVersion, azureADTokenProvider, }); return client; }; const client = getClient(); async function main(): Promise<void> { // Make the audio chat completions request const response = await client.chat.completions.create({ model: "gpt-4o-mini-audio-preview", modalities: ["text", "audio"], audio: { voice: "alloy", format: "wav" }, messages: [ { role: "user", content: "Is a golden retriever a good family dog?" } ] }); // Inspect returned data console.log(response.choices[0]); // Write the output audio data to a file if (response.choices[0].message.audio) { writeFileSync( "dog.wav", Buffer.from(response.choices[0].message.audio.data, 'base64'), { encoding: "utf-8" } ); } else { console.error("Audio data is null or undefined."); } } main().catch((err: Error) => { console.error("Error occurred:", err); }); export { main };创建
tsconfig.json文件以转译 TypeScript 代码,然后复制以下 ECMAScript 代码。{ "compilerOptions": { "module": "NodeNext", "target": "ES2022", // Supports top-level await "moduleResolution": "NodeNext", "skipLibCheck": true, // Avoid type errors from node_modules "strict": true // Enable strict type-checking options }, "include": ["*.ts"] }从 TypeScript 转译到 JavaScript。
tsc使用以下命令登录到 Azure:
az login使用以下命令运行代码:
node to-audio.js
片刻之后即可获得响应。
通过文本输入生成音频的输出
该脚本会在脚本所在的同一目录中生成名为 dog.wav 的音频文件。 该音频文件包含对提示“金毛寻回犬是好的家犬吗?”的语音响应
通过音频输入生成音频和文本
使用以下代码创建
from-audio.ts文件:import { AzureOpenAI } from "openai"; import { writeFileSync } from "node:fs"; import { promises as fs } from 'fs'; import { DefaultAzureCredential, getBearerTokenProvider, } from "@azure/identity"; // Set environment variables or edit the corresponding values here. const endpoint: string = process.env.AZURE_OPENAI_ENDPOINT || "AZURE_OPENAI_ENDPOINT"; const apiVersion: string = "2025-01-01-preview"; const deployment: string = "gpt-4o-mini-audio-preview"; // Keyless authentication const getClient = (): AzureOpenAI => { const credential = new DefaultAzureCredential(); const scope = "https://cognitiveservices.azure.com/.default"; const azureADTokenProvider = getBearerTokenProvider(credential, scope); const client = new AzureOpenAI({ endpoint: endpoint, apiVersion: apiVersion, azureADTokenProvider, }); return client; }; const client = getClient(); async function main(): Promise<void> { // Buffer the audio for input to the chat completion const wavBuffer = await fs.readFile("dog.wav"); const base64str = Buffer.from(wavBuffer).toString("base64"); // Make the audio chat completions request const response = await client.chat.completions.create({ model: "gpt-4o-mini-audio-preview", modalities: ["text", "audio"], audio: { voice: "alloy", format: "wav" }, messages: [ { role: "user", content: [ { type: "text", text: "Describe in detail the spoken audio input." }, { type: "input_audio", input_audio: { data: base64str, format: "wav" } } ] } ] }); console.log(response.choices[0]); // Write the output audio data to a file if (response.choices[0].message.audio) { writeFileSync("analysis.wav", Buffer.from(response.choices[0].message.audio.data, 'base64'), { encoding: "utf-8" }); } else { console.error("Audio data is null or undefined."); } } main().catch((err: Error) => { console.error("Error occurred:", err); }); export { main };创建
tsconfig.json文件以转译 TypeScript 代码,然后复制以下 ECMAScript 代码。{ "compilerOptions": { "module": "NodeNext", "target": "ES2022", // Supports top-level await "moduleResolution": "NodeNext", "skipLibCheck": true, // Avoid type errors from node_modules "strict": true // Enable strict type-checking options }, "include": ["*.ts"] }从 TypeScript 转译到 JavaScript。
tsc使用以下命令登录到 Azure:
az login使用以下命令运行代码:
node from-audio.js
片刻之后即可获得响应。
通过音频输入生成音频和文本的输出
该脚本会生成语音音频输入的总结文本。 它还会在脚本所在的同一目录中生成名为 analysis.wav 的音频文件。 该音频文件包含对提示的语音响应。
生成音频并使用多轮聊天补全
使用以下代码创建
multi-turn.ts文件:import { AzureOpenAI } from "openai/index.mjs"; import { promises as fs } from 'fs'; import { ChatCompletionMessageParam } from "openai/resources/index.mjs"; import { DefaultAzureCredential, getBearerTokenProvider, } from "@azure/identity"; // Set environment variables or edit the corresponding values here. const endpoint: string = process.env.AZURE_OPENAI_ENDPOINT || "AZURE_OPENAI_ENDPOINT"; const apiVersion: string = "2025-01-01-preview"; const deployment: string = "gpt-4o-mini-audio-preview"; // Keyless authentication const getClient = (): AzureOpenAI => { const credential = new DefaultAzureCredential(); const scope = "https://cognitiveservices.azure.com/.default"; const azureADTokenProvider = getBearerTokenProvider(credential, scope); const client = new AzureOpenAI({ endpoint: endpoint, apiVersion: apiVersion, azureADTokenProvider, }); return client; }; const client = getClient(); async function main(): Promise<void> { // Buffer the audio for input to the chat completion const wavBuffer = await fs.readFile("dog.wav"); const base64str = Buffer.from(wavBuffer).toString("base64"); // Initialize messages with the first turn's user input const messages: ChatCompletionMessageParam[] = [ { role: "user", content: [ { type: "text", text: "Describe in detail the spoken audio input." }, { type: "input_audio", input_audio: { data: base64str, format: "wav" } } ] } ]; // Get the first turn's response const response = await client.chat.completions.create({ model: "gpt-4o-mini-audio-preview", modalities: ["text", "audio"], audio: { voice: "alloy", format: "wav" }, messages: messages }); console.log(response.choices[0]); // Add a history message referencing the previous turn's audio by ID messages.push({ role: "assistant", audio: response.choices[0].message.audio ? { id: response.choices[0].message.audio.id } : undefined }); // Add a new user message for the second turn messages.push({ role: "user", content: [ { type: "text", text: "Very concisely summarize the favorability." } ] }); // Send the follow-up request with the accumulated messages const followResponse = await client.chat.completions.create({ model: "gpt-4o-mini-audio-preview", messages: messages }); console.log(followResponse.choices[0].message.content); } main().catch((err: Error) => { console.error("Error occurred:", err); }); export { main };创建
tsconfig.json文件以转译 TypeScript 代码,然后复制以下 ECMAScript 代码。{ "compilerOptions": { "module": "NodeNext", "target": "ES2022", // Supports top-level await "moduleResolution": "NodeNext", "skipLibCheck": true, // Avoid type errors from node_modules "strict": true // Enable strict type-checking options }, "include": ["*.ts"] }从 TypeScript 转译到 JavaScript。
tsc使用以下命令登录到 Azure:
az login使用以下命令运行代码:
node multi-turn.js
片刻之后即可获得响应。
多轮聊天补全的输出
该脚本会生成语音音频输入的总结文本。 然后,它会进行多轮聊天补全,以简要总结语音音频输入。
清理资源
如果你想要清理和移除 Azure OpenAI 资源,可以删除该资源。 在删除资源之前,必须先删除所有已部署的模型。
- Azure 门户
- Azure CLI
故障排除
注释
如果使用 gpt-4o-audio-preview 进行音频模态聊天完成并且 stream 设置为 true,唯一支持的音频格式是 pcm16。