你当前正在访问 Microsoft Azure Global Edition 技术文档网站。 如果需要访问由世纪互联运营的 Microsoft Azure 中国技术文档网站,请访问 https://docs.azure.cn。
LangChain 是一个开发人员生态系统,可用于更轻松地构建推理应用程序。 它包括多个组件,其中大多数组件都可以独立使用,使你可以选取并选择所需的部分。
部署到 Azure AI Foundry 的模型可以通过两种方式与 LangChain 配合使用:
使用 Azure AI 模型推理 API: 在 Azure AI Foundry 中部署的所有模型都支持 模型推理 API,该 API 在目录中的大多数模型中提供一组通用的功能。 由于 API 是一致的,因此切换模型与更改部署一样简单;无需更改代码。 使用 LangChain 安装
langchain-azure-ai集成。使用模型提供程序的 API: 某些模型(如 OpenAI、Cohere 或 Mistral)提供自己的 API 和 LangChain 扩展。 这些扩展可能包括特定于模型的功能,如果需要使用这些扩展,则适用。 安装所选模型的扩展,例如
langchain-openai或langchain-cohere。
本教程演示如何将 langchain-azure-ai 包与 LangChain 配合使用。
先决条件
若要运行本教程,需要:
-
拥有有效订阅的 Azure 帐户。 如果没有帐户,请创建一个 免费的 Azure 帐户,其中包括免费试用订阅。
支持 模型推理 API 的模型部署。 本文使用
Mistral-Large-2411部署,该部署在 Azure AI Foundry 模型目录中提供。已安装 Python 3.9 或更高版本,包括 pip。
已安装 LangChain。 可以使用以下方法安装它:
pip install langchain安装 Azure AI Foundry 集成:
pip install -U langchain-azure-ai
配置环境
若要使用部署在 Azure AI Foundry 门户中的 LLM,需要终结点和凭据来与其连接。 请按照以下步骤从想要使用的模型中获取所需的信息:
小窍门
由于可以在 Azure AI Foundry 门户中 自定义左窗格 ,因此你可能会看到与这些步骤中显示的项不同。 如果未看到要查找的内容,请选择 ... 左窗格底部的更多内容。
转到 Azure AI Foundry。
打开部署模型的项目(如果尚未打开)。
转到“模型 + 终结点”,并根据先决条件选择已部署的模型。
复制终结点 URL 和密钥。
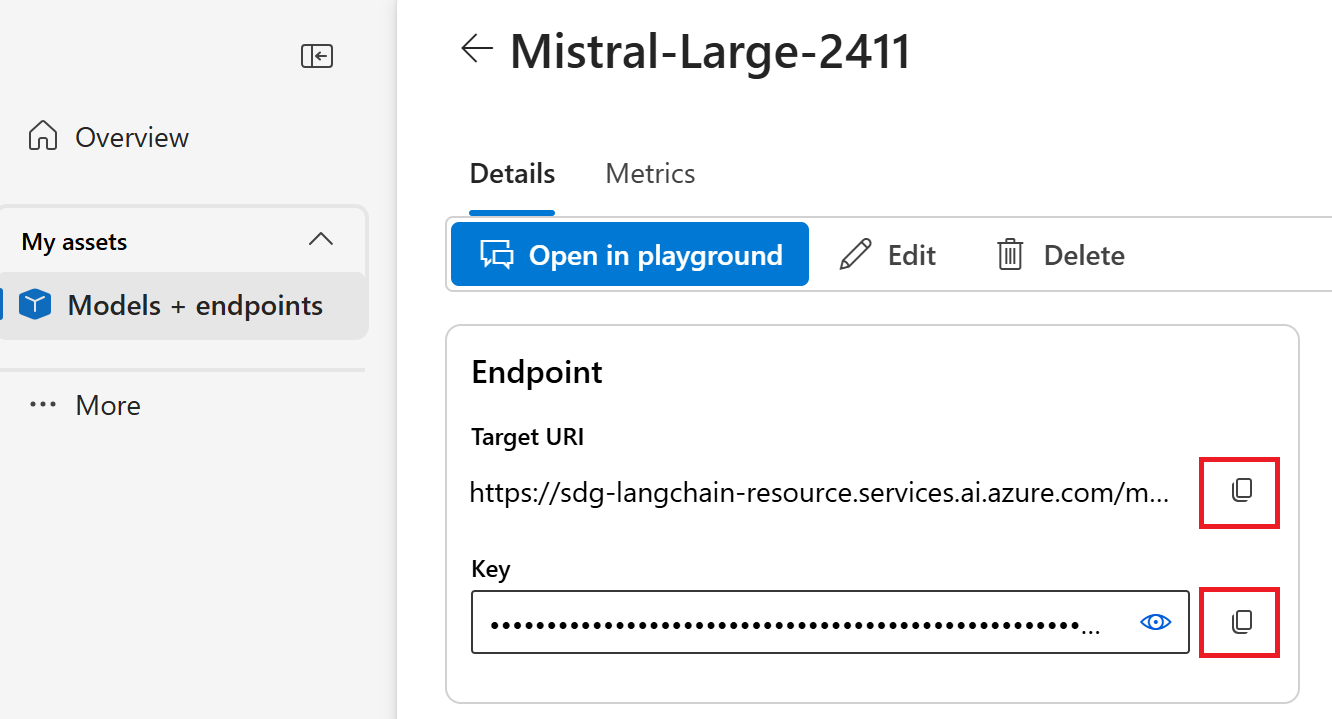
小窍门
如果模型部署了 Microsoft Entra ID 支持,则不需要密钥。

在此方案中,将终结点 URL 和密钥设置为环境变量。 (如果复制的终结点在 /models 之后包含其他文本,请将其删除,使 URL 以 /models 结束。如下所示。)
export AZURE_INFERENCE_ENDPOINT="https://<resource>.services.ai.azure.com/models"
export AZURE_INFERENCE_CREDENTIAL="<your-key-goes-here>"
配置后,创建客户端以使用init_chat_model连接到聊天模型。 有关 Azure OpenAI 模型,请参阅 使用 Azure OpenAI 模型。
from langchain.chat_models import init_chat_model

llm = init_chat_model(model="Mistral-Large-2411", model_provider="azure_ai")
还可以直接使用该类 AzureAIChatCompletionsModel 。
import os
from langchain_azure_ai.chat_models import AzureAIChatCompletionsModel

model = AzureAIChatCompletionsModel(
    endpoint=os.environ["AZURE_INFERENCE_ENDPOINT"],
    credential=os.environ["AZURE_INFERENCE_CREDENTIAL"],
    model="Mistral-Large-2411",
)
谨慎
中断性变更:参数 model_name 在版本 model 中已重命名为 0.1.3。
如果终结点支持 Microsoft Entra ID,则可以使用以下代码创建客户端:
import os
from azure.identity import DefaultAzureCredential
from langchain_azure_ai.chat_models import AzureAIChatCompletionsModel

model = AzureAIChatCompletionsModel(
    endpoint=os.environ["AZURE_INFERENCE_ENDPOINT"],
    credential=DefaultAzureCredential(),
    model="Mistral-Large-2411",
)
注释
使用 Microsoft Entra ID 时,请确保已通过该身份验证方法部署终结点,并且你拥有调用它所需的权限。
如果计划使用异步调用,请使用凭据的异步版本:
from azure.identity.aio import (
    DefaultAzureCredential as DefaultAzureCredentialAsync,
)
from langchain_azure_ai.chat_models import AzureAIChatCompletionsModel

model = AzureAIChatCompletionsModel(
    endpoint=os.environ["AZURE_INFERENCE_ENDPOINT"],
    credential=DefaultAzureCredentialAsync(),
    model="Mistral-Large-2411",
)
如果终结点提供单个模型(例如无服务器 API 部署),请省略 model 参数:
import os
from langchain_azure_ai.chat_models import AzureAIChatCompletionsModel

model = AzureAIChatCompletionsModel(
    endpoint=os.environ["AZURE_INFERENCE_ENDPOINT"],
    credential=os.environ["AZURE_INFERENCE_CREDENTIAL"],
)
使用聊天完成模型
直接使用模型。
ChatModels 是 LangChain Runnable 接口的实例,它提供与它们交互的标准方法。 若要调用模型,请将消息列表传递给 invoke 方法。
from langchain_core.messages import HumanMessage, SystemMessage

messages = [
    SystemMessage(content="Translate the following from English into Italian"),
    HumanMessage(content="hi!"),
]

model.invoke(messages)
根据需要将操作以链的形式组合。 使用提示模板翻译句子:
from langchain_core.output_parsers import StrOutputParser
from langchain_core.prompts import ChatPromptTemplate

system_template = "Translate the following into {language}:"
prompt_template = ChatPromptTemplate.from_messages(
    [("system", system_template), ("user", "{text}")]
)
此链采用 language 和 text 输入。 现在,创建输出分析器:
from langchain_core.output_parsers import StrOutputParser

parser = StrOutputParser()
使用垂直条 (|) 运算符组合模板、模型和输出分析程序:
chain = prompt_template | model | parser
通过使用language方法提供text和invoke值来调用链:
chain.invoke({"language": "italian", "text": "hi"})
将多个 LLM 链接在一起
由于 Azure AI Foundry 中的模型公开了一个常见的模型推理 API,因此你可以链接多个 LLM操作,并为这些步骤选择最适合的模型。
在以下示例中,我们将创建两个模型客户端:一个生成者和一个验证程序。 为了明确区分,我们使用多模型终结点(例如 模型推理 API ),并传递 model 用于 Mistral-Large 生成和 Mistral-Small 验证的参数。 生成内容通常需要更大的模型,而验证可以使用较小的模型。
from langchain_azure_ai.chat_models import AzureAIChatCompletionsModel

producer = AzureAIChatCompletionsModel(
    endpoint=os.environ["AZURE_INFERENCE_ENDPOINT"],
    credential=os.environ["AZURE_INFERENCE_CREDENTIAL"],
    model="Mistral-Large-2411",
)

verifier = AzureAIChatCompletionsModel(
    endpoint=os.environ["AZURE_INFERENCE_ENDPOINT"],
    credential=os.environ["AZURE_INFERENCE_CREDENTIAL"],
    model="mistral-small",
)
小窍门
查看每个模型的模型卡,以了解最佳用例。
以下示例可生成一首由城市诗人写的诗:
from langchain_core.prompts import PromptTemplate

producer_template = PromptTemplate(
    template="You are an urban poet, your job is to come up \
             verses based on a given topic.\n\
             Here is the topic you have been asked to generate a verse on:\n\
             {topic}",
    input_variables=["topic"],
)

verifier_template = PromptTemplate(
    template="You are a verifier of poems, you are tasked\
              to inspect the verses of poem. If they consist of violence and abusive language\
              report it. Your response should be only one word either True or False.\n \
              Here is the lyrics submitted to you:\n\
              {input}",
    input_variables=["input"],
)
将这些部分串联起来:
chain = producer_template | producer | parser | verifier_template | verifier | parser上一个链只返回verifier步骤的输出。 若要访问由此 producer生成的中间结果,请使用 RunnablePassthrough 显示该中间步骤。
from langchain_core.runnables import RunnablePassthrough, RunnableParallel

generate_poem = producer_template | producer | parser
verify_poem = verifier_template | verifier | parser

chain = generate_poem | RunnableParallel(poem=RunnablePassthrough(), verification=RunnablePassthrough() | verify_poem)
使用 invoke 方法调用链:
chain.invoke({"topic": "living in a foreign country"})使用嵌入模型
类似地创建嵌入客户端。 将环境变量设置为指向嵌入模型:
export AZURE_INFERENCE_ENDPOINT="<your-model-endpoint-goes-here>"
export AZURE_INFERENCE_CREDENTIAL="<your-key-goes-here>"
创建客户端:
import os
from langchain_azure_ai.embeddings import AzureAIEmbeddingsModel

embed_model = AzureAIEmbeddingsModel(
    endpoint=os.environ["AZURE_INFERENCE_ENDPOINT"],
    credential=os.environ["AZURE_INFERENCE_CREDENTIAL"],
    model="text-embedding-3-large",
)
使用内存中向量存储:
from langchain_core.vectorstores import InMemoryVectorStore

vector_store = InMemoryVectorStore(embed_model)
添加文档:
from langchain_core.documents import Document

document_1 = Document(id="1", page_content="foo", metadata={"baz": "bar"})
document_2 = Document(id="2", page_content="thud", metadata={"bar": "baz"})

documents = [document_1, document_2]
vector_store.add_documents(documents=documents)
按相似性搜索:
results = vector_store.similarity_search(query="thud", k=1)
for doc in results:
    print(f"* {doc.page_content} [{doc.metadata}]")
使用 Azure OpenAI 模型
在包 langchain-azure-ai 中使用 Azure OpenAI 模型时,请使用以下终结点格式:
from langchain_azure_ai.chat_models import AzureAIChatCompletionsModel

llm = AzureAIChatCompletionsModel(
    endpoint="https://<resource>.openai.azure.com/openai/v1",
    credential=os.environ["AZURE_INFERENCE_CREDENTIAL"],
    model="gpt-4o"
)
调试和故障排除
如果需要调试应用程序并了解发送到 Azure AI Foundry 中的模型的请求,请使用集成的调试功能:
首先,将日志记录配置为所需的级别:
import sys
import logging

# Acquire the logger for this client library. Use 'azure' to affect both
# 'azure.core` and `azure.ai.inference' libraries.
logger = logging.getLogger("azure")

# Set the desired logging level. logging.INFO or logging.DEBUG are good options.
logger.setLevel(logging.DEBUG)

# Direct logging output to stdout:
handler = logging.StreamHandler(stream=sys.stdout)
# Or direct logging output to a file:
# handler = logging.FileHandler(filename="sample.log")
logger.addHandler(handler)

# Optional: change the default logging format. Here we add a timestamp.
formatter = logging.Formatter("%(asctime)s:%(levelname)s:%(name)s:%(message)s")
handler.setFormatter(formatter)要查看请求的有效负载,请在实例化客户端时将logging_enable=True传递到client_kwargs中:
import os
from langchain_azure_ai.chat_models import AzureAIChatCompletionsModel

model = AzureAIChatCompletionsModel(
    endpoint=os.environ["AZURE_INFERENCE_ENDPOINT"],
    credential=os.environ["AZURE_INFERENCE_CREDENTIAL"],
    model="Mistral-Large-2411",
    client_kwargs={"logging_enable": True},
)
像往常一样在代码中使用客户端。
跟踪
在 Azure AI Foundry 中,创建一个跟踪器以使用跟踪功能。 日志存储在 Azure Application Insights 中,随时可以使用 Azure Monitor 或 Azure AI Foundry 门户查询日志。 每个 AI 中心都有关联的 Azure Application Insights 实例。
获取检测连接字符串
小窍门
由于可以在 Azure AI Foundry 门户中 自定义左窗格 ,因此你可能会看到与这些步骤中显示的项不同。 如果未看到要查找的内容,请选择 ... 左窗格底部的更多内容。
可以将应用程序配置为通过以下方式之一将遥测数据发送到 Azure Application Insights:
直接使用用于连接到 Azure Application Insights 的连接字符串:
转到 Azure AI Foundry 门户并选择“跟踪”。
选择“管理数据源”。 在此屏幕中,可以看到与项目关联的实例。
复制“连接字符串”中的值并将其设置到以下变量:
import os

application_insights_connection_string = "instrumentation...."
使用 Azure AI Foundry SDK 和 Foundry 项目端点:
确保已在环境中安装了
azure-ai-projects包。复制 Azure AI Foundry 项目终结点 URL,并在以下代码中设置它:
from azure.ai.projects import AIProjectClient
from azure.identity import DefaultAzureCredential

project_client = AIProjectClient(
    credential=DefaultAzureCredential(),
    endpoint="<your-foundry-project-endpoint-url>",
)

application_insights_connection_string = project_client.telemetry.get_application_insights_connection_string()
为 Azure AI Foundry 配置跟踪
以下代码创建一个连接到 Azure AI Foundry 项目后面的 Azure Application Insights 的跟踪器。 参数 enable_content_recording 设置为 True,该参数捕获整个应用程序的输入和输出,包括中间步骤。 在调试和生成应用程序时,这非常有用,但你可能希望在生产环境中禁用它。 还可以通过 AZURE_TRACING_GEN_AI_CONTENT_RECORDING_ENABLED 环境变量控制这一点:
from langchain_azure_ai.callbacks.tracers import AzureAIOpenTelemetryTracer

azure_tracer = AzureAIOpenTelemetryTracer(
    connection_string=application_insights_connection_string,
    enable_content_recording=True,
)
在config操作中通过invoke传递跟踪器。
chain.invoke({"topic": "living in a foreign country"}, config={"callbacks": [azure_tracer]})
若要配置链本身以进行跟踪,请使用 .with_config() 方法:
chain = chain.with_config({"callbacks": [azure_tracer]})
然后像往常一样使用 invoke() 方法:
chain.invoke({"topic": "living in a foreign country"})
查看跟踪
查看跟踪:
导航到“跟踪”部分。
识别你已创建的跟踪。 可能需要几秒钟时间才能显示。
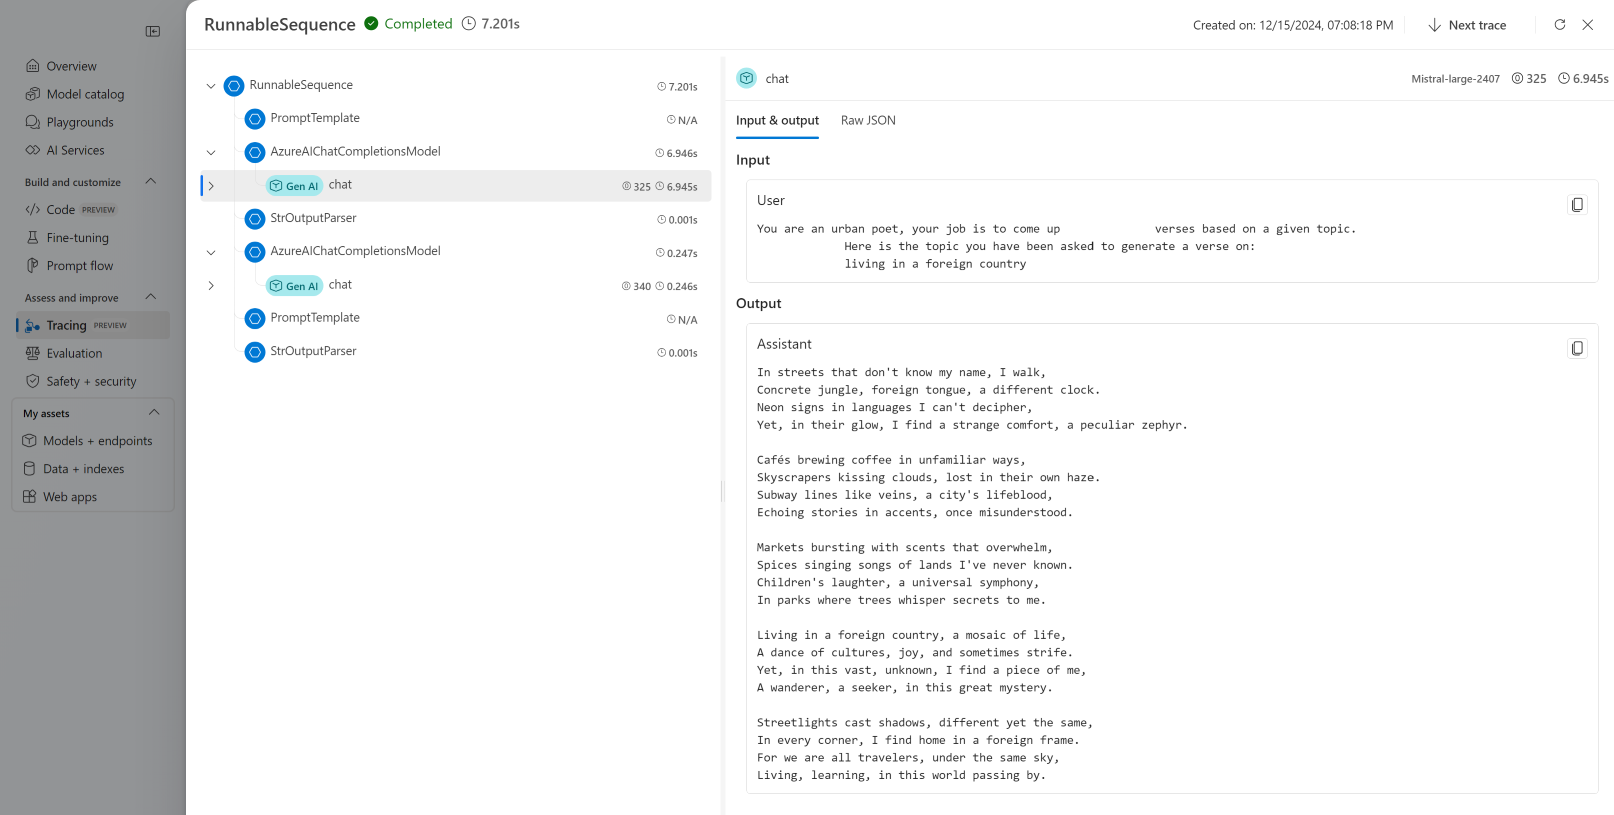

详细了解如何可视化和管理跟踪。