Azure AI Foundry 模型允许你通过单一的终结点和一组凭证访问领先模型提供商提供的最强大的模型。 此功能使你可以在模型之间进行切换,并在应用程序中使用它们,而无需更改任何代码。
本文介绍了 Azure AI Foundry 服务(以前称为 Azure AI 服务)如何组织模型,以及如何使用推理终结点访问模型。
部署
Azure AI Foundry 通过部署机制来提供模型服务。
部署为模型指定名称和设置特定配置。 可以在请求中使用模型部署名称来访问模型。
部署包括:
- 模型名称
- 模型版本
- 预配/容量类型1
- 内容筛选配置1
- 速率限制配置1
1 这些配置可能会根据所选模型而更改。
Azure AI Foundry 资源可以部署许多模型。 只需为对模型部署执行的推理付费。 部署是 Azure 资源,因此会受 Azure 策略的约束。
有关创建部署的详细信息,请参阅添加和配置模型部署。
端点
Azure AI Foundry 服务根据你要执行的工作类型提供多个访问端点:
Azure AI 推理终结点
借助 Azure AI 推理终结点(通常采用 https://<resource-name>.services.ai.azure.com/models 形式),你可以使用具有相同身份验证和架构的单一终结点为资源中部署的模型生成推理。 所有 Foundry 模型都支持此功能。 此端点遵循的是 Azure AI 模型推理 API,该 API 支持以下模式:
路线规划
推理终结点通过将请求内的参数 name 与部署名称进行匹配,将请求路由到给定部署。 此设置意味着部署在某些配置下充当给定模型的别名。 这种灵活性使你能够在服务中多次部署同一个模型,同时如果需要的话,还能根据不同的配置进行部署。
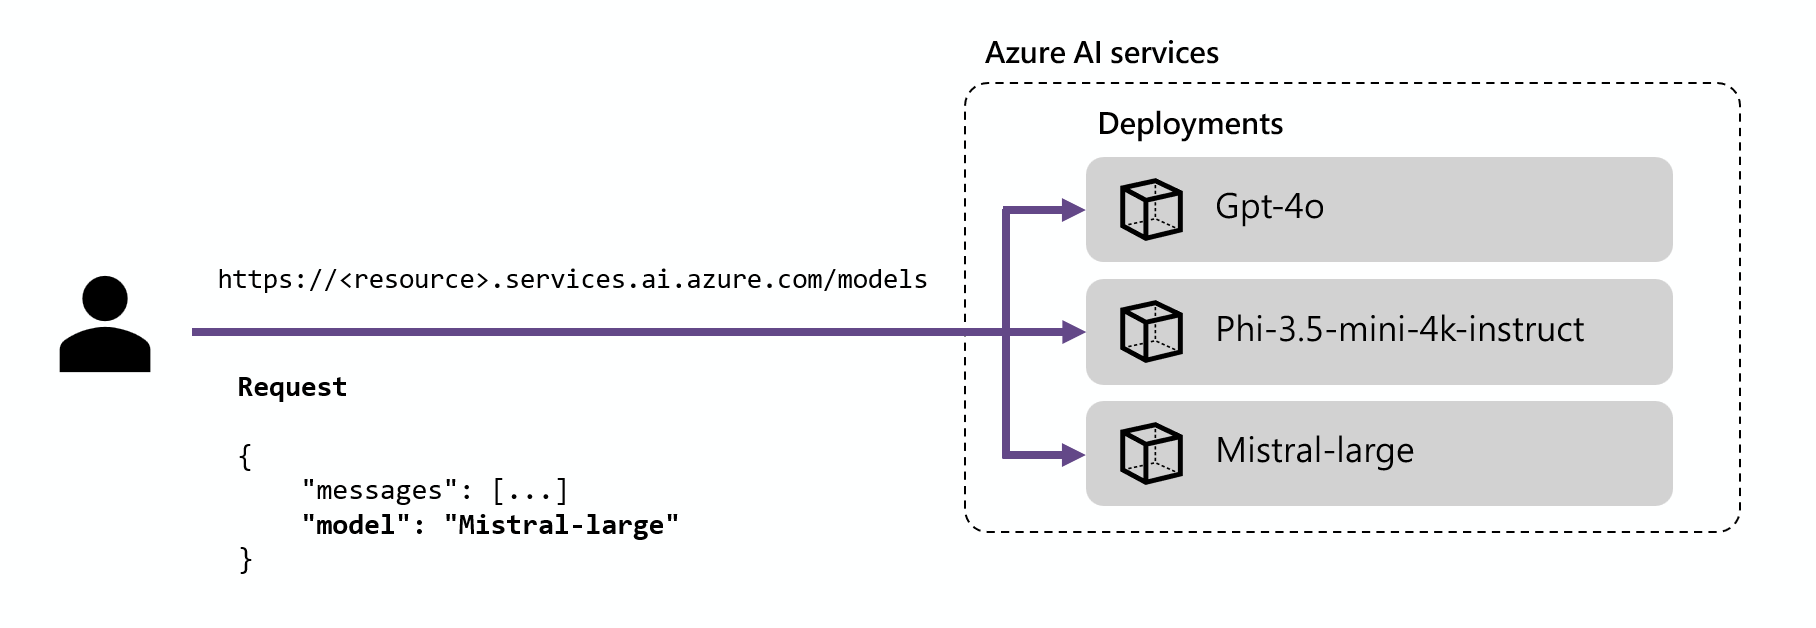
例如,如果创建名为 Mistral-large 的部署,可以调用该部署,如下所示:
使用包管理器(例如 pip)安装包 azure-ai-inference:
pip install azure-ai-inference
然后,可以使用该包来调用模型。 以下示例演示如何创建客户端程序来调用聊天结果:
import os
from azure.ai.inference import ChatCompletionsClient
from azure.core.credentials import AzureKeyCredential

client = ChatCompletionsClient(
    endpoint="https://<resource>.services.ai.azure.com/models",
    credential=AzureKeyCredential(os.environ["AZURE_INFERENCE_CREDENTIAL"]),
)
浏览我们的示例,并阅读 API 参考文档以开始使用。
使用 npm 安装包 @azure-rest/ai-inference:
npm install @azure-rest/ai-inference
然后,可以使用该包来调用模型。 以下示例演示如何创建客户端程序来调用聊天结果:
import ModelClient from "@azure-rest/ai-inference";
import { isUnexpected } from "@azure-rest/ai-inference";
import { AzureKeyCredential } from "@azure/core-auth";

const client = new ModelClient(
    "https://<resource>.services.ai.azure.com/models",
    new AzureKeyCredential(process.env.AZURE_INFERENCE_CREDENTIAL)
);
浏览我们的示例,并阅读 API 参考文档以开始使用。
请使用以下命令安装 Azure AI 推理库:
dotnet add package Azure.AI.Inference --prerelease
导入下列命名空间:
using Azure;
using Azure.Identity;
using Azure.AI.Inference;
然后,可以使用该包来调用模型。 以下示例演示如何创建客户端程序来调用聊天结果:
ChatCompletionsClient client = new ChatCompletionsClient(
    new Uri("https://<resource>.services.ai.azure.com/models"),
    new AzureKeyCredential(Environment.GetEnvironmentVariable("AZURE_INFERENCE_CREDENTIAL"))
);
浏览我们的示例,并阅读 API 参考文档以开始使用。
将包添加到项目:
<dependency>
    <groupId>com.azure</groupId>
    <artifactId>azure-ai-inference</artifactId>
    <version>1.0.0-beta.1</version>
</dependency>
然后,可以使用该包来调用模型。 以下示例演示如何创建客户端程序来调用聊天结果:
ChatCompletionsClient client = new ChatCompletionsClientBuilder()
    .credential(new AzureKeyCredential("{key}"))
    .endpoint("https://<resource>.services.ai.azure.com/models")
    .buildClient();
浏览我们的示例,并阅读 API 参考文档以开始使用。
使用参考部分来探索 API 设计以及可用的参数。 例如,聊天补全的参考部分详细介绍了如何使用路由 /chat/completions 根据聊天格式的指令生成预测。 请注意,URL 的根目录包含路径 /models:
请求
POST https://<resource>.services.ai.azure.com/models/chat/completions?api-version=2024-05-01-preview
api-key: <api-key>
Content-Type: application/json
对于聊天模型,可按如下所示创建请求:
from azure.ai.inference.models import SystemMessage, UserMessage

response = client.complete(
    messages=[
        SystemMessage(content="You are a helpful assistant."),
        UserMessage(content="Explain Riemann's conjecture in 1 paragraph"),
    ],
    model="mistral-large"
)

print(response.choices[0].message.content)
var messages = [
    { role: "system", content: "You are a helpful assistant" },
    { role: "user", content: "Explain Riemann's conjecture in 1 paragraph" },
];

var response = await client.path("/chat/completions").post({
    body: {
        messages: messages,
        model: "mistral-large"
    }
});

console.log(response.body.choices[0].message.content)
requestOptions = new ChatCompletionsOptions()
{
    Messages = {
        new ChatRequestSystemMessage("You are a helpful assistant."),
        new ChatRequestUserMessage("Explain Riemann's conjecture in 1 paragraph")
    },
    Model = "mistral-large"
};

response = client.Complete(requestOptions);
Console.WriteLine($"Response: {response.Value.Content}");
List<ChatRequestMessage> chatMessages = new ArrayList<>();
chatMessages.add(new ChatRequestSystemMessage("You are a helpful assistant"));
chatMessages.add(new ChatRequestUserMessage("Explain Riemann's conjecture in 1 paragraph"));

ChatCompletions chatCompletions = client.complete(new ChatCompletionsOptions(chatMessages));

for (ChatChoice choice : chatCompletions.getChoices()) {
    ChatResponseMessage message = choice.getMessage();
    System.out.println("Response:" + message.getContent());
}
请求
POST https://<resource>.services.ai.azure.com/models/chat/completions?api-version=2024-05-01-preview
api-key: <api-key>
Content-Type: application/json
{
    "messages": [
        {
            "role": "system",
            "content": "You are a helpful assistant"
        },
        {
            "role": "user",
            "content": "Explain Riemann's conjecture in 1 paragraph"
        }
    ],
    "model": "mistral-large"
}
如果指定的模型名称与模型部署均不匹配,则会显示模型不存在的错误。 可以通过创建模型部署来控制哪些模型可供用户使用。 有关详细信息,请参阅添加和配置模型部署。
Azure OpenAI 推理终结点
Azure OpenAI API 公开 OpenAI 模型的完整功能,并支持更多功能,例如助手、线程、文件和批处理推理。 还可以通过此路由访问非 OpenAI 模型。
Azure OpenAI 终结点(通常采用 https://<resource-name>.openai.azure.com 形式)在部署级别运行,每个部署都有其自己的关联 URL。 但是,可以使用相同的身份验证机制来使用部署。 有关详细信息,请参阅 Azure OpenAI API 的参考页。
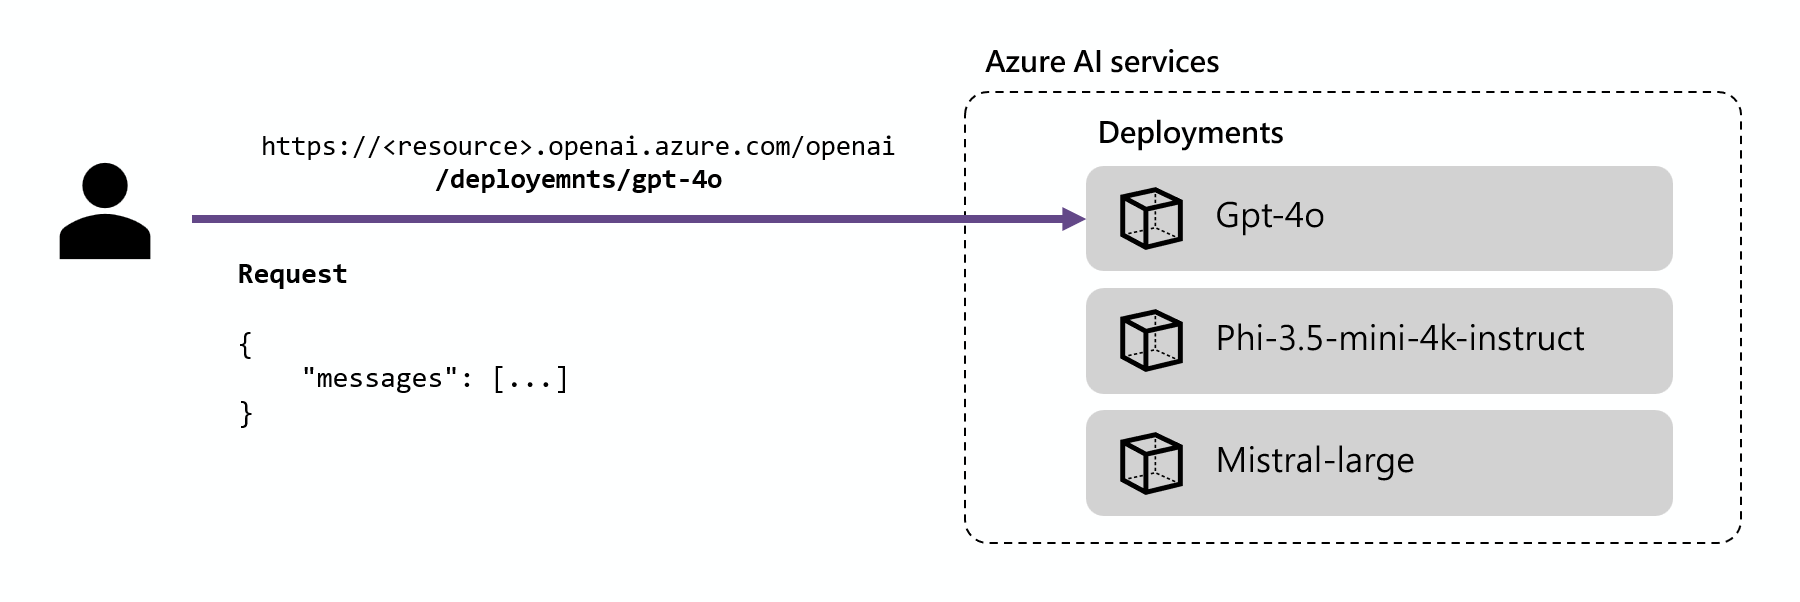
每个部署都有一个 URL,该 URL 由 Azure OpenAI 的基 URL 和路径 /deployments/<model-deployment-name> 拼接而成。
使用包管理器(例如 pip)安装包 openai:
pip install openai --upgrade
然后,可以使用该包来调用模型。 以下示例演示如何创建客户端程序来调用聊天结果:
import os
from openai import AzureOpenAI

client = AzureOpenAI(
    azure_endpoint = "https://<resource>.services.ai.azure.com"
    api_key=os.getenv("AZURE_INFERENCE_CREDENTIAL"),
    api_version="2024-10-21",
)
使用 npm 安装包 openai:
npm install openai
然后,可以使用该包来调用模型。 以下示例演示如何创建客户端程序来调用聊天结果:
import { AzureKeyCredential } from "@azure/openai";

const endpoint = "https://<resource>.services.ai.azure.com";
const apiKey = new AzureKeyCredential(process.env.AZURE_INFERENCE_CREDENTIAL);
const apiVersion = "2024-10-21"

const client = new AzureOpenAI({
    endpoint,
    apiKey,
    apiVersion,
    "deepseek-v3-0324"
});
如你所见,deepseek-v3-0324 是 Azure AI Foundry 资源中的模型部署的名称。
通过以下命令安装 OpenAI 库:
dotnet add package Azure.AI.OpenAI --prerelease
你可以通过包来使用模型。 以下示例演示如何创建客户端程序来调用聊天结果:
AzureOpenAIClient client = new(
    new Uri("https://<resource>.services.ai.azure.com"),
    new ApiKeyCredential(Environment.GetEnvironmentVariable("AZURE_INFERENCE_CREDENTIAL"))
);
将包添加到项目:
<dependency>
    <groupId>com.azure</groupId>
    <artifactId>azure-ai-openai</artifactId>
    <version>1.0.0-beta.16</version>
</dependency>
然后,可以使用该包来调用模型。 以下示例演示如何创建客户端程序来调用聊天结果:
OpenAIClient client = new OpenAIClientBuilder()
    .credential(new AzureKeyCredential("{key}"))
    .endpoint("https://<resource>.services.ai.azure.com")
    .buildClient();
使用参考部分来探索 API 设计以及可用的参数。 例如,聊天补全的参考部分详细介绍了如何使用路由 /chat/completions 根据聊天格式的指令生成预测:
请求
POST https://<resource>.services.ai.azure.com/openai/deployments/deepseek-v3-0324/chat/completions?api-version=2024-10-21
api-key: <api-key>
Content-Type: application/json
如你所见,deepseek-v3-0324 是 Azure AI Foundry 资源中的模型部署的名称。
response = client.chat.completions.create(
    model="deepseek-v3-0324", # Replace with your model dpeloyment name.
    messages=[
        {"role": "system", "content": "You are a helpful assistant."},
        {"role": "user", "content": "Explain Riemann's conjecture in 1 paragraph"}
    ]
)

print(response.model_dump_json(indent=2)
var messages = [
    { role: "system", content: "You are a helpful assistant" },
    { role: "user", content: "Explain Riemann's conjecture in 1 paragraph" },
];

const response = await client.chat.completions.create({ messages, model: "deepseek-v3-0324" });

console.log(response.choices[0].message.content)
ChatCompletion response = chatClient.CompleteChat(
    [
        new SystemChatMessage("You are a helpful assistant."),
        new UserChatMessage("Explain Riemann's conjecture in 1 paragraph"),
    ]);

Console.WriteLine($"{response.Role}: {response.Content[0].Text}");
List<ChatRequestMessage> chatMessages = new ArrayList<>();
chatMessages.add(new ChatRequestSystemMessage("You are a helpful assistant"));
chatMessages.add(new ChatRequestUserMessage("Explain Riemann's conjecture in 1 paragraph"));

ChatCompletions chatCompletions = client.getChatCompletions("deepseek-v3-0324",
    new ChatCompletionsOptions(chatMessages));

System.out.printf("Model ID=%s is created at %s.%n", chatCompletions.getId(), chatCompletions.getCreatedAt());
for (ChatChoice choice : chatCompletions.getChoices()) {
    ChatResponseMessage message = choice.getMessage();
    System.out.printf("Index: %d, Chat Role: %s.%n", choice.getIndex(), message.getRole());
    System.out.println("Message:");
    System.out.println(message.getContent());
}
如你所见,deepseek-v3-0324 是 Azure AI Foundry 资源中的模型部署的名称。
请求
POST https://<resource>.services.ai.azure.com/openai/deployments/deepseek-v3-0324/chat/completions?api-version=2024-10-21
api-key: <api-key>
Content-Type: application/json
{
    "messages": [
        {
            "role": "system",
            "content": "You are a helpful assistant"
        },
        {
            "role": "user",
            "content": "Explain Riemann's conjecture in 1 paragraph"
        }
    ]
}
如你所见,deepseek-v3-0324 是 Azure AI Foundry 资源中的模型部署的名称。
有关如何使用 Azure OpenAI 终结点的详细信息,请参阅 Azure AI Foundry 模型文档中的 Azure OpenAI。
无密钥身份验证
部署到 Azure AI 服务中的 Azure AI Foundry 模型支持使用 Microsoft Entra ID 进行无密钥授权。 无密钥授权可增强安全性、简化用户体验、降低作复杂性,并为新式开发提供可靠的合规性支持。 对于采用安全且可缩放的标识管理解决方案的组织来说,无密钥授权是一个不错的选择。
若要使用无密钥身份验证,请配置资源并向用户授予访问权限以执行推理。 配置资源并授予访问权限后,请按如下所示进行身份验证:
使用诸如 pip 这样包管理器来安装 azure-ai-inference 包:
pip install azure-ai-inference
然后,使用包来调用模型。 以下示例演示如何创建客户端以通过 Microsoft Entra ID 使用聊天补全:
import os
from azure.ai.inference import ChatCompletionsClient
from azure.identity import DefaultAzureCredential

client = ChatCompletionsClient(
    endpoint="https://<resource>.services.ai.azure.com/models",
    credential=DefaultAzureCredential(),
    credential_scopes=["https://cognitiveservices.azure.com/.default"],
)
使用 npm 安装 @azure-rest/ai-inference 软件包:
npm install @azure-rest/ai-inference
然后,使用包来调用模型。 以下示例演示如何创建客户端以通过 Microsoft Entra ID 使用聊天补全:
import ModelClient from "@azure-rest/ai-inference";
import { isUnexpected } from "@azure-rest/ai-inference";
import { DefaultAzureCredential } from "@azure/identity";

const clientOptions = { credentials: { "https://cognitiveservices.azure.com" } };

const client = new ModelClient(
    "https://<resource>.services.ai.azure.com/models",
    new DefaultAzureCredential(),
    clientOptions,
);
请使用以下命令安装 Azure AI 推理库:
dotnet add package Azure.AI.Inference --prerelease
安装 Azure.Identity 包:
dotnet add package Azure.Identity
导入下列命名空间:
using Azure;
using Azure.Identity;
using Azure.AI.Inference;
然后,使用包来调用模型。 以下示例演示如何创建客户端以通过 Microsoft Entra ID 使用聊天补全:
TokenCredential credential = new DefaultAzureCredential();
AzureAIInferenceClientOptions clientOptions = new AzureAIInferenceClientOptions();
BearerTokenAuthenticationPolicy tokenPolicy = new BearerTokenAuthenticationPolicy(credential, new string[] { "https://cognitiveservices.azure.com/.default" });
clientOptions.AddPolicy(tokenPolicy, HttpPipelinePosition.PerRetry);

ChatCompletionsClient client = new ChatCompletionsClient(
    new Uri("https://<resource>.services.ai.azure.com/models"),
    credential,
    clientOptions.
);
将包添加到项目:
<dependency>
    <groupId>com.azure</groupId>
    <artifactId>azure-ai-inference</artifactId>
    <version>1.0.0-beta.4</version>
</dependency>
<dependency>
    <groupId>com.azure</groupId>
    <artifactId>azure-identity</artifactId>
    <version>1.15.3</version>
</dependency>
然后,使用包来调用模型。 以下示例演示如何创建客户端程序来调用聊天结果:
TokenCredential defaultCredential = new DefaultAzureCredentialBuilder().build();
ChatCompletionsClient client = new ChatCompletionsClientBuilder()
    .credential(defaultCredential)
    .endpoint("https://<resource>.services.ai.azure.com/models")
    .buildClient();
浏览我们的 示例 并阅读 API 参考文档 以开始使用。
使用参考部分浏览 API 设计,并查看哪些参数可用。 请在标头 Authorization 中指定身份验证令牌。 例如,聊天补全的参考部分详细介绍了如何使用路由 /chat/completions 根据聊天格式的指令生成预测。 路径 /models 包含在 URL 的根目录中:
请求
POST https://<resource>.services.ai.azure.com/models/chat/completions?api-version=2024-05-01-preview
Authorization: Bearer <bearer-token>
Content-Type: application/json
令牌必须带有作用域 https://cognitiveservices.azure.com/.default。
出于测试目的,为用户帐户获取有效令牌最容易的方法是使用 Azure CLI。 在控制台中,运行以下 Azure CLI 命令:
az account get-access-token --resource https://cognitiveservices.azure.com --query "accessToken" --output tsv
局限性
相关内容

