作者 :斯科特·米切尔
虽然 GridView 控件不提供插入新数据记录的内置支持,但本教程演示如何扩充 GridView 以包含插入接口。
介绍
如 “插入、更新和删除数据概述” 教程中所述,GridView、DetailsView 和 FormView Web 控件都包含内置数据修改功能。 与声明性数据源控件一起使用时,可以快速轻松地配置这三个 Web 控件以修改数据-在方案中无需编写一行代码。 遗憾的是,只有 DetailsView 和 FormView 控件提供内置的插入、编辑和删除功能。 GridView 仅提供编辑和删除支持。 但是,只要稍加努力,我们就可以增强 GridView 以包含插入界面。
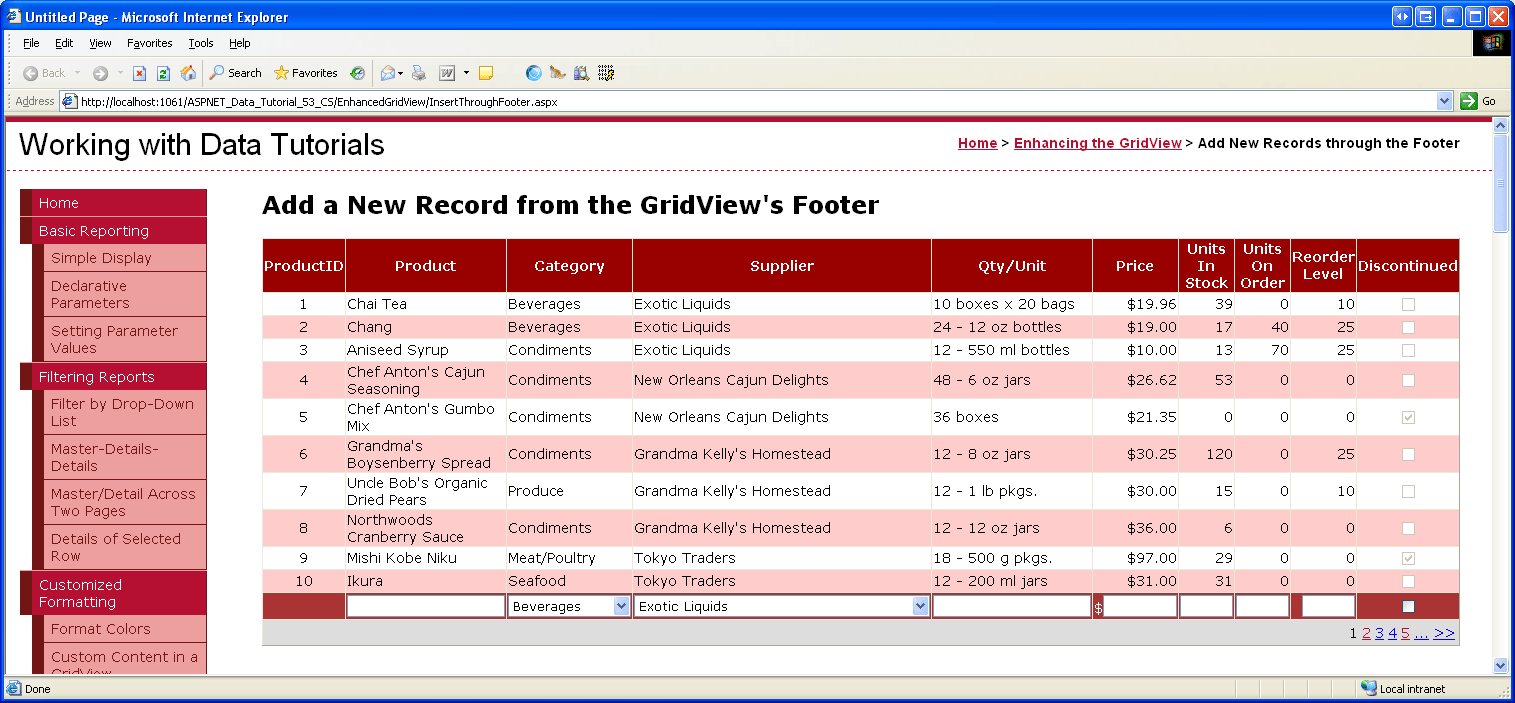
在向 GridView 添加插入功能时,我们负责决定如何添加新记录、创建插入界面以及编写代码以插入新记录。 在本教程中,我们将介绍如何将插入接口添加到 GridView 的页脚行(请参阅图 1)。 每个列的页脚单元格包括相应的数据收集用户界面元素(产品名称的 TextBox、供应商的 DropDownList 等)。 我们还需要一个“添加”按钮的列,单击后,将会使用在页脚行中填写的值来回发请求,并将新记录插入 Products 表中。
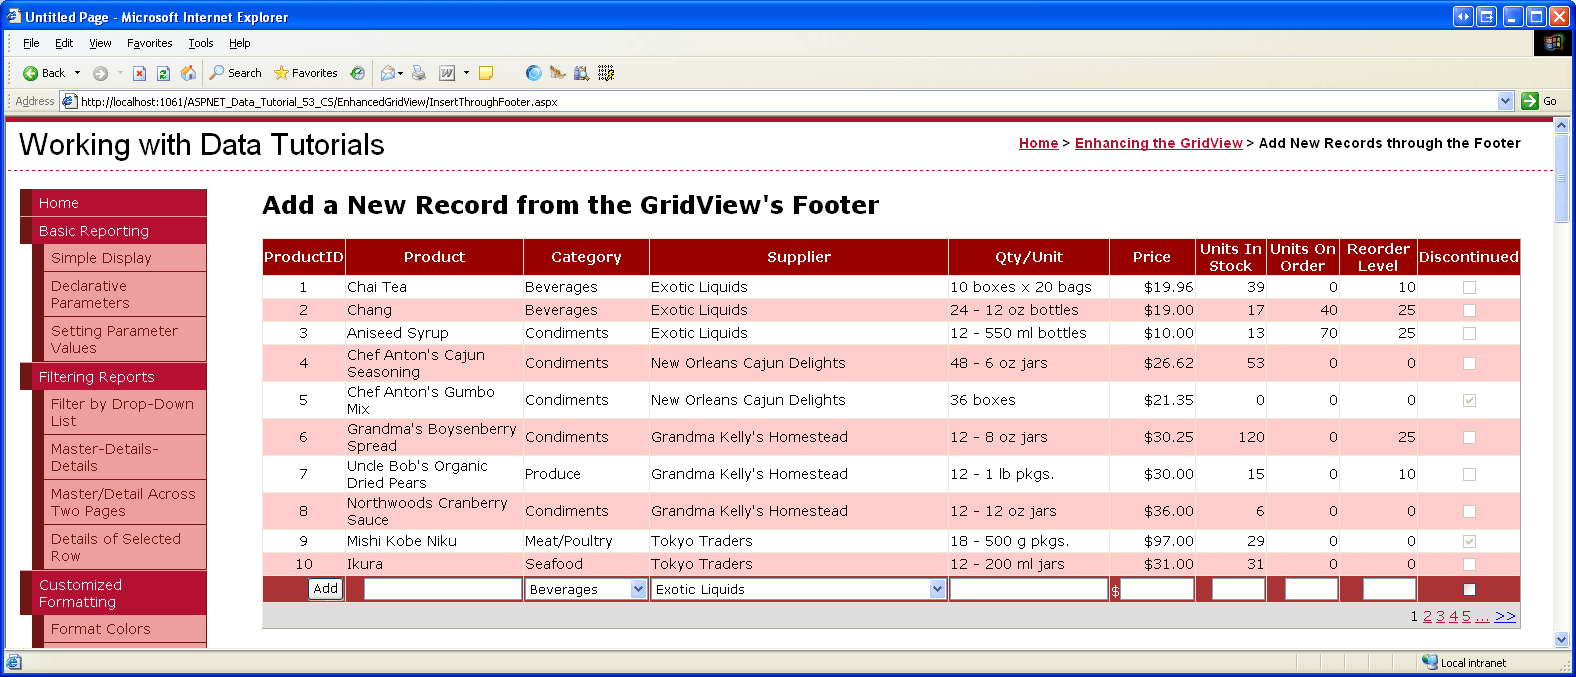
图 1:页脚行提供用于添加新产品的接口(单击以查看全尺寸图像)
步骤 1:在 GridView 中显示产品信息
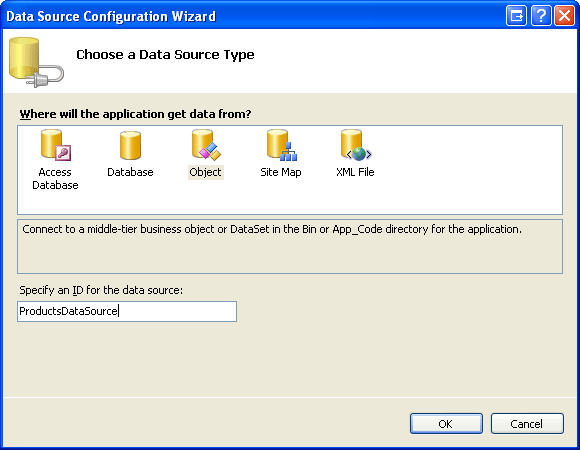
在关注在 GridView 页脚中创建插入接口之前,让我们首先专注于将 GridView 添加到列出数据库中产品的页面。 首先打开 InsertThroughFooter.aspx 文件夹中的页面 EnhancedGridView ,并将 GridView 从工具箱拖动到设计器上,将 GridView 属性 ID 设置为 Products。 接下来,使用 GridView 的智能标记将其绑定到名为 ProductsDataSource的新 ObjectDataSource。

图 2:创建名为 ProductsDataSource 的新 ObjectDataSource (单击可查看全尺寸图像)
将 ObjectDataSource 配置为使用 ProductsBLL 类的 GetProducts() 方法来检索产品信息。 在本教程中,让我们严格关注添加插入功能,而不必担心编辑和删除。 因此,请确保 INSERT 选项卡中的下拉列表设置为 AddProduct() ,并且 UPDATE 和 DELETE 选项卡中的下拉列表设置为 (None) 。
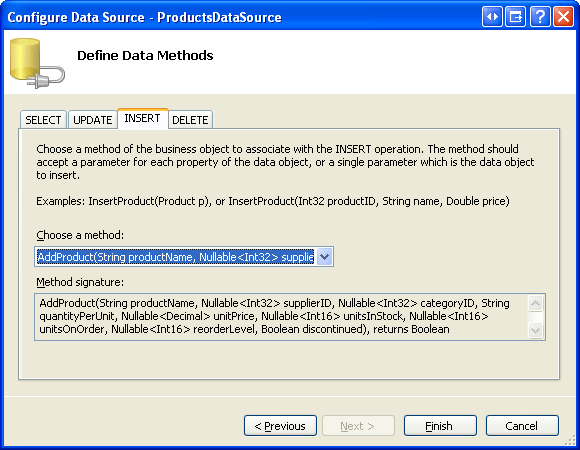
图 3:将 AddProduct 方法映射到 ObjectDataSource s Insert() 方法(单击以查看全尺寸图像)

图 4:将“更新”和“删除”选项卡 Drop-Down 列表设置为“无”(单击以查看全尺寸图像)
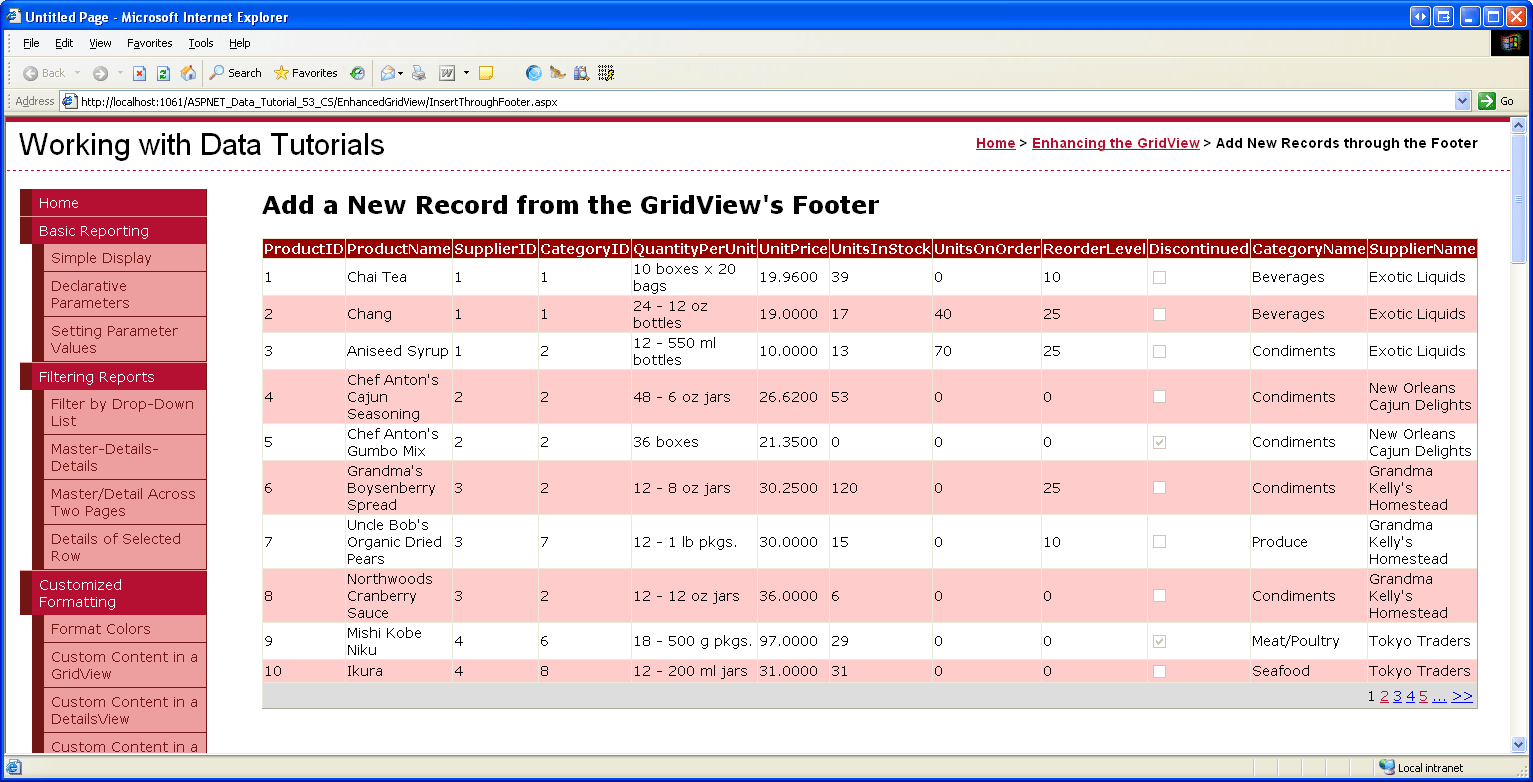
完成 ObjectDataSource 的“配置数据源”向导后,Visual Studio 会自动为每个相应的数据字段将字段添加到 GridView。 目前,请保留 Visual Studio 添加的所有字段。 在本教程的后面部分,我们将返回并删除一些字段,这些字段的值在添加新记录时不需要指定。
由于数据库中有近 80 个产品,因此用户必须一直向下滚动到网页底部才能添加新记录。 因此,让我们启用分页以使插入接口更加可见且易于访问。 若要启用分页,只需选中 GridView 智能标记中的“启用分页”复选框。
此时,GridView 和 ObjectDataSource 的声明性标记应如下所示:
<asp:GridView ID="Products" runat="server" AutoGenerateColumns="False"
    DataKeyNames="ProductID" DataSourceID="ProductsDataSource"
    AllowPaging="True" EnableViewState="False">
    <Columns>
        <asp:BoundField DataField="ProductID" HeaderText="ProductID"
            InsertVisible="False" ReadOnly="True"
            SortExpression="ProductID" />
        <asp:BoundField DataField="ProductName" HeaderText="ProductName"
            SortExpression="ProductName" />
        <asp:BoundField DataField="SupplierID" HeaderText="SupplierID"
            SortExpression="SupplierID" />
        <asp:BoundField DataField="CategoryID" HeaderText="CategoryID"
            SortExpression="CategoryID" />
        <asp:BoundField DataField="QuantityPerUnit" HeaderText="QuantityPerUnit"
            SortExpression="QuantityPerUnit" />
        <asp:BoundField DataField="UnitPrice" HeaderText="UnitPrice"
            SortExpression="UnitPrice" />
        <asp:BoundField DataField="UnitsInStock" HeaderText="UnitsInStock"
            SortExpression="UnitsInStock" />
        <asp:BoundField DataField="UnitsOnOrder" HeaderText="UnitsOnOrder"
            SortExpression="UnitsOnOrder" />
        <asp:BoundField DataField="ReorderLevel" HeaderText="ReorderLevel"
            SortExpression="ReorderLevel" />
        <asp:CheckBoxField DataField="Discontinued" HeaderText="Discontinued"
            SortExpression="Discontinued" />
        <asp:BoundField DataField="CategoryName" HeaderText="CategoryName"
            ReadOnly="True" SortExpression="CategoryName" />
        <asp:BoundField DataField="SupplierName" HeaderText="SupplierName"
            ReadOnly="True" SortExpression="SupplierName" />
    </Columns>
</asp:GridView>
<asp:ObjectDataSource ID="ProductsDataSource" runat="server"
    InsertMethod="AddProduct" OldValuesParameterFormatString="original_{0}"
    SelectMethod="GetProducts" TypeName="ProductsBLL">
    <InsertParameters>
        <asp:Parameter Name="productName" Type="String" />
        <asp:Parameter Name="supplierID" Type="Int32" />
        <asp:Parameter Name="categoryID" Type="Int32" />
        <asp:Parameter Name="quantityPerUnit" Type="String" />
        <asp:Parameter Name="unitPrice" Type="Decimal" />
        <asp:Parameter Name="unitsInStock" Type="Int16" />
        <asp:Parameter Name="unitsOnOrder" Type="Int16" />
        <asp:Parameter Name="reorderLevel" Type="Int16" />
        <asp:Parameter Name="discontinued" Type="Boolean" />
    </InsertParameters>
</asp:ObjectDataSource>

图 5:所有产品数据字段都显示在分页网格视图中(单击以查看全尺寸图像)
步骤 2:添加页脚行
GridView 除了页眉和数据行,还包括一个页脚行。 根据 GridView 的 ShowHeader 和 ShowFooter 属性的值,显示页眉和页脚行。 若要显示页脚行,只需将 ShowFooter 属性设置为 True。 如图 6 所示,将属性ShowFooter设置为True向网格添加页脚行。
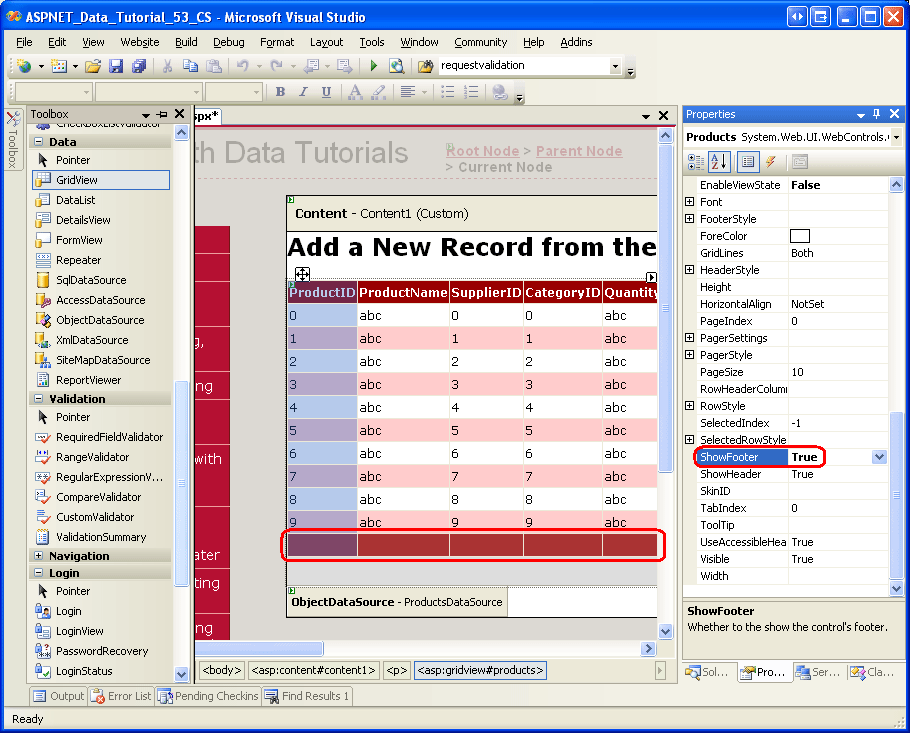
图 6:若要显示页脚行,请设置为 ShowFooterTrue (单击以查看全尺寸图像)
请注意,页脚行具有深红色背景色。 这是因为我们创建了 DataWebControls 主题并将其应用于 “使用 ObjectDataSource 显示数据 ”教程中的所有页面。 具体而言,GridView.skin 文件将 FooterStyle 属性配置为使用 FooterStyle CSS 类。 该 FooterStyle 类在 Styles.css 中定义如下:
.FooterStyle
{
    background-color: #a33;
    color: White;
    text-align: right;
}
注释
我们在前面的教程中介绍了如何使用 GridView 的页脚行。 如果需要,请重新查阅教程中的GridView 页脚显示摘要信息以便温习。
将 ShowFooter 属性设置为 True后,花点时间在浏览器中查看输出。 目前页脚行不包含任何文本或 Web 控件。 在步骤 3 中,我们将修改每个 GridView 字段的页脚,使其包含相应的插入接口。

图 7:在分页界面控件上方显示空页脚行(单击以查看全尺寸图像)
步骤 3:自定义页脚行
返回 GridView 控件教程中的 Using TemplateFields ,我们了解了如何使用 TemplateFields(而不是 BoundFields 或 CheckBoxFields)极大地自定义特定 GridView 列的显示;在 自定义数据修改接口 时,我们查看了如何使用 TemplateFields 在 GridView 中自定义编辑接口。 回想一下,TemplateField 由许多模板组成,这些模板定义用于某些类型的行的标记、Web 控件和数据绑定语法的组合。 例如,指定 ItemTemplate用于只读行的模板,而 EditItemTemplate 定义可编辑行的模板。
TemplateField 与 ItemTemplate 和 EditItemTemplate 一起,还包含一个 FooterTemplate,用于指定页脚行的内容。 因此,我们可以将每个字段插入接口所需的 Web 控件添加到 FooterTemplate。 首先,将 GridView 中的所有字段转换为 TemplateFields。 为此,可以单击 GridView 智能标记中的“编辑列”链接,选择左下角的每个字段,然后单击“将此字段转换为 TemplateField”链接。
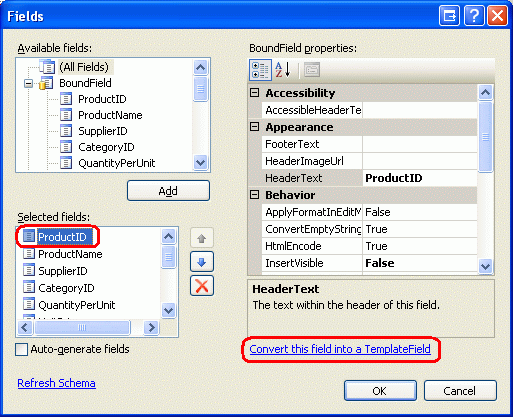
图 8:将每个字段转换为 TemplateField
单击“将此字段转换为 TemplateField”会将当前字段类型转换为等效的 TemplateField。 例如,每个 BoundField 都被替换为包含多个控件的 TemplateField:ItemTemplate 包含一个 Label控件,该控件用于显示相应的数据字段,以及一个 EditItemTemplate 显示数据字段的 TextBox控件。 已将ProductName BoundField 转换为以下 TemplateField 标记:
<asp:TemplateField HeaderText="ProductName" SortExpression="ProductName">
    <EditItemTemplate>
        <asp:TextBox ID="TextBox1" runat="server"
            Text='<%# Bind("ProductName") %>'></asp:TextBox>
    </EditItemTemplate>
    <ItemTemplate>
        <asp:Label ID="Label2" runat="server"
            Text='<%# Bind("ProductName") %>'></asp:Label>
    </ItemTemplate>
</asp:TemplateField>
同样,Discontinued CheckBoxField 已转换为一个包含 ItemTemplate CheckBox Web 控件的 TemplateField,而 EditItemTemplate 中的 CheckBox 被禁用了。 只读ProductID BoundField 已转换为 TemplateField,在ItemTemplate和EditItemTemplate中都有一个标签控件。 简言之,将现有 GridView 字段转换为 TemplateField 是一种快速简便的方法,可以切换到更具自定义的 TemplateField,而不会丢失任何现有字段的功能。
由于我们正在使用的 GridView 不支持编辑,因此可以随意从每个 TemplateField 中删除 EditItemTemplate,只留下 ItemTemplate。 执行此作后,GridView 的声明性标记应如下所示:
<asp:GridView ID="Products" runat="server" AutoGenerateColumns="False"
    DataKeyNames="ProductID" DataSourceID="ProductsDataSource"
    AllowPaging="True" EnableViewState="False" ShowFooter="True">
    <Columns>
        <asp:TemplateField HeaderText="ProductID" InsertVisible="False"
            SortExpression="ProductID">
            <ItemTemplate>
                <asp:Label ID="Label1" runat="server"
                    Text='<%# Bind("ProductID") %>'></asp:Label>
            </ItemTemplate>
        </asp:TemplateField>
        <asp:TemplateField HeaderText="ProductName" SortExpression="ProductName">
            <ItemTemplate>
                <asp:Label ID="Label2" runat="server"
                    Text='<%# Bind("ProductName") %>'></asp:Label>
            </ItemTemplate>
        </asp:TemplateField>
        <asp:TemplateField HeaderText="SupplierID" SortExpression="SupplierID">
            <ItemTemplate>
                <asp:Label ID="Label3" runat="server"
                    Text='<%# Bind("SupplierID") %>'></asp:Label>
            </ItemTemplate>
        </asp:TemplateField>
        <asp:TemplateField HeaderText="CategoryID" SortExpression="CategoryID">
            <ItemTemplate>
                <asp:Label ID="Label4" runat="server"
                    Text='<%# Bind("CategoryID") %>'></asp:Label>
            </ItemTemplate>
        </asp:TemplateField>
        <asp:TemplateField HeaderText="QuantityPerUnit"
            SortExpression="QuantityPerUnit">
            <ItemTemplate>
                <asp:Label ID="Label5" runat="server"
                    Text='<%# Bind("QuantityPerUnit") %>'></asp:Label>
            </ItemTemplate>
        </asp:TemplateField>
        <asp:TemplateField HeaderText="UnitPrice" SortExpression="UnitPrice">
            <ItemTemplate>
                <asp:Label ID="Label6" runat="server"
                    Text='<%# Bind("UnitPrice") %>'></asp:Label>
            </ItemTemplate>
        </asp:TemplateField>
        <asp:TemplateField HeaderText="UnitsInStock"
            SortExpression="UnitsInStock">
            <ItemTemplate>
                <asp:Label ID="Label7" runat="server"
                    Text='<%# Bind("UnitsInStock") %>'></asp:Label>
            </ItemTemplate>
        </asp:TemplateField>
        <asp:TemplateField HeaderText="UnitsOnOrder"
            SortExpression="UnitsOnOrder">
            <ItemTemplate>
                <asp:Label ID="Label8" runat="server"
                    Text='<%# Bind("UnitsOnOrder") %>'></asp:Label>
            </ItemTemplate>
        </asp:TemplateField>
        <asp:TemplateField HeaderText="ReorderLevel"
            SortExpression="ReorderLevel">
            <ItemTemplate>
                <asp:Label ID="Label9" runat="server"
                    Text='<%# Bind("ReorderLevel") %>'></asp:Label>
            </ItemTemplate>
        </asp:TemplateField>
        <asp:TemplateField HeaderText="Discontinued"
            SortExpression="Discontinued">
            <ItemTemplate>
                <asp:CheckBox ID="CheckBox1" runat="server"
                    Checked='<%# Bind("Discontinued") %>' Enabled="false" />
            </ItemTemplate>
        </asp:TemplateField>
        <asp:TemplateField HeaderText="CategoryName"
            SortExpression="CategoryName">
            <ItemTemplate>
                <asp:Label ID="Label10" runat="server"
                    Text='<%# Bind("CategoryName") %>'></asp:Label>
            </ItemTemplate>
        </asp:TemplateField>
        <asp:TemplateField HeaderText="SupplierName"
            SortExpression="SupplierName">
            <ItemTemplate>
                <asp:Label ID="Label11" runat="server"
                    Text='<%# Bind("SupplierName") %>'></asp:Label>
            </ItemTemplate>
        </asp:TemplateField>
    </Columns>
</asp:GridView>
现在,每个 GridView 字段都已转换为 TemplateField,我们可以将相应的插入接口输入到每个字段。FooterTemplate 某些字段将没有插入接口(ProductID例如);其他字段在用于收集新产品信息的 Web 控件中会有所不同。
若要创建编辑界面,请从 GridView 智能标记中选择“编辑模板”链接。 然后,从下拉列表中选择相应的字段, FooterTemplate 并将相应的控件从工具箱拖动到设计器上。
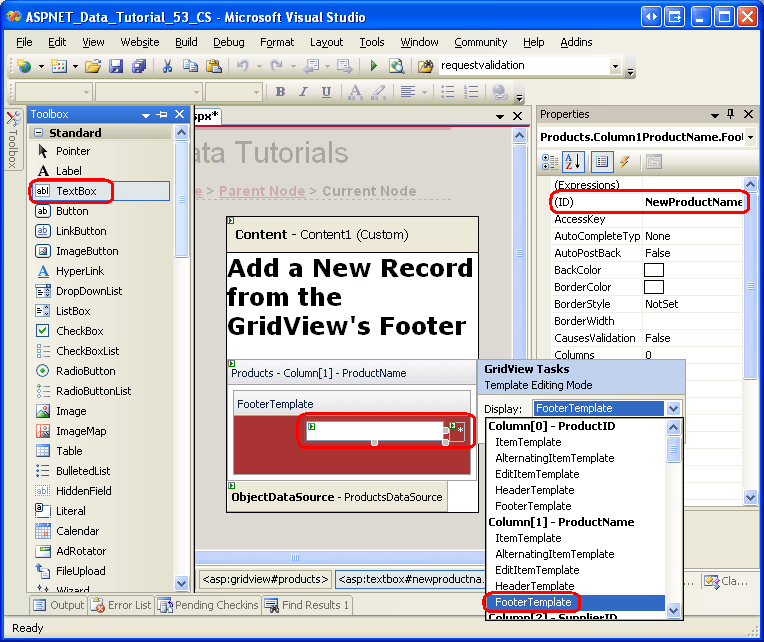
图 9:向每个字段 FooterTemplate 添加适当的插入接口(单击以查看全尺寸图像)
以下项目符号列表枚举了 GridView 的字段,并指定要添加的插入接口:
-
ProductID没有。 -
ProductName添加 TextBox 并将其设置为IDNewProductName。 添加 RequiredFieldValidator 控件,以确保用户输入新产品名称的值。 -
SupplierID没有。 -
CategoryID没有。 -
QuantityPerUnit添加 TextBox,将其ID设置为NewQuantityPerUnit. -
UnitPrice添加一个名为NewUnitPrice的 TextBox 以及一个 CompareValidator,以确保输入的值是大于或等于零的货币值。 -
UnitsInStock使用一个ID设置为NewUnitsInStock的TextBox。 包含 CompareValidator,确保输入的值是大于或等于零的整数值。 -
UnitsOnOrder使用一个ID设置为NewUnitsOnOrder的TextBox。 包含 CompareValidator,确保输入的值是大于或等于零的整数值。 -
ReorderLevel使用一个ID设置为NewReorderLevel的TextBox。 包含 CompareValidator,确保输入的值是大于或等于零的整数值。 -
Discontinued添加 CheckBox,将其ID设置为NewDiscontinued. -
CategoryName添加一个 DropDownList,并将其ID设置为NewCategoryID。 将其绑定到名为CategoriesDataSource的新 ObjectDataSource,并将其配置为使用CategoriesBLL类 sGetCategories()方法。 让 DropDownList 显示ListItemCategoryName数据字段,并使用CategoryID数据字段作为其值。 -
SupplierName添加一个 DropDownList,并将其ID设置为NewSupplierID。 将其绑定到名为SuppliersDataSource的新 ObjectDataSource,并将其配置为使用SuppliersBLL类 sGetSuppliers()方法。 让 DropDownList 显示ListItemCompanyName数据字段,并使用SupplierID数据字段作为其值。
对于每个验证控件,请清除 ForeColor 该属性,以便 FooterStyle 使用 CSS 类的白色前景色代替默认红色。 此外,请使用该 ErrorMessage 属性进行详细说明,但将 Text 属性设置为星号。 若要防止验证控件的文本导致插入界面换行成两行,请将每个使用验证控件的 FooterStyle 的 Wrap 属性设置为 false。 最后,在 GridView 下面添加 ValidationSummary 控件,并将其 ShowMessageBox 属性 True 设置为及其 ShowSummary 属性 False。
添加新产品时,我们需要提供 CategoryID 和 SupplierID。 此信息通过页脚单元格中的下拉列表来捕获,适用于 CategoryName 和 SupplierName 字段。 我选择使用这些字段而不是 CategoryIDSupplierID TemplateFields,因为在网格的数据行中,用户可能更感兴趣的是查看类别和供应商名称,而不是它们的 ID 值。 由于CategoryID和SupplierID值现在在CategoryName和SupplierName字段接口中被捕获,因此我们可以删除 GridView 中的CategoryID和SupplierID TemplateFields。
同样,在添加新产品时不使用 ProductID ,因此也可以删除 ProductID 模板字段。 但是,让我们将 ProductID 字段保留在网格中。 除了构成插入接口的 TextBoxes、DropDownLists、CheckBoxes 和验证控件外,还需要一个“添加”按钮,单击后,执行将新产品添加到数据库的逻辑。 在步骤 4 中,我们将在 TemplateField s ProductID的插入界面FooterTemplate中包含“添加”按钮。
随时改进各种 GridView 字段的外观。 例如,你可能希望将UnitPrice值的格式设置为货币、右对齐UnitsInStockUnitsOnOrder和ReorderLevel字段,并更新 HeaderText TemplateFields 的值。
在 FooterTemplate 中创建一系列插入接口、删除 SupplierID 和 CategoryID TemplateFields 并通过格式设置和对齐 TemplateFields 来改进网格的美观之后,GridView 的声明性标记会如下所示:
<asp:GridView ID="Products" runat="server" AutoGenerateColumns="False"
    DataKeyNames="ProductID" DataSourceID="ProductsDataSource"
    AllowPaging="True" EnableViewState="False" ShowFooter="True">
    <Columns>
        <asp:TemplateField HeaderText="ProductID" InsertVisible="False"
            SortExpression="ProductID">
            <ItemTemplate>
                <asp:Label ID="Label1" runat="server"
                    Text='<%# Bind("ProductID") %>'></asp:Label>
            </ItemTemplate>
            <ItemStyle HorizontalAlign="Center" />
        </asp:TemplateField>
        <asp:TemplateField HeaderText="Product" SortExpression="ProductName">
            <ItemTemplate>
                <asp:Label ID="Label2" runat="server"
                    Text='<%# Bind("ProductName") %>'></asp:Label>
            </ItemTemplate>
            <FooterTemplate>
                <asp:TextBox ID="NewProductName" runat="server"></asp:TextBox>
                <asp:RequiredFieldValidator ID="RequiredFieldValidator1"
                    runat="server" ControlToValidate="NewProductName"
                    Display="Dynamic"  ForeColor="
                    ErrorMessage="You must enter a name for the new product.">
                    * </asp:RequiredFieldValidator>
            </FooterTemplate>
            <FooterStyle Wrap="False" />
        </asp:TemplateField>
        <asp:TemplateField HeaderText="Category" SortExpression="CategoryName">
            <ItemTemplate>
                <asp:Label ID="Label10" runat="server"
                    Text='<%# Bind("CategoryName") %>'></asp:Label>
            </ItemTemplate>
            <FooterTemplate>
                <asp:DropDownList ID="NewCategoryID" runat="server"
                    DataSourceID="CategoriesDataSource"
                    DataTextField="CategoryName" DataValueField="CategoryID">
                </asp:DropDownList>
                <asp:ObjectDataSource ID="CategoriesDataSource" runat="server"
                    OldValuesParameterFormatString="original_{0}"
                    SelectMethod="GetCategories" TypeName="CategoriesBLL">
                </asp:ObjectDataSource>
            </FooterTemplate>
        </asp:TemplateField>
        <asp:TemplateField HeaderText="Supplier" SortExpression="SupplierName">
            <ItemTemplate>
                <asp:Label ID="Label11" runat="server"
                    Text='<%# Bind("SupplierName") %>'></asp:Label>
            </ItemTemplate>
            <FooterTemplate>
                <asp:DropDownList ID="NewSupplierID" runat="server"
                    DataSourceID="SuppliersDataSource"
                    DataTextField="CompanyName" DataValueField="SupplierID">
                </asp:DropDownList><asp:ObjectDataSource ID="SuppliersDataSource"
                    runat="server" OldValuesParameterFormatString="original_{0}"
                    SelectMethod="GetSuppliers" TypeName="SuppliersBLL">
                </asp:ObjectDataSource>
            </FooterTemplate>
        </asp:TemplateField>
        <asp:TemplateField HeaderText="Qty/Unit" SortExpression="QuantityPerUnit">
            <ItemTemplate>
                <asp:Label ID="Label5" runat="server"
                    Text='<%# Bind("QuantityPerUnit") %>'></asp:Label>
            </ItemTemplate>
            <FooterTemplate>
                <asp:TextBox ID="NewQuantityPerUnit" runat="server"></asp:TextBox>
            </FooterTemplate>
        </asp:TemplateField>
        <asp:TemplateField HeaderText="Price" SortExpression="UnitPrice">
            <ItemTemplate>
                <asp:Label ID="Label6" runat="server"
                    Text='<%# Bind("UnitPrice", "{0:c}") %>'></asp:Label>
            </ItemTemplate>
            <FooterTemplate>
                $<asp:TextBox ID="NewUnitPrice" runat="server" Columns="8" />
                <asp:CompareValidator ID="CompareValidator1" runat="server"
                    ControlToValidate="NewUnitPrice"
                    ErrorMessage="You must enter a valid currency value greater than
                        or equal to 0.00. Do not include the currency symbol."
                    ForeColor="" Operator="GreaterThanEqual" Type="Currency"
                    ValueToCompare="0" Display="Dynamic">
                    * </asp:CompareValidator>
            </FooterTemplate>
            <ItemStyle HorizontalAlign="Right" />
            <FooterStyle Wrap="False" />
        </asp:TemplateField>
        <asp:TemplateField HeaderText="Units In Stock"
            SortExpression="Units In Stock">
            <ItemTemplate>
                <asp:Label ID="Label7" runat="server"
                    Text='<%# Bind("UnitsInStock") %>'></asp:Label>
            </ItemTemplate>
            <FooterTemplate>
                <asp:TextBox ID="NewUnitsInStock" runat="server" Columns="5" />
                <asp:CompareValidator ID="CompareValidator2" runat="server"
                    ControlToValidate="NewUnitsInStock" Display="Dynamic"
                    ErrorMessage="You must enter a valid numeric value for units
                        in stock that's greater than or equal to zero."
                    ForeColor="" Operator="GreaterThanEqual" Type="Integer"
                        ValueToCompare="0">*</asp:CompareValidator>
            </FooterTemplate>
            <ItemStyle HorizontalAlign="Right" />
            <FooterStyle Wrap="False" />
        </asp:TemplateField>
        <asp:TemplateField HeaderText="Units On Order" SortExpression="UnitsOnOrder">
            <ItemTemplate>
                <asp:Label ID="Label8" runat="server"
                    Text='<%# Bind("UnitsOnOrder") %>'></asp:Label>
            </ItemTemplate>
            <FooterTemplate>
                <asp:TextBox ID="NewUnitsOnOrder" runat="server" Columns="5" />
                <asp:CompareValidator ID="CompareValidator3" runat="server"
                    ControlToValidate="NewUnitsOnOrder" Display="Dynamic"
                    ErrorMessage="You must enter a valid numeric value for units on
                        order that's greater than or equal to zero."
                    ForeColor="" Operator="GreaterThanEqual" Type="Integer"
                    ValueToCompare="0">*</asp:CompareValidator>
            </FooterTemplate>
            <ItemStyle HorizontalAlign="Right" />
            <FooterStyle Wrap="False" />
        </asp:TemplateField>
        <asp:TemplateField HeaderText="Reorder Level" SortExpression="ReorderLevel">
            <ItemTemplate>
                <asp:Label ID="Label9" runat="server"
                    Text='<%# Bind("ReorderLevel") %>'></asp:Label>
            </ItemTemplate>
            <FooterTemplate>
                <asp:TextBox ID="NewReorderLevel" runat="server" Columns="5" />
                <asp:CompareValidator ID="CompareValidator4" runat="server"
                    ControlToValidate="NewReorderLevel" Display="Dynamic"
                    ErrorMessage="You must enter a valid numeric value for reorder
                        level that's greater than or equal to zero."
                    ForeColor="" Operator="GreaterThanEqual" Type="Integer"
                    ValueToCompare="0">*</asp:CompareValidator>
            </FooterTemplate>
            <ItemStyle HorizontalAlign="Right" />
            <FooterStyle Wrap="False" />
        </asp:TemplateField>
        <asp:TemplateField HeaderText="Discontinued" SortExpression="Discontinued">
            <ItemTemplate>
                <asp:CheckBox ID="CheckBox1" runat="server"
                    Checked='<%# Bind("Discontinued") %>' Enabled="false" />
            </ItemTemplate>
            <FooterTemplate>
                <asp:CheckBox ID="NewDiscontinued" runat="server" />
            </FooterTemplate>
            <ItemStyle HorizontalAlign="Center" />
            <FooterStyle HorizontalAlign="Center" />
        </asp:TemplateField>
    </Columns>
</asp:GridView>
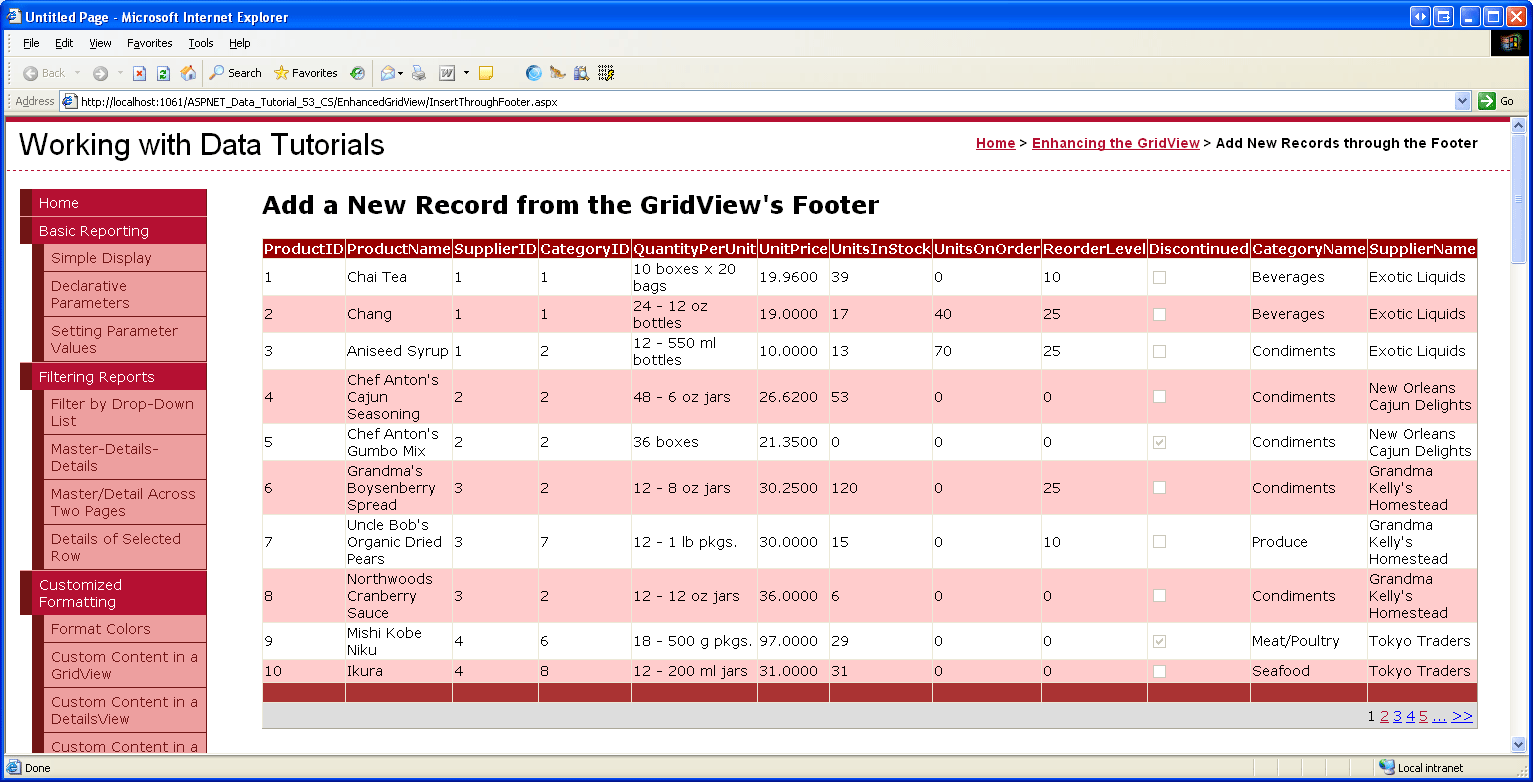
通过浏览器查看时,GridView 的页脚行现在包括已完成的插入界面(请参阅图 10)。 此时,插入界面不包含用户指示她已输入新产品的数据,并希望在数据库中插入新记录的方法。 此外,我们尚未解决输入页脚的数据将如何转换为数据库中的新记录 Products 。 在步骤 4 中,我们将了解如何在插入界面中包含一个“添加”按钮,以及如何在单击按钮后在回发时执行代码。 步骤 5 演示如何使用页脚中的数据插入新记录。

图 10:GridView 页脚提供用于添加新记录的接口(单击以查看全尺寸图像)
步骤 4:在插入界面中包含“添加”按钮
我们需要在插入界面中包含一个“添加”按钮,因为页脚行插入界面当前缺少指示用户已完成输入新产品信息的方法。 这可以放置在现有 FooterTemplate s 之一中,也可以为此向网格添加新列。 在本教程中,让我们将“添加”按钮 ProductID 放在 TemplateField s 中 FooterTemplate。
在设计器中,单击 GridView 智能标记中的“编辑模板”链接,然后从下拉列表中选择字段ProductIDFooterTemplate。 将一个按钮 Web 控件(或者根据需要选择 LinkButton 或 ImageButton)添加到模板中,将其 ID 设置为AddProduct,将CommandName设置为“插入”,并将Text属性设置为“添加”,如图 11 所示。
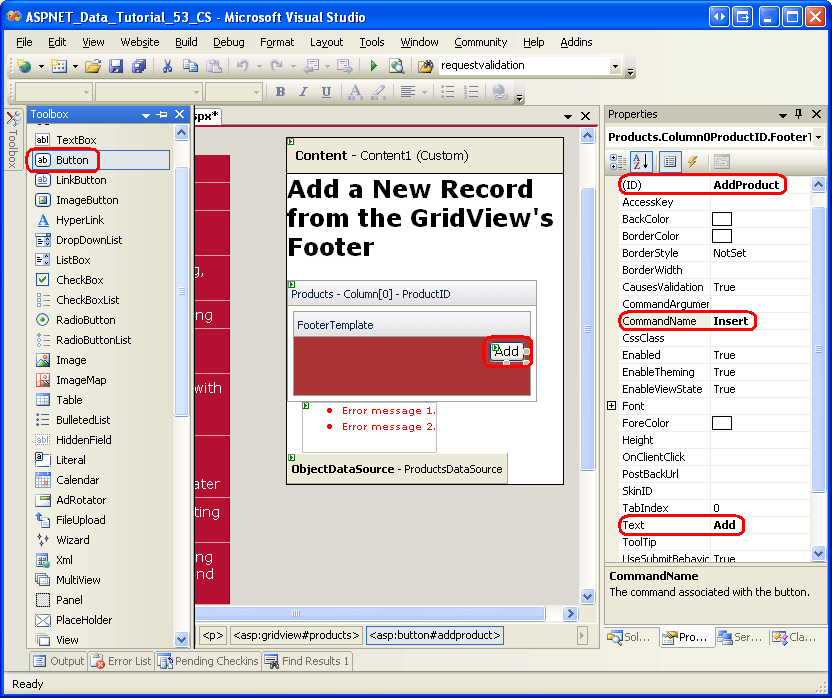
图 11:将“添加按钮 ProductID ”置于 TemplateField s 中 FooterTemplate (单击以查看全尺寸图像)
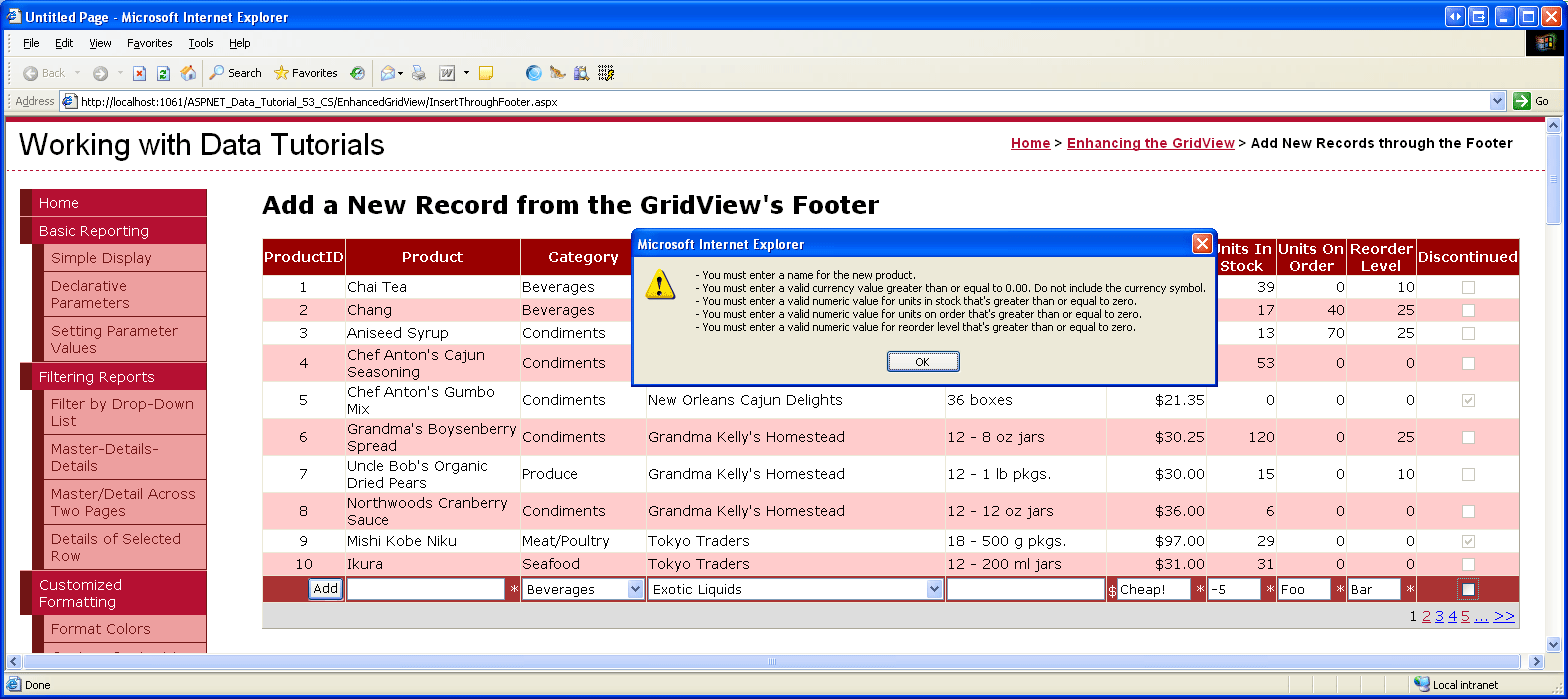
在包含“添加”按钮后,在浏览器中测试页面。 请注意,单击插入接口中具有无效数据的“添加”按钮时,回发会短路,ValidationSummary 控件指示无效数据(请参阅图 12)。 输入适当的数据后,单击“添加”按钮会导致回传。 但是,不会向数据库添加任何记录。 我们需要编写一些代码来实际执行插入。

图 12:如果插入界面中存在无效数据,“添加”按钮的响应将被中断(单击以查看全尺寸图像)
注释
插入接口中的验证控件未分配给验证组。 只要插入接口是页面上唯一的一组验证控件,这就可以正常工作。 但是,如果页面上还有其他验证控件(例如网格编辑界面中的验证控件),则应为插入界面和添加按钮 ValidationGroup 属性中的验证控件分配相同的值,以便将这些控件与特定的验证组相关联。 有关将页面上的验证控件和按钮分区为验证组的详细信息,请参阅 ASP.NET 2.0 中的验证控件 。
步骤 5:将新记录Products插入表中
利用 GridView 的内置编辑功能时,GridView 会自动处理执行更新所需的所有工作。 具体而言,当单击“更新”按钮时,它将从编辑界面输入的值复制到 ObjectDataSource 集合 UpdateParameters 中的参数,并通过调用 ObjectDataSource 方法 Update() 启动更新。 由于 GridView 不提供此类内置功能用于插入,因此我们必须实现调用 ObjectDataSource 方法 Insert() 的代码,并将插入接口中的值复制到 ObjectDataSource 集合 InsertParameters 。
单击“添加”按钮后,应执行此插入逻辑。 如 GridView 教程中的“添加和响应按钮 ”中所述,只要单击 GridView 中的 Button、LinkButton 或 ImageButton,GridView 的事件 RowCommand 就会在回发时触发。 此事件无论是在页脚行中通过显式添加的按钮、LinkButton或ImageButton(例如“添加”按钮),还是由GridView自动添加的(例如,选择“启用排序”时的每个列顶部的LinkButton或在选择“启用分页”时分页界面中的LinkButton),都会被触发。
因此,若要响应用户单击“添加”按钮,我们需要为 GridView 事件 RowCommand 创建事件处理程序。 由于每当单击 GridView 中的任何 Button、LinkButton 或 ImageButton 时,此事件就会触发,因此,仅当传入事件处理程序的CommandName属性映射到“添加”按钮的CommandName值(Insert)时,我们才需要继续执行插入逻辑。 此外,仅当验证控件报告有效数据时,我们才应继续作。 为此,请使用以下代码为 RowCommand 事件创建事件处理程序:
Protected Sub Products_RowCommand(sender As Object, e As GridViewCommandEventArgs) _
    Handles Products.RowCommand

    ' Insert data if the CommandName == "Insert"
    ' and the validation controls indicate valid data...
    If e.CommandName = "Insert" AndAlso Page.IsValid Then
        ' TODO: Insert new record...
    End If
End Sub
注释
你可能想知道为什么事件处理程序费心检查 Page.IsValid 属性。 毕竟,如果插入接口中提供了无效数据,不会禁止回发? 只要用户未禁用 JavaScript 或已采取措施规避客户端验证逻辑,此假设是正确的。 简言之,绝不应严格依赖客户端验证:在处理数据之前,应始终执行服务器端检查的有效性。
在步骤 1 中,我们创建了 ProductsDataSource ObjectDataSource,使其 Insert() 方法映射到 ProductsBLL 类的 AddProduct 方法。 若要将新记录 Products 插入表中,我们只需调用 ObjectDataSource s Insert() 方法:
Protected Sub Products_RowCommand(sender As Object, e As GridViewCommandEventArgs) _
    Handles Products.RowCommand

    ' Insert data if the CommandName == "Insert"
    ' and the validation controls indicate valid data...
    If e.CommandName = "Insert" AndAlso Page.IsValid Then
        ' Insert new record
        ProductsDataSource.Insert()
    End If
End Sub
现在,Insert() 方法已被调用,剩余的工作是将插入接口中的值复制到传递给 ProductsBLL 类的 AddProduct 方法的参数中。 正如我们在 检查与插入、更新和删除教程关联的事件 时看到的那样,这可以通过 ObjectDataSource s Inserting 事件来完成。
Inserting在这种情况下,我们需要以编程方式引用 GridView 页脚行中的控件Products,并将其值e.InputParameters分配给集合。 如果用户省略一个值(例如将 TextBox 留 ReorderLevel 空),则需要指定插入到数据库中的值应为 NULL。 由于AddProducts方法接受可为空的数据库字段的类型,因此只需要使用可为空的类型,并在用户输入省略的情况下将其值设为Nothing。
Protected Sub ProductsDataSource_Inserting _
    (sender As Object, e As .ObjectDataSourceMethodEventArgs) _
    Handles ProductsDataSource.Inserting

    ' Programmatically reference Web controls in the inserting interface...
    Dim NewProductName As TextBox = _
        Products.FooterRow.FindControl("NewProductName")
    Dim NewCategoryID As DropDownList = _
        Products.FooterRow.FindControl("NewCategoryID")
    Dim NewSupplierID As DropDownList = _
        Products.FooterRow.FindControl("NewSupplierID")
    Dim NewQuantityPerUnit As TextBox = _
        Products.FooterRow.FindControl("NewQuantityPerUnit")
    Dim NewUnitPrice As TextBox = _
        Products.FooterRow.FindControl("NewUnitPrice")
    Dim NewUnitsInStock As TextBox = _
        Products.FooterRow.FindControl("NewUnitsInStock")
    Dim NewUnitsOnOrder As TextBox = _
        Products.FooterRow.FindControl("NewUnitsOnOrder")
    Dim NewReorderLevel As TextBox = _
        Products.FooterRow.FindControl("NewReorderLevel")
    Dim NewDiscontinued As CheckBox = _
        Products.FooterRow.FindControl("NewDiscontinued")
    ' Set the ObjectDataSource's InsertParameters values...
    e.InputParameters("productName") = NewProductName.Text
    e.InputParameters("supplierID") = _
        Convert.ToInt32(NewSupplierID.SelectedValue)
    e.InputParameters("categoryID") = _
        Convert.ToInt32(NewCategoryID.SelectedValue)
    Dim quantityPerUnit As String = Nothing
    If Not String.IsNullOrEmpty(NewQuantityPerUnit.Text) Then
        quantityPerUnit = NewQuantityPerUnit.Text
    End If
    e.InputParameters("quantityPerUnit") = quantityPerUnit
    Dim unitPrice As Nullable(Of Decimal) = Nothing
    If Not String.IsNullOrEmpty(NewUnitPrice.Text) Then
        unitPrice = Convert.ToDecimal(NewUnitPrice.Text)
    End If
    e.InputParameters("unitPrice") = unitPrice
    Dim unitsInStock As Nullable(Of Short) = Nothing
    If Not String.IsNullOrEmpty(NewUnitsInStock.Text) Then
        unitsInStock = Convert.ToInt16(NewUnitsInStock.Text)
    End If
    e.InputParameters("unitsInStock") = unitsInStock
    Dim unitsOnOrder As Nullable(Of Short) = Nothing
    If Not String.IsNullOrEmpty(NewUnitsOnOrder.Text) Then
        unitsOnOrder = Convert.ToInt16(NewUnitsOnOrder.Text)
    End If
    e.InputParameters("unitsOnOrder") = unitsOnOrder
    Dim reorderLevel As Nullable(Of Short) = Nothing
    If Not String.IsNullOrEmpty(NewReorderLevel.Text) Then
        reorderLevel = Convert.ToInt16(NewReorderLevel.Text)
    End If
    e.InputParameters("reorderLevel") = reorderLevel
    e.InputParameters("discontinued") = NewDiscontinued.Checked
End Sub
完成事件处理程序后 Inserting ,可以通过 GridView 的页脚行将新记录添加到 Products 数据库表中。 请继续尝试添加几个新产品。
增强和自定义添加操作
目前,单击“添加”按钮将新记录添加到数据库表,但不提供已成功添加记录的任何视觉反馈。 理想情况下,标签 Web 控件或客户端警报框会通知用户其插入已成功完成。 我把这留给读者的练习。
本教程中使用的 GridView 不会对列出的产品应用任何排序顺序,也不允许最终用户对数据进行排序。 因此,记录按主键字段在数据库中进行排序。 由于每个新记录的值 ProductID 都大于上一条,因此每次添加新产品时,它都会附加到网格的末尾。 因此,你可能希望在添加新记录后自动将用户发送到 GridView 的最后一页。 这可以通过在ProductsDataSource.Insert()事件处理程序中调用RowCommand之后,添加以下代码行来实现,以指示在将数据绑定到 GridView 后,需要将用户导航到最后一页:
' Indicate that the user needs to be sent to the last page
SendUserToLastPage = True
SendUserToLastPage 是一个页级布尔变量,初始被赋值为 False。 在 GridView 的 DataBound 事件处理程序中,如果 SendUserToLastPage 为 false,则会 PageIndex 更新属性以将用户发送到最后一页。
Protected Sub Products_DataBound(sender As Object, e As EventArgs) _
    Handles Products.DataBound

    ' Send user to last page of data, if needed
    If SendUserToLastPage Then
        Products.PageIndex = Products.PageCount - 1
    End If
End Sub
属性PageIndex是在DataBound事件处理程序中设置的(而不是在RowCommand事件处理程序中),因为当RowCommand事件处理程序触发时,我们尚未将新记录添加到Products数据库表。 因此,在事件处理程序中 RowCommand ,最后一页索引 (PageCount - 1) 表示添加新产品 之前 的最后一页索引。 对于要添加的大多数产品,在添加新产品后,最后一页索引相同。 但是,当添加的产品生成新的最后一页索引时,如果我们错误地更新 PageIndex 中的 RowCommand 事件处理程序,那么我们会被带到倒数第二页(添加新产品之前的最后一页索引),而不是新的最后一页索引。
DataBound由于事件处理程序在添加新产品后触发,并且数据会反弹到网格中,因此通过设置PageIndex该属性,我们知道我们重新获取了正确的最后一页索引。
最后,由于添加新产品时需要收集的字段数量较多,本教程中使用的 GridView 的宽度很大。 由于此宽度,可能首选 DetailsView 的垂直布局。 可以通过收集更少的输入来减少 GridView 的整体宽度。 也许在添加新产品时,我们不需要收集UnitsOnOrderUnitsInStock字段和ReorderLevel字段,在这种情况下,可以从 GridView 中删除这些字段。
若要调整收集的数据,可以使用以下两种方法之一:
- 继续使用期望
AddProduct、UnitsOnOrder和UnitsInStock字段值的ReorderLevel方法。 在Inserting事件处理程序中,提供硬编码的默认值,以用于那些已从插入接口中删除的输入。 - 在
AddProduct类中创建新的ProductsBLL方法重载,该重载不接受UnitsOnOrder、UnitsInStock和ReorderLevel字段的输入。 然后,在 ASP.NET 页中,将 ObjectDataSource 配置为使用此新重载。
任一选项都会同样有效。 在以前的教程中,我们使用后一个选项,为 ProductsBLL 类 UpdateProduct 方法创建多个重载。
概要
GridView 缺少 DetailsView 和 FormView 中找到的内置插入功能,但可以努力地将插入接口添加到页脚行。 若要在 GridView 中显示页脚行,只需将其 ShowFooter 属性设置为 True。 通过将字段转换为 TemplateField 模板字段,并将插入接口添加到 FooterTemplate,可以为每个字段自定义页脚行内容。 正如我们在本教程中看到的那样, FooterTemplate 可以包含 Buttons、TextBoxes、DropDownLists、CheckBoxes、用于填充数据驱动 Web 控件(如 DropDownLists)和验证控件的数据源控件。 除了用于收集用户输入的控件外,还需要一个“添加按钮”、LinkButton 或 ImageButton。
单击“添加”按钮时,将调用 ObjectDataSource s Insert() 方法以启动插入工作流。 然后,ObjectDataSource 将调用配置的 insert 方法( ProductsBLL 本教程中的类 s AddProduct 方法)。 在调用 insert 方法之前,我们必须将 GridView 插入接口中的值复制到 ObjectDataSource 集合 InsertParameters 。 这可以通过以编程方式引用 ObjectDataSource 事件处理程序 Inserting 中的插入接口 Web 控件来实现。
本教程介绍了增强 GridView 外观的技术。 下一组教程将介绍如何处理图像、PDF、Word 文档等二进制数据以及数据 Web 控件。
快乐编程!
关于作者
斯科特·米切尔,七本 ASP/ASP.NET 书籍的作者和 4GuysFromRolla.com 的创始人,自1998年以来一直在与Microsoft Web 技术合作。 斯科特担任独立顾问、教练和作家。 他的最新书是:《24小时自学ASP.NET 2.0》 他可以通过 mitchell@4GuysFromRolla.com 联系到。
特别感谢
本教程系列由许多有用的审阅者审阅。 本教程的主要审阅者是 Bernadette Leigh。 有兴趣查看即将发布的 MSDN 文章? 如果是这样,请给我发个消息。mitchell@4GuysFromRolla.com