本文介绍如何开始将 ASP.NET MVC 项目迁移到 ASP.NET Core MVC。 在这一过程中,它突出了与 ASP.NET MVC 相关的变更。
从 ASP.NET MVC 迁移是一个多步骤过程。 本文介绍:
- Initial setup.
- 基本控制器和视图。
- Static content.
- Client-side dependencies.
有关迁移配置和 Identity 代码,请参阅 将配置迁移到 ASP.NET Core 和 将身份验证和 Identity 迁移到 ASP.NET Core。
Prerequisites
- 具有 ASP.NET 和 Web 开发工作负载的 Visual Studio 2019 16.4 或更高版本
- .NET Core 3.1 SDK
创建 ASP.NET MVC 的入门项目
在 Visual Studio 中创建 ASP.NET MVC 项目的示例以迁移:
- From the File menu, select New>Project.
- 选择 ASP.NET Web 应用程序(.NET Framework), 然后选择“ 下一步”。
- Name the project WebApp1 so the namespace matches the ASP.NET Core project created in the next step. Select Create.
- Select MVC, and then select Create.
创建 ASP.NET 核心项目
使用新的 ASP.NET Core 项目创建新解决方案,以便迁移到:
- 启动 Visual Studio 的第二个实例。
- From the File menu, select New>Project.
- 选择 ASP.NET 核心 Web 应用程序 ,然后选择“ 下一步”。
- 在 “配置新项目 ”对话框中,将项目 命名为 WebApp1。
- 将位置设置为与上一个项目不同的目录,以使用相同的项目名称。 使用相同的命名空间可以更轻松地在两个项目之间复制代码。 Select Create.
- 在“创建新的 ASP.NET 核心 Web 应用程序 对话框中,确认已选择 .NET Core 和 ASP.NET Core 3.1。 选择 Web 应用程序(模型-View-Controller) 项目模板,然后选择“ 创建”。
将 ASP.NET 核心站点配置为使用 MVC
在 ASP.NET Core 3.0 或更高版本项目中,.NET Framework 不再是受支持的目标框架。 项目必须面向 .NET Core。 ASP.NET Core 共享框架(包括 MVC)是 .NET Core 运行时安装的一部分。 在项目文件中使用 Microsoft.NET.Sdk.Web SDK 时,会自动引用共享框架:
<Project Sdk="Microsoft.NET.Sdk.Web">
For more information, see Framework reference.
在 ASP.NET Core 中的 Startup 类:
-
Global.asax替换 。 - 处理所有应用启动任务。
有关详细信息,请参阅 ASP.NET Core 中的应用启动。
在 ASP.NET Core 项目中,打开 Startup.cs 该文件:
public class Startup
{
    public Startup(IConfiguration configuration)
    {
        Configuration = configuration;
    }

    public IConfiguration Configuration { get; }

    // This method gets called by the runtime. Use this method to add services to the container.
    public void ConfigureServices(IServiceCollection services)
    {
        services.AddControllersWithViews();
    }

    // This method gets called by the runtime. Use this method to configure the HTTP request pipeline.
    public void Configure(IApplicationBuilder app, IWebHostEnvironment env)
    {
        if (env.IsDevelopment())
        {
            app.UseDeveloperExceptionPage();
        }
        else
        {
            app.UseExceptionHandler("/Home/Error");
            // The default HSTS value is 30 days. You may want to change this for production scenarios, see https://aka.ms/aspnetcore-hsts.
            app.UseHsts();
        }
        app.UseHttpsRedirection();
        app.UseStaticFiles();

        app.UseRouting();

        app.UseAuthorization();

        app.UseEndpoints(endpoints =>
        {
            endpoints.MapControllerRoute(
                name: "default",
                pattern: "{controller=Home}/{action=Index}/{id?}");
        });
    }
}
ASP.NET 核心应用必须选择使用中间件加入框架功能。 上一个模板生成的代码添加以下服务和中间件:
- 扩展 AddControllersWithViews 方法为控制器、API 相关功能和视图注册 MVC 服务支持。 有关 MVC 服务注册选项的详细信息,请参阅 MVC 服务注册
-
UseStaticFiles扩展方法添加静态文件处理程序
Microsoft.AspNetCore.StaticFiles。 必须调用扩展方法UseStaticFiles,然后才能调用UseRouting。 有关详细信息,请参阅 ASP.NET Core 中的静态文件。 - 扩展 UseRouting 方法添加路由。 有关详细信息,请参阅 ASP.NET Core 中的路由。
此现有配置包括迁移示例 ASP.NET MVC 项目所需的内容。 有关 ASP.NET 核心中间件选项的详细信息,请参阅 ASP.NET Core 中的应用启动。
迁移控制器和视图
在 ASP.NET Core 项目中,将添加一个新的空控制器类和视图类,作为占位符,并与任何要从中迁移的 ASP.NET MVC 项目中的控制器类和视图类同名。
The ASP.NET Core WebApp1 project already includes a minimal example controller and view by the same name as the ASP.NET MVC project. So those will serve as placeholders for the ASP.NET MVC controller and views to be migrated from the ASP.NET MVC WebApp1 project.
- 从 ASP.NET MVC
HomeController复制方法以替换新的 ASP.NET CoreHomeController方法。 无需更改动作方法的返回类型。 ASP.NET MVC 内置模板的控制器作方法返回类型为 ActionResult;在 ASP.NET Core MVC 中,作方法将改为返回IActionResult。ActionResult可实现IActionResult。 - In the ASP.NET Core project, right-click the Views/Home directory, select Add>Existing Item.
- 在 “添加现有项 ”对话框中,导航到 ASP.NET MVC WebApp1 项目的 视图/Home 目录。
- Select the
About.cshtml,Contact.cshtml, andIndex.cshtmlRazor view files, then select Add, replacing the existing files.
有关详细信息,请参阅 在 ASP.NET Core MVC 中使用控制器处理请求 和 ASP.NET Core MVC 中的视图。
测试每个方法
可以测试每个控制器终结点,但文档中稍后将介绍布局和样式。
- 运行 ASP.NET Core 应用。
- 通过将当前端口号替换为 ASP.NET Core 项目中使用的端口号,从浏览器调用正在运行的 ASP.NET Core 应用上的呈现视图。 例如,
https://localhost:44375/home/about。
迁移静态内容
在 ASP.NET MVC 5 或更早版本中,静态内容是从 Web 项目的根目录托管的,并与服务器端文件混合。 In ASP.NET Core, static files are stored within the project's web root directory. 默认目录是 {content root}/wwwroot,但可以更改它。 有关详细信息,请参阅 ASP.NET Core 中的静态文件。
Copy the static content from the ASP.NET MVC WebApp1 project to the wwwroot directory in the ASP.NET Core WebApp1 project:
- In the ASP.NET Core project, right-click the
wwwrootdirectory, select Add>Existing Item. - 在 “添加现有项 ”对话框中,导航到 ASP.NET MVC WebApp1 项目。
- Select the
favicon.icofile, then select Add, replacing the existing file.
迁移布局文件
将 ASP.NET MVC 项目布局文件复制到 ASP.NET 核心项目:
- In the ASP.NET Core project, right-click the
Viewsdirectory, select Add>Existing Item. - 在 “添加现有项 ”对话框中,导航到 ASP.NET MVC WebApp1 项目的
Views目录。 - Select the
_ViewStart.cshtmlfile then select Add.
将 ASP.NET MVC 项目共享布局文件复制到 ASP.NET 核心项目:
- In the ASP.NET Core project, right-click the
Views/Shareddirectory, select Add>Existing Item. - 在 “添加现有项 ”对话框中,导航到 ASP.NET MVC WebApp1 项目的
Views/Shared目录。 - Select the
_Layout.cshtmlfile, then select Add, replacing the existing file.
在 ASP.NET Core 项目中,打开 _Layout.cshtml 该文件。 进行以下更改以匹配如下所示的已完成代码:
更新 Bootstrap CSS 的引用,以符合以下完成的代码:
- 将
@Styles.Render("~/Content/css")替换为<link>元素以加载bootstrap.css(请参阅下文)。 - 删除
@Scripts.Render("~/bundles/modernizr")。
完整的替换标记用于包含 Bootstrap CSS:
<link rel="stylesheet"
    href="https://maxcdn.bootstrapcdn.com/bootstrap/3.3.7/css/bootstrap.css"
    integrity="sha384-BVYiiSIFeK1dGmJRAkycuHAHRg32OmUcww7on3RYdg4Va+PmSTsz/K68vbdEjh4u"
    crossorigin="anonymous">
更新 jQuery 和 Bootstrap 的 JavaScript 引入,以匹配下方已完成的代码:
- 将
@Scripts.Render("~/bundles/jquery")替换为<script>元素(请参阅下文)。 - 将
@Scripts.Render("~/bundles/bootstrap")替换为<script>元素(请参阅下文)。
jQuery 和 Bootstrap JavaScript 包含的完整替换标记:
<script src="https://code.jquery.com/jquery-3.3.1.js"></script>
<script src="https://maxcdn.bootstrapcdn.com/bootstrap/3.3.7/js/bootstrap.js"
    integrity="sha384-Tc5IQib027qvyjSMfHjOMaLkfuWVxZxUPnCJA7l2mCWNIpG9mGCD8wGNIcPD7Txa" crossorigin="anonymous"></script>
更新后的 _Layout.cshtml 文件如下:
<!DOCTYPE html>
<html>
<head>
<meta charset="utf-8" />
<meta name="viewport" content="width=device-width, initial-scale=1.0">
<title>@ViewBag.Title - My ASP.NET Application</title>
<link rel="stylesheet"
href="https://maxcdn.bootstrapcdn.com/bootstrap/3.3.7/css/bootstrap.css"
integrity="sha384-BVYiiSIFeK1dGmJRAkycuHAHRg32OmUcww7on3RYdg4Va+PmSTsz/K68vbdEjh4u"
crossorigin="anonymous">
</head>
<body>
<div class="navbar navbar-inverse navbar-fixed-top">
<div class="container">
<div class="navbar-header">
<button type="button" class="navbar-toggle" data-toggle="collapse" data-target=".navbar-collapse">
<span class="icon-bar"></span>
<span class="icon-bar"></span>
<span class="icon-bar"></span>
</button>
@Html.ActionLink("Application name", "Index", "Home", new { area = "" }, new { @class = "navbar-brand" })
</div>
<div class="navbar-collapse collapse">
<ul class="nav navbar-nav">
<li>@Html.ActionLink("Home", "Index", "Home")</li>
<li>@Html.ActionLink("About", "About", "Home")</li>
<li>@Html.ActionLink("Contact", "Contact", "Home")</li>
</ul>
</div>
</div>
</div>
<div class="container body-content">
@RenderBody()
<hr />
<footer>
<p>© @DateTime.Now.Year - My ASP.NET Application</p>
</footer>
</div>
<script src="https://code.jquery.com/jquery-3.3.1.js"></script>
<script src="https://maxcdn.bootstrapcdn.com/bootstrap/3.3.7/js/bootstrap.js"
integrity="sha384-Tc5IQib027qvyjSMfHjOMaLkfuWVxZxUPnCJA7l2mCWNIpG9mGCD8wGNIcPD7Txa" crossorigin="anonymous"></script>
@RenderSection("scripts", required: false)
</body>
</html>
在浏览器中查看站点。 它应按照预期样式呈现。
配置打包和压缩
ASP.NET Core is compatible with several open-source bundling and minification solutions such as WebOptimizer and other similar libraries. ASP.NET Core 不提供本机捆绑和缩小解决方案。 有关配置捆绑和缩小的信息,请参阅 捆绑和缩小。
解决 HTTP 500 错误
有许多问题可能导致 HTTP 500 错误消息不包含有关问题源的信息。 例如,如果 Views/_ViewImports.cshtml 文件包含项目中不存在的命名空间,则会生成 HTTP 500 错误。 By default in ASP.NET Core apps, the UseDeveloperExceptionPage extension is added to the IApplicationBuilder and executed when the environment is Development. 以下代码对此进行了详细介绍:
public class Startup
{
    public Startup(IConfiguration configuration)
    {
        Configuration = configuration;
    }

    public IConfiguration Configuration { get; }

    // This method gets called by the runtime. Use this method to add services to the container.
    public void ConfigureServices(IServiceCollection services)
    {
        services.AddControllersWithViews();
    }

    // This method gets called by the runtime. Use this method to configure the HTTP request pipeline.
    public void Configure(IApplicationBuilder app, IWebHostEnvironment env)
    {
        if (env.IsDevelopment())
        {
            app.UseDeveloperExceptionPage();
        }
        else
        {
            app.UseExceptionHandler("/Home/Error");
            // The default HSTS value is 30 days. You may want to change this for production scenarios, see https://aka.ms/aspnetcore-hsts.
            app.UseHsts();
        }
        app.UseHttpsRedirection();
        app.UseStaticFiles();

        app.UseRouting();

        app.UseAuthorization();

        app.UseEndpoints(endpoints =>
        {
            endpoints.MapControllerRoute(
                name: "default",
                pattern: "{controller=Home}/{action=Index}/{id?}");
        });
    }
}
ASP.NET Core 将未经处理的异常转换为 HTTP 500 错误响应。 通常,错误详细信息不包括在这些响应中,以防止泄露有关服务器的潜在敏感信息。 有关详细信息,请参阅 开发人员异常页。
Next steps
- <identity.md>
Additional resources
本文介绍如何开始将 ASP.NET MVC 项目迁移到 ASP.NET Core MVC 2.2。 在此过程中,它突出了 ASP.NET MVC 许多变化之处。 从 ASP.NET MVC 迁移是一个多步骤过程。 本文介绍:
- Initial setup
- 基本控制器和视图
- Static content
- Client-side dependencies.
有关迁移配置和 Identity 代码,请参阅 <configuration.md> 和 <identity.md>。
Note
示例中的版本号可能不是最新的,请相应地更新项目。
创建 ASP.NET MVC 的入门项目
为了演示升级,首先创建 ASP.NET MVC 应用。 Create it with the name WebApp1 so the namespace matches the ASP.NET Core project created in the next step.


Optional: Change the name of the Solution from WebApp1 to Mvc5. Visual Studio displays the new solution name (Mvc5), which makes it easier to tell this project from the next project.
创建 ASP.NET 核心项目
Create a new empty ASP.NET Core web app with the same name as the previous project (WebApp1) so the namespaces in the two projects match. 使用同一命名空间可以更轻松地在两个项目之间复制代码。 在与上一个项目不同的目录中创建此项目以使用相同的名称。

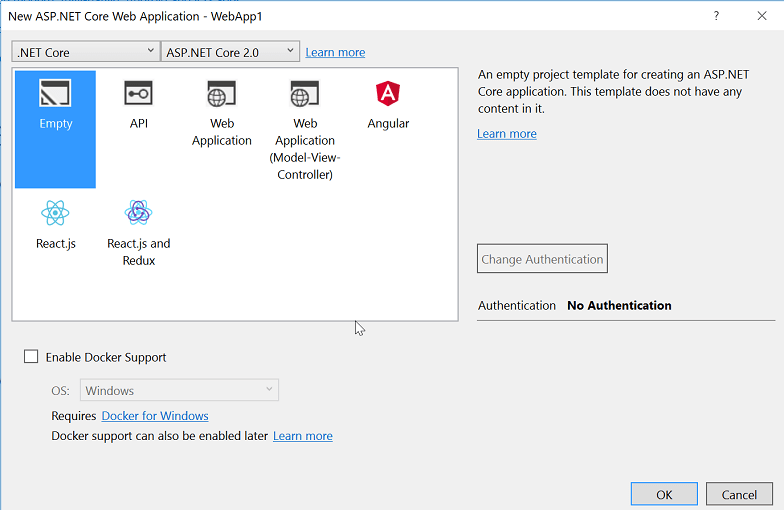
- Optional: Create a new ASP.NET Core app using the Web Application project template. Name the project WebApp1, and select an authentication option of Individual User Accounts. Rename this app to FullAspNetCore. 创建此项目可节省转换时间。 最终结果可以在模板生成的代码中查看,代码可以复制到转换项目,也可以与模板生成的项目进行比较。
将站点配置为使用 MVC
- When targeting .NET Core, the Microsoft.AspNetCore.App metapackage is referenced by default. 此包包含 MVC 应用常用的包。 如果面向 .NET Framework,则必须在项目文件中单独列出包引用。
Microsoft.AspNetCore.Mvc 是 ASP.NET Core MVC 框架。
Microsoft.AspNetCore.StaticFiles 是静态文件处理程序。 ASP.NET Core 应用显式选择性使用中间件,例如用于提供静态文件服务。 For more information, see Static files.
-
Startup.cs打开该文件并更改代码以匹配以下内容:
public class Startup
{
    // This method gets called by the runtime. Use this method to add services to the container.
    // For more information on how to configure your application, visit https://go.microsoft.com/fwlink/?LinkID=398940
    public void ConfigureServices(IServiceCollection services)
    {
        services.AddMvc();
    }

    // This method gets called by the runtime. Use this method to configure the HTTP request pipeline.
    public void Configure(IApplicationBuilder app, IHostingEnvironment env)
    {
        if (env.IsDevelopment())
        {
            app.UseDeveloperExceptionPage();
        }

        app.UseStaticFiles();

        app.UseMvc(routes =>
        {
            routes.MapRoute(
                name: "default",
                template: "{controller=Home}/{action=Index}/{id?}");
        });
    }
}
扩展 UseStaticFiles 方法添加静态文件处理程序。 For more information, see Application Startup and Routing.
添加控制器和视图
在本部分中,将添加一个最简控制器和视图,以用作下一个部分中迁移的 ASP.NET MVC 控制器和视图的占位符。
Controllers添加目录。添加一个名为目录的
HomeController.csControllers控制器类。

Views添加目录。Views/Home添加目录。添加一
Index.cshtml个名为Razor目录的Views/Home视图。

项目结构如下所示:
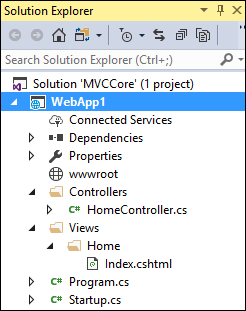
将 Views/Home/Index.cshtml 文件的内容替换为以下标记:
<h1>Hello world!</h1>
运行应用。

For more information, see Controllers and Views.
以下功能需要从示例 ASP.NET MVC 项目迁移到 ASP.NET Core 项目:
客户端内容(CSS、字体和脚本)
controllers
views
models
捆绑
filters
登录/注销, Identity (这是在下一教程中完成的)。
控制器和视图
将每个方法从 ASP.NET MVC
HomeController复制到新HomeController方法。 在 ASP.NET MVC 中,内置模板的控制器作方法返回类型为 ActionResult;在 ASP.NET Core MVC 中,作方法将改为返回IActionResult。ActionResult实现了IActionResult,因此无需更改动作方法的返回类型。将
About.cshtmlContact.cshtmlIndex.cshtmlRazor ASP.NET MVC 项目中的文件复制到 ASP.NET Core 项目。
测试每个方法
布局文件和样式尚未迁移,因此呈现的视图仅包含视图文件中的内容。 布局文件为About和Contact视图生成的链接尚不可用。
通过将当前端口号替换为 ASP.NET 核心项目中使用的端口号,从浏览器调用正在运行的 ASP.NET 核心应用上的呈现视图。 例如: https://localhost:44375/home/about。

请注意样式和菜单项的缺失。 下一部分将改进样式。
Static content
在 ASP.NET MVC 5 或更早版本中,静态内容是从 Web 项目的根目录托管的,并与服务器端文件混为一起。 在 ASP.NET Core 中,静态内容托管在 wwwroot 目录中。 将 ASP.NET MVC 应用中的静态内容复制到 wwwroot ASP.NET Core 项目中的目录。 在此示例转换中:
- 将
favicon.ico文件从 ASP.NET MVC 项目复制到wwwrootASP.NET Core 项目中的目录。
The ASP.NET MVC project uses Bootstrap for its styling and stores the Bootstrap files in the Content and Scripts directories. 生成 ASP.NET MVC 项目的模板引用布局文件中的 Bootstrap(Views/Shared/_Layout.cshtml)。
bootstrap.css可以将bootstrap.js文件从 ASP.NET MVC 项目wwwroot复制到新项目中的目录。 相反,本文档在下一部分中添加了对使用 CDN 的 Bootstrap(和其他客户端库)的支持。
迁移布局文件
将
_ViewStart.cshtml文件从 ASP.NET MVC 项目的Views目录复制到 ASP.NET Core 项目的Views目录中。 文件_ViewStart.cshtml在 ASP.NET Core MVC 中未更改。创建
Views/Shared目录。Optional: Copy
_ViewImports.cshtmlfrom the FullAspNetCore MVC project'sViewsdirectory into the ASP.NET Core project'sViewsdirectory. 删除文件中的任何命名空间声明_ViewImports.cshtml。 The_ViewImports.cshtmlfile provides namespaces for all the view files and brings in Tag Helpers. 标签助手被用于新布局文件中。 该文件_ViewImports.cshtml是 ASP.NET Core 中的新文件。将
_Layout.cshtml文件从 ASP.NET MVC 项目的Views/Shared目录复制到 ASP.NET Core 项目的Views/Shared目录中。
打开 _Layout.cshtml 文件并进行以下更改(如下所示已完成的代码):
将
@Styles.Render("~/Content/css")替换为<link>元素以加载bootstrap.css(请参阅下文)。删除
@Scripts.Render("~/bundles/modernizr")。将
@Html.Partial("_LoginPartial")行注释掉(在该行前后加上@*...*@)。 有关详细信息,请参阅迁移身份验证和Identity到 ASP.NET Core将
@Scripts.Render("~/bundles/jquery")替换为<script>元素(请参阅下文)。将
@Scripts.Render("~/bundles/bootstrap")替换为<script>元素(请参阅下文)。
Bootstrap CSS 包含的替换标记:
<link rel="stylesheet"
    href="https://maxcdn.bootstrapcdn.com/bootstrap/3.3.7/css/bootstrap.css"
    integrity="sha384-BVYiiSIFeK1dGmJRAkycuHAHRg32OmUcww7on3RYdg4Va+PmSTsz/K68vbdEjh4u"
    crossorigin="anonymous">
jQuery 和 Bootstrap JavaScript 的替换标记包含:
<script src="https://code.jquery.com/jquery-3.3.1.js"></script>
<script src="https://maxcdn.bootstrapcdn.com/bootstrap/3.3.7/js/bootstrap.js"
    integrity="sha384-Tc5IQib027qvyjSMfHjOMaLkfuWVxZxUPnCJA7l2mCWNIpG9mGCD8wGNIcPD7Txa" crossorigin="anonymous"></script>
更新后的 _Layout.cshtml 文件如下:
<!DOCTYPE html>
<html>
<head>
<meta charset="utf-8" />
<meta name="viewport" content="width=device-width, initial-scale=1.0">
<title>@ViewBag.Title - My ASP.NET Application</title>
<link rel="stylesheet"
href="https://maxcdn.bootstrapcdn.com/bootstrap/3.3.7/css/bootstrap.css"
integrity="sha384-BVYiiSIFeK1dGmJRAkycuHAHRg32OmUcww7on3RYdg4Va+PmSTsz/K68vbdEjh4u"
crossorigin="anonymous">
</head>
<body>
<div class="navbar navbar-inverse navbar-fixed-top">
<div class="container">
<div class="navbar-header">
<button type="button" class="navbar-toggle" data-toggle="collapse" data-target=".navbar-collapse">
<span class="icon-bar"></span>
<span class="icon-bar"></span>
<span class="icon-bar"></span>
</button>
@Html.ActionLink("Application name", "Index", "Home", new { area = "" }, new { @class = "navbar-brand" })
</div>
<div class="navbar-collapse collapse">
<ul class="nav navbar-nav">
<li>@Html.ActionLink("Home", "Index", "Home")</li>
<li>@Html.ActionLink("About", "About", "Home")</li>
<li>@Html.ActionLink("Contact", "Contact", "Home")</li>
</ul>
@*@Html.Partial("_LoginPartial")*@
</div>
</div>
</div>
<div class="container body-content">
@RenderBody()
<hr />
<footer>
<p>© @DateTime.Now.Year - My ASP.NET Application</p>
</footer>
</div>
<script src="https://code.jquery.com/jquery-3.3.1.js"></script>
<script src="https://maxcdn.bootstrapcdn.com/bootstrap/3.3.7/js/bootstrap.js"
integrity="sha384-Tc5IQib027qvyjSMfHjOMaLkfuWVxZxUPnCJA7l2mCWNIpG9mGCD8wGNIcPD7Txa"
crossorigin="anonymous"></script>
@RenderSection("scripts", required: false)
</body>
</html>
在浏览器中查看站点。 现在,它应该能够正确加载,并具有预期的样式。
- Optional: Try using the new layout file. Copy the layout file from the FullAspNetCore project. The new layout file uses Tag Helpers and has other improvements.
配置打包和压缩
有关如何配置捆绑和缩小的信息,请参阅 捆绑和缩小。
解决 HTTP 500 错误
有许多问题可能导致 HTTP 500 错误消息不包含有关问题源的信息。 例如,如果 Views/_ViewImports.cshtml 文件包含项目中不存在的命名空间,则会生成 HTTP 500 错误。 By default in ASP.NET Core apps, the UseDeveloperExceptionPage extension is added to the IApplicationBuilder and executed when the configuration is Development. 请参阅以下代码中的示例:
public class Startup
{
    // This method gets called by the runtime. Use this method to add services to the container.
    // For more information on how to configure your application, visit https://go.microsoft.com/fwlink/?LinkID=398940
    public void ConfigureServices(IServiceCollection services)
    {
        services.AddMvc();
    }

    // This method gets called by the runtime. Use this method to configure the HTTP request pipeline.
    public void Configure(IApplicationBuilder app, IHostingEnvironment env)
    {
        if (env.IsDevelopment())
        {
            app.UseDeveloperExceptionPage();
        }

        app.UseStaticFiles();

        app.UseMvc(routes =>
        {
            routes.MapRoute(
                name: "default",
                template: "{controller=Home}/{action=Index}/{id?}");
        });
    }
}
ASP.NET Core 将未经处理的异常转换为 HTTP 500 错误响应。 通常,错误详细信息不包括在这些响应中,以防止泄露有关服务器的潜在敏感信息。 有关详细信息,请参阅 开发人员异常页。
Additional resources
本文介绍如何开始将 ASP.NET MVC 项目迁移到 ASP.NET Core MVC 2.1。 在此过程中,它突出了 ASP.NET MVC 许多变化之处。 从 ASP.NET MVC 迁移是一个多步骤过程。 本文介绍:
- Initial setup
- 基本控制器和视图
- Static content
- Client-side dependencies.
有关迁移配置和 Identity 代码,请参阅 将配置迁移到 ASP.NET Core 和 将身份验证和 Identity 迁移到 ASP.NET Core。
Note
示例中的版本号可能不是最新的,请相应地更新项目。
创建 ASP.NET MVC 的入门项目
为了演示升级,首先创建 ASP.NET MVC 应用。 Create it with the name WebApp1 so the namespace matches the ASP.NET Core project created in the next step.
Optional: Change the name of the Solution from WebApp1 to Mvc5. Visual Studio displays the new solution name (Mvc5), which makes it easier to tell this project from the next project.
创建 ASP.NET 核心项目
Create a new empty ASP.NET Core web app with the same name as the previous project (WebApp1) so the namespaces in the two projects match. 使用同一命名空间可以更轻松地在两个项目之间复制代码。 在与上一个项目不同的目录中创建此项目以使用相同的名称。
- Optional: Create a new ASP.NET Core app using the Web Application project template. Name the project WebApp1, and select an authentication option of Individual User Accounts. Rename this app to FullAspNetCore. 创建此项目可节省转换时间。 最终结果可以在模板生成的代码中查看,代码可以复制到转换项目,也可以与模板生成的项目进行比较。
将站点配置为使用 MVC
- When targeting .NET Core, the Microsoft.AspNetCore.App metapackage is referenced by default. 此包包含 MVC 应用常用的包。 如果面向 .NET Framework,则必须在项目文件中单独列出包引用。
Microsoft.AspNetCore.Mvc 是 ASP.NET Core MVC 框架。
Microsoft.AspNetCore.StaticFiles 是静态文件处理程序。 ASP.NET Core 应用显式选择性使用中间件,例如用于提供静态文件服务。 For more information, see Static files.
-
Startup.cs打开该文件并更改代码以匹配以下内容:
public class Startup
{
    // This method gets called by the runtime. Use this method to add services to the container.
    // For more information on how to configure your application, visit https://go.microsoft.com/fwlink/?LinkID=398940
    public void ConfigureServices(IServiceCollection services)
    {
        services.AddMvc();
    }

    // This method gets called by the runtime. Use this method to configure the HTTP request pipeline.
    public void Configure(IApplicationBuilder app, IHostingEnvironment env)
    {
        if (env.IsDevelopment())
        {
            app.UseDeveloperExceptionPage();
        }

        app.UseStaticFiles();

        app.UseMvc(routes =>
        {
            routes.MapRoute(
                name: "default",
                template: "{controller=Home}/{action=Index}/{id?}");
        });
    }
}
扩展 UseStaticFiles 方法添加静态文件处理程序。 扩展 UseMvc 方法添加路由。 For more information, see Application Startup and Routing.
添加控制器和视图
在本部分中,将添加一个最简控制器和视图,以用作下一个部分中迁移的 ASP.NET MVC 控制器和视图的占位符。
Controllers添加目录。Add a Controller Class named
HomeController.csto theControllersdirectory.
Views添加目录。Views/Home添加目录。添加一
Index.cshtml个名为Razor目录的Views/Home视图。
项目结构如下所示:
将 Views/Home/Index.cshtml 文件的内容替换为以下标记:
<h1>Hello world!</h1>
运行应用。
For more information, see Controllers and Views.
以下功能需要从示例 ASP.NET MVC 项目迁移到 ASP.NET Core 项目:
客户端内容(CSS、字体和脚本)
controllers
views
models
捆绑
filters
登录/注销, Identity (这是在下一教程中完成的)。
控制器和视图
将每个方法从 ASP.NET MVC
HomeController复制到新HomeController方法。 在 ASP.NET MVC 中,内置模板的控制器作方法返回类型为 ActionResult;在 ASP.NET Core MVC 中,作方法将改为返回IActionResult。ActionResult实现了IActionResult,因此无需更改动作方法的返回类型。将
About.cshtmlContact.cshtmlIndex.cshtmlRazor ASP.NET MVC 项目中的文件复制到 ASP.NET Core 项目。
测试每个方法
布局文件和样式尚未迁移,因此呈现的视图仅包含视图文件中的内容。 布局文件为About和Contact视图生成的链接尚不可用。
- 通过将当前端口号替换为 ASP.NET 核心项目中使用的端口号,从浏览器调用正在运行的 ASP.NET 核心应用上的呈现视图。 例如:
https://localhost:44375/home/about。
请注意样式和菜单项的缺失。 下一部分将改进样式。
Static content
在 ASP.NET MVC 5 或更早版本中,静态内容是从 Web 项目的根目录托管的,并与服务器端文件混为一起。 在 ASP.NET Core 中,静态内容托管在 wwwroot 目录中。 将 ASP.NET MVC 应用中的静态内容复制到 wwwroot ASP.NET Core 项目中的目录。 在此示例转换中:
- 将
favicon.ico文件从 ASP.NET MVC 项目复制到wwwrootASP.NET Core 项目中的目录。
The ASP.NET MVC project uses Bootstrap for its styling and stores the Bootstrap files in the Content and Scripts directories. 生成 ASP.NET MVC 项目的模板引用布局文件中的 Bootstrap(Views/Shared/_Layout.cshtml)。
bootstrap.css可以将bootstrap.js文件从 ASP.NET MVC 项目wwwroot复制到新项目中的目录。 相反,本文档在下一部分中添加了对使用 CDN 的 Bootstrap(和其他客户端库)的支持。
迁移布局文件
将
_ViewStart.cshtml文件从 ASP.NET MVC 项目的Views目录复制到 ASP.NET Core 项目的Views目录中。 文件_ViewStart.cshtml在 ASP.NET Core MVC 中未更改。创建
Views/Shared目录。Optional: Copy
_ViewImports.cshtmlfrom the FullAspNetCore MVC project'sViewsdirectory into the ASP.NET Core project'sViewsdirectory. 删除文件中的任何命名空间声明_ViewImports.cshtml。 The_ViewImports.cshtmlfile provides namespaces for all the view files and brings in Tag Helpers. 标签助手被用于新布局文件中。 该文件_ViewImports.cshtml是 ASP.NET Core 中的新文件。将
_Layout.cshtml文件从 ASP.NET MVC 项目的Views/Shared目录复制到 ASP.NET Core 项目的Views/Shared目录中。
打开 _Layout.cshtml 文件并进行以下更改(如下所示已完成的代码):
将
@Styles.Render("~/Content/css")替换为<link>元素以加载bootstrap.css(请参阅下文)。删除
@Scripts.Render("~/bundles/modernizr")。将
@Html.Partial("_LoginPartial")行注释掉(在该行前后加上@*...*@)。 有关详细信息,请参阅迁移身份验证和Identity到 ASP.NET Core将
@Scripts.Render("~/bundles/jquery")替换为<script>元素(请参阅下文)。将
@Scripts.Render("~/bundles/bootstrap")替换为<script>元素(请参阅下文)。
Bootstrap CSS 包含的替换标记:
<link rel="stylesheet"
    href="https://maxcdn.bootstrapcdn.com/bootstrap/3.3.7/css/bootstrap.css"
    integrity="sha384-BVYiiSIFeK1dGmJRAkycuHAHRg32OmUcww7on3RYdg4Va+PmSTsz/K68vbdEjh4u"
    crossorigin="anonymous">
jQuery 和 Bootstrap JavaScript 的替换标记包含:
<script src="https://code.jquery.com/jquery-3.3.1.js"></script>
<script src="https://maxcdn.bootstrapcdn.com/bootstrap/3.3.7/js/bootstrap.js"
    integrity="sha384-Tc5IQib027qvyjSMfHjOMaLkfuWVxZxUPnCJA7l2mCWNIpG9mGCD8wGNIcPD7Txa" crossorigin="anonymous"></script>
更新后的 _Layout.cshtml 文件如下:
<!DOCTYPE html>
<html>
<head>
<meta charset="utf-8" />
<meta name="viewport" content="width=device-width, initial-scale=1.0">
<title>@ViewBag.Title - My ASP.NET Application</title>
<link rel="stylesheet"
href="https://maxcdn.bootstrapcdn.com/bootstrap/3.3.7/css/bootstrap.css"
integrity="sha384-BVYiiSIFeK1dGmJRAkycuHAHRg32OmUcww7on3RYdg4Va+PmSTsz/K68vbdEjh4u"
crossorigin="anonymous">
</head>
<body>
<div class="navbar navbar-inverse navbar-fixed-top">
<div class="container">
<div class="navbar-header">
<button type="button" class="navbar-toggle" data-toggle="collapse" data-target=".navbar-collapse">
<span class="icon-bar"></span>
<span class="icon-bar"></span>
<span class="icon-bar"></span>
</button>
@Html.ActionLink("Application name", "Index", "Home", new { area = "" }, new { @class = "navbar-brand" })
</div>
<div class="navbar-collapse collapse">
<ul class="nav navbar-nav">
<li>@Html.ActionLink("Home", "Index", "Home")</li>
<li>@Html.ActionLink("About", "About", "Home")</li>
<li>@Html.ActionLink("Contact", "Contact", "Home")</li>
</ul>
@*@Html.Partial("_LoginPartial")*@
</div>
</div>
</div>
<div class="container body-content">
@RenderBody()
<hr />
<footer>
<p>© @DateTime.Now.Year - My ASP.NET Application</p>
</footer>
</div>
<script src="https://code.jquery.com/jquery-3.3.1.js"></script>
<script src="https://maxcdn.bootstrapcdn.com/bootstrap/3.3.7/js/bootstrap.js"
integrity="sha384-Tc5IQib027qvyjSMfHjOMaLkfuWVxZxUPnCJA7l2mCWNIpG9mGCD8wGNIcPD7Txa"
crossorigin="anonymous"></script>
@RenderSection("scripts", required: false)
</body>
</html>
在浏览器中查看站点。 现在,它应该能够正确加载,并具有预期的样式。
- Optional: Try using the new layout file. Copy the layout file from the FullAspNetCore project. The new layout file uses Tag Helpers and has other improvements.
配置打包和压缩
有关如何配置捆绑和缩小的信息,请参阅 捆绑和缩小。
解决 HTTP 500 错误
有许多问题可能导致 HTTP 500 错误消息不包含有关问题源的信息。 例如,如果 Views/_ViewImports.cshtml 文件包含项目中不存在的命名空间,则会生成 HTTP 500 错误。 By default in ASP.NET Core apps, the UseDeveloperExceptionPage extension is added to the IApplicationBuilder and executed when the configuration is Development. 请参阅以下代码中的示例:
public class Startup
{
    // This method gets called by the runtime. Use this method to add services to the container.
    // For more information on how to configure your application, visit https://go.microsoft.com/fwlink/?LinkID=398940
    public void ConfigureServices(IServiceCollection services)
    {
        services.AddMvc();
    }

    // This method gets called by the runtime. Use this method to configure the HTTP request pipeline.
    public void Configure(IApplicationBuilder app, IHostingEnvironment env)
    {
        if (env.IsDevelopment())
        {
            app.UseDeveloperExceptionPage();
        }

        app.UseStaticFiles();

        app.UseMvc(routes =>
        {
            routes.MapRoute(
                name: "default",
                template: "{controller=Home}/{action=Index}/{id?}");
        });
    }
}
ASP.NET Core 将未经处理的异常转换为 HTTP 500 错误响应。 通常,错误详细信息不包括在这些响应中,以防止泄露有关服务器的潜在敏感信息。 有关详细信息,请参阅 开发人员异常页。