Note
Access to this page requires authorization. You can try signing in or changing directories.
Access to this page requires authorization. You can try changing directories.
Applies to: ✔️ Linux VMs
Note
New! Try VM assist for Faster Diagnostics
We recommend that you run VM assist for Windows or VM assist for Linux. These script-based diagnostic tools help you to identify common issues that affect the Azure VM Guest Agent and overall VM health.
Having access to the Serial Console and GRUB will improve recovery times of your IaaS Linux Virtual Machine in most cases. GRUB offers recovery options that otherwise would take longer to recover your VM.
The reasons to perform a VM recovery are many and can be attributed to scenarios such as:
- Corrupt file systems/kernel/MBR (Master Boot Record)
- Failed kernel upgrades
- Incorrect GRUB kernel parameters
- Incorrect fstab configurations
- Firewall configurations
- Lost password
- Mangled sshd configurations files
- Networking configurations
Many other scenarios as detailed here
Verify that you can access GRUB and the Serial console on your VMs deployed in Azure.
If you are new to Serial Console, refer to this link.
Tip
Ensure you take backups of files before making changes
Watch this video below to see how you can quickly recover your Linux VM once you have access to GRUB
There are a number of methods to help recovery of Linux VMs. In a Cloud environment, this process has been challenging. Progress is being made continually to tooling and features to ensure services are recovered quickly.
With the Azure Serial Console, you can interact with your Linux VM as if you were at a system's console.
You can manipulate many configuration files including how the kernel will boot.
The more experienced Linux/Unix sys admins will appreciate the single user and emergency modes that are accessible via the Azure Serial Console making Disk Swap and VM deletion for many recovery scenarios redundant.
The method of recovery depends on the problem being experienced, for example a lost or misplaced password can be reset through Azure portal options -> Reset Password. The Reset Password feature is known as an Extension and communicates with the Linux Guest agent.
Other extensions such as Custom Script are available however these options require that the Linux waagent be up and in a healthy state which isn't always the case.

Ensuring you have access to the Azure Serial Console and GRUB means that a password change or an incorrect configuration can be rectified in a matter of minutes instead of hours. You could even force the VM to boot from an alternative kernel should you have multiple kernels on disk in the scenario where your primary kernel becomes corrupt.

Suggested order of recovery methods
Azure Serial Console
Legacy Method
Disk Swap Video
If you don't have access to GRUB watch this video and see, how you can easily automate the disk swap procedure to recover your VM
Challenges
Not all Linux Azure VMs are configured by default for GRUB access and neither are they all configured to be interrupted with the sysrq commands. Some older distros such as SLES 11 aren't configured to display Login prompt in the Azure Serial Console
In this article, we'll review various Linux distributions and document configurations on how to make GRUB available.
How to configure Linux VM to accept SysRq keys
The sysrq key is enabled on some newer Linux distros by default, although on others it might be configured for accepting values only for certain SysRq functions. On older distros, it might be disabled completely.
The SysRq feature is useful for rebooting a crashed or non-responding VM directly from the Azure Serial Console, also helpful in gaining access to the GRUB menu, alternatively restarting a VM from another portal window or ssh session might drop your current console connection thus expiring GRUB Timeouts to which are used to display the GRUB menu. The VM must be configured to accept a value of 1 for the kernel parameter, which enables all functions of sysrq or 128, which allows reboot/poweroff
To configure the VM to accept a reboot via SysRq commands on the Azure portal, you will need to set a value of 1 for the kernel parameter kernel.sysrq
For this configuration to persist a reboot, add an entry to the file sysctl.conf
sudo echo kernel.sysrq = 1 >> /etc/sysctl.conf
To configure the kernel parameter dynamically
sudo sysctl -w kernel.sysrq=1
If you don't have root access or sudo is broken, it will not be possible configure sysrq from a shell prompt.
You can enable sysrq in this scenario using the Azure portal. This method can be beneficial if the sudoers.d/waagent file has become broken or has been deleted.
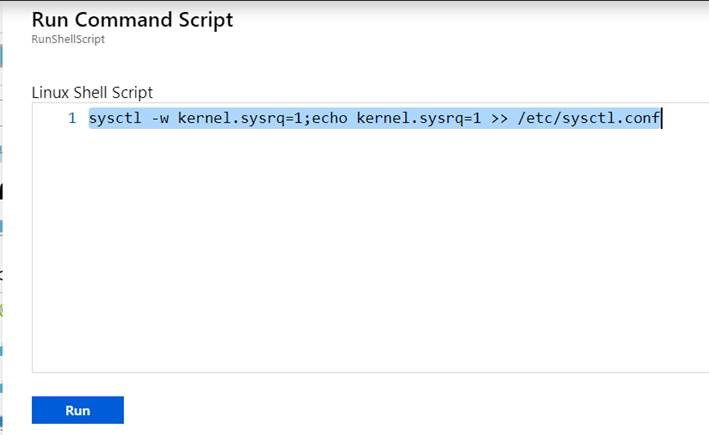
Using the Azure portal Operations -> Run Command -> RunShellScript feature, requires the waagent process be healthy you can then inject this command to enable sysrq
sudo sysctl -w kernel.sysrq=1 ; sudo echo kernel.sysrq = 1 >> /etc/sysctl.conf
As shown here:
Once completed, you can then try accessing sysrq and should see that a reboot is possible.

Select Reboot and Send SysRq Command

The system should log a reset message such as this

Ubuntu GRUB configuration
By default you should be able to access GRUB by holding down Esc key during the VM boot, if the GRUB menu isn't presented you can force and keep the GRUB menu on screen in the Azure Serial Console by using one of these options.
Option 1 - Forces GRUB to be displayed on Screen
Update the file /etc/default/grub.d/50-cloudimg-settings.cfg to keep the GRUB menu on screen for the specified TIMEOUT. You aren't required to hit Esc as GRUB will be displayed immediately.
GRUB_TIMEOUT=5
GRUB_TIMEOUT_STYLE=menu
Option 2 - Allows for Esc to be pressed before booting
Similar behavior can be experienced by making changes to the file /etc/default/grub and observe a 3-second timeout to hit Esc
Comment out these two lines:
#GRUB_HIDDEN_TIMEOUT=0
#GRUB_HIDDEN_TIMEOUT_QUIET=true
and add this line:
GRUB_TIMEOUT_STYLE=countdown
Make sure the serial-getty@ttyS0.service is enabled so that systemd provides a login prompt on that console:
sudo systemctl enable serial-getty@ttyS0.service
sudo systemctl start serial-getty@ttyS0.service
Ubuntu Recovery Mode
Additional recovery and clean-up options are available for Ubuntu via GRUB however these settings are only accessible if you configure kernel parameters accordingly. Failure to configure this kernel boot parameter would force the Recovery menu to be sent to the Azure Diagnostics and not to the Azure Serial Console. You can obtain access to the Ubuntu Recovery Menu by following these steps:
Interrupt the BOOT Process and access GRUB menu
Select Advanced Options for Ubuntu and press enter

Select the line displaying (recovery mode) don't press enter but press "e"

Locate the line that will load the kernel and substitute the last parameter nomodeset with destination as console=ttyS0
linux /boot/vmlinuz-4.15.0-1023-azure root=UUID=21b294f1-25bd-4265-9c4e-d6e4aeb57e97 ro recovery nomodeset

change to

linux /boot/vmlinuz-4.15.0-1023-azure root=UUID=21b294f1-25bd-4265-9c4e-d6e4aeb57e97 ro recovery console=ttyS0

Press Ctrl-x to start and load the kernel. If all goes well you will see these additional Options, which can help perform other recovery options

Red Hat GRUB configuration
Red Hat 8.6+ GRUB configuration
The default /etc/default/grub configuration on these versions is adequately configured.
GRUB_TIMEOUT=10
GRUB_DISTRIBUTOR="$(sed 's, release .*$,,g' /etc/system-release)"
GRUB_DEFAULT=saved
GRUB_DISABLE_SUBMENU=true
GRUB_TERMINAL_OUTPUT="console"
GRUB_CMDLINE_LINUX="crashkernel=auto console=tty1 console=ttyS0 earlyprintk=ttyS0 rootdelay=300"
GRUB_DISABLE_RECOVERY="true"
GRUB_ENABLE_BLSCFG=true

GRUB_TIMEOUT_STYLE=countdown
GRUB_TERMINAL="serial console"
GRUB_SERIAL_COMMAND="serial --speed=115200 --unit=0 --word=8 --parity=no --stop=1"
Make sure the serial-getty@ttyS0.service is enabled so that systemd provides a login prompt on that console:
sudo systemctl enable serial-getty@ttyS0.service
sudo systemctl start serial-getty@ttyS0.service
SuSE
SLES 15 sp5
The default /etc/default/grub configuration on these versions is adequately configured.
GRUB_DEFAULT=0
GRUB_HIDDEN_TIMEOUT=0
GRUB_HIDDEN_TIMEOUT_QUIET=true
GRUB_TIMEOUT=1
GRUB_CMDLINE_LINUX_DEFAULT="console=ttyS0 net.ifnames=0 dis_ucode_ldr earlyprintk=ttyS0 multipath=off nvme_core.io_timeout=240 rootdelay=300 scsi_mod.use_blk_mq=1 USE_BY_UUID_DEVICE_NAMES=1 systemd.unified_cgroup_hierarchy=1"
GRUB_CMDLINE_LINUX=""


GRUB_DISTRIBUTOR="SLES15-SP5"
GRUB_GFXMODE=auto
GRUB_TERMINAL_INPUT="serial"
GRUB_TERMINAL_OUTPUT="serial"
GRUB_TIMEOUT_STYLE=countdow
Make sure the serial-getty@ttyS0.service is enabled so that systemd provides a login prompt on that console:
sudo systemctl enable serial-getty@ttyS0.service
sudo systemctl start serial-getty@ttyS0.service
SLES 12 sp1
Either use YaST bootloader as per the official docs
Or add/change to /etc/default/grub the following parameters:
GRUB_CMDLINE_LINUX_DEFAULT="console=ttyS0 net.ifnames=0 dis_ucode_ldr earlyprintk=ttyS0 multipath=off nvme_core.io_timeout=240 rootdelay=300 scsi_mod.use_blk_mq=1 USE_BY_UUID_DEVICE_NAMES=1 systemd.unified_cgroup_hierarchy=1"
GRUB_TERMINAL_INPUT="serial"
GRUB_TERMINAL_OUTPUT="serial"
GRUB_TIMEOUT=10
GRUB_TIMEOUT_STYLE=countdown
Recreate the grub.cfg
grub2-mkconfig -o /boot/grub2/grub.cfg
Make sure the serial-getty@ttyS0.service is enabled so that systemd provides a login prompt on that console:
sudo systemctl enable serial-getty@ttyS0.service
sudo systemctl start serial-getty@ttyS0.service
This configuration will enable the message Press any key to continue to appear on the console for 5 seconds
It will then display the GRUB menu for an additional 5 seconds - by pressing the down arrow you will interrupt the counter and select a kernel you want to boot either append the keyword single for single user mode that requires root password to be set.
Appending the command init=/bin/bash will load the kernel but ensures that the init program is replaced by a bash shell.
You will gain access to a shell without having to enter a password. You can then proceed to update password for Linux accounts or make other configuration changes.
Force the kernel to a bash prompt
Having access to GRUB allows you to interrupt the initialization process this interaction is useful for many recovery procedures. If you don't have root password and single user requires you to have a root password, you can boot the kernel replacing the init program with a bash prompt – this interrupt can be achieved by appending init=/bin/bash to the kernel boot line

Remount your / (root) file system RW using the command
mount -o remount,rw /

Now you can perform root password change or many other Linux configuration changes

Restart the VM with
/sbin/reboot -f
Single User mode
Alternatively you might need to access the VM in single user or emergency mode. Select the kernel you wish to boot or interrupt using arrow keys. Enter the desired mode by appending the keyword single or 1 to the kernel boot line. On RHEL systems, you can also append rd.break.
For more information on how to access single user mode, see this doc

Next steps
Learn more about Azure Serial Console
Contact us for help
If you have questions or need help, create a support request, or ask Azure community support. You can also submit product feedback to Azure feedback community.