Exercise - Push a change through the pipeline
In this unit, you'll practice the complete code workflow by pushing a small change to the Space Game website to GitHub.
Mara has been given the task of changing some text on the home page of the website, Index.cshtml. In this unit, you'll follow along.
Let's briefly review the steps to follow to complete the task:
- Synchronize your local repository with the latest
mainbranch on GitHub. - Create a branch to hold your changes.
- Make the code changes you need, and verify them locally.
- Push your branch to GitHub.
- Merge any recent changes from the
mainbranch on GitHub into your local working branch, and verify that your changes still work. - Push up any remaining changes, watch Azure Pipelines build the application, and submit your pull request.
Fetch the latest main branch
In the previous unit, you created a pull request and merged your code-workflow branch into the main branch on GitHub. Now you need to pull the changes to main back to your local branch.
The git pull command fetches the latest code from the remote repository and merges it into your local repository. This way, you know you're working with the latest code base.
In your terminal, run
git checkout mainto switch to themainbranch:git checkout mainTo pull down the latest changes, run this
git pullcommand:git pull origin mainYou can view the list of files that were changed. As an optional step, you can open the azure-pipelines.yml file to verify that it contains your complete build configuration.
Recall that a Git repository where team members collaborate (such as on GitHub) is called a remote. Here, origin specifies your repository on GitHub.
Later, you'll fetch starter code from the Microsoft GitHub repository, known as upstream.
Build and run the web application
To ensure that you have a working copy to start your changes, build and run the web application locally.
In Visual Studio Code, go to the terminal window and run the following
dotnet buildcommand to build the application:dotnet build --configuration ReleaseRun the following
dotnet runcommand to run the application:dotnet run --configuration Release --no-build --project Tailspin.SpaceGame.WebTip
If you see an error in your browser that's related to a privacy or certificate error, select Ctrl+C from your terminal to stop the running application.
Then run
dotnet dev-certs https --trustand select Yes when prompted, or see this blog post for more information.After your computer trusts your local SSL certificate, run the
dotnet runcommand a second time and go tohttp://localhost:5000from a new browser tab to see the running application.
Verify that the application is running
In development mode, the Space Game website is configured to run on port 5000.
In a new browser tab, navigate to http://localhost:5000 to see the running application.
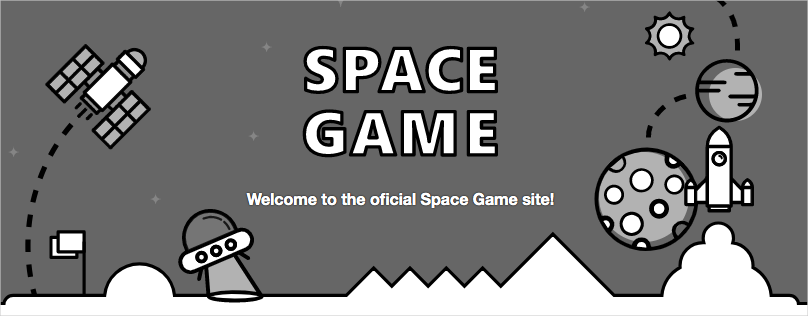
You should see this:

You can interact with the page, including the leaderboard. When you select a player's name, you see details about that player.
When you're finished, return to the terminal window, and select Ctrl+C to stop the running application.
Create a feature branch
In this section, you'll create a Git branch so that you can work on files without affecting anyone else. No one will even know you're working on those files until you push them to the remote repository.
To create a branch, you use the git checkout command and give your branch a name, just like you did in the previous part.
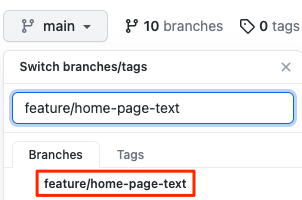
Before you create a branch, it's a good idea to adhere to a naming convention. For example, if your branch is for working on a new feature, you might use feature/<branch-name>. For a bug fix, you could use bugfix/<bug-number>. In this example, your branch name will be feature/home-page-text.
In your terminal, run the following git checkout command:
git checkout -B feature/home-page-text
Like before, the feature/home-page-text is based on the main branch.
Make changes and test it locally
In Visual Studio Code, open Index.cshtml in the Tailspin.SpaceGame.Web/Views/Home directory.
Look for this text near the top of the page:
<p>An example site for learning</p>Tip
Visual Studio Code also provides an easy way to search for text in files. To access the search pane, select the magnifying glass icon in the side pane.
Replace the text in the previous step with the following "mistyped" text, and then save the file:
<p>Welcome to the oficial Space Game site!</p>Note that the word "oficial" is intentionally mistyped. We'll address that error later in this module.
In your terminal, run the following
dotnet buildcommand to build the application:dotnet build --configuration ReleaseRun the following
dotnet runcommand to run the application:dotnet run --configuration Release --no-build --project Tailspin.SpaceGame.WebOn a new browser tab, go to
http://localhost:5000to see the running application.You can see that the home page contains the updated text.
When you're finished, return to the terminal window, and then press Ctrl+C to stop the running application.
Commit and push your branch
Here you'll stage your changes to Index.cshtml, commit the change to your branch, and push your branch up to GitHub.
Run
git statusto check and see whether there are uncommitted changes on your branch:git statusYou'll see that Index.cshtml has been modified. Like before, the next step is to make sure that Git is tracking this file, which is called staging the file.
Run the following
git addcommand to stage Index.cshtml:git add Tailspin.SpaceGame.Web/Views/Home/Index.cshtmlRun the following
git commitcommand to commit your staged file to thefeature/home-page-textbranch:git commit -m "Improve the text at the top of the home page"Run this
git pushcommand to push, or upload, thefeature/home-page-textbranch to your repository on GitHub:git push origin feature/home-page-textJust as before, you can locate your branch on GitHub from the branch drop-down box.
Watch Azure Pipelines build the application
Just as you did previously, Azure Pipelines automatically queues the build when you push changes to GitHub.
As an optional step, trace the build as it moves through the pipeline, and verify that the build succeeds.
Synchronize any changes to the main branch
While you were busy working on your feature, changes might have been made to the remote main branch. Before you create a pull request, it's common practice to get the latest from the remote main branch.
To do this, first check out, or switch to, the main branch. Then, merge the remote main branch with your local main branch.
Next, check out your feature branch, and then merge your feature branch with the main branch.
Let's try the process now.
In your terminal, run this
git checkoutcommand to check out themainbranch:git checkout mainTo download the latest changes to the remote
mainbranch and merge those changes into your localmainbranch, run thisgit pullcommand:git pull origin mainBecause no one actually made any changes to your
mainbranch, the following command tells you that everything is already up to date.From https://github.com/username/mslearn-tailspin-spacegame-web * branch main -> FETCH_HEAD Already up to date.To check out your feature branch, run
git checkout:git checkout feature/home-page-textMerge your feature branch with
main:git merge mainAgain, because no one actually made any changes to your
mainbranch, you see that everything is still up to date.Already up to date.If you did incorporate any changes, you would want to test your application again to ensure that everything is still working.
Push your local branch again
When you incorporate changes from the remote repository into your local feature branch, you need to push your local branch back to the remote repository a second time.
Although you didn't incorporate any changes from the remote repository, let's practice the process to see what happens.
Run this
git pushcommand to push your changes to GitHub:git push origin feature/home-page-textOnce again, the response says that you're already up to date since no changes were made.
Everything up-to-date
Submit a pull request
In this section, you submit a pull request just as you did previously.
In a browser, sign in to GitHub.
Go to your mslearn-tailspin-spacegame-web repository.
In the drop-down list, select your
feature/home-page-textbranch.To start your pull request, select Contribute and then Open pull request.
Ensure that the base drop-down list specifies your repository and not the Microsoft repository.

Important
Again, this step is important because you can't merge your changes into the Microsoft repository.
When you work directly with your own repository, and not a fork, your
mainbranch is selected by default.Enter a title and a description for your pull request.
- Title: Improve the text at the top of the home page
- Description: Received the latest home page text from the product team.
To complete your pull request, select Create pull request.
This step doesn't merge any code. It tells others that you have changes that you're proposing to merge.
The pull request window is displayed. As before, a pull request triggers Azure Pipelines to build your application by default.
Optionally, select the Details link or go to your project on Azure DevOps and watch the pipeline run.
When the build is finished, go back to your pull request on GitHub.
Select Merge pull request, and then select Confirm merge.
Select Delete branch to delete the
feature/home-page-textbranch from GitHub.