Note
Access to this page requires authorization. You can try signing in or changing directories.
Access to this page requires authorization. You can try changing directories.
Important
Forensic evidence is an opt-in add-on feature in Microsoft Purview Insider Risk Management that gives security teams visual insights into potential insider data security incidents, with user privacy built in. Forensic evidence includes customizable event triggers and built-in user privacy protection controls, enabling security teams to better investigate, understand and respond to potential insider data risks like unauthorized data exfiltration of sensitive data.
Organizations set the right policies for themselves, including what risky events are highest priority for capturing forensic evidence and what data is most sensitive. Forensic evidence is off by default, policy creation requires dual authorization and usernames can be masked with pseudonymization (which is on by default for Insider Risk Management). Setting up policies and reviewing security alerts within Insider Risk Management leverages strong role-based access controls (RBAC), ensuring that the designated individuals in the organization are taking the right actions with additional auditing capabilities.
Important
Microsoft Purview Insider Risk Management correlates various signals to identify potential malicious or inadvertent insider risks, such as IP theft, data leakage, and security violations. Insider Risk Management enables customers to create policies to manage security and compliance. Built with privacy by design, users are pseudonymized by default, and role-based access controls and audit logs are in place to help ensure user-level privacy.
When you complete the configuration steps and create your forensic evidence policy, you start seeing alerts for potentially risky security-related user activities that meet the conditions for indicators defined in the policy.
Tip
Get started with Microsoft Security Copilot to explore new ways to work smarter and faster using the power of AI. Learn more about Microsoft Security Copilot in Microsoft Purview.
Dashboard
The forensic evidence dashboard provides a summary view of key areas of the forensic evidence configuration in your organization. For the preview, the dashboard includes only a Forensic evidence device health section. Select View device health report to open the Device health tab and report.
Managing users
You must request and approve specific users before they're eligible for forensic evidence capturing. Simply adding users to a forensic evidence policy doesn't automatically make those users eligible for capturing. You can request and approve users before or after creating forensic evidence policies, but the clip captures associated with policy indicators are created and available for reviewing only after approving the users.
Users assigned to the Insider Risk Management or Insider Risk Management Admins role groups can submit approval requests to users assigned to the Insider Risk Management Approvers role group.
Request capturing approvals
Request turning on forensic evidence to capture information for specific users. When you submit a request, approvers in your organization receive an email notification and can approve or reject the request. If approved, the user appears on the Approved users tab and is eligible for capturing. If not addressed, the request expires six months from the day it was submitted.
Sign in to the Microsoft Purview portal with credentials for an admin account in your Microsoft 365 organization.
Go to the Insider Risk Management solution.
Select Forensic evidence in the left navigation, then select User management.
Select the Manage forensic evidence requests tab.
Select Create request.
On the Users page, select Add users.
Use Search to locate a specific user or select one or more users from the list. Select Add, then select Next.
On the Forensic evidence policy page, select a forensic evidence policy for the added users. The policy you choose determines the scope of activity to capture for users.
Select Next.
On the Justification page, explain why you're requesting that capturing be enabled for the users you added in the Justification for turning on forensic evidence capturing text box. This is a required field. When complete, select Next.
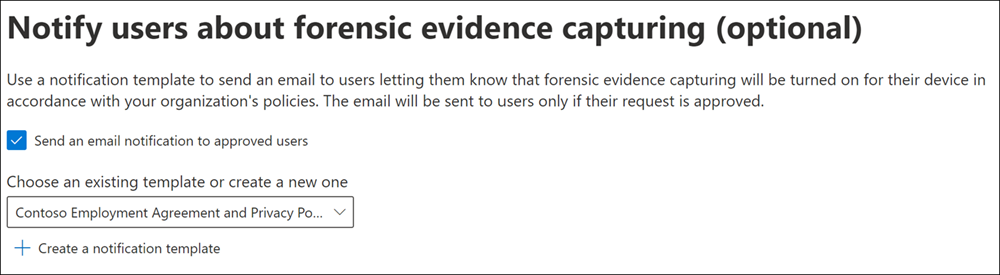
On the Email notifications page, use a notification template to send an email to users letting them know that forensic evidence capturing is turned on for their device in accordance with your organization's policies. The email is sent to users only if their request is approved.
Select the Send an email notification to approved users check box. Choose an existing template or create a new one. To create a new template, select Create a notification template and complete the required fields in the New email notification template pane.
Select Next.
On the Finish page, review your settings before submitting the request. Select Edit users or Edit justification to change any of the request values or select Submit to create and send the request to reviewers.
To view pending approval requests, go to Insider Risk Management > Forensic evidence > Pending requests. Here you see the users with pending requests, their email address, the request submission date, and who submitted the approval request. If no users are displayed, there aren't any pending approval requests for any users.
Users assigned to the Insider Risk Management Approvers role group can select a user on the Forensic evidence request tab and review the request. After reviewing the request, these users can approve or reject the forensic evidence capturing request. Approving or rejecting the capturing request removes the pending request for users from this view.
Approve or reject capturing requests
After completing the requests, users assigned to the Insider Risk Management Approvers role group receive an email notification for the approval request.
- Sign in to the Microsoft Purview portal with credentials for an admin account in your Microsoft 365 organization.
- Go to the Insider Risk Management solution.
- Select Forensic evidence in the left navigation, then select Pending requests.
- Select a user to review.
- On the Review forensic evidence request (preview) pane, review the justification submitted by the requestor. Select Approve or Reject as applicable.
- On the Request approved or Request rejected page, select Close.
Revoke capturing approvals
If needed, you can revoke approval for specific users and exclude them from forensic evidence capturing. Revoking approval doesn't delete or remove any existing captures for these users. It only disables future capturing of activity for these users.
- Sign in to the Microsoft Purview portal as a member of the Insider Risk Management Approvers role group.
- Go to the Insider Risk Management solution.
- Select Forensic evidence in the left navigation, then select User management.
- Select the Approved users tab.
- Select a user, then select Remove.
- On the removal confirmation page, select Remove to revoke capturing approval.
Creating and managing notification templates
You can create and use a notification template to send an email to users, letting them know that forensic evidence capturing is turned on for their device in accordance with your organization's policies. The email is sent to users only if their request is approved.
Create a new notification template
- Sign in to the Microsoft Purview portal with credentials for an admin account in your Microsoft 365 organization.
- Go to the Insider Risk Management solution.
- Select Forensic evidence in the left navigation, then select Notification templates.
- Select Create notification template.
- On the New email notification template pane, enter the following required fields:
- Template name
- Send from
- Subject
- Message body
- Select Save.
Note
To delete an existing notification template, select the template, then select Delete.
Viewing captured clips
You can view and explore captured clips by selecting the Forensics evidence tab when you open Microsoft Purview Insider Risk Management. You can also select the Forensics evidence tab from other areas in the solution to view a list of captured clips in context:
- Alerts dashboard. Clips accessible from the Alerts dashboard correspond to the option to capture specific user activities when the forensic evidence policy is created. The captured clips are defined by indicators you select in the forensic evidence policy.
- User activity reports. Clips accessible from User activity reports correspond to the option to capture any security-related activity performed by users included in forensic evidence policies.
- Cases dashboard. Clips accessible from the Cases dashboard are alerts that you escalated to cases.
Note
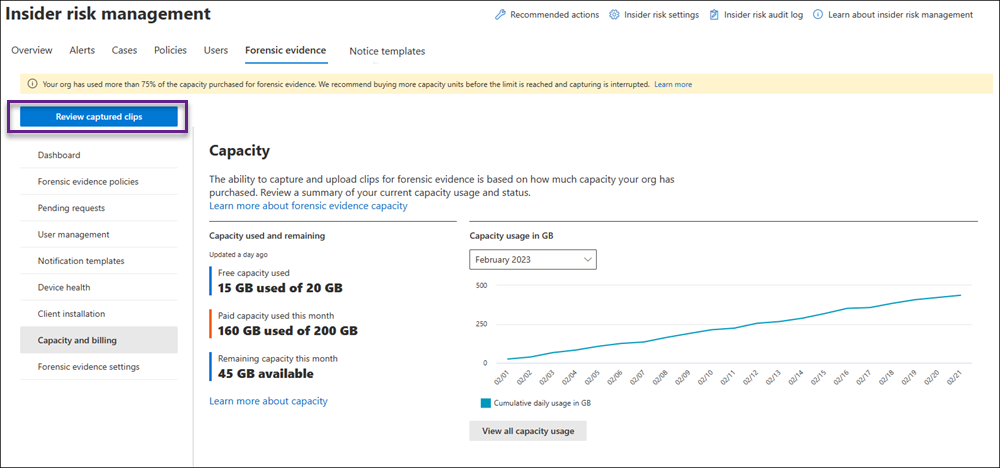
If you're a member of both the Insider Risk Management Investigators role group and the Insider Risk Management Admins role group, you see Review captured clips when you open Microsoft Purview Insider Risk Management. If you select Review captured clips, it changes to Open forensic evidence settings. This action is to go back and forth between the list of captured clips and settings if you have both roles. Learn more about role groups.
When you select the Forensics evidence tab, captured clips and associated information display in a list. If you select a captured clip in the list, a video player appears in the center of the screen, and a transcript of activities and events from the clip displays to the right of the video player.
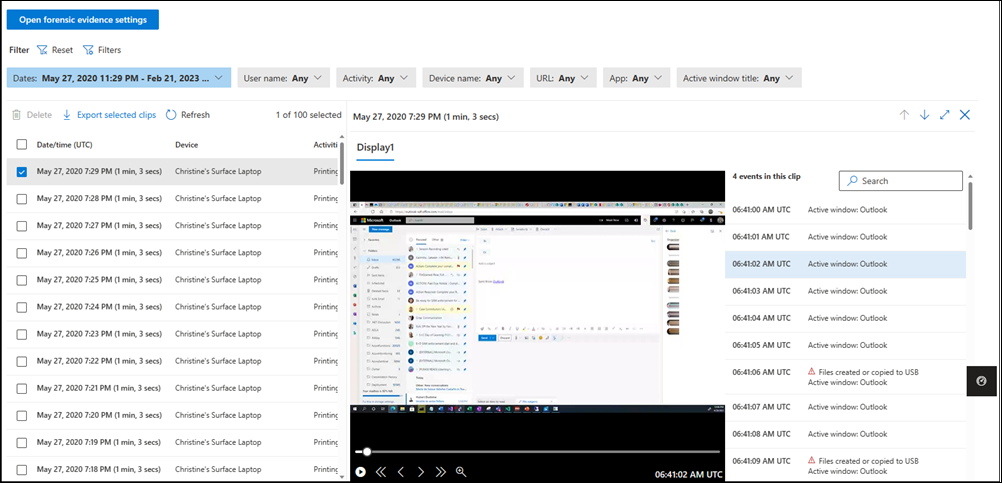
Each captured clip includes the following information:
- Date/time (UTC): The date, time (UTC), and duration of the capture. The duration of the capture is the total time spanned by the capture. The actual length of the capture might be shorter since Insider Risk Management automatically eliminates identical frames.
- Device: The name of the device in Windows 10/11.
- Activities: The Insider Risk Management activity type included in the capture. These activities are based on global and policy indicators assigned to the associated policy.
- User: The name of the user.
- URL (if applicable): The URL that the user was accessing when the activity took place.
- Application (if applicable): The application that the user was accessing when the activity took place.
- Active window title: The title of the window that the user was accessing when the activity took place.
To view a captured clip:
If needed, configure the filters at the top of the list.
Select a clip from the list.
Using the video player controls, select the Play control to review the entire clip from beginning to end.
To scope the review to a specific activity or event in the clip, select the activity or event in the transcript. You can also use the search box to search for specific activities or events.
Note
A red triangle in the transcript denotes an activity.
Filtering the captured clips list
You can use the filters for the captured clips list to filter for specific activities and information. Each filter supports up to 10 unique IDs so, for example, you can filter on up to 10 users at one time. The following table describes the different filters.
| Filter name | Description |
|---|---|
| Active window title | Filter for the active window title. You can select Contains any of or Contains all of to filter in the same way as the App filter. |
| Activity | Select a specific activity to filter on, such as Printing files or Password used to sign into the device has been reused. |
| App | Filter by app name. You can select Contains any of or Contains all of with this filter. Example: if you select Contains any of and enter "Contoso.com,Contoso2.com", you could have one clip that captures Contoso.com and another that captures Contoso2.com. If you select Contains all of and enter "Contoso.com,Contoso2.com", any captures would have to contain both domains. |
| Device name | Filter on any device name. |
| URL | Filter for a domain name or search for any keyword after filtering for a domain name. Example: entering "SharePoint" as a keyword returns any URL that includes "SharePoint" anywhere in the URL. |
| User name | Filter on any user name. |
Deleting clips
Users assigned to the Insider Risk Management Investigators role group can delete individual clips from the captured clips list. To do this:
- Select the check box next to the capture.
- Select Delete.
Users assigned to the Insider Risk Management Admins role group can do bulk deletions through settings.
Make a bulk deletion
- Sign in to the Microsoft Purview portal as a member of the Insider Risk Management Admins role group.
- Go to the Insider Risk Management solution.
- Select Forensic evidence in the left navigation, then select Forensic evidence settings.
- Make sure that the Allow deletion of forensic user data by an Administrator or Investigator option is set to On.
- Under Delete a user's data, choose Select a user, then select the user that you want to delete clips for.
Important
Forensic evidence clips are deleted 120 days after they're captured. You can export or transfer forensic evidence clips before they're deleted.
Alerts dashboard
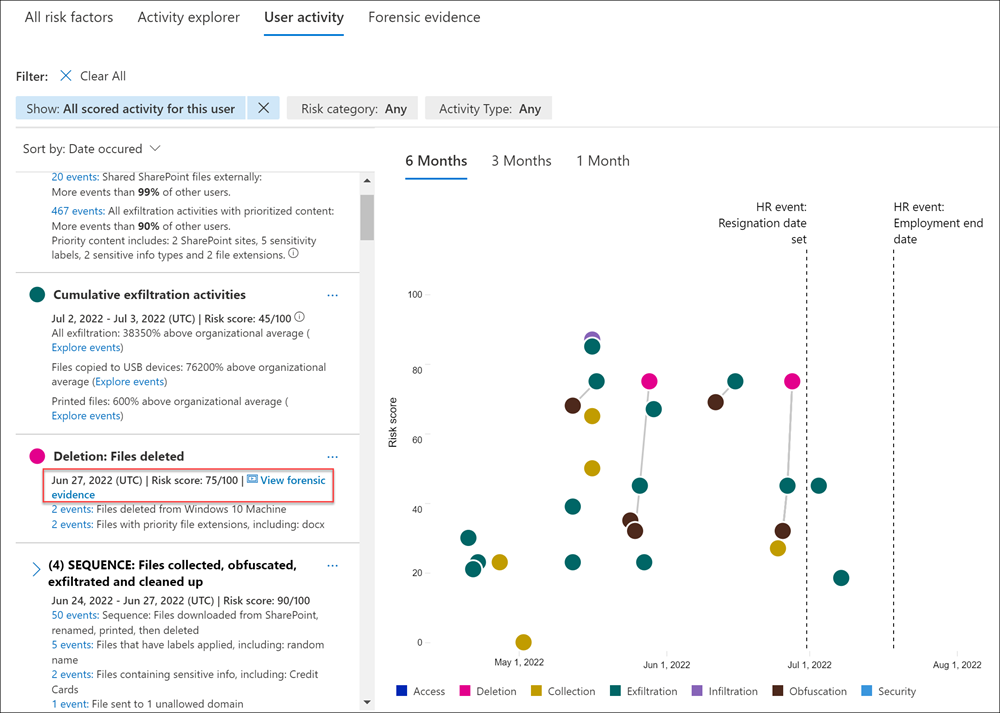
For alerts generated by policies, you can review forensic evidence captures on the Forensic evidence tab on the Alerts dashboard. If one or more captures are available for the alert, you also see a View forensic evidence notification link in the activity that generates an alert header section. You can select the notification link or the Forensic evidence tab to review a list of activity captures.
Reviewing an alert for potentially risky activity that might contain forensic evidence captures is essentially the same as reviewing an alert without forensic evidence captures. The significant difference is the inclusion of any applicable captures. The Forensic evidence tab provides access to all available captures associated with the alert.
Cases dashboard
If you escalate alerts to cases, include all associated forensic evidence captures as part of the case. Reviewing forensic evidence captures for cases follows the same process as reviewing captures for alerts.
User activity reports
User activity reports allow you to examine activities for specific users for a defined time period without having to assign them temporarily or explicitly to an Insider Risk Management policy. If these user activities include activities supported by forensic evidence capturing, the report includes clips with the user activity.
If you configure forensic evidence to capture all security-related user activity, regardless of whether they're included in a forensic evidence policy, review these captures by following these steps:
- Select Insider Risk Management > Overview.
- At the bottom of the Overview screen, under Investigate user activity, select Manage reports.
- Select a specific user, then select the Forensic evidence tab.
- Refer to the previous instructions.
Device health report (preview)
After you configure devices to support forensic evidence, you can review the Microsoft Purview Client health status for all devices in your organization by going to Insider Risk Management > Forensic evidence > Device health.

For a list of minimum device and configuration requirements, see Learn about forensic evidence. To onboard supported devices, follow the steps in the Onboard Windows 10 and Windows 11 devices into Microsoft 365 overview article.
The Device health report lets you view the status and health of all devices that have the forensic evidence agent installed. Each report widget on the report displays information for last 24 hours.
- Devices online: The total number of devices currently online.
- Devices offline: The total number of devices currently offline.
- Devices with warnings: The total number of devices with a warning.
- Devices with errors: The total number of devices with an error.
The device health queue lists all the devices configured for forensic evidence in your organization. In addition, the report lists the status of the following device attributes:
- Device name: The name of the device, defined by the ComputerName attribute of the device.
- Device status: The status of the Microsoft Purview Client on the device. Status values are as follows:
- Healthy: The client on the device is working properly and forensic evidence capture features are fully supported.
- Warning: The client on the device has a warning and forensic evidence capture features might not be fully supported.
- Error: The client on the device has an error and forensic evidence capture features are disabled or not fully supported.
- Status details: More information about the device status.
- Last sync (UTC): Date and time of the last status sync for the device.
- User name: The user name for the user logged into the device when the status sync was performed.
- Windows version: The version of Microsoft Windows installed on the device.
- Client version: The version of the Microsoft Purview Client installed on the device.
The device health status gives you insights into potential issues with your devices and the Microsoft Purview Client. The Device status column on the Device health page can alert you to device issues that might prevent user activity from being captured or why the volume of forensic evidence capturing is unusual. The device health status can also confirm that the devices included in forensic evidence capturing are healthy and don't need attention or configuration changes. The following table lists potential status detail messages and recommended actions you can take to address warnings and errors:
| Status details | Status | Suggested action |
|---|---|---|
| An internal server error occurred. As a result, capture data might be missing. | Error | Create a support ticket with Microsoft for further investigation |
| CPU usage on the device has exceeded the maximum threshold. | Error | The capture process has been stopped and will restart in a few minutes. |
| Device is unable to access the directory that stores forensic evidence captures. | Error | Reinstall the client on this device |
| Encoder initialization failed. | Error | Reinstall the client on this device. |
| GPU usage on the device has exceeded the maximum threshold. | Error | The capture process has been stopped and will restart in a few minutes. |
| Memory usage on the device has exceeded the maximum threshold. | Error | The capture process has been stopped and will restart in a few minutes. |
| Offline storage has reached 90% of the configured limit on this device. Captures might be overwritten soon. | Warning | Increase the offline capturing cache limit on the Forensic evidence settings page. |
| The configured offline storage limit has been reached on this device. As a result, offline captures are being overwritten. | Error | Increase the offline capturing cache limit on the Forensic evidence settings page. |
| The configured upload bandwidth limit has been reached on this device. No more captures are uploaded for the day. | Error | Increase the upload bandwidth limit on the Forensic evidence settings page. |
| The Microsoft Purview Client installed on the device hasn't synced with the forensic evidence policy in over 24 hours. | Error | Connect to network & reinstall client |
| The Microsoft Purview Client installed on the device in unable to sync with the forensic evidence policy. | Warning | Connect to network & reinstall client |
| The Microsoft Purview Client is unable to capture activity because display monitors on this device were turned off or disconnected. | Error | Connect/Turn on display monitors for the device |
| The Microsoft Purview Client is unable to capture activity because no display monitors are detected on this device. | Error | Add display monitors for this device |
| The Microsoft Purview Client is unable to capture activity because no graphics card is detected on this device. | Error | Add a graphics card or replace the device with one that has a graphics card |
| Upload bandwidth has reached 90% of the configured limit on this device. Captures might be overwritten soon. | Warning | Increase the upload bandwidth limit on the Forensic evidence settings page. |
Contact Microsoft Support if the recommended actions don't resolve issues with the client.
Capacity and billing
When you configure forensic evidence, you can choose to purchase the forensic evidence add-on for Insider Risk Management for your captured clips. Organizations with any of the following licenses can get the add-on: Microsoft 365 E5, Microsoft Purview Suite (formerly known as Microsoft 365 E5 Compliance), or Microsoft 365 E5 Insider Risk Management.
Organizations can purchase the add-on in units of 100 GB per month. Purchased capacity applies to the ingestion of forensic evidence starting on the date of purchase and resets on the first of the month. Unused capacity doesn't carry over. We recommend purchasing the license at the beginning of the month to maximize the value of the license. One hundred gigabytes roughly equals around 1,100 hours of forensic evidence captures per tenant, at a video resolution of 1080p. You can download the capacity calculator to help estimate the number of GBs needed per month.
Once you ingest the forensic evidence, the system retains it for 120 days. You can export forensic evidence if needed after the 120-day retention period.
Payment plans
When you purchase the add-on through the Microsoft 365 admin center, you have two payment plans available:
- Pay yearly (available in all channels). With the annual commitment option, you buy the number of licenses you specify each month for 12 months. This option is suitable for customers who want to ensure they have capacity available each month to ingest forensic evidence without interruption. This payment plan automatically replenishes the number of licenses purchased each month. Purchased capacity applies to the ingestion of forensic evidence starting on the date of purchase and resets on the first of the month. Unused capacity doesn't carry over. Customers can choose to be billed one time or split the bill into 12 monthly payments.
- Pay monthly (only available in web direct). If you don't want to make an annual commitment, you can buy the number of licenses needed each month. Purchased capacity applies to the ingestion of forensic evidence starting on the date of purchase and resets on the first of the month. Unused capacity doesn't carry over.
Can I try the forensic capability before purchasing it?
Each tenant with a Microsoft 365 E5, Microsoft Purview Suite (formerly known as Microsoft 365 E5 Compliance), or Microsoft 365 E5 Insider Risk Management license can sign up for a 20-GB trial license to try the forensic evidence capability.
Note
The 20-GB trial license is only available for customers on the legacy commerce platform.
The trial license provides 20 GB of capacity until you use it up or until one year from the activation date, whichever comes first. If you purchase a forensic evidence add-on license before using all the trial capacity, you can use the remaining trial capacity before the system starts metering the purchased capacity.
If you use up the 20 GB of trial capacity without purchasing the forensic add-on for Insider Risk Management, you can view any ingested clips but can't ingest new clips.
Sign up for the 20-GB trial license
Sign in to the Microsoft Purview portal with credentials for an admin account in your Microsoft 365 organization.
Go to the Insider Risk Management solution.
Select Forensic evidence in the left navigation, then select Capacity and billing.
Note
You can also sign up for the trial license from the Insider Risk Management > Forensic evidence > Dashboard tab.
Select Claim 20 GB of capacity.
Follow the prompts in the Microsoft 365 admin center.
Purchase the forensic add-on for Insider Risk Management
- Go to Microsoft 365 admin center > Marketplace > All products.
- Search for "forensic evidence".
Analyze your capacity
After purchasing capacity or signing up for the 20-GB trial license, use the Capacity page to check how much capacity you used and how much capacity remains. You can also see how much capacity you use each month by selecting an option from the Capacity usage in GB list or by selecting View all capacity usage.
Note
The commerce platform has a legacy billing platform and a modern billing platform. Insider Risk Management billing works with the modern billing platform. Purchased capacity applies to the ingestion of forensic evidence each month, starting on the date of purchase and resetting on the first day of every month. Any purchased capacity can be fully used in that month and resets on the first day of the next month. You can use the capacity until the date the license expires.