Note
Access to this page requires authorization. You can try signing in or changing directories.
Access to this page requires authorization. You can try changing directories.
The Microsoft Purview Application Programming Interface (API) for eDiscovery in Microsoft Graph enables your organization to automate repetitive tasks and integrate with your existing eDiscovery tools to build repeatable workflows that industry regulations might require. This article provides guidance on how to configure the required prerequisites to enable access to the Microsoft Purview APIs for eDiscovery. This guidance is based on using app-only access to the APIs, with either a client secret or a self-signed certificate to authenticate the requests.
Microsoft Purview APIs
The Microsoft Purview APIs for eDiscovery include two separate APIs:
- Microsoft Graph: Part of the
Microsoft.Graph.Securitynamespace and used for working with eDiscovery cases. - Microsoft Purview eDiscovery API: Used exclusively to programmatically download packages created when exporting from searches and review sets in eDiscovery.
eDiscovery APIs in Microsoft Graph only support eDiscovery cases with premium features enabled.
For a list of supported API calls within the Microsoft Graph calls, see Use the Microsoft Purview eDiscovery API.
Application access to data
Before you can make any calls to the Microsoft Purview APIs for eDiscovery, you must first register an app in the Microsoft Identity Platform, Entra ID.
An application can access data in two ways:
- Delegated access: An app acting on behalf of a signed-in user.
- App-only access: An app acting with its own identity.
For more information on access scenarios, see Authentication and authorization basics.
Microsoft Graph API
Prerequisites
Implementing app-only access involves registering an app in Azure portal, creating client secret/certificates, assigning API permissions, setting up a service principal, and then using app-only access to call Microsoft Graph APIs. To register an app, create client secret/certificates and assign API permissions the account must be a Cloud Application Administrator.
For more information on registering an app in the Azure portal, see Register an application with the Microsoft identity platform.
Granting tenant-wide admin consent for Microsoft Purview eDiscovery API application permissions requires you to sign in as a user that is authorized to consent on behalf of your organization. For more information, see Grant tenant-wide admin consent to an application.
Setting up a service principal requires the following prerequisites:
- A machine with the ExchangeOnlineManagement module installed.
- An account that has the Role Management role assigned in Microsoft Purview.
For detailed steps on implementing app-only access for eDiscovery, see Set up app-only access for Microsoft Purview eDiscovery.
Connecting to Microsoft Graph API using app-only access
Use the Connect-MgGraph cmdlet in PowerShell to authenticate and connect to Microsoft Graph using the app-only access method. This cmdlet enables your app to interact with Microsoft Graph securely and enables you to explore the Microsoft Purview eDiscovery APIs.
Connecting via client secret
To connect using a client secret, update and run the following example PowerShell code.
$clientSecret = "<client secret>" ## Update with client secret added to the registered app
$appID = "<APP ID>" ## Update with Application ID of registered/Enterprise app
$tenantId = "<Tenant ID>" ## Update with tenant ID
$ClientSecretPW = ConvertTo-SecureString "$clientSecret" -AsPlainText -Force
$clientSecretCred = New-Object System.Management.Automation.PSCredential -ArgumentList ("$appID", $clientSecretPW)
Connect-MgGraph -TenantId "$tenantId" -ClientSecretCredential $clientSecretCred
Connecting via certificate
To connect using a certificate, update and run the following example PowerShell code.
$certPath = "Cert:\currentuser\my\<xxxxxxxxxx>" ## Update with the cert thumbnail
$appID = "<APP ID>" ## Update with Application ID of registered/Enterprise app
$tenantId = "<Tenant ID>" ## Update with tenant ID
$ClientCert = Get-ChildItem $certPath
Connect-MgGraph -TenantId $TenantId -ClientId $appId -Certificate $ClientCert
Invoke Microsoft Graph API calls
After you connect, you can start making calls to the Microsoft Graph API.
For example, you can list the eDiscovery cases within the tenant by using the ediscoveryCases API. The guidance for each operation lists the following information:
- Permissions required to make the API call
- HTTP request and method
- Request header and body information
- Response
- Examples (HTTP, C#, CLI, Go, Java, PHP, PowerShell, Python)
Because you're connected through the Microsoft Graph PowerShell module, you can use either the HTTP or PowerShell method.
First, let's look at the PowerShell example.
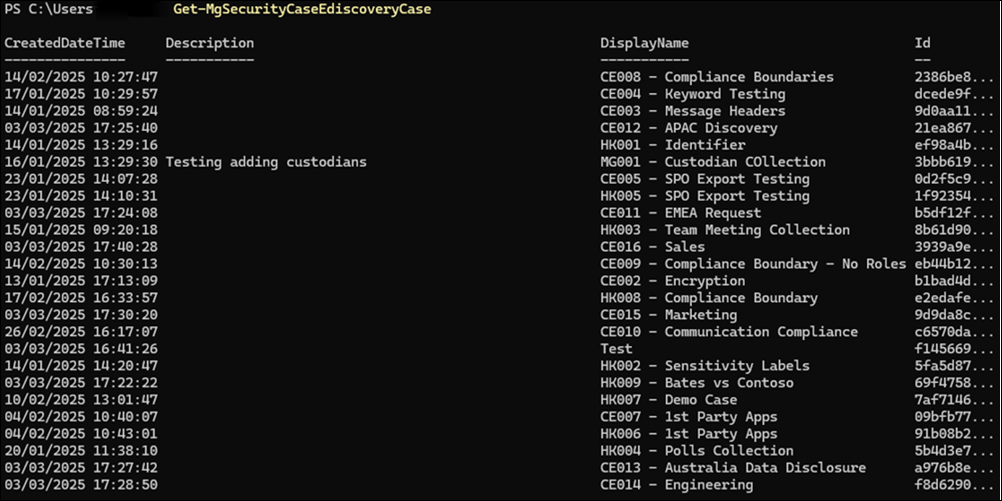
As you can see, it returns a list of all the cases within the tenant. When delving deeper into a case, it's important to record the case ID. You need this ID for future API calls.
Now, let's look at an HTTP example. You use the Invoke-MgGraphRequest cmdlet to make the call by using PowerShell.
First, store the URL in a variable:
$uri = "https://graph.microsoft.com/v1.0/security/cases/ediscoveryCases"
Then use the Invoke-MgGraphRequest cmdlet to make the API call.
Invoke-MgGraphRequest -Method Get -Uri $uri
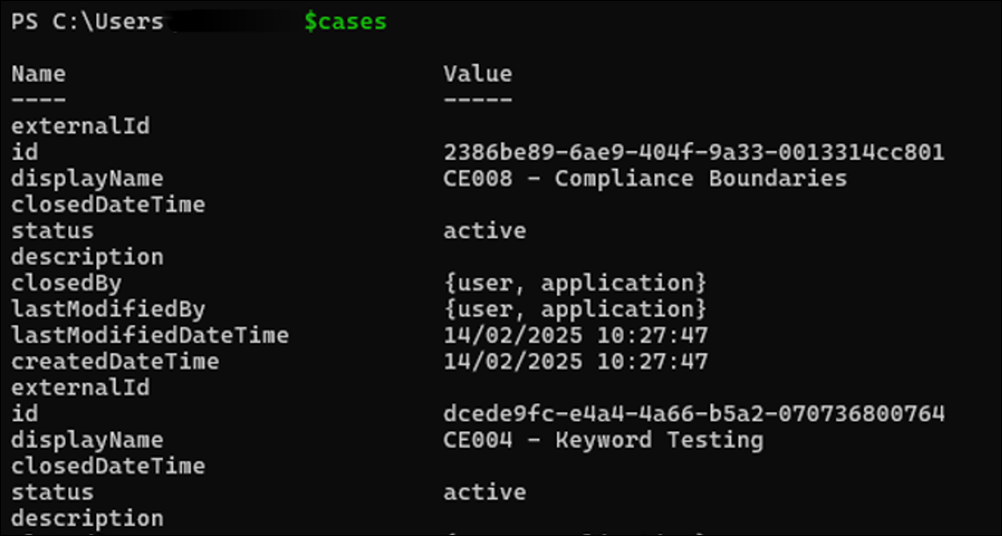
As you can see from the following output, you need to extract the values from the returned response.

You can save the Value elements of the response to a new variable by using the following command.
$cases = (Invoke-MgGraphRequest -Method Get -Uri $uri).value
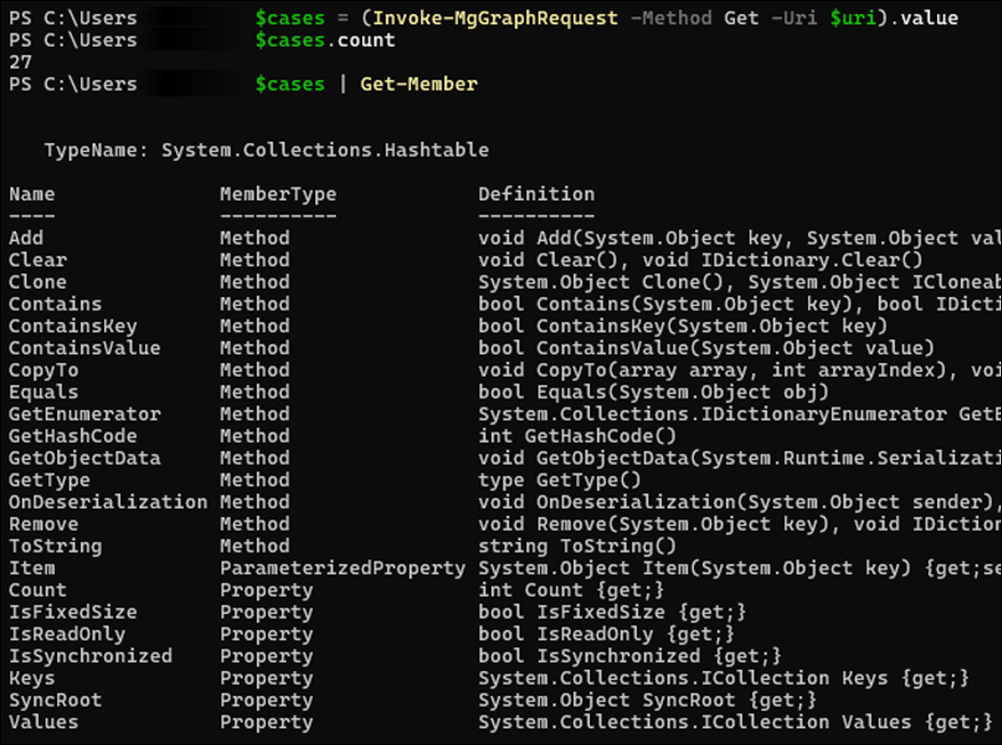
This command returns a collection of hash tables. Optionally, you can run a small bit of PowerShell code to convert the hash tables into PowerShell objects for easier use with cmdlet parameters such as format-table and format-list.
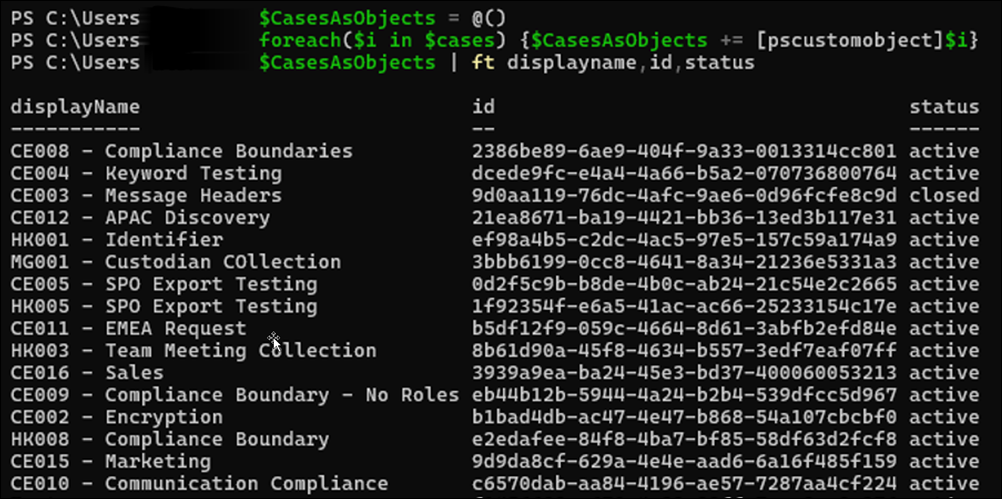
$CasesAsObjects = @()
foreach($i in $cases) {$CasesAsObjects += [pscustomobject]$i}
$CasesAsObjects | ft displayname,id,status
Microsoft Purview eDiscovery API
You can configure the Microsoft Purview eDiscovery API to enable the programmatic download of export packages and the reports from an export process in an eDiscovery case.
Prerequisites
Before you execute the configuration steps in this section, complete and validate the configuration detailed in the Microsoft Graph API section. Extend the previously registered app in Microsoft Entra ID to include the required permissions to achieve programmatic download of the export package.
This configuration already provides the following prerequisites:
- Registered app in Azure portal configured with the appropriate client secret or certificate.
- Service principal in Microsoft Purview assigned the relevant eDiscovery roles.
- Microsoft eDiscovery API permissions configured for the Microsoft Graph.
To extend the existing registered app's API permissions to enable programmatic download, complete the following steps:
- Register a new Microsoft Application and service principal in the tenant.
- Assign additional API permissions to the previously registered app in the Azure portal.
To grant tenant-wide admin consent for Microsoft Purview eDiscovery APIs application permissions, sign in as a user that is authorized to consent on behalf of the organization. For more information, see Grant tenant-wide admin consent to an application.
Configuration steps
Step 1: Register the MicrosoftPurviewEDiscovery app in Microsoft Entra ID
Complete the following steps:
Validate that the MicrosoftPurviewEDiscovery app isn't already registered. Sign in to the Azure portal and go to Microsoft Entra ID > Enterprise Applications.
Change the Application type filter to show Microsoft Applications.
In the search box, enter MicrosoftPurviewEDiscovery. The MicrosoftPurviewEDiscovery app should be displayed. If the MicrosoftPurviewEDiscovery app isn't listed, register the app in Microsoft Entra ID.
To register the app, complete the following steps:
- Use the Microsoft.Graph PowerShell Module to register the MicrosoftPurviewEDiscovery app in Microsoft Entra ID. For more information, see Install the Microsoft Graph PowerShell SDK.
- Once the module is installed on a machine, run the following cmdlet to connect to Microsoft Graph using PowerShell:
Connect-MgGraph -scopes "Application.ReadWrite.All"If this is the first time using Microsoft Graph PowerShell cmdlets, you might be prompted to consent to required permissions.
To register the MicrosoftPurviewEDiscovery app, run the following PowerShell commands:
$spId = @{"AppId" = "b26e684c-5068-4120-a679-64a5d2c909d9" }New-MgServicePrincipal -BodyParameter $spId;
Note
Use the PowerShell script to register a new application in Microsoft Entra ID and assign the Microsoft Purview eDiscovery API permissions for application authentication if applicable. After you register the application, you need to configure the client secret or certificate and grant admin consent through the portal.
Step 2: Assign additional MicrosoftPurviewEDiscovery permissions to the registered app
Now that the service principal is added, update the permissions on your previously registered app created in the Microsoft Graph API section of this article. Sign in to the Azure portal and go to Microsoft Entra ID > App Registrations.
- Find and select the app you created in the Microsoft Graph API section of this article.
- Select API Permissions from the navigation menu.
- Select Add a permission and then APIs my organization uses.
- Search for MicrosoftPurviewEDiscovery and select it.
- Select Application Permissions.
- Select the check box for eDiscovery.Download.Read.
- Select Add Permissions.
- On API permissions, select Grant Admin Consent (your organization) to approve the added permissions.
Once admin consent is granted, the status of the added permissions is updated for your organization.
Downloading the export packages and reports
Retrieving the case ID and export job ID
To download the export packages and reports of an export process in an eDiscovery case, you need the case ID and the operation or job ID for the export job.
To gather this information by using the Microsoft Purview portal:
- Open an eDiscovery case.
- Locate the export process.
- Select Copy support information.
- Add this information into a text editor (like Notepad).
Alternatively, access this information programmatically by using the following Graph API calls to locate the case ID and the job ID you want to export:
Connect to Microsoft Graph by following the steps in the Connecting to Microsoft Graph API using app-only access section of this article.
Use the eDiscovery Graph PowerShell cmdlets with the following command if you know the case name:
Get-MgSecurityCaseEdiscoveryCase | where {$_.displayname -eq "<Name of case>"}Once you have the case ID, look up the operations in the case to identify the job ID for the export by using the following command:
Get-MgSecurityCaseEdiscoveryCaseOperation -EdiscoveryCaseId "<case ID>"
Export jobs are logged under an action of exportResult for a direct export from search or ContentExport for an export from a review set. The name of the export jobs isn't returned by this API call. To find the name of the export process, you must query the specific operation ID. Use the following command to find the name of the export process:
Get-MgSecurityCaseEdiscoveryCaseOperation -EdiscoveryCaseId "<case ID>" -CaseOperationId “<operation ID>”
The name of the export operation is included in the AdditionalProperties field.
To make the HTTP API calls directly to list cases in your organization, see List ediscoveryCases.
To make the HTTP API calls directly to list the operations for a case, see List caseOperations.
Use the case ID in the API call to indicate which case to list the operations from. For example:
https://graph.microsoft.com/v1.0/security/cases/ediscoveryCases/<CaseID>/operations/
The name of the export jobs isn't returned with this API call. To find the name of the export process, you must query the specific job ID. For example:
https://graph.microsoft.com/v1.0/security/cases/ediscoveryCases/<CaseID>/operations/<Operation ID
Downloading an export package
Retrieving the download URLs for export packages
The exportFileMetaData property contains the URL you need to download the export packages and reports. To get the URL, you need the case ID of the eDiscovery case where you ran the export process and the operation ID for the export process.
Use the following eDiscovery Graph PowerShell cmdlets to find this information:
$operation = Get-MgSecurityCaseEdiscoveryCaseOperation -EdiscoveryCaseId "<case ID>" -CaseOperationId “<operation ID>”
$Operation.AdditionalProperties.exportFileMetadata
To make the HTTP API calls directly to return the exportFileMetaData information for an operation, see List caseOperations.
Each export package in the Microsoft Purview portal has an entry in the exportFileMetaData property. Each entry lists the following information:
- The export package file name
- The downloadUrl to retrieve the export package
- The size of the export package
Example scripts to download the export package
Because the Microsoft Purview eDiscovery API is separate from Microsoft Graph API, you need a separate authentication token to authorize a download request. Use the MSAL.PS PowerShell Module and the Get-MSALToken cmdlet to get a separate token. You also need to connect to the Microsoft Graph APIs by using the Connect-MgGraph cmdlet.
The following example scripts can be used as a reference when developing your own scripts to enable the programmatic download of the export packages.
Connecting with a client secret
If you configured your app to use a client secret, use the following example script as a reference to download the export package and reports programmatically. Copy the contents into Notepad and save it as DownloadExportUsingApp.ps1.
[CmdletBinding()]
param (
    [Parameter(Mandatory = $true)]
    [string]$tenantId,
    [Parameter(Mandatory = $true)]
    [string]$appId,
    [Parameter(Mandatory = $true)]
    [string]$appSecret,
    [Parameter(Mandatory = $true)]
    [string]$caseId,
    [Parameter(Mandatory = $true)]
    [string]$exportId,
    [Parameter(Mandatory = $true)]
    [string]$path = "D:\Temp",
    [ValidateSet($null, 'USGov', 'USGovDoD')]
    [string]$environment = $null
)

if (-not(Get-Module -Name Microsoft.Graph -ListAvailable)) {
    Write-Host "Installing Microsoft.Graph module"
    Install-Module Microsoft.Graph -Scope CurrentUser
}

if (-not(Get-Module -Name MSAL.PS -ListAvailable)) {
    Write-Host "Installing MSAL.PS module"
    Install-Module MSAL.PS -Scope CurrentUser
}

$password = ConvertTo-SecureString $appSecret -AsPlainText -Force
$clientSecretCred = New-Object System.Management.Automation.PSCredential -ArgumentList ($appId, $password)

if (-not(Get-MgContext)) {
    Write-Host "Connect with credentials of a ediscovery admin (token for graph)"
    if (-not($environment)) {
        Connect-MgGraph -TenantId $TenantId -ClientSecretCredential $clientSecretCred
    }
    else {
        Connect-MgGraph -TenantId $TenantId -ClientSecretCredential $clientSecretCred -Environment $environment
    }
}

Write-Host "Connect with credentials of a ediscovery admin (token for export)"
$exportToken = Get-MsalToken -ClientId $appId -Scopes "b26e684c-5068-4120-a679-64a5d2c909d9/.default" -TenantId $tenantId -RedirectUri "http://localhost" -ClientSecret $password

$uri = "/v1.0/security/cases/ediscoveryCases/$($caseId)/operations/$($exportId)"

$export = Invoke-MgGraphRequest -Uri $uri;
if (-not($export)){
    Write-Host "Export not found"
    exit
}
else{
    $export.exportFileMetadata | % {
        Write-Host "Downloading $($_.fileName)"
        Invoke-WebRequest -Uri $_.downloadUrl -OutFile "$($path)\$($_.fileName)" -Headers @{"Authorization" = "Bearer $($exportToken.AccessToken)"; "X-AllowWithAADToken" = "true" }
    }
}
Save the script and open a new PowerShell window with the following PowerShell modules installed:
- Microsoft.Graph
- MSAL.PS
Browse to the directory where you saved the script and run the following command:
.\DownloadExportUsingApp.ps1 -tenantId “<tenant ID>” -appId “<App ID>” -appSecret “<Client Secret>” -caseId “<CaseID>” -exportId “<ExportID>” -path “<Output Path>”
Review the folder you specified as the path to view the downloaded files.
Connecting with a certificate
If you configured your app to use a certificate, use the following example script as a reference to download the export package and reports programmatically. Copy the contents into a text editor and save it as DownloadExportUsingAppCert.ps1.
[CmdletBinding()]
param (
    [Parameter(Mandatory = $true)]
    [string]$tenantId,
    [Parameter(Mandatory = $true)]
    [string]$appId,
    [Parameter(Mandatory = $true)]
    [String]$certPath,
    [Parameter(Mandatory = $true)]
    [string]$caseId,
    [Parameter(Mandatory = $true)]
    [string]$exportId,
    [Parameter(Mandatory = $true)]
    [string]$path = "D:\Temp",
    [ValidateSet($null, 'USGov', 'USGovDoD')]
    [string]$environment = $null
)

if (-not(Get-Module -Name Microsoft.Graph -ListAvailable)) {
    Write-Host "Installing Microsoft.Graph module"
    Install-Module Microsoft.Graph -Scope CurrentUser
}

if (-not(Get-Module -Name MSAL.PS -ListAvailable)) {
    Write-Host "Installing MSAL.PS module"
    Install-Module MSAL.PS -Scope CurrentUser
}

##$password = ConvertTo-SecureString $appSecret -AsPlainText -Force
##$clientSecretCred = New-Object System.Management.Automation.PSCredential -ArgumentList ($appId, $password)

$ClientCert = Get-ChildItem $certPath

if (-not(Get-MgContext)) {
    Write-Host "Connect with credentials of a ediscovery admin (token for graph)"
    if (-not($environment)) {
        Connect-MgGraph -TenantId $TenantId -ClientId $appId -Certificate $ClientCert
    }
    else {
        Connect-MgGraph -TenantId $TenantId -ClientId $appId -Certificate $ClientCert -Environment $environment
    }
}

Write-Host "Connect with credentials of a ediscovery admin (token for export)"

$connectionDetails = @{
    'TenantId'          = $tenantId
    'ClientId'          = $appID
    'ClientCertificate' = $ClientCert
    'Scope' = "b26e684c-5068-4120-a679-64a5d2c909d9/.default"
}

$exportToken = Get-MsalToken @connectionDetails

$uri = "/v1.0/security/cases/ediscoveryCases/$($caseId)/operations/$($exportId)"

$export = Invoke-MgGraphRequest -Uri $uri;
if (-not($export)){
    Write-Host "Export not found"
    exit
}
else{
    $export.exportFileMetadata | % {
        Write-Host "Downloading $($_.fileName)"
        Invoke-WebRequest -Uri $_.downloadUrl -OutFile "$($path)\$($_.fileName)" -Headers @{"Authorization" = "Bearer $($exportToken.AccessToken)"; "X-AllowWithAADToken" = "true" }
    }
}
When you save the script, open a new PowerShell window with the following PowerShell modules installed:
- Microsoft.Graph
- MSAL.PS
Browse to the directory where you saved the script and run the following command.
.\DownloadExportUsingAppCert.ps1 -tenantId “<tenant ID>” -appId “<App ID>” -certPath “<Certificate Path>” -caseId “<CaseID>” -exportId “<ExportID>” -path “<Output Path>”
Review the folder you specified as the path to view the downloaded files.