Note
Access to this page requires authorization. You can try signing in or changing directories.
Access to this page requires authorization. You can try changing directories.
Use a native connector to import and archive financial services chat data from the ICE Chat collaboration tool. After you set up and configure a connector, it connects to your organization's ICE Chat secure FTP (SFTP) site once every day, converts the content of chat messages to an email message format, and then imports those items to mailboxes in Microsoft 365.
After storing ICE chat data in user mailboxes, you can apply Microsoft Purview features such as litigation hold, eDiscovery, archiving, auditing, communication compliance, and Microsoft 365 retention policies to ICE Chat data. For example, you can search ICE Chat messages by using content search or associate the mailbox that contains the ICE Chat data in an eDiscovery case. Using an ICE Chat connector to import and archive data in Microsoft 365 can help your organization stay compliant with government and regulatory policies.
Overview of archiving ICE Chat data
The following overview explains the process of using a connector to archive ICE chat data in Microsoft 365.
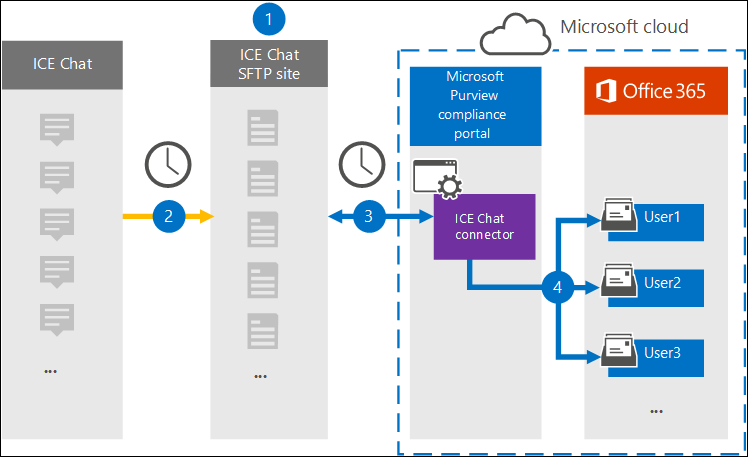
Your organization works with ICE Chat to set up an ICE Chat SFTP site. You also work with ICE Chat to configure ICE Chat to copy chat messages to your ICE Chat SFTP site.
Once every 24 hours, ICE Chat copies chat messages to your ICE Chat SFTP site.
The ICE Chat connector that you create in the Microsoft Purview portal connects to the ICE Chat SFTP site every day and transfers the chat messages from the previous 24 hours to a secure Azure Storage location in the Microsoft cloud. The connector also converts the content of a chat massage to an email message format.
The connector imports chat message items to the mailboxes of specific users. A new folder named ICE Chat is created in the user mailboxes and the chat message items are imported to that folder. The connector uses the value of the SenderEmail and RecipientEmail properties. Every chat message contains these properties, which are populated with email address of the sender and every recipient/participant of the chat message.
In addition to automatic user mapping that uses the values of the SenderEmail and RecipientEmail property (which means that the connector imports a chat message to the sender's mailbox and the mailboxes of every recipient), you can also define custom user mapping by uploading a CSV mapping file. This mapping file contains the ICE Chat ImId and the corresponding Microsoft 365 mailbox address for every user in your organization. If you enable automatic user mapping and provide a custom-mapping file, for every chat item the connector first looks at the custom-mapping file. If it doesn't find a valid Microsoft 365 user account that corresponds to a user's ICE Chat ImId, the connector uses the SenderEmail and RecipientEmail properties of the chat item to import the item to the mailboxes of the chat participants. If the connector doesn't find a valid Microsoft 365 user in either the custom-mapping file or the SenderEmail and RecipientEmail properties, the item won't be imported.
Before you set up a connector
Some implementation steps for archiving ICE Chat data are external to Microsoft 365. You must complete these steps before you create the connector in the compliance center.
ICE Chat charges customers a fee for external compliance. Your organization should contact the ICE Chat sales group to discuss and sign the ICE Chat data services agreement, which you can get at https://www.theice.com/publicdocs/agreements/ICE_Data_Services_Agreement.pdf. This agreement is between ICE Chat and your organization and doesn't involve Microsoft. After you set up an ICE Chat SFTP site in Step 2, ICE Chat provides the FTP credentials directly to your organization. Then you provide those credentials to Microsoft when setting up the connector in Step 3.
You must set up an ICE Chat SFTP site before creating the connector in Step 3. After working with ICE Chat to set up the SFTP site, data from ICE Chat is uploaded to the SFTP site every day. The connector you create in Step 3 connects to this SFTP site and transfers the chat data to Microsoft 365 mailboxes. SFTP also encrypts the ICE Chat data that's sent to mailboxes during the transfer process.
To set up an ICE Chat connector, you need keys and key passphrases for Pretty Good Privacy (PGP) and Secure Shell (SSH). These keys configure the ICE Chat SFTP site and help the connector connect to the ICE Chat SFTP site to import data to Microsoft 365. The PGP key configures the encryption of data that's transferred from the ICE Chat SFTP site to Microsoft 365. The SSH key configures secure shell to enable a secure remote authentication when the connector connects to the ICE Chat SFTP site.
When setting up a connector, you can use public keys and key passphrases provided by Microsoft or your own private keys and passphrases. We recommend that you use the public keys provided by Microsoft. However, if your organization already configured an ICE Chat SFTP site by using private keys, you can create a connector by using these same private keys.
The ICE Chat connector can import up to 200,000 items in a single day. If there are more than 200,000 items on the SFTP site, none of those items are imported to Microsoft 365.
The admin who creates the ICE Chat connector in Step 3 (and who downloads the public keys and IP address in Step 1) must be assigned the Data Connector Admin role. This role is required to add connectors on the Data connectors page in the Microsoft Purview portal. This role is added by default to multiple role groups. For a list of these role groups, see Roles in Microsoft Defender for Office 365 and Microsoft Purview compliance. Alternatively, an admin in your organization can create a custom role group, assign the Data Connector Admin role, and then add the appropriate users as members. For instructions, see:
Set up a connector by using public keys
The steps in this section show you how to set up an ICE Chat connector by using the public keys for Pretty Good Privacy (PGP) and Secure Shell (SSH).
Step 1: Obtain PGP and SSH public keys
First, get a copy of the public keys for Pretty Good Privacy (PGP) and Secure Shell (SSH). You use these keys in Step 2 to configure the ICE Chat SFTP site to allow the connector (that you create in Step 3) to connect to the SFTP site and transfer the ICE Chat data to Microsoft 365 mailboxes. You also get an IP address in this step, which you use when configuring the ICE Chat SFTP site.
Sign in to the Microsoft Purview portal.
Select Settings > Data connectors.
Select My connectors, then select Add connector.
Choose ICE Chat from the list.
On the Terms of service page, select Accept.
On the Add credentials for content source page, select I want to use PGP and SSH public keys provided by Microsoft.
Under step 1, select the Download SSH key, Download PGP key, and Download IP address links to save a copy of each file to your local computer.
These files contain the following items that you use to configure the ICE Chat SFTP site in Step 2:
- PGP public key: Use this key to configure the encryption of data that's transferred from the ICE Chat SFTP site to Microsoft 365.
- SSH public key: Use this key to configure Secure SSH to enable a secure remote authentication when the connector connects to the ICE Chat SFTP site.
- IP address: Configure the ICE Chat SFTP site to accept a connection request only from this IP address, which is used by the ICE Chat connector that you create in Step 3.
Select Cancel to close the workflow. You come back to this workflow in Step 3 to create the connector.
Step 2: Configure the ICE Chat SFTP site
Next, use the PGP and SSH public keys and the IP address that you got in Step 1 to configure PGP encryption and SSH authentication for the ICE Chat SFTP site. This configuration lets the ICE Chat connector that you create in Step 3 connect to the ICE Chat SFTP site and transfer ICE Chat data to Microsoft 365. You need to work with ICE Chat customer support to set up your ICE Chat SFTP site.
Step 3: Create an ICE Chat connector
In the last step, you create an ICE Chat connector in the Microsoft Purview portal. The connector uses the information you provide to connect to the ICE Chat SFTP site and transfer chat messages to the corresponding user mailboxes in Microsoft 365.
Sign in to the Microsoft Purview portal.
Select Settings > Data connectors.
Select My connectors, then select Add connector.
Choose ICE Chat from the list.
On the Terms of service page, select Accept.
On the Add credentials for content source page, select I want to use PGP and SSH public keys.
Under Step 3, enter the required information in the following boxes and then select Validate connection.
- Firm code: The ID for your organization, which you use as the username for the ICE Chat SFTP site.
- Password: The password for your ICE Chat SFTP site.
- SFTP URL: The URL for the ICE Chat SFTP site (for example,
sftp.theice.com). You can also use an IP address for this value. - SFTP port: The port number for the ICE Chat SFTP site. The connector uses this port to connect to the SFTP site.
After the connection is successfully validated, select Next.
On the Define user page, specify the users to import data for.
- All users in your organization. Select this option to import data for all users.
- Only users on Litigation hold. Select this option to import data only for users whose mailboxes are placed on Litigation hold. This option imports data to user mailboxes that have the LitigationHoldEnabled property set to True. For more information, see Create a Litigation hold.
On the Map external users to Microsoft 365 users page, enable automatic user mapping and provide custom user mapping as required. You can download a copy of the user-mapping CSV file on this page. You can add the user mappings to the file and then upload it.
Note
As previously explained, the custom mapping file contains the ICE Chat imid and corresponding Microsoft 365 mailbox address for each user. If you enable automatic user mapping and provide a custom mapping, for every chat item, the connector first looks at the custom mapping file. If it doesn't find a valid Microsoft 365 user that corresponds to a user's ICE Chat imid, the connector imports the item to the mailboxes for the users specified in the SenderEmail and RecipientEmail properties of the chat item. If the connector doesn't find a valid Microsoft 365 user by either automatic or custom user mapping, the item isn't imported.
Select Next, review your settings, and then select Finish to create the connector.
Set up a connector by using private keys
The steps in this section show you how to set up an ICE Chat connector by using PGP and SSH private keys. Use this connector setup option if your organization already configured an ICE Chat SFTP site by using private keys.
Step 1: Get an IP address to configure the ICE Chat SFTP site
If your organization uses PGP and SSH private keys to set up an ICE Chat SFTP site, get an IP address and give it to ICE Chat customer support. The ICE Chat SFTP site must accept connection requests from this IP address. The same IP address is used by the ICE Chat connector to connect to the SFTP site and transfer ICE Chat data to Microsoft 365.
To get the IP address:
- Sign in to the Microsoft Purview portal.
- Select Settings > Data connectors.
- Select My connectors, then select Add connector.
- Choose ICE Chat from the list.
- On the Terms of service page, select Accept.
- On the Add credentials for content source page, select I want to use PGP and SSH private keys.
- Under step 1, select Download IP address to save a copy of the IP address file to your local computer.
- Select Cancel to close the workflow. You come back to this workflow in Step 2 to create the connector.
Work with ICE Chat customer support to configure your ICE Chat SFTP site to accept connection requests from this IP address.
Step 2: Create an ICE Chat connector
After you configure your ICE Chat SFTP site, create an ICE Chat connector in the Microsoft Purview portal. The connector uses the information you provide to connect to the ICE Chat SFTP site and transfer email messages to the corresponding user mailboxes in Microsoft 365. To complete this step, make sure you have copies of the same private keys and key passphrases that you used to set up your ICE Chat SFTP site.
Sign in to the Microsoft Purview portal.
Select Settings > Data connectors.
Select My connectors, then select Add connector.
Choose ICE Chat from the list.
On the Terms of service page, select Accept.
On the Add credentials for content source page, select I want to use PGP and SSH private keys.
Under Step 3, enter the required information in the following boxes and then select Validate connection.
- Name: The name for the connector. It must be unique in your organization.
- Firm code: The ID for your organization that is used as the username for the ICE Chat SFTP site.
- Password: The password for your organization's ICE Chat SFTP site.
- SFTP URL: The URL for the ICE Chat SFTP site (for example,
sftp.theice.com). You can also use an IP address for this value. - SFTP port: The port number for the ICE Chat SFTP site. The connector uses this port to connect to the SFTP site.
- PGP private key: The PGP private key for the ICE Chat SFTP site. Include the entire private key value, including the beginning and ending lines of the key block.
- PGP key passphrase: The passphrase for the PGP private key.
- SSH private key: The SSH private key for the ICE Chat SFTP site. Include the entire private key value, including the beginning and ending lines of the key block.
- SSH key passphrase: The passphrase for the SSH private key.
After the connection is successfully validated, select Next.
On the Define user page, specify the users to import data for.
- All users in your organization. Select this option to import data for all users.
- Only users on Litigation hold. Select this option to import data only for users whose mailboxes are placed on Litigation hold. This option imports data to user mailboxes that have the LitigationHoldEnabled property set to True. For more information, see Create a Litigation hold.
On the Map ICE Chat users to Microsoft 365 users page, enable automatic user mapping and provide custom user mapping as required.
Note
As previously explained, the custom mapping file contains the ICE Chat imid and corresponding Microsoft 365 mailbox address for each user. If you enable automatic user mapping and provide a custom mapping, for every chat item, the connector first looks at the custom mapping file. If it doesn't find a valid Microsoft 365 user that corresponds to a user's ICE Chat imid, the connector imports the item to the mailboxes for the users specified in the SenderEmail and RecipientEmail properties of the chat item. If the connector doesn't find a valid Microsoft 365 user by either automatic or custom user mapping, the item isn't imported.
Select Next, review your settings, and then select Finish to create the connector.