Note
Access to this page requires authorization. You can try signing in or changing directories.
Access to this page requires authorization. You can try changing directories.
Use the Symphony DataParser from 17a-4 LLC to import and archive Symphony communications data to user mailboxes in your Microsoft 365 organization. The DataParser includes a Symphony connector that you configure to capture items from a third-party data source and import those items to Microsoft 365. The Symphony DataParser connector converts Symphony data to an email message format and then imports those items to user mailboxes in Microsoft 365.
After storing Symphony data in user mailboxes, you can apply Microsoft Purview features such as Litigation Hold, eDiscovery, retention policies and retention labels, and communication compliance. By using a Symphony connector to import and archive data in Microsoft 365, you help your organization stay compliant with government and regulatory policies.
Overview of archiving Symphony data
The following overview explains the process of using a data connector to archive Symphony data in Microsoft 365.
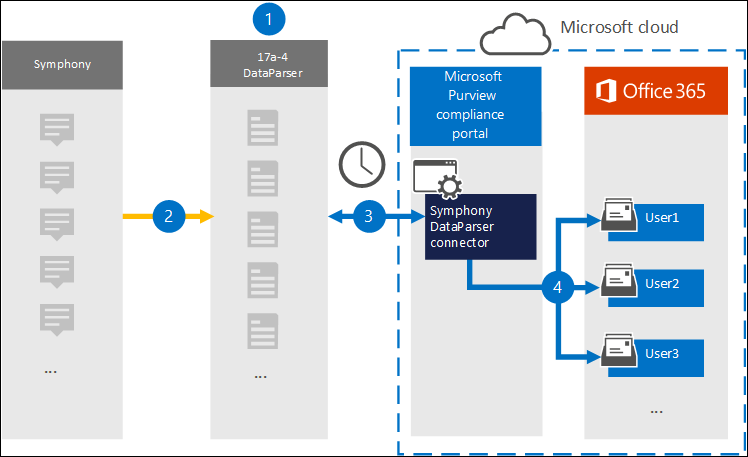
Your organization works with 17a-4 to set up and configure the Symphony DataParser.
The DataParser regularly collects Symphony items and converts the content of a message to an email message format.
You create the Symphony DataParser connector in the Microsoft Purview portal. The connector connects to DataParser and transfers the messages to a secure Azure Storage location in the Microsoft cloud.
The connector creates a subfolder in the Inbox folder named Symphony DataParser in the user mailboxes and imports the Symphony items to that folder. The connector uses the value of the Email property to determine which mailbox to import items to. Every Symphony item contains this property, which is populated with the email address of every participant.
Before you set up a connector
Important
All partner third-party data connector configurations require a provisioned service principal for the partner application. This requirement isn't applicable for native Microsoft third-pary data connector configurations.
To provision a service principal using PowerShell, see Provision a service principal for partner third-party data connectors.
Create a DataParser account for Microsoft connectors. To create an account, contact 17a-4 LLC. You need to sign in to this account when you create the connector in Step 1.
Assign the Data Connector Admin role to the user who creates the Symphony DataParser connector in Step 1 (and completes it in Step 3). This role is required to add connectors on the Data connectors page in the Microsoft Purview portal. Multiple role groups include this role by default. For a list of these role groups, see Roles in Microsoft Defender for Office 365 and Microsoft Purview compliance. Alternatively, an admin in your organization can create a custom role group, assign the Data Connector Admin role, and add the appropriate users as members. For instructions, see:
This 17a-4 data connector is available in GCC environments in the Microsoft 365 US Government cloud. Third-party applications and services might involve storing, transmitting, and processing your organization's customer data on third-party systems that are outside of the Microsoft 365 infrastructure. Therefore, Microsoft Purview and data protection commitments don't cover these systems. Microsoft makes no representation that use of this product to connect to third-party applications implies that those third-party applications are FEDRAMP compliant.
Step 1: Set up a Symphony DataParser connector
Create a 17a-4 connector for Symphony data in the Microsoft Purview portal.
- Sign in to the Microsoft Purview portal.
- Select Settings > Data connectors.
- Select My connectors, then select Add connector.
- From the list, choose Symphony DataParser.
- On the Terms of service page, select Accept.
- Enter a unique name that identifies the connector and then select Next.
- Sign in to your 17a-4 account and complete the steps in the Symphony DataParser connection workflow.
Step 2: Configure the Symphony DataParser connector
Work with 17a-4 Support to configure the Symphony DataParser connector.
Step 3: Map users
The Symphony DataParser connector automatically maps users to their Microsoft 365 email addresses before importing data to Microsoft 365.
Step 4: Monitor the Symphony DataParser connector
After you create a Symphony DataParser connector, you can view the connector status in the Microsoft Purview portal.
- Sign in to the Microsoft Purview portal.
- Select Settings > Data connectors.
- Select My connectors, then select the Symphony DataParser connector that you created to display the flyout page, which contains the properties and information about the connector.
- Under Connector status with source, select the Download log link to open (or save) the status log for the connector. This log contains information about the data that's been imported to the Microsoft cloud. For more information, see View admin logs for data connectors.
Limits
Importing attachments or items supports files up to 10 MB.