Note
Access to this page requires authorization. You can try signing in or changing directories.
Access to this page requires authorization. You can try changing directories.
With your agent published, you can make your agent available to your WhatsApp users. You must publish the agent before your WhatsApp users can interact with the agent.
Note
When you publish your agent to WhatsApp, some data such as agent content and user chat content is shared with WhatsApp (meaning your data flows outside of your organization's compliance and geographic or regional boundaries).
For more information, see WhatsApp Business Platform Policy and Spam Enforcement.
Set up your agent to use WhatsApp
Important
Make sure all prerequisites are met before beginning this procedure.
Make sure your agent's authentication is set to either No authentication or Authenticate manually.
Make sure your agent is already published. See Publish the latest content.
Go to the Channels page for your agent.
Select WhatsApp. The configuration panel appears.
On the first page of the configuration panel, select Continue.
Select your Azure subscription and Azure Communication Services (ACS) resource, then select Continue.
Select the desired phone number for your agent to connect to, then select Deploy.
Note
Once you select Deploy, Copilot Studio might take a moment before showing a QR code.
With your WhatsApp device, scan the QR code to begin chatting with the agent over WhatsApp. Alternatively, select Download to download the QR code image. Anyone with this QR code who meets all authentication criteria can chat to the agent over WhatsApp.
Use supported Adaptive Cards in your agent's topics
As with all agents in Copilot Studio, agents deployed to WhatsApp make use of topics to define how an agent conversation progresses. Adaptive cards allow you to write platform-agnostic UI snippets in JSON that are interpreted into native UI when delivered to specific apps. However, WhatsApp agents support the following three types of adaptive cards:
Interactive actions adaptive card (
"type": "Action.Submit")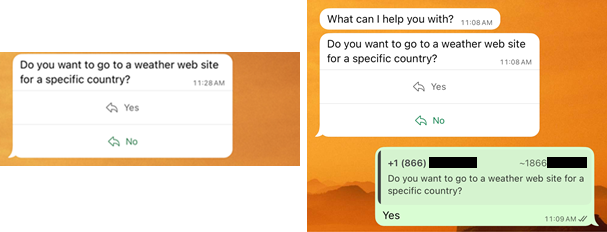
Choice adaptive card (
"type": "Input.ChoiceSet")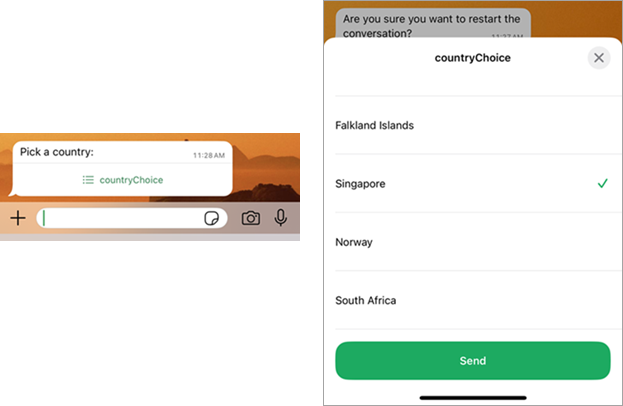
Open URL adaptive card (
"type": "Action.OpenUrl")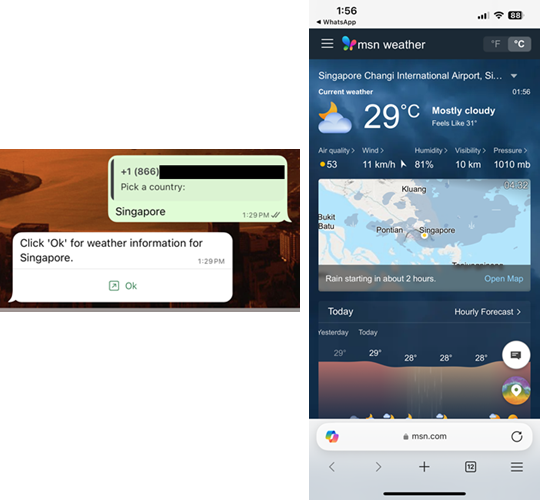
As a maker, if you want to deploy an agent to a WhatsApp channel, you must therefore make sure you restrict your use of adaptive cards to this subset of card types. For more information about the use of adaptive cards in Copilot Studio, see Using Adaptive Cards in Copilot Studio.
Example: Interactive actions adaptive card
Use the Interactive Actions adaptive card to allow end-users to select one of up to three options in the form of buttons. This method of selecting from multiple options is quicker for the end-user, with fewer steps, than the alternative method of selecting from a list of options (the Choice adaptive card method). However, the Interactive actions adaptive card can't be used for more than three buttons. Makers can invoke this adaptive card with the Ask with Adaptive Card functionality.
Go to the desired topic and add an Adaptive Card node.
In the Card payload editor of the Adaptive card designer, copy and paste the following JSON code:
{
"type": "AdaptiveCard",
"$schema": "https://adaptivecards.io/schemas/adaptive-card.json",
"version": "1.5",
"body": [
  {
    "type": "TextBlock",
    "text": "Do you want to go to a weather web site for a specific country?",
    "wrap": true
  },
  {
    "type": "ActionSet",
    "actions": [
      {
        "type": "Action.Submit",
        "title": "Yes",
        "id": "yesButtonId"
      },
      {
        "type": "Action.Submit",
        "title": "No",
        "id": "noButtonId"
      }
    ]
 }
]
}
In the JSON, in the section with a
typekey of valueActionSet, under"actions":, make sure you have the right number of actions.For example, if you need three buttons, under
"actions":, there should be three sets of actions, with each set comprised of atype,title, andidkey.Make the following further changes to the JSON:
Change To Value of "text":(under"type": "TextBlock")The desired text that prompts end-users to make a choice from among the buttons Value of "title":(under the first"type": "Action.Submit"key)The desired text on the first button Value of "id":(under the first"type": "Action.Submit"key)The desired ID for the first button Value of "title":(under the second"type": "Action.Submit"key)The desired text on the second button Value of "id":(under the second"type": "Action.Submit"key)The desired ID for the second button Select Save in the Adaptive card designer, and then select Close.
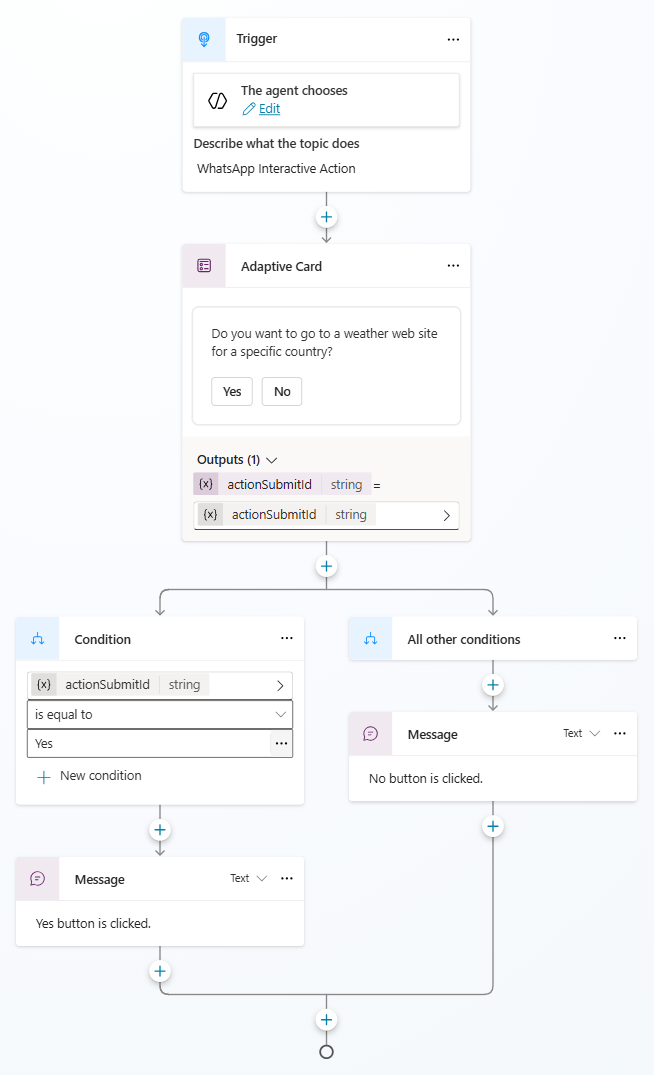
The authoring canvas for this topic might resemble this:
Save your topic.
Once you finish all changes to the agent, publish your agent again.
Example: Choice adaptive card
Use the Choice adaptive card to allow end-users to select one option from up to 10 presented as a list. This adaptive card uses a text block the WhatsApp end-user must select which then displays the choice set of options. The end-user must then select one of the options, and then select Send. Makers can invoke this adaptive card with the Ask with Adaptive Card functionality.
In the authoring canvas of the topic you would like to add this adaptive card to, select the Add node icon in the desired location, then select Ask with adaptive card.
Bring the new Adaptive Card node into focus by selecting it, and then select the More icon for the node and select Properties.
On the Adaptive Card Node properties pane, select Edit adaptive card.
In the Card payload editor of the Adaptive card designer, copy and paste the following JSON code:
{
"type": "AdaptiveCard",
"$schema": "https://adaptivecards.io/schemas/adaptive-card.json",
"version": "1.5",
"body": [
  {
    "type": "TextBlock",
    "text": "Pick a country:",
    "wrap": true
  },
  {
    "type": "Input.ChoiceSet",
    "choices": [
      {
        "title": "Falkland Islands",
        "value": "Falkland Islands"
      },
      {
        "title": "Singapore",
        "value": "Singapore"
      },
      {
        "title": "Norway",
        "value": "Norway"
      },
      {
        "title": "South Africa",
        "value": "South Africa"
      }
    ],
    "placeholder": "Select Country",
    "id": "countryChoice"
  },
  {
    "type": "ActionSet",
    "actions": [
      {
        "type": "Action.Submit",
        "title": "Submit Response",
        "id": "submitResponseId"
      }
    ]
  }
]
}
In the JSON, in the section with a
typekey of valueInput.ChoiceSet, under"choices":, make sure you have the right number of choices.For example, if you need seven (7) selectable choices presented in a list, under
"choices":, there should be seven sets of choices, with each set comprised of atitleandvaluekey.Make the following further changes to the JSON:
Change To Value of "text":(under"type": "TextBlock")The desired text that prompts end-users to display a list of options Value of "title":(for each choice under"type": "Input.ChoiceSet"key)The desired text describing or naming the listed option Value of "value":(for each choice under"type": "Input.ChoiceSet"key)The value assigned to the Input.ChoiceSet.value, which is then used for further processingValue of "id":(under"type": "Input.ChoiceSet")The ID value for the choice set variable (named countryChoice, in the example). This ID value takes on the recordedvaluesignifying the user's choice from the list. Note: This value should be in camelCase formal format.Select Save in the Adaptive card designer, and then select Close.
The authoring canvas for this topic might resemble the following:
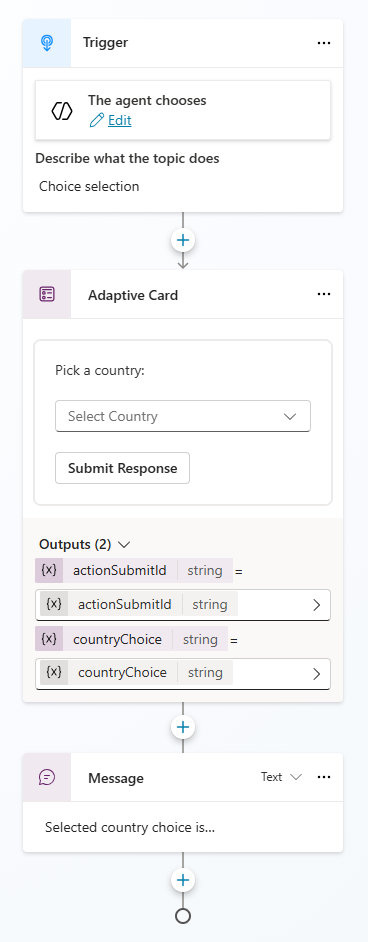
Select Save in the authoring canvas to commit your adaptive card changes to the topic.
Once you finish all changes to the agent, republish the agent.
Example: Open URL adaptive card
Use the Open URL adaptive card to send an end-user to a website. Unlike the other two adaptive cards, the Open URL adaptive card can't be invoked with the Ask with Adaptive Card functionality in Copilot Studio. Instead, you must attach this adaptive card to a message created with the Send a message functionality.
In the authoring canvas of the topic you would like to add this adaptive card to, select the Add node icon in the desired location, then select Send a message.
In the new Message node, select + Add > Adaptive card.
Select the new Media area of the message node, then select the More icon for the node and select Properties.
Note
Select the new Media area of the message node again if the Edit adaptive card button doesn't appear on the Adaptive Card properties pane.
On the Adaptive Card properties pane, select Edit adaptive card.
In the Card payload editor of the Adaptive card designer, copy and paste the following JSON code:
{
"type": "AdaptiveCard",
"$schema": "https://adaptivecards.io/schemas/adaptive-card.json",
"version": "1.5",
"body": [
  {
    "type": "TextBlock",
     "text": "Click 'Ok' for weather information for Singapore.",
     "wrap": true
  },
  {
    "type": "ActionSet",
    "actions": [
       {
         "type": "Action.OpenUrl",
         "title": "Ok",
         "url": "https://www.msn.com/en-za/weather/forecast/in-Singapore"
       }
    ]
  }
]
}
Make the following changes to the JSON:
Change To Value of "text":(under"type": "TextBlock")The desired text that prompts end-users to open the website Value of "title":(under"type": "ActionSet"key)The desired selectable text that opens the website in a browser when selected Value of "url":(under"type": "ActionSet"key)The desired value of the website's uniform resource locator (URL) Select Save in the Adaptive card designer, and then select Close.
The authoring canvas for this topic might resemble the following:
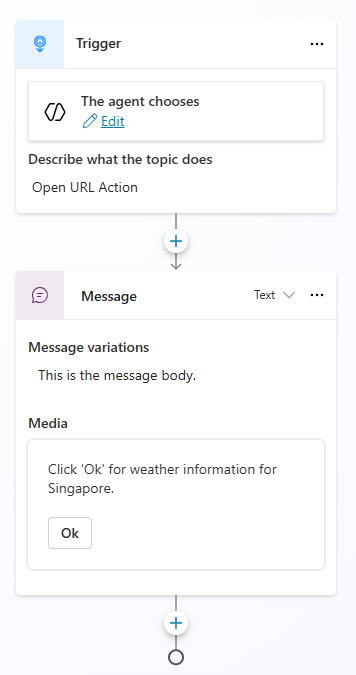
Select Save in the authoring canvas to commit your adaptive card changes to the topic.
Once you finish all changes to the agent, republish the agent.
Configure user authentication using phone numbers in WhatsApp
When you publish an agent to WhatsApp, you can choose to authenticate or not to authenticate user. If you choose not to authenticate at all, you don't need to do anything further.
If you choose to authenticate, your options are:
Authenticate manually (see Authenticate manually)
Authenticate using a phone number as a recognized WhatsApp ID (see Example: Authenticate with a phone number)
Authenticate manually and by using phone number recognition. Authenticate with both methods for added security.
Important
Authenticating with Microsoft isn't supported for the WhatsApp channel.
Example: Authenticate with a phone number
WhatsApp uses phone numbers as identifiers (IDs). When a maker chooses to use phone number authentication, a backend API verifies the number associated with the WhatsApp account of a given user is included in the list of authorized phone numbers in the database. You must configure a trigger in Copilot Studio to send an HTTP request to the API, manage the response schema, and set conditions to manage the conversation flow based on whether the user is registered or not.
Note
Make sure the backend server provides an API to validate if a given phone number is registered in the database.
In our example, the server provides the following API:
URI: /exists/_{phoneNumber}_
Response:
  {
      phone: string
      exists: boolean
  }
Go to the Topics page for your agent.
Select Add a topic > From blank.
Select the Change trigger icon
 of the Trigger node, and then select A message is received.
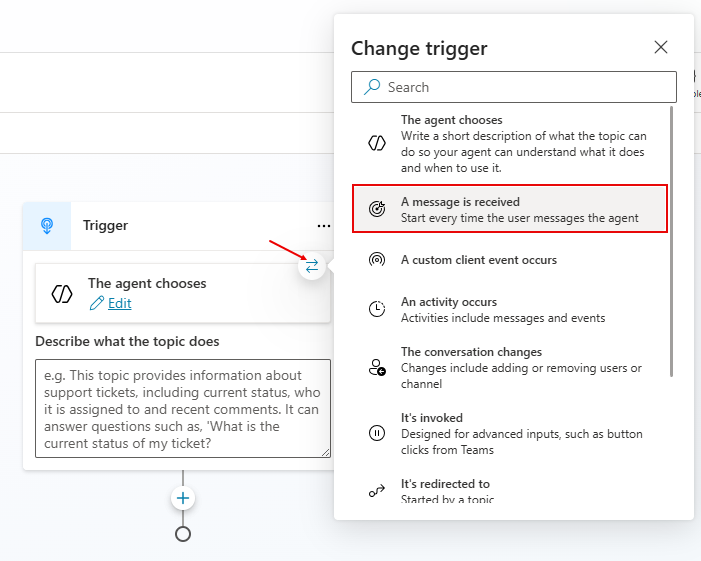
Select the Add node icon under the trigger node and select Variable management > Set a variable value.
In the Set variable value node, select the Set variable field.
In the Select a variable window, select Create new.
In the Set variable value node, select the variable name in the Set variable field and then rename the variable name in the Variable properties pane.
In the Set variable value node, in the To value field, select the More icon (…).
In the Enter formula window, select the Formula tab.
Copy the following formula to the formula field, substituting
<<BaseUri>>with the uniform resource identifier (URI) of the API, and then select Insert.<BaseUri>/exists/"&System.Activity.From.Id
Select the Add node icon under the Set variable value node and select Advanced > Send HTTP request.
Select Record under Response data type.
Select Edit Schema and provide the response schema.
kind: Record
properties:
  exists: Boolean
  phone: String
For Save response as, create a new variable named
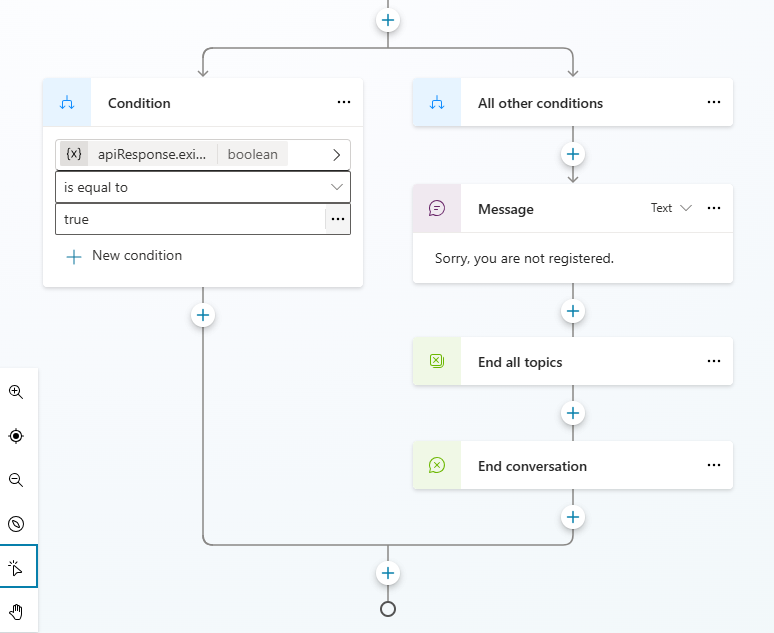
apiResponse.Select the Add node icon under the HTTP Request node, and select Add a Condition.
On the Condition node, select Select a variable > apiResponse.exists.
On the second input field, select Is equal to.
Under Enter or Select a value, type
true.Select the Add node icon under the All other conditions node, and select Send a message.
Write a message to display to unregistered users.
Note
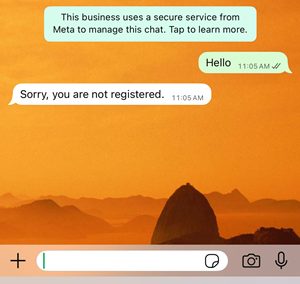
You can customize the message sent to unregistered users. In this example, the message is
Sorry, you are not registered.Select the Add node icon under the Message node, and select Topic management > End all topics.
Select the Add node icon under the End all topics node, and select Topic Management > End conversation.
Select Save in the authoring canvas to commit your changes to the topic.
Once you finish all changes to the agent, republish the agent.
After this change is published, if the phone number associated with a user's WhatsApp device isn't registered in the database, the message you configured as the unregistered message appears.
Disconnect an agent from a phone number
To disconnect your agent from the phone number configured for the WhatsApp channel, open the configuration panel and select Disconnect.