Note
Access to this page requires authorization. You can try signing in or changing directories.
Access to this page requires authorization. You can try changing directories.
This quickstart guides you through creating a custom engine agent that replies back with whatever message you send to it.
Prerequisites
Python 3.9 or newer.
- To install Python, go to https://www.python.org/downloads/, and follow the instructions for your operating system.
- To verify the version, in a terminal window type
python --version.
A code editor of your choice. These instructions use Visual Studio Code.
If you use Visual Studio Code, install the Python extension
Initialize the project and install the SDK
Create a Python project and install the required dependencies.
Open a terminal and create a new folder
mkdir echo
cd echo
Open the folder using Visual Studio Code using this command:
code .Create a virtual environment with the method of your choice and activate it either through Visual Studio Code or in a terminal.
When using Visual Studio Code, you can use these steps with the Python extension installed.
Press F1, type
Python: Create environment, and press Enter.Select Venv to create a
.venvvirtual environment in the current workspace.Select a Python installation to create the virtual environment.
The value might look like this:
Python 1.13.6 ~\AppData\Local\Programs\Python\Python313\python.exe
Install the Agents SDK
Use pip to install the microsoft-agents-hosting-aiohttp package with this command:
pip install microsoft-agents-hosting-aiohttp
Create the server application and import the required libraries
Create a file named
start_server.py, copy the following code, and paste it in:# start_server.py from os import environ from microsoft_agents.hosting.core import AgentApplication, AgentAuthConfiguration from microsoft_agents.hosting.aiohttp import ( start_agent_process, jwt_authorization_middleware, CloudAdapter, ) from aiohttp.web import Request, Response, Application, run_app def start_server( agent_application: AgentApplication, auth_configuration: AgentAuthConfiguration ): async def entry_point(req: Request) -> Response: agent: AgentApplication = req.app["agent_app"] adapter: CloudAdapter = req.app["adapter"] return await start_agent_process( req, agent, adapter, ) APP = Application(middlewares=[jwt_authorization_middleware]) APP.router.add_post("/api/messages", entry_point) APP.router.add_get("/api/messages", lambda _: Response(status=200)) APP["agent_configuration"] = auth_configuration APP["agent_app"] = agent_application APP["adapter"] = agent_application.adapter try: run_app(APP, host="localhost", port=environ.get("PORT", 3978)) except Exception as error: raise errorThis code defines a
start_serverfunction we'll use in the next file.In the same directory, create a file named
app.pywith the following code.# app.py from microsoft_agents.hosting.core import ( AgentApplication, TurnState, TurnContext, MemoryStorage, ) from microsoft_agents.hosting.aiohttp import CloudAdapter from start_server import start_server
Create an instance of the Agent as an AgentApplication
In app.py, add the following code to create the AGENT_APP as an instance of the AgentApplication, and implement three routes to respond to three events:
- Conversation Update
- the message
/help - any other activity
AGENT_APP = AgentApplication[TurnState](
    storage=MemoryStorage(), adapter=CloudAdapter()
)

async def _help(context: TurnContext, _: TurnState):
    await context.send_activity(
        "Welcome to the Echo Agent sample 🚀. "
        "Type /help for help or send a message to see the echo feature in action."
    )

AGENT_APP.conversation_update("membersAdded")(_help)

AGENT_APP.message("/help")(_help)


@AGENT_APP.activity("message")
async def on_message(context: TurnContext, _):
    await context.send_activity(f"you said: {context.activity.text}")
Start the web server to listen in localhost:3978
At the end of app.py, start the web server using start_server.
if __name__ == "__main__":
    try:
        start_server(AGENT_APP, None)
    except Exception as error:
        raise error
Run the Agent locally in anonymous mode
From your terminal, run this command:
python app.py
The terminal should return the following:
======== Running on http://localhost:3978 ========
(Press CTRL+C to quit)
Test the agent locally
From another terminal (to keep the agent running) install the Microsoft 365 Agents Playground with this command:
npm install -g @microsoft/teams-app-test-toolNote
This command uses npm because the Microsoft 365 Agents Playground isn't available using pip.
The terminal should return something like:
added 1 package, and audited 130 packages in 1s

19 packages are looking for funding
run `npm fund` for details

found 0 vulnerabilities
Run the test tool to interact with your agent using this command:
teamsapptesterThe terminal should return something like:
Telemetry: agents-playground-cli/serverStart {"cleanProperties":{"options":"{\"configFileOptions\":{\"path\":\"<REDACTED: user-file-path>\"},\"appConfig\":{},\"port\":56150,\"disableTelemetry\":false}"}}

Telemetry: agents-playground-cli/cliStart {"cleanProperties":{"isExec":"false","argv":"<REDACTED: user-file-path>,<REDACTED: user-file-path>"}}

Listening on 56150
Microsoft 365 Agents Playground is being launched for you to debug the app: http://localhost:56150
started web socket client
started web socket client
Waiting for connection of endpoint: http://127.0.0.1:3978/api/messages
waiting for 1 resources: http://127.0.0.1:3978/api/messages
wait-on(37568) complete
Telemetry: agents-playground-server/getConfig {"cleanProperties":{"internalConfig":"{\"locale\":\"en-US\",\"localTimezone\":\"America/Los_Angeles\",\"channelId\":\"msteams\"}"}}

Telemetry: agents-playground-server/sendActivity {"cleanProperties":{"activityType":"installationUpdate","conversationId":"5305bb42-59c9-4a4c-a2b6-e7a8f4162ede","headers":"{\"x-ms-agents-playground\":\"true\"}"}}

Telemetry: agents-playground-server/sendActivity {"cleanProperties":{"activityType":"conversationUpdate","conversationId":"5305bb42-59c9-4a4c-a2b6-e7a8f4162ede","headers":"{\"x-ms-agents-playground\":\"true\"}"}}
The teamsapptester command opens your default browser and connects to your agent.
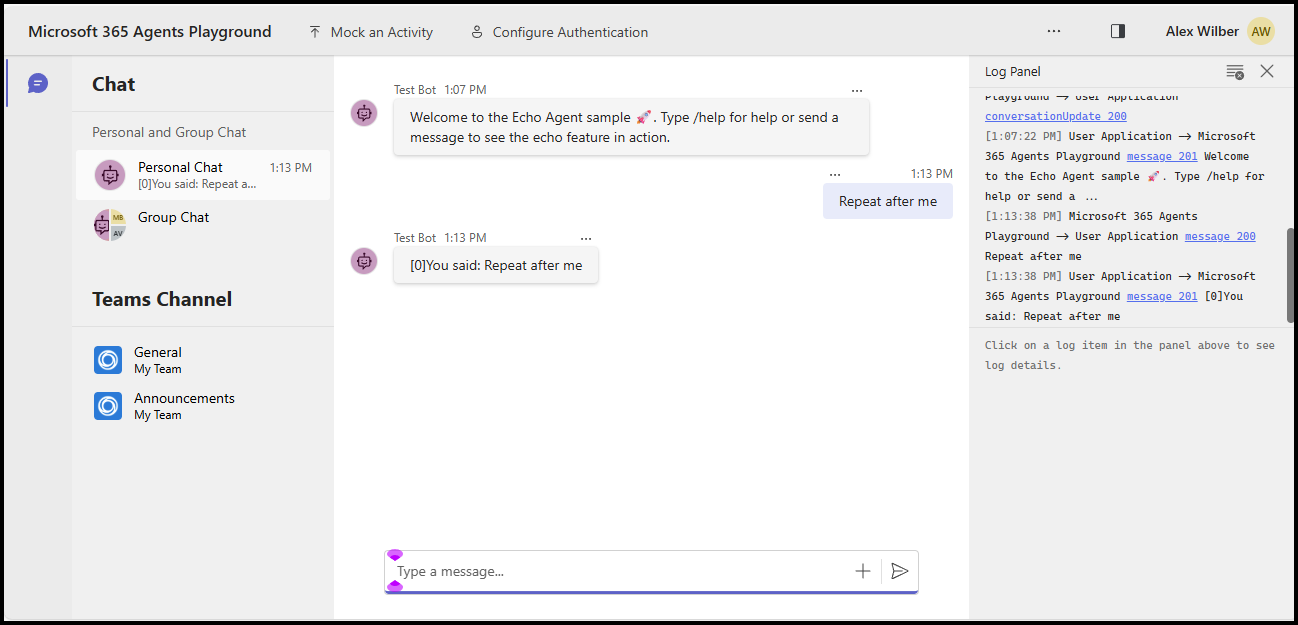
Now you can send any message to see the echo reply, or send the message /help to see how that message is routed to the _help handler.