Note
Access to this page requires authorization. You can try signing in or changing directories.
Access to this page requires authorization. You can try changing directories.
Applies to:  Workforce tenants External tenants (learn more)
This is the second tutorial in the tutorial series that demonstrates how to add Microsoft Authentication Library (MSAL) for iOS and macOS to your iOS Swift app.
Before you begin, use the Choose a tenant type selector at the top of this page to select tenant type. Microsoft Entra ID provides two tenant configurations, workforce and external. A workforce tenant configuration is for your employees, internal apps, and other organizational resources. An external tenant is for your customer-facing apps.
In this tutorial, you:
- Add the MSAL framework to an iOS (Swift) app.
- Create SDK instance.
- Configure Xcode project settings.
Prerequisites
- Register a new client web app in the Microsoft Entra admin center, configured for Accounts in any organizational directory and personal Microsoft accounts. Refer to Register an application for more details. Record the following values from the application Overview page for later use:
- Application (client) ID
- Directory (tenant) ID
- Xcode.
- iOS (Swift) project.
Add a platform redirect URL
To specify your app type to your app registration, follow these steps:
- Under Manage, select Authentication > Add a platform > iOS/macOS.
- Enter your project's Bundle ID. If downloaded the code sample, the Bundle ID is
com.microsoft.identitysample.MSALiOS. If you're creating your own project, select your project in Xcode and open the General tab. The bundle identifier appears in the Identity section. - Select Configure and save the MSAL Configuration that appears in the MSAL configuration page so you can enter it when you configure your app later.
- Select Done.
Add the MSAL framework to an iOS (Swift) app
Choose one of the following ways to install the MSAL library in your app:
CocoaPods
If you're using CocoaPods, install
MSALby first creating an empty file called podfile in the same folder as your project's .xcodeproj file. Add the following to podfile:use_frameworks! target '<your-target-here>' do pod 'MSAL' endReplace
<your-target-here>with the name of your project.In a terminal window, navigate to the folder that contains the podfile you created and run
pod installto install the MSAL library.Close Xcode and open
<your project name>.xcworkspaceto reload the project in Xcode.
Carthage
If you're using Carthage, install MSAL by adding it to your Cartfile:
github "AzureAD/microsoft-authentication-library-for-objc" "master"
From a terminal window, in the same directory as the updated Cartfile, run the following command to have Carthage update the dependencies in your project.
iOS:
carthage update --platform iOS
macOS:
carthage update --platform macOS
Manually
You can also use Git Submodule, or check out the latest release to use as a framework in your application.
Add the app registration
Next, we add your app registration to your code.
First, add the following import statement to the top of the ViewController.swift file and either AppDelegate.swift or SceneDelegate.swift:
import MSAL
Next, add the following code to ViewController.swift before to viewDidLoad():
// Update the below to your client ID. The below is for running the demo only
let kClientID = "Your_Application_Id_Here"
let kGraphEndpoint = "https://graph.microsoft.com/" // the Microsoft Graph endpoint
let kAuthority = "https://login.microsoftonline.com/common" // this authority allows a personal Microsoft account and a work or school account in any organization's Azure AD tenant to sign in

let kScopes: [String] = ["user.read"] // request permission to read the profile of the signed-in user

var accessToken = String()
var applicationContext : MSALPublicClientApplication?
var webViewParameters : MSALWebviewParameters?
var currentAccount: MSALAccount?
The only value you modify is the value assigned to kClientID to be your Application ID. This value is part of the MSAL Configuration data that you saved during the step at the beginning of this tutorial to register the application.
Create SDK instance
To create MSAL instance in your project, follow these steps:
To the ViewController class, add the initMSAL method:
    func initMSAL() throws {

        guard let authorityURL = URL(string: kAuthority) else {
            self.updateLogging(text: "Unable to create authority URL")
            return
        }

        let authority = try MSALAADAuthority(url: authorityURL)

        let msalConfiguration = MSALPublicClientApplicationConfig(clientId: kClientID, redirectUri: nil, authority: authority)
        self.applicationContext = try MSALPublicClientApplication(configuration: msalConfiguration)
        self.initWebViewParams()
    }
Still in the ViewController class and after the initMSAL method, add the initWebViewParams method:
iOS code:
func initWebViewParams() {
        self.webViewParameters = MSALWebviewParameters(authPresentationViewController: self)
    }
macOS code:
func initWebViewParams() {
        self.webViewParameters = MSALWebviewParameters()
    }
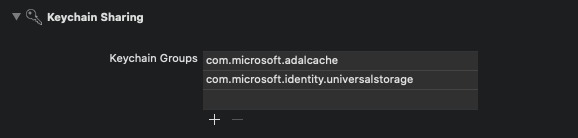
Configure Xcode project settings
Add a new keychain group to your project Signing & Capabilities. The keychain group should be com.microsoft.adalcache on iOS and com.microsoft.identity.universalstorage on macOS.
For iOS only, configure URL schemes
In this step, you'll register CFBundleURLSchemes so that the user can be redirected back to the app after sign in. By the way, LSApplicationQueriesSchemes also allows your app to make use of Microsoft Authenticator.
In Xcode, open Info.plist as a source code file, and add the following inside of the <dict> section. Replace [BUNDLE_ID] with the value you previously used. If you downloaded the code, the bundle identifier is com.microsoft.identitysample.MSALiOS. If you're creating your own project, select your project in Xcode and open the General tab. The bundle identifier appears in the Identity section.
<key>CFBundleURLTypes</key>
<array>
    <dict>
        <key>CFBundleURLSchemes</key>
        <array>
            <string>msauth.[BUNDLE_ID]</string>
        </array>
    </dict>
</array>
<key>LSApplicationQueriesSchemes</key>
<array>
    <string>msauthv2</string>
    <string>msauthv3</string>
</array>
For macOS only, configure App Sandbox
- Go to your Xcode Project Settings > Capabilities tab > App Sandbox
- Select Outgoing Connections (Client) checkbox.
Next steps
This is the second tutorial in the tutorial series that demonstrates how to add Microsoft Authentication Library (MSAL) for iOS and macOS to your iOS Swift app.
Before you begin, use the Choose a tenant type selector at the top of this page to select tenant type. Microsoft Entra ID provides two tenant configurations, workforce and external. A workforce tenant configuration is for your employees, internal apps, and other organizational resources. An external tenant is for your customer-facing apps.
In this tutorial, you;
- Add the MSAL framework to an iOS (Swift) app.
- Create SDK instance.
Prerequisites
- Register a new client web app in the Microsoft Entra admin center, configured for Accounts in any organizational directory and personal Microsoft accounts. Refer to Register an application for more details. Record the following values from the application Overview page for later use:
- Application (client) ID
- Directory (tenant) ID
- Xcode.
- iOS (Swift) project.
Add a platform redirect URL
To specify your app type to your app registration, follow these steps:
- Under Manage, select Authentication > Add a platform > iOS/macOS.
- Enter your project's Bundle ID. If downloaded the code sample, the Bundle ID is
com.microsoft.identitysample.MSALiOS. If you're creating your own project, select your project in Xcode and open the General tab. The bundle identifier appears in the Identity section. - Select Configure and save the MSAL Configuration that appears in the MSAL configuration page so you can enter it when you configure your app later.
- Select Done.
Enable public client flow
To identify your app as a public client, follow these steps:
Under Manage, select Authentication.
Under Advanced settings, for Allow public client flows, select Yes.
Select Save to save your changes.
Add the MSAL framework to an iOS (Swift) app
The MSAL authentication SDK is used for integrating authentication into your apps using standard OAuth2 and OpenID Connect. It allows you to sign in users or apps with Microsoft identities. To add MSAL to your iOS (Swift) project, follow these steps:
- Open your iOS project in Xcode.
- Select Add Package Dependencies... from the File menu.
- Enter
https://github.com/AzureAD/microsoft-authentication-library-for-objcas the Package URL and choose Add Package
Update the Bundle Identifier
In Apple ecosystem, a Bundle Identifier is a unique identifier for an application. To update the Bundle Identifier in your project, follow these steps:
Open the project settings. In the Identity section, enter the Bundle Identifier.
Right-click Info.plist and select Open As > Source Code.
Under the dict root node, replace
Enter_the_bundle_Id_Herewith the Bundle Id that you used in the portal. Notice themsauth.prefix in the string.<key>CFBundleURLTypes</key> <array> <dict> <key>CFBundleURLSchemes</key> <array> <string>msauth.Enter_the_Bundle_Id_Here</string> </array> </dict> </array>
Create SDK instance
To create MSAL instance in your project, follow these steps:
Import the MSAL library into your view controller by adding
import MSALat the top of yourViewControllerclass.Add an
applicationContextmember variable to your ViewController class by adding the following code just before theviewDidLoad()function:var applicationContext : MSALPublicClientApplication? var webViewParameters : MSALWebviewParameters?The code declares two variables:
applicationContext, which stores an instance ofMSALPublicClientApplication, andwebViewParameters, which stores an instance ofMSALWebviewParameters.MSALPublicClientApplicationis a class provided by the MSAL for handling public client applications. TheMSALWebviewParametersis a class provided by MSAL that defines parameters for configuring the web view used during the authentication process.Add the following code to the view
viewDidLoad()function:do { try self.initMSAL() } catch let error { self.updateLogging(text: "Unable to create Application Context \(error)") }The code attempts to initialize MSAL, handling any errors that occur during the process. If an error occurs, it updates the logging with the details of the error.
Add the following code that creates
initMSAL()function, which initializes MSAL:func initMSAL() throws { guard let authorityURL = URL(string: Configuration.kAuthority) else { self.updateLogging(text: "Unable to create authority URL") return } let authority = try MSALCIAMAuthority(url: authorityURL) let msalConfiguration = MSALPublicClientApplicationConfig(clientId: Configuration.kClientID, redirectUri: Configuration.kRedirectUri, authority: authority) self.applicationContext = try MSALPublicClientApplication(configuration: msalConfiguration) }This code initializes the MSAL for iOS. It first attempts to create a URL for the authority using the provided Configuration.kAuthority string. If successful, it creates an MSAL authority object based on that URL. Then, it configures the
MSALPublicClientApplicationwith the given client ID, redirect URI, and authority. If all configurations are set up correctly, it initializes the application context with the configuredMSALPublicClientApplication. If any errors occur during the process, it throws an error.Create Configuration.swift file and add the following configurations:
import Foundation

@objcMembers
class Configuration {
    static let kTenantSubdomain = "Enter_the_Tenant_Subdomain_Here"

    // Update the below to your client ID you received in the portal.
    static let kClientID = "Enter_the_Application_Id_Here"
    static let kRedirectUri = "Enter_the_Redirect_URI_Here"
    static let kProtectedAPIEndpoint = "Enter_the_Protected_API_Full_URL_Here"
    static let kScopes = ["Enter_the_Protected_API_Scopes_Here"]

    static let kAuthority = "https://\(kTenantSubdomain).ciamlogin.com"

}
This Swift configuration code defines a class named
Configurationand is marked with@objcMembers. It includes static constants for various configuration parameters related to an authentication setup. These parameters include the tenant subdomain, client ID, redirect URI, protected API endpoint, and scopes. These configuration constants should be updated with appropriate values specific to the application's setup.Find the placeholder:
Enter_the_Application_Id_Hereand replace it with the Application (client) ID of the app you registered earlier.Enter_the_Redirect_URI_Hereand replace it with the value of kRedirectUri in the MSAL configuration file you downloaded earlier when you added the platform redirect URL.Enter_the_Protected_API_Scopes_Hereand replace it with the scopes recorded earlier. If you haven't recorded any scopes, you can leave this scope list empty.Enter_the_Tenant_Subdomain_Hereand replace it with the Directory (tenant) subdomain. For example, if your tenant primary domain iscontoso.onmicrosoft.com, usecontoso. If you don't know your tenant subdomain, learn how to read your tenant details.
Use custom URL domain (Optional)
Use a custom domain to fully brand the authentication URL. From a user perspective, users remain on your domain during the authentication process, rather than being redirected to ciamlogin.com domain name.
Use the following steps to use a custom domain:
Use the steps in Enable custom URL domains for apps in external tenants to enable custom URL domain for your external tenant.
Open Configuration.swift file:
- Update the value of the
kAuthorityproperty to https://Enter_the_Custom_Domain_Here/Enter_the_Tenant_ID_Here. ReplaceEnter_the_Custom_Domain_Herewith your custom URL domain andEnter_the_Tenant_ID_Herewith your tenant ID. If you don't have your tenant ID, learn how to read your tenant details.
- Update the value of the
After you make the changes to your Configuration.swift file, if your custom URL domain is login.contoso.com, and your tenant ID is aaaabbbb-0000-cccc-1111-dddd2222eeee, then your file should look similar to the following snippet:
    import Foundation

    @objcMembers
    class Configuration {
        static let kTenantSubdomain = "login.contoso.com"

        // Update the below to your client ID you received in the portal.
        static let kClientID = "Enter_the_Application_Id_Here"
        static let kRedirectUri = "Enter_the_Redirect_URI_Here"
        static let kProtectedAPIEndpoint = "Enter_the_Protected_API_Full_URL_Here"
        static let kScopes = ["Enter_the_Protected_API_Scopes_Here"]

        static let kAuthority = "https://\(kTenantSubdomain)/aaaabbbb-0000-cccc-1111-dddd2222eeee"

    }