Note
Access to this page requires authorization. You can try signing in or changing directories.
Access to this page requires authorization. You can try changing directories.
Applies to: Dynamics 365 Field Service
This article explains how to configure the schedule board in Dynamics 365 Field Service to display additional details about scheduled bookings for bookable resources. Frontline workers, equipment, and facilities are types of bookable resources. Learn more in Set up bookable resources.
Bookings appear on the schedule board based on booking templates. Modify the booking template to display an icon that indicates the type of work for the booking, based on logic captured at the work order level. With this information, the dispatchers or users who are looking at the schedule board can quickly see the type of work that the bookings represent based on a visual indicator icon.
Prerequisites
Prepare the environment.
Set up the data in an attribute on the bookable resource booking. Alternatively, use a system entity record related to the booking entity that supports the method you choose for displaying the image or icon on the schedule board.
Obtain a working knowledge of HTML for editing the booking template.
Use case
A dispatcher might manage the workloads of many resources at once. The schedule board provides text-based information for each booking to keep the scheduler informed. But depending on the layout, this information might be too long to display, especially in a compact layout. A graphic or icon representation can serve as a quick visual indicator for the dispatcher.
For example, a dispatcher wants to identify the type of work already booked to a frontline worker. They might prefer not to book too much of the same work type for a frontline worker in one day to ensure sufficient spare parts are available.
This information can be retrieved from the work order itself, either from standard attributes such as the associated primary incident type, or from a custom attribute, which would provide more flexibility in terms of naming.
Sample code
Select an attribute or a custom attribute on the bookable resource booking, or on a system entity with a relationship to the booking entity that you use to drive the logic for your visual indicator.
Note
Only the use of attribute values from system entities is supported.
Tip
If you're using a custom attribute, it might not show on the schedule board after you apply the template changes. Refresh the schedule board to display the attribute.
You can use HTML and CSS styling for formatting or adding color or conditional values. Learn more in Advanced booking template styling using CSS.
For this example, we use the name of the primary incident on the work order related to the booking. The incident type name matches the icon name from Font Awesome. As an alternative, you can use a custom attribute field to hold the Font Awesome character so that the name of the incident type can remain more descriptive and reference that field instead of the primary incident from this sample.
Edit the booking template
In the schedule board, navigate to scheduler settings, choose the link to open All board settings, expand the Schedule Types section, and then select the entity that you want to change the booking template for.
For the example code in the next step, the entity is Work Order. Edits to the booking template apply only to the schedule board tab where the settings are opened.
Toggle the Custom booking template field to On, and then add the following snippet to the HTML code:
<i class="fa fa-{msdyn_msdyn_workorder_bookableresourcebooking_WorkOrder.msdyn_primaryincidenttype}"></i>Save your changes.
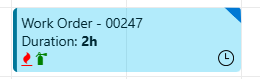
The screenshot shows a fire icon populated from an incident type using the provided snippet with added color styling. In this screenshot, a fire extinguisher icon was added directly from the web resource to show the different types of changes to the styling.
Tip
Custom HTML is sanitized automatically, so unsupported code is identified. You can receive an error message if your customization results in sanitization. Update the code to remove any unsupported code, and then save again.