Note
Access to this page requires authorization. You can try signing in or changing directories.
Access to this page requires authorization. You can try changing directories.
Important
Some information in this article relates to a prereleased product, which may be substantially modified before it's commercially released. Microsoft makes no warranties, express or implied, with respect to the information provided here.
ServiceNow is an enterprise app ecosystem designed to connect and automate business processes, delivered as a SaaS application. Many security operation centers (SOCs) use ServiceNow as part of their incident management flow, and often extend the core functionality with customizations, integrations, and security-specific applications.
The Copilot for Security plugin for ServiceNow enables connectivity between a Security Copilot session and a ServiceNow incident queue. Users can import a ServiceNow incident into Copilot for Security. Users can easily correlate data from Microsoft security products such as Defender for Endpoint, enrich with external threat intelligence, and persist the results of their investigation in ServiceNow. These capabilities, combined with the narrative prompt and generative AI powered by Azure OpenAI help speed incident resolution. These capabilities also help up-skill team members, and provide more comprehensive views into any security incident.
Know before you begin
Prerequisites
- Supported Products (Cloud):
- ServiceNow IT Service Management (ITSM) package – Incident Response application
- ServiceNow Security Operations (SecOps) package – Security Incident Response application
- Access to your ServiceNow instance, with permissions to create new users
- Permissions to set up plugins
- Available ServiceNow API quota
ServiceNow setup
There are two connectivity methods to ServiceNow:
Choose the one that suits your needs.
OAuth authorization code grant flow (ServiceNow inbound integration) - Recommended
Note
Before you begin, ensure you have the ServiceNow admin permission and the Security Copilot Owner or Contributor permission.
Make sure the OAuth plugin is active and the OAuth activation property is set to true. Follow the links to activate both if they aren't activated by default.
Access your ServiceNow instance and create a new Application Registry object by following these steps:
Navigate to System OAuth > Application Registry, select New.
Select Create an OAuth API endpoint for external clients.
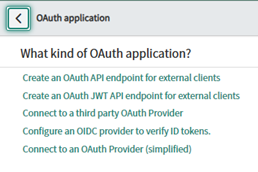
Enter a name that identifies the Security Copilot integration.
Enter the redirect URI corresponding to the Security Copilot instance, for example
https://securitycopilot.microsoft.com/auth/v1/callback.Assign an auth scope corresponding to your access control needs. The user account scope would suffice.
Save the Application Registry object.
From the newly created object, note the client ID and client secret.
This OAuth setup should only be done once per ServiceNow instance. The resulting OAuth Application Registry object can be used multiple times by different users.
HTTP Basic auth
Access your ServiceNow instance and locate the option to create a new user:
- Navigate to Discovery > Credentials in the ServiceNow platform.
- Select New to create a new credential record.
- Select Basic Auth as the credential type. Enter the following details:
- Name: Descriptive name for the credential.
- Username: Username for authentication.
- Password: Password for authentication.
- Save the credentials.
Assign the
itilandrest_api_explorerroles to the username:- Navigate to User Administration > Users.
- Search for and select the username created.
- In the Roles related list, select Edit.
- Add
itilandrest_api_explorerroles from the available roles list. - Save the role assignments.
Note the credentials and the ServiceNow instance URL.
Security Copilot connection
Sign in to Microsoft Security Copilot.
Access Manage Plugins by selecting the Sources button from the prompt bar.

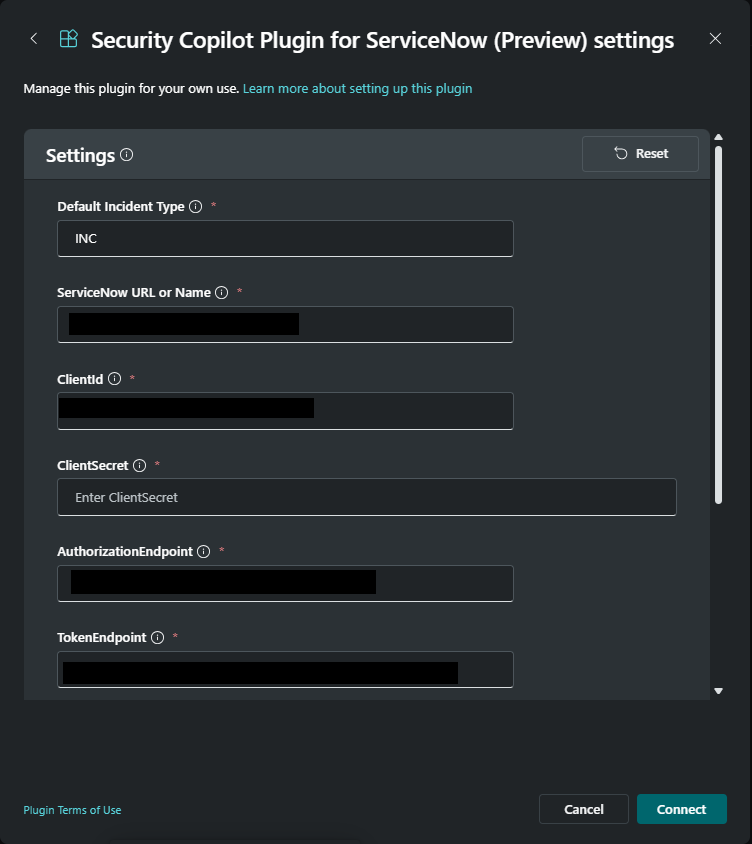
Next to ServiceNow, select Set up.
Note
Be sure to scroll all the way down to reach other fields such as Scopes.
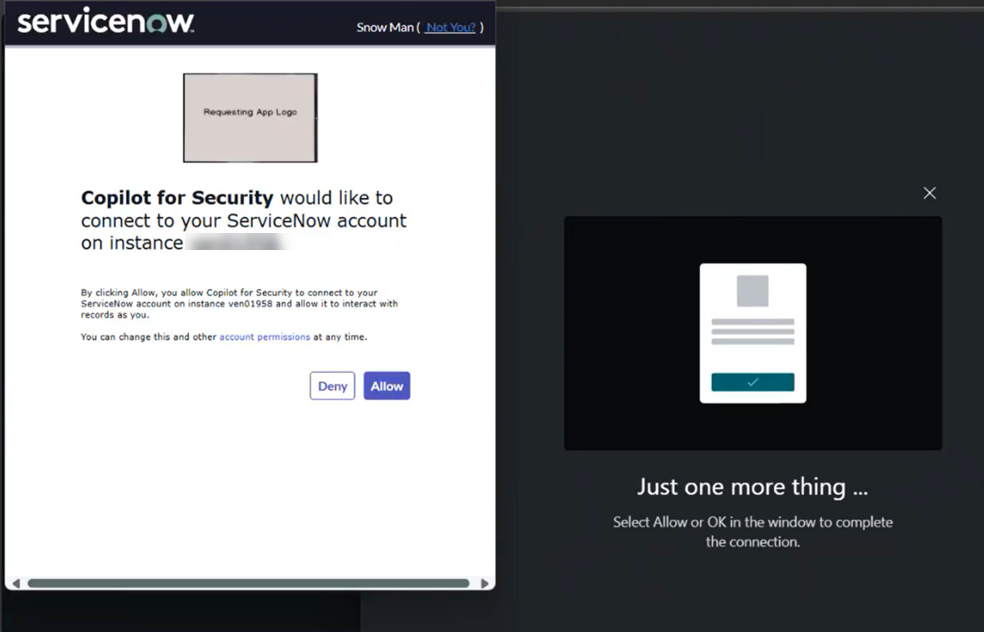
Grant consent to the Security Copilot application so that you can access your ServiceNow instance.
OAuth authorization_code instructions
- Enter auth parameters corresponding to the Application Registry object you created earlier.
- The instance URL, client ID, and client secret correspond to values of the same name in the Application Registry object. To determine what to enter for each value, refer to the following table:
Setting name Description Example Default Incident Type Incident type to default to when the type isn't provided within prompts. Must be one of: INC or SIR INC or SIR Instance Set to the ServiceNow instance URL https://xyz.service-now.com/ClientId Set to client ID in ServiceNow Application Registry object ClientSecret Set to client secret in ServiceNow Application Registry object AuthorizationEndpoint Set to https://<service-now-instance-domain>/oauth_auth.do.https://xyz.service-now.com/oauth_auth.doTokenEndpoint Set to https://<service-now-instance-domain>/oauth_token.do.https://xyz.service-now.com/oauth_token.doScopes Set to the scopes defined in the ServiceNow Application Registry object. Comma-separate multiple scopes. user account AuthorizationContentType Should be left unchanged from default application/x-www-form-urlencoded application/x-www-form-urlencoded Resource Resource ID Can be left blank Select Save or Connect to complete the setup.
Note
Currently, the system doesn't validate your credentials when you save your settings. If they aren't correct, you'll see an error later when Security Copilot attempts to invoke the ServiceNow plugin.
Close the plugins window.
Sample ServiceNow prompts
Security Copilot operates primarily with natural language prompts. When you're ready to load an incident into your Security Copilot session or search for related ServiceNow incidents, you'll submit a prompt that guides Security Copilot to select the ServiceNow skill set and invoke the proper skill.
When you word your prompt, ensure you mention ServiceNow as the preferred source of your incident. Security Copilot can connect to several systems that each provide incidents, and it benefits from guidance on which source you prefer.
Example prompts for incident queries:
- "Load ServiceNow incident INC12345"
- "What ServiceNow incidents refer to IP address 10.0.0.1?"
- "Show me recent high severity ServiceNow incidents"
- "Show details on the third incident"
- "What is the MDTI reputation score for those IP addresses?"
- "Write a link to this Copilot investigation to ServiceNow incident INC12345"
- "Write the following text to that ServiceNow incident: Investigated with Security Copilot and deployed new detection logic."
- "Write a summary of this investigation to ServiceNow incident INC12345"
- "Summarize this investigation and write it as a comment on the ServiceNow incident."
Appending comments to ServiceNow incidents
If enabled with appropriate permissions, the ServiceNow connector can append comments to ServiceNow incidents. The comment text can be provided by the user, or sourced from Security Copilot features, such as session sharing links or pinned prompt investigation summaries.
Example prompts include:
- "Write a link to this Copilot investigation to ServiceNow incident INC12345"
After loading an incident:
- "Write the following text to that ServiceNow incident: Investigated with Security Copilot and deployed new detection logic."
After pinning a few prompts:
- "Write a summary of this investigation to ServiceNow incident INC12345" or if the session is already loaded "Summarize this investigation and write it as a comment on the ServiceNow incident."
Note
The current version of the plugin appends comments to the ServiceNow incident. Future versions may provide the option of writing to the work notes instead.
Troubleshoot the ServiceNow plugin
Ensure the relevant IPs for your region from the following list are allowed. For more information, see Egress IP addresses for Microsoft Security Copilot.
Steps to add Allowed IPs:
Sign in to your ServiceNow Instance:
- Use an account with administrative privileges.
Navigate to the IP Access Control Settings. ServiceNow documentation on the steps: IP Address Access Control:
- In the left navigation pane, search for "IP Access Control" or go to:
System Security > IP Access Control
Review the IP addresses from this list and select the appropriate one for your region and add it to the allowlist with direction Type as inbound:

- In the left navigation pane, search for "IP Access Control" or go to:
Errors occur
If you encounter errors, such as Couldn't complete your request, or An unknown error occurred, make sure the plugin is turned on. If the issue persists, sign out of Security Copilot, and then sign back in.
Prompts aren't invoking the correct capabilities
If prompts aren't invoking the correct capabilities, or prompts are invoking some other capability set, you might have custom plugins or other plugins that have similar functionality as the capability set you want to use. You can either use the product name ServiceNowSIR in your prompts, or type the name of a specific capability, like <> instead.
Provide feedback
To provide feedback, contact ServiceNow product management.