Note
Access to this page requires authorization. You can try signing in or changing directories.
Access to this page requires authorization. You can try changing directories.
Important
Some information in this article relates to a prereleased product which may be substantially modified before it's commercially released. Microsoft makes no warranties, express or implied, with respect to the information provided here.
Model Context Protocol (MCP) provides a standardized way to connect AI systems with different data sources and tools. An MCP server hosts a live catalog of tools that any MCP client can dynamically discover and call. You can connect an existing MCP server to your Security Copilot environment. This enables you to use tools from the MCP server in Security Copilot experiences such as prompting in the standalone experience, promptbooks, Logic Apps, and custom agents.
How does MCP work?
When you connect an MCP server to Security Copilot, MCP tools can be added as tools (skills) in Security Copilot. Name, description, inputs, and outputs are inherited from the server.
When you connect to a non-Microsoft product, including an external MCP server, you're responsible for the tools and data you access from within Security Copilot.
We recommend that you carefully review and track what MCP servers you add to Security Copilot. We also recommend that you rely on servers hosted by trusted service providers themselves rather than proxies.
Create the manifest file
Use the following example to create the manifest file.
Descriptor:
  Name: SampleMathMCPServerManifest
  DisplayName: Math MCP Server with simple Math functions
  Description: Math MCP Server with simple Math functions
  DescriptionForModel: Math MCP Server with simple Math functions to add, divide and multiply
  SupportedAuthTypes:
    - OAuthAuthorizationCodeFlow
  Authorization:
    Type: OAuthAuthorizationCodeFlow
    ClientId: <id of client that wants to auth>
    AuthorizationEndpoint: https://sample.com/login/oauth/authorize
    TokenEndpoint: https://sample.com/login/oauth/access_token
    Scopes: <Scopes>
    AuthorizationContentType: application/x-www-form-urlencoded
SkillGroups:
  - Format: MCP
    Settings:
      Endpoint:  https://samplemathmcpserver.com/mcp
      UseStreamableHttp: true
      UsePluginAuth: true
      TimeoutInSeconds: 120
      AllowedTools: add,divide,multiply
MCP skill settings
The following table shows the settings that can be configured for any MCP skill targets:
| Setting Name | Type | Description | Required |
|---|---|---|---|
| Endpoint | string | The URL of the MCP Server | Yes |
| UseStreamableHttp | string | Will use SSE if set to false, StreamableHttp otherwise. CAUTION: SSE is not as secure as StreamableHttp and will be deprecated after some time. | Yes |
| UsePluginAuth | string | Set to True if using OAuth2 or AADDelegated. If false, user’s credential will be used. | Yes |
| TokenScope | string | Gives the Scope for the AADDelegated token, not required for OAuthAuthorizationCodeFlow. | Required only if UsePluginAuth setting is AADDelegated |
| TimeoutInSeconds | numeric | Time to wait for a tool list and tool execution calls to complete. | Optional |
| AllowedTools | string | Comma separated list of tools that are allowed to be imported and called by Security Copilot. If the MCP server has a tool that is not in the AllowedTools, it cannot be used by Security Copilot. | Yes |
Upload the plugin manifest
Sign in to Microsoft Security Copilot.
Access Manage Plugins by selecting the Plugin button from the prompt bar.

Scroll down to Custom and select Add plugin.

In Manage plugins, scroll down to the Custom section.
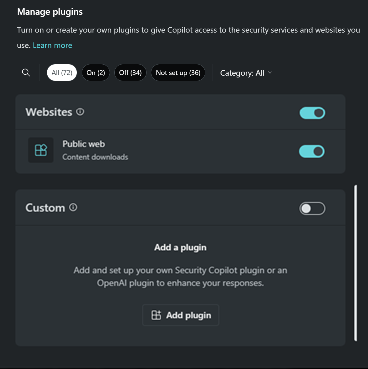
Select, Add plugin.
From the drop-down options, specify if you want to make the plugin available to just yourself or anyone in the organization. Then choose Security Copilot plugin.
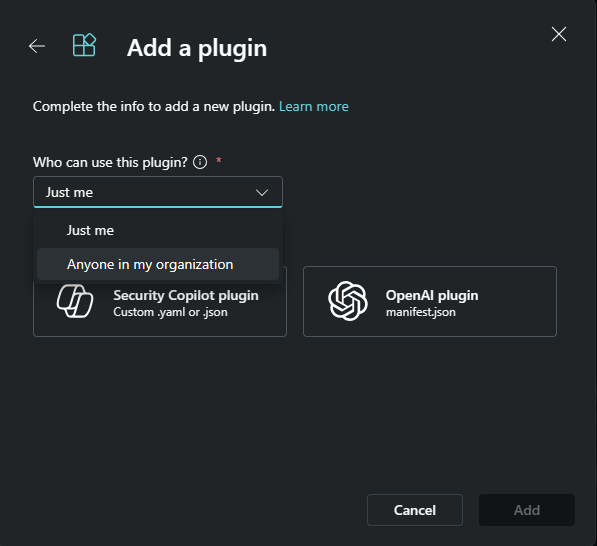
Note
If you choose to make a plugin available to just yourself, a private tag is added to the plugin. If you choose the option of making it available to anyone in the organization, then the plugin will be available to all Security Copilot users.
Select Security Copilot plugin.
You can choose to upload a file or upload as a link.
To upload a file:
- Select the Upload file section.
- Select the file to upload, then select Add.
To upload a link:
- Turn on Upload as a link toggle.
- Paste a link to a .yaml.
- Specify the file type.
- Select Add.
After the plugin is successfully added, some plugins might need to be set up. You can also choose to set up the plugin later.
Provide the appropriate values for the settings fields, then select Setup.
After completing the setup steps, your plugin will be visible in the Custom section. You can turn the toggle on or off.

Known limitations
Security Copilot currently only supports MCP tools. It does not support MCP resources, prompts, or utilities from MCP servers.
When tools are updated (for example, added or edited) in an MCP server, Security Copilot does not dynamically discover and reflect these changes. To update the MCP server connection with new tools, you must reupload the YAML file to Security Copilot.
MCP tools with destructiveHint set to
trueare not supported and will not be imported into Security Copilot, even if included in the AllowedTools setting.Only primitive data types are supported for tool inputs.