Note
Access to this page requires authorization. You can try signing in or changing directories.
Access to this page requires authorization. You can try changing directories.
Important
Some information in this article relates to a prereleased product which may be substantially modified before it's commercially released. Microsoft makes no warranties, express or implied, with respect to the information provided here.
This article provides general guidance to developers on how-to build and upload your manifest YAML file to create an agent.
To try out the YAML samples, see Sample Collections.
Note
The solution described here for uploading the YAML file is a workaround until the Upload YAML feature is developed in the Agent Builder.
Steps to build and upload YAML
As a developer, the agent definitions you create are available for the Security Analysts to run and see the results.
To build your agent manifest, reference the attributes in the manifest, see Agent manifest. You can build the manifest using the sample provided.
If you're building an agent on your own, follow these steps to build and upload the YAML.
Step 1: Create a tool (skill)
Create a file called
http_manifest.yaml.You can add any of the predefined tools such as
API,KQL,GPT, orAGENT.
For
Format:GPT,API,KQL- Under
Skills: define name, description, inputs (if any), settings.
- Under
For
Format:AGENT- Provide other details such as:
- Instructions - You can add Natural Language (NL) directions to guide how the agent should execute tasks.
- Child skills (optional) - You can define the skills the agent could use to solve your business logic. When defined, agent uses the list of skills defined in this section to create a dynamic plan and execute it.
- Provide other details such as:
Refer to the manifest section on Format and settings, see Settings.
Step 2: Upload the YAML as a custom plugin
After adding a custom plugin to your YAML, you must upload the file.
Note
This option is only available if an Owner configures Security Copilot to allow Owners and Contributors to add and manage custom plugins for everyone in the organization.
Select the Security Copilot sources icon.
In Manage plugins, scroll down to the Custom section.
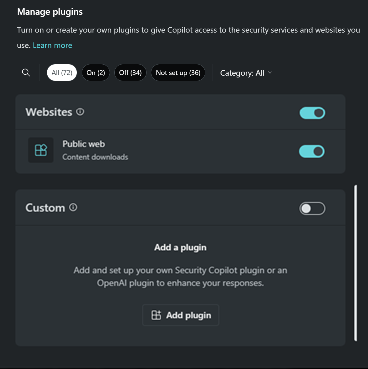
Select, Upload plugin.
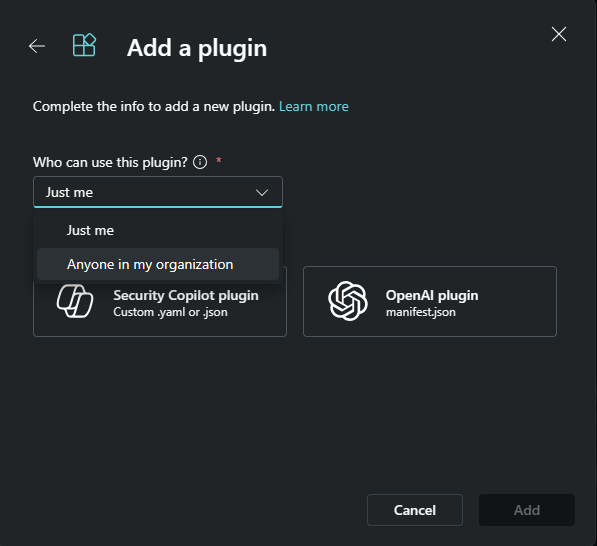
From the dropdown options, specify if you want to make the plugin available to just yourself or anyone in the organization. Then choose between adding a Security Copilot plugin or an OpenAI plugin.
Note
If you choose to make a plugin available to just yourself, a private tag is added to the plugin. If you choose the option of making it available to anyone in the organization, then the plugin will be available to all Security Copilot users.
Depending on the plugin you'd like to add, follow the corresponding steps:
Select Security Copilot plugin.
You can choose to upload a file or upload as a link.
To upload a file:
- Select the Upload file section.
- Select the file to upload, then select Add.
To upload a link:
- Turn on Upload as a link toggle.
- Paste a link to a YAML or JSON file.
- Specify the file type.
- Select Add.
After the plugin is successfully added, some plugins might need to be set up. You can also choose to set up the plugin later.
Provide the appropriate values for the settings fields, then select Setup.
- After completing the setup steps, your plugin will be visible in the Custom section.
- Select the Show # more option at the bottom of the screen.
- Scroll down to find your plugin.
- You must turn on the toggle.
- You can close the Manage Sources dialog.
Note
You need to complete the setup steps for the plugin to be available for use and appear in the Custom section. The uploaded YAML or manifest is published as an agent to Active agents only if the manifest YAML has an agent definition (AgentDefinitions) defined.
Step 3: Check permissions
Security Copilot role controls what activities you have access to on the platform, such as configuring settings, assigning permissions, and performing tasks. Security Copilot roles are defined and managed within Copilot and only grant access to Security Copilot features. For detailed information on permissions, see Permissions.
Step 4: Discover and Setup/Configuration of agent
To discover agents in Security Copilot, you must search by the value specified in the DisplayName field from the manifest.
An Admin or a Copilot owner has the option to set up, configure, and enable agents for the workspace if not already installed.
Step 5: Test the plugin (agent)
The simplest way to test the agent is to invoke it via the System Capabilities as follows:
If you're logged into the product, select the Microsoft Security Copilot link at the top-left of the navigation menu > Home.
Select Prompts in the "How can Security Copilot help?" prompt bar.
Navigate to See all system capabilities.
Use the search bar to find and select your plugin. This fills in the search bar with the agent's name and the input parameters.
Select submit prompt. This runs the agent (it will probably take around 30 - 45 seconds).
The response should show you the results.
You can validate the agent performed its function calling loop by clicking the Agent view button at the top-right of the screen. This displays a decision tree the agent used to complete the task.