Note
Access to this page requires authorization. You can try signing in or changing directories.
Access to this page requires authorization. You can try changing directories.
Azure Resource Manager enables you to manage the components of a solution on Azure—components like databases, virtual machines, and web apps. This tutorial demonstrates how to enable authentication in Microsoft Entra ID, register one of the Resource Manager APIs as a custom connector, and then connect to it in Power Automate. You can also create the custom connector for Power Apps or Azure Logic Apps, or create a custom AI-enabled connector for Microsoft Copilot Studio.
The process you follow in this tutorial can be used to access any RESTful API that's authenticated by using Microsoft Entra ID.
Prerequisites
- An Azure subscription
- A Power Automate account
- A sample OpenAPI file
Enable authentication in Microsoft Entra ID
First, you create a Microsoft Entra ID application that performs the authentication when calling the Resource Manager API endpoint.
Sign in to the Azure portal. If you have more than one Microsoft Entra ID tenant, make sure you're signed in to the correct directory by verifying that your user name appears in the upper-right corner.

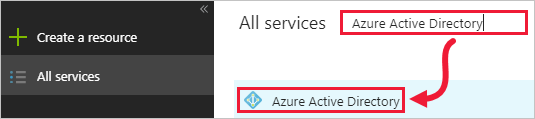
On the left pane, select All services. In the Filter box, enter Azure Active Directory, and then select Azure Active Directory.
The Azure Active Directory blade opens.
On the left pane of the Azure Active Directory blade, select App registrations.
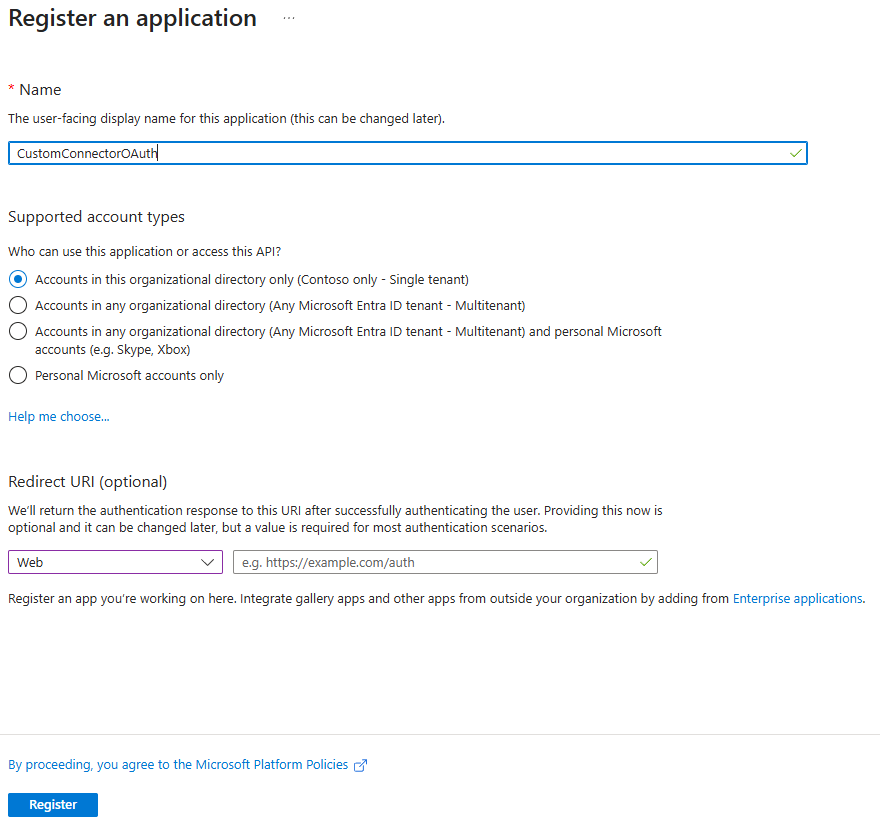
In the list of registered applications, select New application registration.
Enter a name for your application, and leave Application Type as Web app/API.
Copy the Application ID, because you need it later.
On the left pane of the Manage blade, select API permissions. Then select Add a permission.

The Request API permissions blade opens.
Under Delegated permissions, select Access Azure Service Management as organization users > Select.
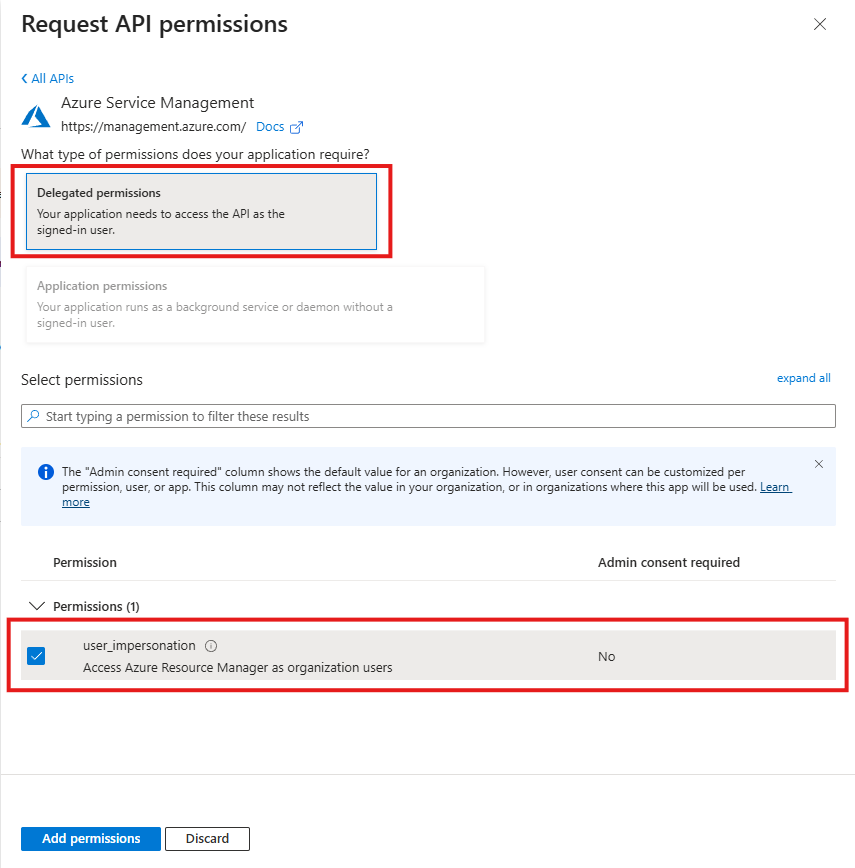
On the Add API access blade, select Add permissions.
Back on the Manage blade, select Certificates and secrets and select New client secret, enter a description for your secret, select an expiration period, and then select Save.
Your new secret is displayed. Copy the secret value, because you need it later and it cannot be retrieved once you navigate away for this page.

There's one more step to complete in the Azure portal, but first you create a custom connector.
Create a custom connector
Now that the Microsoft Entra ID application is configured, you create the custom connector.
In the Power Automate web app, select Settings (the gear icon) in the upper-right corner of the page, and then select Custom Connectors.
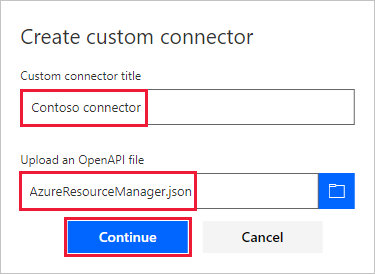
Select Create custom connector > Import an OpenAPI file.
Enter a name for the connector, browse to your sample OpenAPI file, and then select Continue.
The General page opens. Leave the default values as they appear, and then select the Security page.
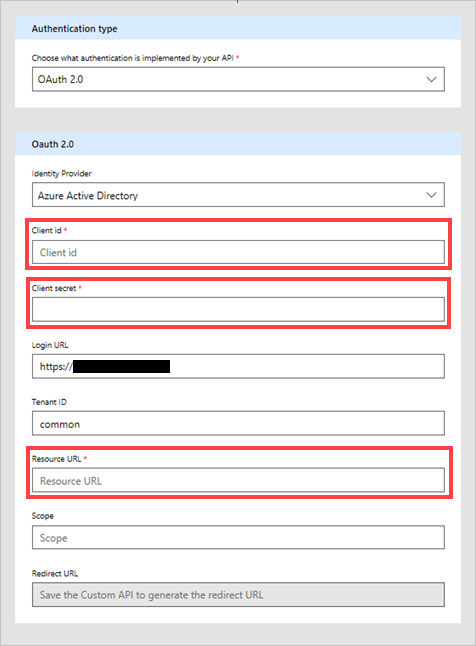
On the Security page, enter Microsoft Entra ID information for the application:
Under Client id, enter the Microsoft Entra ID application ID value you copied earlier.
For Client secret, use the value you copied earlier.
For Resource URL, enter
https://management.core.windows.net/. Be sure to include the resource URL exactly as written, including the trailing slash.
After entering security information, select the check mark (✓) next to the flow name at the top of the page to create the custom connector.
On the Security page, the Redirect URL field is now populated. Copy this URL so you can use it in the next section of this tutorial.
Your custom connector is now displayed under Custom Connectors.

Now that the custom connector is registered, create a connection to the custom connector so that it can be used in your apps and flows. Select the plus sign (+) to the right of the name of your custom connector, and then complete the sign-in screen.
Note
The sample OpenAPI doesn't define the full set of Resource Manager operations; currently, it only contains the List all subscriptions operation. You can edit this OpenAPI file, or create another OpenAPI file by using the online OpenAPI editor.
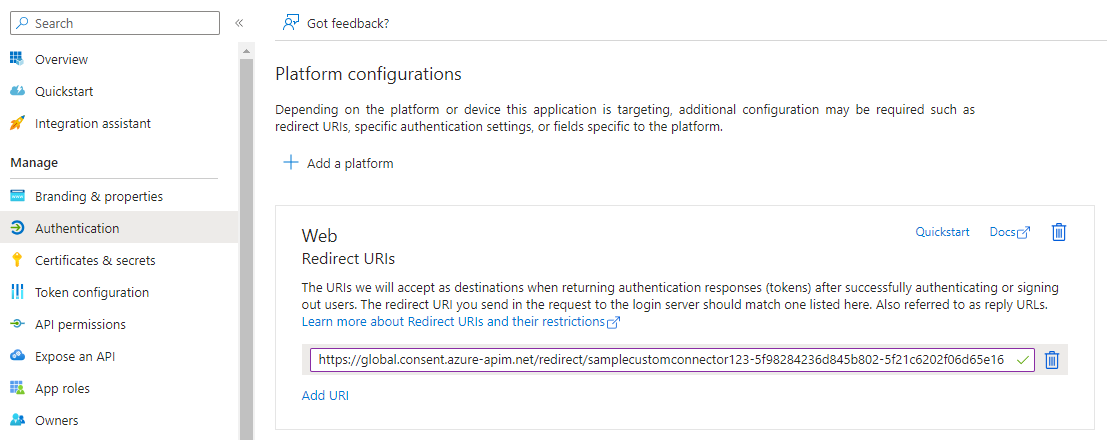
Set the reply URL in Azure
Select Azure Active Directory (Microsoft Entra ID), then select your app. Select Authentication from left menu, then select Add URI. Add the value you copied from the Redirect URI field in the custom connector—for example, https://global.consent.azure-apim.net/redirect/samplecustomconnector123-5f98284236d845b802-5f21c6202f06d65e16—and then select Save.
Managed identity authentication (Preview)
Custom connectors now support using a managed identity instead of using the client secret for Entra user delegated authentication. That way, you do not have to bother about rotating the client secrets once they are nearing their expiry. Note that this is a preview feature and is still being rolled out. So you may not see this option in your custom connectors UX. It is also important to note that this feature needs the client application to be a single tenant application.
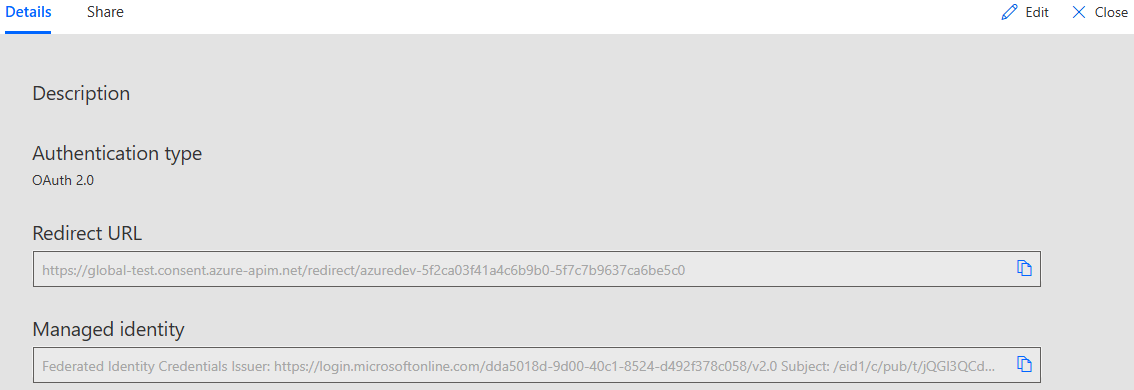
On the Security tab of the custom connector, select Authentication type as OAuth 2.0 and Identity Provider as Azure Active Directory and then select the managed identity radio button. Note that the Tenant Id in this case needs to be a real tenant id Guid. Using common will not work.

Once you save the connector, the managed identity strings can be copied from the bottom of the security page or the connector details page.
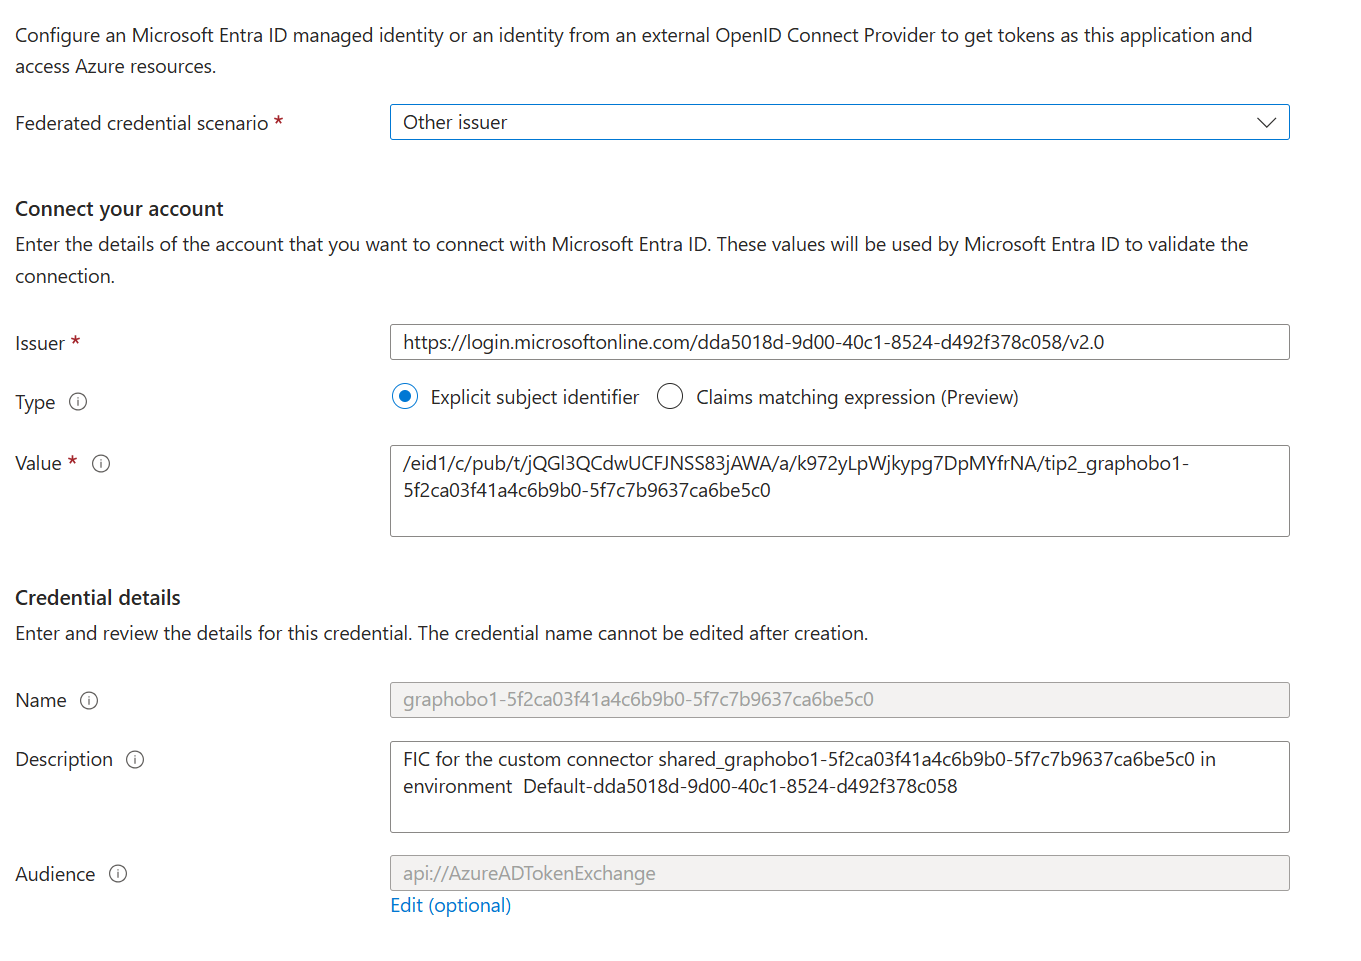
You need to add this managed identity created for the custom connector to your client Entra app. Under Certificates and secrets section, select the Federated Credentials tab.
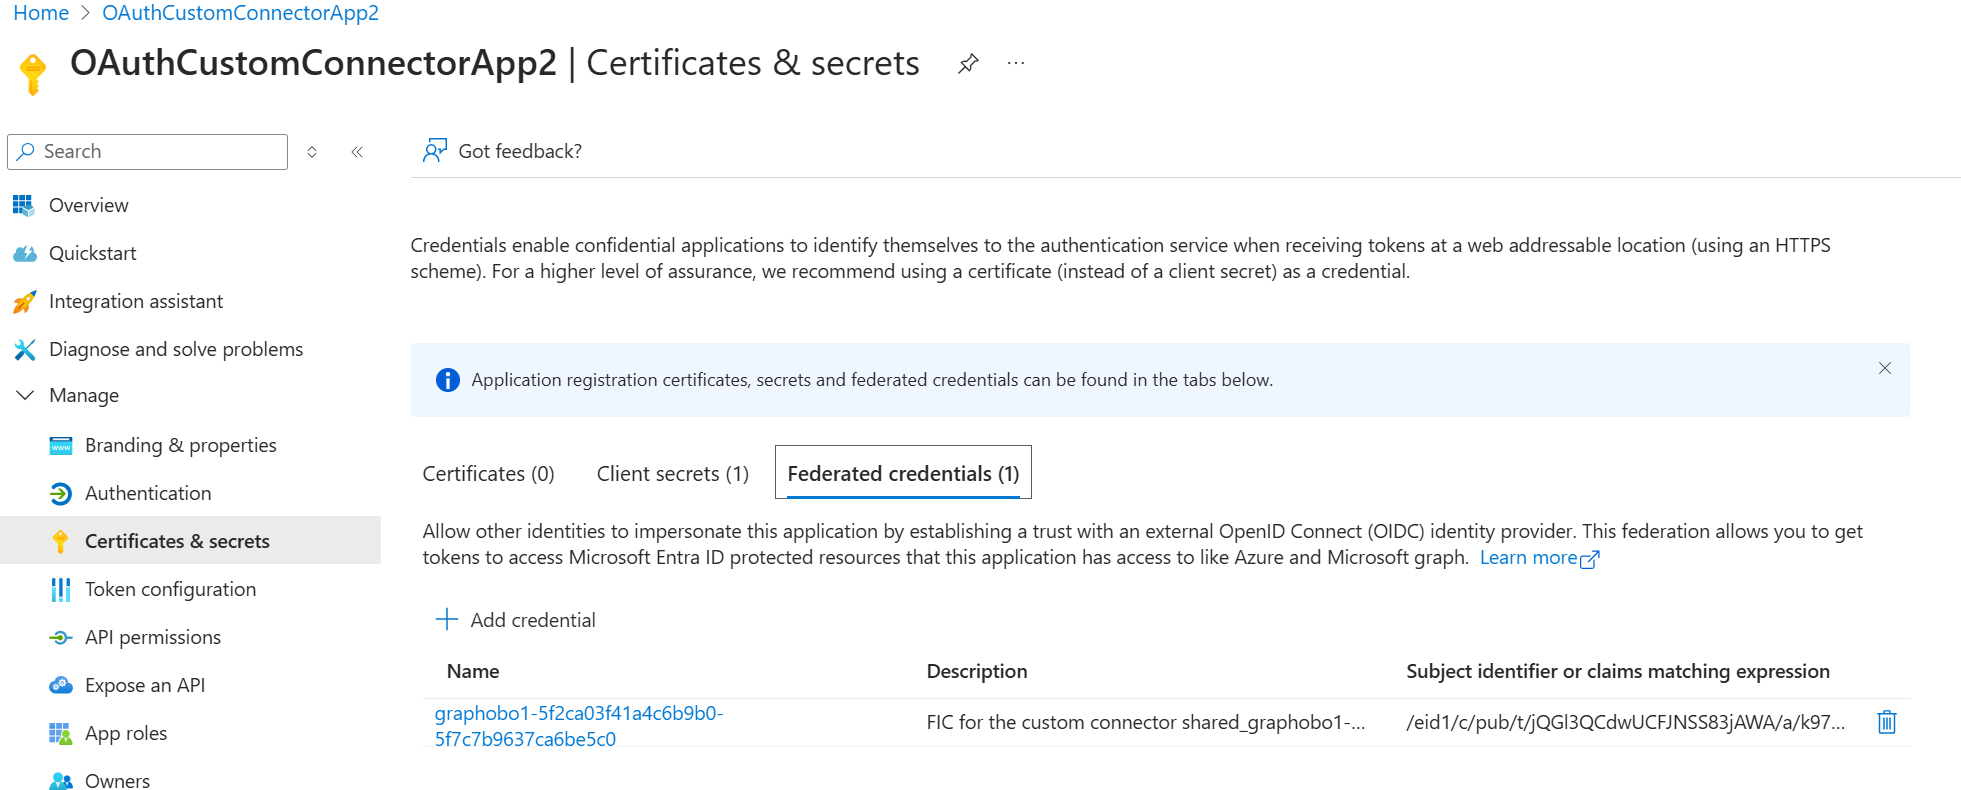
Add a new credential.
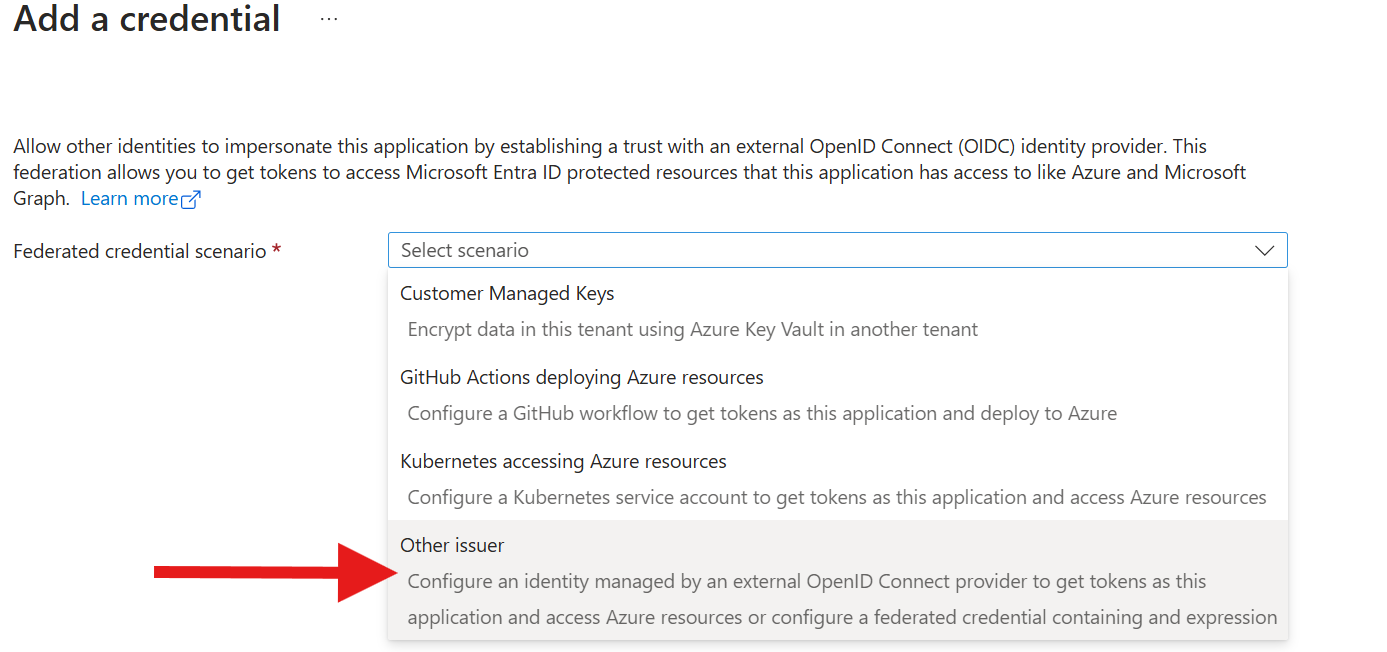
Copy-paste the issuer and subject identifier strings taken from the Managed identity field in the custom connector details page or the security tab on the edit page.
After you add this managed identity to the app, you can successfully create connections for your connector. Also this is a one time setup and like the redirect URL, the managed identity details do not change if you update the connector. Also, if you export and import the connector into a different environment, a new managed identity will be generated for that connector which needs to be added to the respective Entra app.
Related information
Use custom connectors in Power Automate.
To ask questions or make comments about custom connectors, join our community.
Provide feedback
We greatly appreciate feedback on issues with our connector platform, or new feature ideas. To provide feedback, go to Submit issues or get help with connectors and select your feedback type.