Note
Access to this page requires authorization. You can try signing in or changing directories.
Access to this page requires authorization. You can try changing directories.
Important
The Import data (new) wizard now supports keyword search, which was previously only available in the Import data wizard. We recommend the new wizard for an improved search experience. For more information about how we're consolidating the wizards, see Import data wizards in the Azure portal.
In this quickstart, you learn how a skillset in Azure AI Search adds optical character recognition (OCR), image analysis, language detection, text merging, and entity recognition to generate text-searchable content in an index.
You can run the Import data (new) wizard in the Azure portal to apply skills that create and transform textual content during indexing. The input is your raw data, usually blobs in Azure Storage. The output is a searchable index containing AI-generated image text, captions, and entities. You can then query generated content in the Azure portal using Search explorer.
Before you run the wizard, you create a few resources and upload sample files.
Prerequisites
An Azure account with an active subscription. Create an account for free.
An Azure AI Search service. Create a service or find an existing service in your current subscription. You can use a free service for this quickstart.
An Azure Storage account. Use Azure Blob Storage on a standard performance (general-purpose v2) account. To avoid bandwidth charges, use the same region as Azure AI Search.
Note
This quickstart uses Azure AI services for AI enrichment. Because the workload is small, Azure AI services is tapped behind the scenes for free processing up to 20 transactions. Therefore, you don't need to create an Azure AI services multi-service resource.
Prepare sample data
In this section, you create an Azure Storage container to store sample data consisting of various file types, including images and application files that aren't full-text searchable in their native formats.
To prepare the sample data for this quickstart:
Sign in to the Azure portal and select your Azure Storage account.
From the left pane, select Data storage > Containers.
Create a container, and then upload the sample data to the container.
Run the wizard
To run the wizard:
Sign in to the Azure portal and select your search service.
On the Overview page, select Import data (new).

Select Azure Blob Storage for the data source.

Select Keyword search.


Step 1: Create a data source
Azure AI Search requires a connection to a data source for content ingestion and indexing. In this case, the data source is your Azure Storage account.
To create the data source:
On the Connect to your data page, select your Azure subscription.
Select your storage account, and then select the container you created.
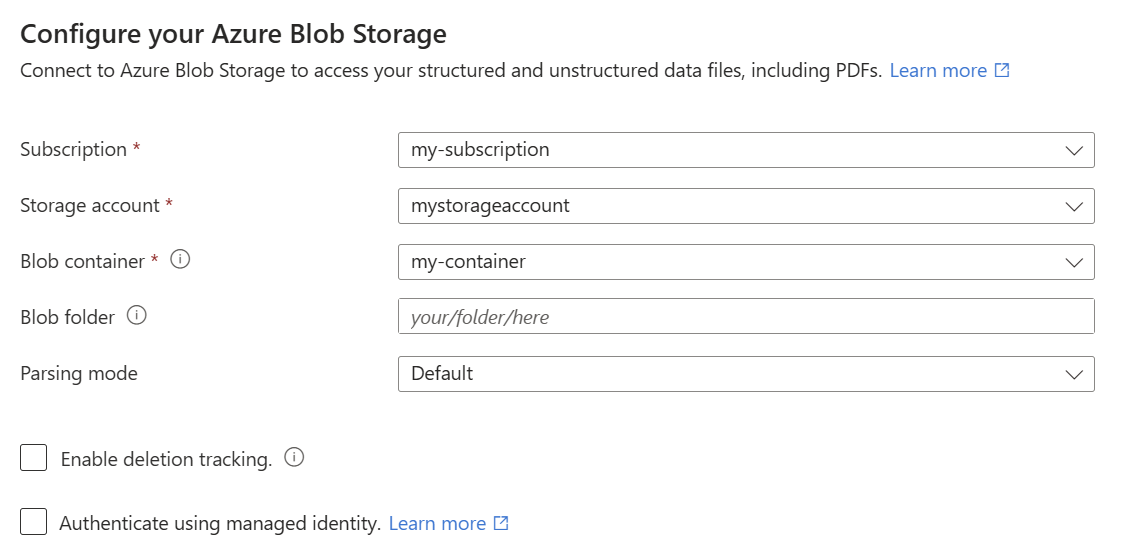
Select Next.

If you get Error detecting index schema from data source, the indexer that powers the wizard can't connect to your data source. The data source most likely has security protections. Try the following solutions, and then rerun the wizard.
| Security feature | Solution |
|---|---|
| Resource requires Azure roles, or its access keys are disabled. | Connect as a trusted service or connect using a managed identity. |
| Resource is behind an IP firewall. | Create an inbound rule for Azure AI Search and the Azure portal. |
| Resource requires a private endpoint connection. | Connect over a private endpoint. |
Step 2: Add cognitive skills
The next step is to configure AI enrichment to invoke OCR, image analysis, and entity recognition.
OCR and image analysis are available for blobs in Azure Blob Storage and Azure Data Lake Storage (ADLS) Gen2 and for image content in Microsoft OneLake. Images can be standalone files or embedded images in a PDF or other files.
To add the skills:
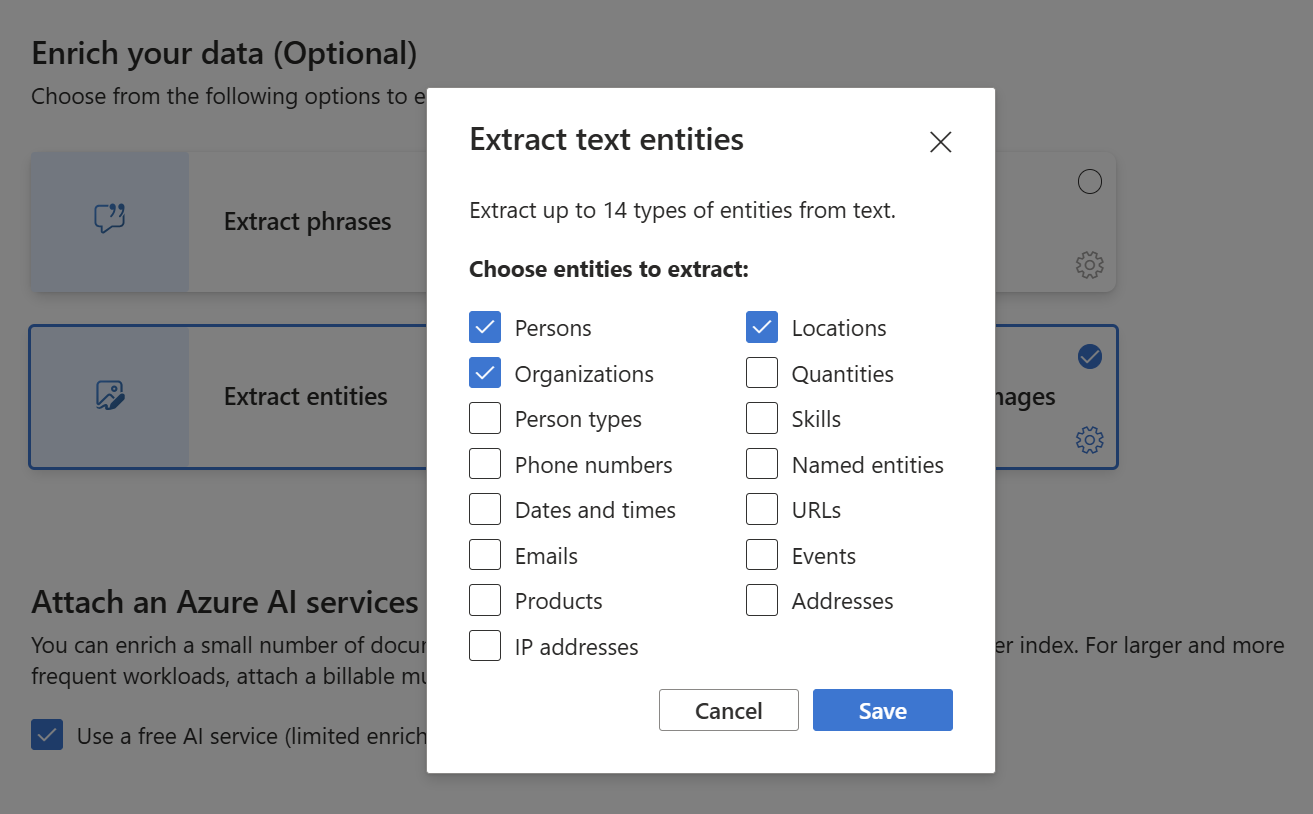
Select Extract entities, and then select the gear icon.
Select and save the following checkboxes:
Persons
Locations
Organizations
Select Extract text from images, and then select the gear icon.
Select and save the following checkboxes:
Generate tags
Categorize content

Leave the Use a free AI service (limited enrichments) checkbox selected.
The sample data consists of 14 files, so the free allotment of 20 transactions on Azure AI services is sufficient.
Select Next.


Step 3: Configure the index
An index contains your searchable content. The wizard can usually create the schema by sampling the data source. In this step, you review the generated schema and potentially revise any settings.
For this quickstart, the wizard sets reasonable defaults:
Default fields are based on metadata properties of existing blobs and new fields for the enrichment output, such as
persons,locations, andorganizations. Data types are inferred from metadata and by data sampling.
Default document key is
metadata_storage_path, which is selected because the field contains unique values.Default field attributes are based on the skills you selected. For example, fields created by the Entity Recognition skill (
persons,locations, andorganizations) are Retrievable, Filterable, Facetable, and Searchable. To view and change these attributes, select a field, and then select Configure field.Retrievable fields can be returned in results, while Searchable fields support full-text search. Use Filterable if you want to use fields in a filter expression.
Marking a field as Retrievable doesn't mean that the field must appear in search results. You can control which fields are returned by using the
selectquery parameter.

After you review the index schema, select Next.
Step 4: Skip advanced settings
The wizard offers advanced settings for semantic ranking and index scheduling, which are beyond the scope of this quickstart. Skip this step by selecting Next.
Step 5: Review and create objects
The last step is to review your configuration and create the index, indexer, and data source on your search service. The indexer automates the process of extracting content from your data source, loading the index, and driving skillset execution.
To review and create the objects:
Accept the default Objects name prefix.
Review the object configurations.

AI enrichment, semantic ranker, and indexer scheduling are either disabled or set to their default values because you skipped their wizard steps.
Select Create to simultaneously create the objects and run the indexer.

Monitor status
You can monitor the creation of the indexer in the Azure portal. Skills-based indexing takes longer than text-based indexing, especially OCR and image analysis.
To monitor the progress of the indexer:
From the left pane, select Indexers.
Select your indexer from the list.
Select Success (or Failed) to view execution details.


In this quickstart, there are a few warnings, including Could not execute skill because one or more skill input was invalid. This warning tells you that a PNG file in the data source doesn't provide a text input to Entity Recognition. It occurs because the upstream OCR skill didn't recognize any text in the image and couldn't provide a text input to the downstream Entity Recognition skill.
Warnings are common in skillset execution. As you become familiar with how skills iterate over your data, you might begin to notice patterns and learn which warnings are safe to ignore.
Query in Search explorer
To query your index:
From the left pane, select Indexes.
Select your index from the list. If the index has zero documents or storage, wait for the Azure portal to refresh.
On the Search explorer tab, enter a search string, such as
satya nadella.
The search bar accepts keywords, quote-enclosed phrases, and operators. For example: "Satya Nadella" +"Bill Gates" +"Steve Ballmer"
Results are returned as verbose JSON, which can be hard to read, especially in large documents. Here are tips for searching in this tool:
- Switch to the JSON view to specify parameters that shape results.
- Add
selectto limit the fields in results. - Add
countto show the number of matches. - Use Ctrl-F to search within the JSON for specific properties or terms.

Here's some JSON you can paste into the view:
{
"search": "\"Satya Nadella\" +\"Bill Gates\" +\"Steve Ballmer\"",
"count": true,
"select": "merged_content, persons"
}
Tip
Query strings are case sensitive, so if you get an "unknown field" message, check Fields or Index Definition (JSON) to verify the name and case.
Important
The Import data wizard will eventually be deprecated. Most of its functionality is available in the Import data (new) wizard, which we recommend for most search scenarios. For more information, see Import data wizards in the Azure portal.
In this quickstart, you learn how a skillset in Azure AI Search adds optical character recognition (OCR), image analysis, language detection, text merging, and entity recognition to generate text-searchable content in an index.
You can run the Import data wizard in the Azure portal to apply skills that create and transform textual content during indexing. The input is your raw data, usually blobs in Azure Storage. The output is a searchable index containing AI-generated image text, captions, and entities. You can then query generated content in the Azure portal using Search explorer.
Before you run the wizard, you create a few resources and upload sample files.
Prerequisites
An Azure account with an active subscription. Create an account for free.
An Azure AI Search service. Create a service or find an existing service in your current subscription. You can use a free service for this quickstart.
An Azure Storage account. Use Azure Blob Storage on a standard performance (general-purpose v2) account. To avoid bandwidth charges, use the same region as Azure AI Search.
Note
This quickstart uses Azure AI services for AI enrichment. Because the workload is small, Azure AI services is tapped behind the scenes for free processing up to 20 transactions. Therefore, you don't need to create an Azure AI services multi-service resource.
Prepare sample data
In this section, you create an Azure Storage container to store sample data consisting of various file types, including images and application files that aren't full-text searchable in their native formats.
To prepare the sample data for this quickstart:
Sign in to the Azure portal and select your Azure Storage account.
From the left pane, select Data storage > Containers.
Create a container, and then upload the sample data to the container.
Run the wizard
To run the wizard:
Sign in to the Azure portal and select your search service.
On the Overview page, select Import data.

Step 1: Create a data source
Azure AI Search requires a connection to a data source for content ingestion and indexing. In this case, the data source is your Azure Storage account.
To create the data source:
On the Connect to your data page, select the Data Source dropdown list, and then select Azure Blob Storage.
Choose an existing connection string for your storage account, and then select the container you created.
Enter a name for the data source.

Select Next: Add cognitive skills (Optional).

If you get Error detecting index schema from data source, the indexer that powers the wizard can't connect to your data source. The data source most likely has security protections. Try the following solutions, and then rerun the wizard.
| Security feature | Solution |
|---|---|
| Resource requires Azure roles, or its access keys are disabled. | Connect as a trusted service or connect using a managed identity. |
| Resource is behind an IP firewall. | Create an inbound rule for Azure AI Search and the Azure portal. |
| Resource requires a private endpoint connection. | Connect over a private endpoint. |
Step 2: Add cognitive skills
The next step is to configure AI enrichment to invoke OCR, image analysis, and natural-language processing.
OCR and image analysis are available for blobs in Azure Blob Storage and Azure Data Lake Storage (ADLS) Gen2 and for image content in Microsoft OneLake. Images can be standalone files or embedded images in a PDF or other files.
To add the skills:
Expand the Attach Cognitive Services section.
Select Free (Limited enrichments) to use a free Azure AI services multi-service resource.

The sample data consists of 14 files, so the free allotment of 20 transactions on Azure AI services is sufficient.
Expand the Add enrichments section.
Select the Enable OCR and merge all text into merged_content field checkbox.
Under Text Cognitive Skills, select the following checkboxes:
Extract people names
Extract organization names
Extract location names
Under Image Cognitive Skills, select the following checkboxes:
Generate tags from images
Generate captions from images

Select Next: Customer target index.


Step 3: Configure the index
An index contains your searchable content. The wizard can usually create the schema by sampling the data source. In this step, you review the generated schema and potentially revise any settings.
For this quickstart, the wizard sets reasonable defaults:
Default fields are based on metadata properties of existing blobs and new fields for the enrichment output, such as
people,organizations, andlocations. Data types are inferred from metadata and by data sampling.Default document key is
metadata_storage_path, which is selected because the field contains unique values.Default attributes are Retrievable and Searchable. Retrievable fields can be returned in results, while Searchable fields support full-text search. The wizard assumes you want these fields to be retrievable and searchable because you created them via a skillset. Select Filterable if you want to use fields in a filter expression.

Marking a field as Retrievable doesn't mean that the field must appear in search results. You can control which fields are returned by using the
selectquery parameter.

After you review the index schema, select Next: Create an indexer.
Step 4: Configure the indexer
The indexer drives the indexing process and specifies the data source name, a target index, and frequency of execution. In this step, the wizard creates several objects, including an indexer that you can reset and run repeatedly.
To configure the indexer:
On the Create an indexer page, accept the default name.
Select Once for the schedule.

Select Submit to simultaneously create and run the indexer.

Monitor status
You can monitor the creation of the indexer in the Azure portal. Skills-based indexing takes longer than text-based indexing, especially OCR and image analysis.
To monitor the progress of the indexer:
From the left pane, select Indexers.
Select your indexer from the list.
Select Success (or Failed) to view execution details.
In this quickstart, there are a few warnings, including Could not execute skill because one or more skill input was invalid. This warning tells you that a PNG file in the data source doesn't provide a text input to Entity Recognition. It occurs because the upstream OCR skill didn't recognize any text in the image and couldn't provide a text input to the downstream Entity Recognition skill.
Warnings are common in skillset execution. As you become familiar with how skills iterate over your data, you might begin to notice patterns and learn which warnings are safe to ignore.
Query in Search explorer
To query your index:
From the left pane, select Indexes.
Select your index from the list. If the index has zero documents or storage, wait for the Azure portal to refresh.
On the Search explorer tab, enter a search string, such as
satya nadella.
The search bar accepts keywords, quote-enclosed phrases, and operators. For example: "Satya Nadella" +"Bill Gates" +"Steve Ballmer"
Results are returned as verbose JSON, which can be hard to read, especially in large documents. Here are tips for searching in this tool:
- Switch to the JSON view to specify parameters that shape results.
- Add
selectto limit the fields in results. - Add
countto show the number of matches. - Use Ctrl-F to search within the JSON for specific properties or terms.

Here's some JSON you can paste into the view:
{
"search": "\"Satya Nadella\" +\"Bill Gates\" +\"Steve Ballmer\"",
"count": true,
"select": "content, people"
}
Tip
Query strings are case sensitive, so if you get an "unknown field" message, check Fields or Index Definition (JSON) to verify the name and case.
Takeaways
You've created your first skillset and learned the basic steps of skills-based indexing.
Some key concepts that we hope you picked up include the dependencies. A skillset is bound to an indexer, and indexers are Azure and source-specific. Although this quickstart uses Azure Blob Storage, other Azure data sources are available. For more information, see Indexers in Azure AI Search.
Another important concept is that skills operate over content types, and when you use heterogeneous content, some inputs are skipped. Also, large files or fields might exceed the indexer limits of your service tier. It's normal to see warnings when these events occur.
The output is routed to a search index, and there's a mapping between name-value pairs created during indexing and individual fields in your index. Internally, the wizard sets up an enrichment tree and defines a skillset, establishing the order of operations and general flow. These steps are hidden in the wizard, but when you start writing code, these concepts become important.
Finally, you learned that you can verify content by querying the index. Ultimately, Azure AI Search provides a searchable index that you can query using either simple or fully extended query syntax. An index containing enriched fields is like any other. You can incorporate standard or custom analyzers, scoring profiles, synonyms, faceted navigation, geo-search, and other Azure AI Search features.
Clean up resources
When you're working in your own subscription, it's a good idea at the end of a project to identify whether you still need the resources you created. Resources left running can cost you money. You can delete resources individually or delete the resource group to delete the entire set of resources.
You can find and manage resources in the Azure portal by selecting All resources or Resource groups from the left pane.
If you used a free service, remember that you're limited to three indexes, indexers, and data sources. You can delete individual items in the Azure portal to stay under the limit.
Next step
You can use the Azure portal, REST APIs, or an Azure SDK to create skillsets. Try the REST APIs by using a REST client and more sample data: