Note
Access to this page requires authorization. You can try signing in or changing directories.
Access to this page requires authorization. You can try changing directories.
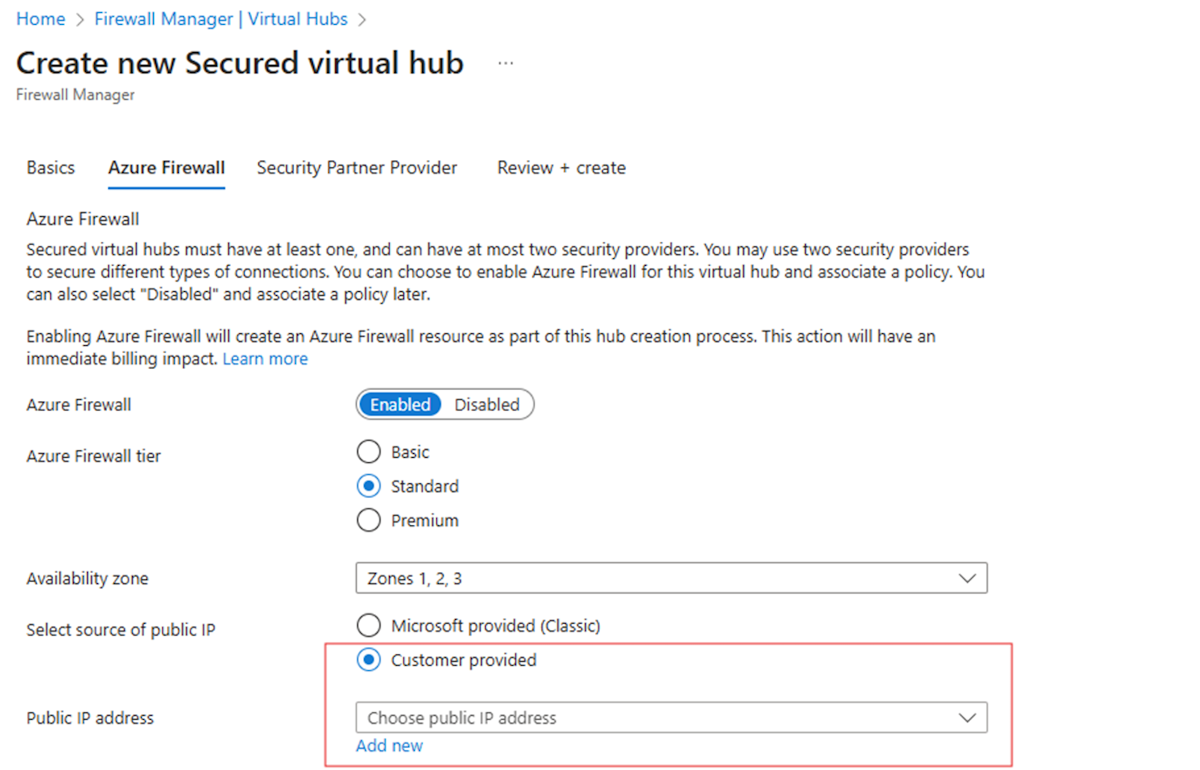
Azure Firewall in Virtual WAN secured hubs now supports the use of customer-provided public IP addresses. This capability enables organizations to bring their own public IP addresses when deploying Azure Firewall in a secured Virtual WAN hub, providing greater flexibility and control over network infrastructure.
With this feature, instead of relying on Azure-managed public IP addresses, you can specify your own public IP addresses that are already allocated in your Azure subscription. This is valuable for organizations that need to maintain consistent IP addresses for compliance, security policies, or integration with third-party systems.
This capability is available only for new deployments of secured hub Azure Firewalls. For existing secured Virtual WAN hubs with Azure Firewall already deployed, you must delete the hub firewall and redeploy it during scheduled maintenance hours to take advantage of customer-provided public IP addresses.
You can configure this feature using either the Azure portal or Azure PowerShell.
Benefits
Using customer-provided public IP addresses with secured hub Azure Firewalls offers several advantages:
IP lifecycle management: You own and control the complete lifecycle of the Azure Firewall public IP addresses, including creation, configuration, and deletion.
Enhanced DDoS protection: Secured hub firewalls can enable enhanced DDoS mitigation features to defend against DDoS attacks when using customer-provided public IPs.
IP prefix allocation: You can allocate Azure Firewall public IP addresses from an IP address prefix pool, enabling better IP address management and simplified routing configurations.
Compliance and consistency: Maintain consistent public IP addresses across deployments to meet regulatory requirements or integrate with existing network security policies.
Prerequisites
Before you can use customer-provided public IP addresses with secured hub Azure Firewalls, ensure you have the following resources permissions:
Azure subscription: An active Azure subscription with appropriate permissions to create and manage Azure Firewall resources.
Virtual WAN and hub: A Virtual WAN instance with a virtual hub where you plan to deploy the secured hub firewall.
Public IP addresses: One or more public IP addresses already created in your Azure subscription. These public IP addresses must:
- Be in the same region as your virtual hub
- Have a Standard SKU
- Use static allocation method
- Not be associated with any other Azure resources
Resource group: A resource group to contain your Azure Firewall and related resources.
Permissions: Appropriate Azure RBAC permissions to:
- Create and configure Azure Firewall resources
- Manage public IP addresses
- Modify Virtual WAN hub configurations
IP prefix (recommended): For better management, allocate your public IP addresses from a public IP address prefix pool.ided public IP address support in secured hubs description: Learn how to use customer-provided public IP addresses with Azure Firewall in secured Virtual WAN hubs for enhanced control and DDoS protection.
The capability is available to new as well as existing deployments of secured hub Firewalls.
Configure a new Secure Hub Azure Firewall with customer tenant public IP
You can configure this feature using either the Azure portal or Azure PowerShell.
You can associate a preexisting public IP address with a secured hub firewall. You should allocate public IP addresses from an IP prefix pool to simplify downstream security access control lists (ACLs).
Note
For existing secured virtual WAN hubs, you have to remove all the public IPs assigned to the Hub, stop/deallocate the hub firewall. and allocate the Firewall with your public IP during scheduled maintenance hours.
Reconfigure an existing Secure Hub Azure Firewall with customer tenant public IP
To reconfigure an Azure Firewall with a public IP address, follow these steps:
Retrieve the existing firewall
Use theGet-AzFirewallcmdlet to retrieve the current Azure Firewall configuration:$Azfw = Get-AzFirewall -ResourceGroupName rgName -Name azFwSet the current count of Firewall Public IPs to 0
Create a new public IP configuration with a count of 0 and update the firewall's hub IP addresses:$hubIp = New-AzFirewallHubPublicIpAddress -Count 0 $AzFWHubIPs = New-AzFirewallHubIpAddress -PublicIP $hubIp $Azfw.HubIpAddresses = $AzFWHubIPs Set-AzFirewall -AzureFirewall $AzFwDeallocate the Firewall
Deallocate the firewall to prepare it for reconfiguration:$AzFw.Deallocate() Set-AzFirewall -AzureFirewall $AzFwAllocate the firewall with the Public IP
Retrieve the public IP address and virtual hub, then allocate the firewall with the new configuration:$publicip = Get-AzPublicIpAddress -ResourceGroupName rgName -Name PIPWC2 $virtualhub = Get-AzVirtualHub -ResourceGroupName rgName -Name "LegacyHUB" $AzFw.Allocate($virtualhub.Id, $publicip) Set-AzFirewall -AzureFirewall $AzFw