Note
Access to this page requires authorization. You can try signing in or changing directories.
Access to this page requires authorization. You can try changing directories.
This article shows you how to build a Model Context Protocol (MCP) agent using .NET. In this sample, the MCP client (written in C#/.NET) connects to an MCP server (written in TypeScript) to manage a todo list. The client finds available tools from the server and sends them to an Azure OpenAI model. Users can then talk to the todo system using everyday language.
Get to the code
Check out the OpenAI MCP Agent Building Block AI template. This example shows how to build an OpenAI agent that uses an MCP client to consume an existing MCP server.
Jump to the code walkthrough section to understand how this sample works.
Architectural overview
The following diagram shows the simple architecture of the sample app:

- MCP Client: Connects to the MCP server and finds available tools
- Chat Client: Works with Azure OpenAI to understand natural language
- Blazor UI: Provides a web interface where users can chat
- Transport Layer: Uses Server-Sent Events (SSE) to send messages in real-time
- Authentication: Uses JWT tokens to keep the connection secure
The MCP server runs as a containerized app on Azure Container Apps (ACA). It uses a TypeScript backend to provide tools to the MCP client through the Model Context Protocol. All tools work with a backend SQLite database.
Note
Visit Build a TypeScript MCP server using Azure Container Apps to see the code walkthrough of the TypeScript MCP Server used in this article.
Cost
To keep costs low, this sample uses basic or consumption pricing tiers for most resources. Adjust the tier as needed, and delete resources when you're done to avoid charges.
Prerequisites
- Visual Studio Code - Latest version to support MCP Server development.
- .NET 9 SDK
- C# Dev Kit for Visual Studio Code Visual Studio Code extension
- GitHub Copilot Visual Studio Code extension
- GitHub Copilot Chat Visual Studio Code extension
- Azure Developer CLI (azd)
- The AI Foundry Extension Visual Studio Code extension
- A deployed AI Foundry gpt-5-mini model
A development container includes all the dependencies you need for this article. You can run it in GitHub Codespaces (in a browser) or locally using Visual Studio Code.
To follow this article, make sure you meet these prerequisites:
Deploy an AI Foundry gpt-5-mini model using the AI Foundry VS Code Extension
Deploy a gpt-5-mini model using the AI Foundry Extension in Visual Studio Code using the following steps:
Create an AI Foundry project and deploy the model
- To create an AI Foundry project and deploy a
gpt-5-minimodel, follow the Get Started instructions in the Work with the Azure AI Foundry for Visual Studio Code extension (Preview) article.
Create the OpenAI Model connection string
Once the
gpt-5-minimodel is deployed, right-click the model in the AI Foundry extension and select Copy API key to copy the model's API key to your clipboard.Next, right-click the deployed
gpt-5-minimodel in the AI Foundry extension and select Copy endpoint to copy the model's endpoint to your clipboard, as shown in the following screenshot: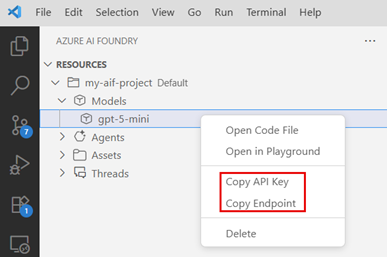
Finally, create a connection string for the deployed
gpt-5-minimodel using the copied endpoint and API key in the following format:Endpoint=<AZURE_OPENAI_ENDPOINT>;Key=<AZURE_OPENAI_API_KEY>. You need this connection string later in the article.

- An Azure subscription – Create one for free
- Azure account permissions – Your Azure account must have
Microsoft.Authorization/roleAssignments/writepermissions, such as Role Based Access Control Administrator, User Access Administrator, or Owner. If you don't have subscription-level permissions, you must be granted RBAC for an existing resource group and deploy to that group.- Your Azure account also needs
Microsoft.Resources/deployments/writepermissions at the subscription level.
- Your Azure account also needs
- GitHub account
Open development environment
Follow these steps to set up a preconfigured development environment with all the required dependencies.
GitHub Codespaces runs a development container managed by GitHub with Visual Studio Code for the Web as the interface. Use GitHub Codespaces for the simplest setup, as it comes with the necessary tools and dependencies preinstalled for this article.
Important
All GitHub accounts can use Codespaces for up to 60 hours free each month with two core instances. For more information, see GitHub Codespaces monthly included storage and core hours.
Use the following steps to create a new GitHub Codespace on the main branch of the Azure-Samples/openai-mcp-agent-dotnet GitHub repository.
Right-click the following button and select Open link in new window. This action lets you have the development environment and the documentation open side by side.

On the Create codespace page, review and then select Create new codespace.
Wait for the codespace to start. It might take a few minutes.
Make sure that your deployed model name is
gpt-5-mini. If your deployed model is different, updatesrc/McpTodo.ClientApp/appsettings.jsonwith the correct deployment name.{ "OpenAI": { // Make sure this is the right deployment name. "DeploymentName": "gpt-5-mini" } }Sign in to Azure with the Azure Developer CLI in the terminal at the bottom of the screen.
azd auth loginCopy the code from the terminal and then paste it into a browser. Follow the instructions to authenticate with your Azure account.
You do the rest of the tasks in this development container.
Note
To run the MCP agent locally:
- Set up your environment as described in the Getting started section in the sample repository.
- Install your MCP Server by following the instructions in the Get MCP Server App section in the sample repository.
- Run the MCP agent locally by following the instructions in the Run locally section in the sample repository.
- Skip to the Use the TODO MCP agent section to continue.
Deploy and run
The sample repository contains all the code and configuration files for the MCP agent Azure deployment. The following steps walk you through the sample MCP agent Azure deployment process.
Deploy to Azure
Important
Azure resources in this section start costing money immediately, even if you stop the command before it finishes.
Set the JWT token
Set the JWT token for the MCP server by running the following command in the terminal at the bottom of the screen:
# zsh/bash
./scripts/set-jwttoken.sh
# PowerShell ./scripts/Set-JwtToken.ps1
Add JWT token to azd environment configuration
Add the JWT token to azd environment configuration by running the following command in the terminal at the bottom of the screen:
# zsh/bash
env_dir=".azure/$(azd env get-value AZURE_ENV_NAME)"
mkdir -p "$env_dir"
cat ./src/McpTodo.ServerApp/.env >> "$env_dir/.env"
# PowerShell $dotenv = Get-Content ./src/McpTodo.ServerApp/.env $dotenv | Add-Content -Path ./.azure/$(azd env get-value AZURE_ENV_NAME)/.env -Encoding utf8 -ForceNote
By default, the MCP client app is protected by the ACA built-in authentication feature. You can turn off this feature before running
azd upby setting:azd env set USE_LOGIN falseRun the following Azure Developer CLI command for Azure resource provisioning and source code deployment:
azd upUse the following table to answer the prompts:
Prompt Answer Environment name Use a short, lowercase name. Add your name or alias. For example, my-mcp-agent. The environment name becomes part of the resource group name.Subscription Choose the subscription where you want to create resources. Location (for hosting) Pick the model deployment location from the list. OpenAI Connection string Paste the connection string for the OpenAI model you created earlier in the Create the OpenAI Model connection string section. App deployment takes 5 to 10 minutes.
After deployment finishes, you can access the MCP agent using the URL in the output. The URL looks like this:
https://<env-name>.<container-id>.<region>.azurecontainerapps.ioOpen the URL in a web browser to use the MCP agent.
Use the TODO MCP agent
After the MCP agent is running, you can use the tools it provides in agent mode. To use MCP tools in agent mode:
Navigate to the client app URL and sign in to the app.
Note
if you set the
USE_LOGINvalue tofalse, you might not be asked to sign in.Enter a prompt such as "I need to send an email to my manager on Wednesday" in the chat input box and notice how tools are automatically invoked as needed.
The MCP agent uses the tools provided by the MCP server to fulfill the request and return a response in the chat interface.
Experiment with other prompts like:
Give me a list of to dos.
Set "meeting at 1pm".
Give me a list of to dos.
Mark #1 as completed.
Delete #1 from the to-do list.
Explore the code
The sample repository contains all the code and configuration files for the MCP agent Azure deployment. The following sections walk you through the key components of the MCP agent code.
MCP Client configuration and setup
The application sets up the MCP client in Program.cs. This configuration defines how to connect and what options to use. The code uses several advanced patterns including .NET Aspire integration and service defaults:
builder.Services.AddSingleton<IMcpClient>(sp =>
{
    var config = sp.GetRequiredService<IConfiguration>();
    var loggerFactory = sp.GetRequiredService<ILoggerFactory>();

    var uri = new Uri(config["McpServers:TodoList"]!);

    var clientTransportOptions = new SseClientTransportOptions()
    {
        Endpoint = new Uri($"{uri.AbsoluteUri.TrimEnd('/')}/mcp"),
        AdditionalHeaders = new Dictionary<string, string>
        {
            { "Authorization", $"Bearer {config["McpServers:JWT:Token"]!}" }
        }
    };
    var clientTransport = new SseClientTransport(clientTransportOptions, loggerFactory);

    var clientOptions = new McpClientOptions()
    {
        ClientInfo = new Implementation()
        {
            Name = "MCP Todo Client",
            Version = "1.0.0",
        }
    };

    return McpClientFactory.CreateAsync(clientTransport, clientOptions, loggerFactory).GetAwaiter().GetResult();
});
Key implementation details:
- Transport Configuration:
SseClientTransportOptionssupports both Server-Sent Events (SSE) and streamable HTTP transport. The transport method depends on the endpoint URL - endpoints ending with/sseuse Server-Sent Events, while endpoints ending with/mcpuse streamable HTTP. This approach enables real-time communication between client and server - Authentication Headers: JWT tokens go in the
AdditionalHeadersto keep server communication secure - Client Information:
McpClientOptionstells the server the client's name and version - Factory Pattern:
McpClientFactory.CreateAsync()connects and completes the protocol handshake
.NET Aspire service defaults integration
The application uses .NET Aspire's service defaults pattern for cross-cutting concerns:
// McpTodo.ServiceDefaults/Extensions.cs
public static TBuilder AddServiceDefaults<TBuilder>(this TBuilder builder) where TBuilder : IHostApplicationBuilder
{
    builder.ConfigureOpenTelemetry();
    builder.AddDefaultHealthChecks();
    builder.Services.AddServiceDiscovery();

    builder.Services.ConfigureHttpClientDefaults(http =>
    {
        // Turn on resilience by default
        http.AddStandardResilienceHandler();
        // Turn on service discovery by default
        http.AddServiceDiscovery();
    });

    return builder;
}
Service defaults benefits:
- Composable Extension Methods: The system uses a clean builder pattern to add shared features
- Standard Resilience Handlers: The system adds built-in retry, circuit breaker, and timeout rules for you
- Service Discovery Integration: The system finds services automatically in container environments
- OpenTelemetry by Default: The system gets full monitoring without any setup work
The following diagram shows the relationship between cross-cutting concerns and application services:

Configuration URL Resolution
The sample includes sophisticated URL resolution for different environments:
// AspireUrlParserExtensions.cs
public static Uri Resolve(this Uri uri, IConfiguration config)
{
    var absoluteUrl = uri.ToString();
    if (absoluteUrl.StartsWith("https+http://"))
    {
        var appname = absoluteUrl.Substring("https+http://".Length).Split('/')[0];
        var https = config[$"services:{appname}:https:0"]!;
        var http = config[$"services:{appname}:http:0"]!;

        return string.IsNullOrWhiteSpace(https) ? new Uri(http) : new Uri(https);
    }
    // Handle other URL formats...
}
Configuration Management Features:
- Service Discovery Abstraction: The system handles development and production URLs cleanly
- Protocol Negotiation: The system chooses HTTPS first, then falls back to HTTP
- Configuration Convention: The system uses standard .NET Aspire service setup patterns
Authentication Implementation
This sample uses JWT (JSON Web Token) authentication to secure the connection between the MCP client and server.
dotnet user-secrets --project ./src/McpTodo.ClientApp set McpServers:JWT:Token "$TOKEN"
Note
The scripts created the $TOKEN variable automatically when you ran either the Bash (set-jwttoken.sh) or PowerShell (Set-JwtToken.ps1) script earlier in the Deploy to Azure section.
These scripts perform the following steps:
- Run
npm run generate-tokenin the MCP server app to create a JWT token - Parse the generated
.envfile to extract the JWT_TOKEN value - Automatically store it in .NET user secrets for the MCPClient
The MCP client retrieves the JWT token from configuration and includes it in the HTTP headers for authentication when connecting to the MCP server:
AdditionalHeaders = new Dictionary<string, string>
{
    { "Authorization", $"Bearer {config["McpServers:JWT:Token"]!}" }
}
This approach ensures:
- Secure Communication: The system only allows clients with valid tokens to connect to the MCP server
- Token-Based Authorization: JWT tokens let the system verify users without storing session data
- Configuration Management: The system stores sensitive tokens safely in user secrets during development
Azure Container Apps Authentication Integration
The infrastructure shows advanced authentication patterns using Azure Container Apps built-in authentication and authorization features ("Easy Auth"):
// containerapps-authconfigs.bicep
resource containerappAuthConfig 'Microsoft.App/containerApps/authConfigs@2024-10-02-preview' = {
  properties: {
    identityProviders: {
      azureActiveDirectory: {
        enabled: true
        registration: {
          clientId: clientId
          openIdIssuer: openIdIssuer
        }
      }
    }
    login: {
      tokenStore: {
        enabled: true
        azureBlobStorage: {
          blobContainerUri: '${storageAccount.properties.primaryEndpoints.blob}/token-store'
          managedIdentityResourceId: userAssignedIdentity.id
        }
      }
    }
  }
}
Advanced Authentication Features:
- Zero-Code Authentication: Azure Container Apps provides built-in authentication
- Managed Identity for Storage: The system stores tokens securely without connection strings
- Federated Identity Credentials: The system enables workload identity for Kubernetes-style authentication
The following diagram shows the security handshake between components:

Tool discovery and registration
The MCP client discovers available tools from the server during component initialization in Chat.razor:
protected override async Task OnInitializedAsync()
{
    messages.Add(new(ChatRole.System, SystemPrompt));
    tools = await McpClient.ListToolsAsync();
    chatOptions.Tools = [.. tools];
}
How Tool Discovery Works:
- Server Query:
McpClient.ListToolsAsync()sends a request to the MCP server to list available tools - Schema Retrieval: The server sends back tool definitions with names, descriptions, and input schemas
- Tool Registration: The system registers tools with the
ChatOptionsobject, making them available to the OpenAI client - Type Safety: The
McpClientToolclass inherits fromAIFunction, giving smooth integration with Microsoft.Extensions.AI
The following diagram shows how tool schemas are parsed and registered:

OpenAI integration and function invocation
The chat client configuration demonstrates how MCP tools integrate with Azure OpenAI:
var chatClient = openAIClient.GetChatClient(config["OpenAI:DeploymentName"]).AsIChatClient();

builder.Services.AddChatClient(chatClient)
                .UseFunctionInvocation()
                .UseLogging();
Integration benefits:
- Automatic Function Calling: The
.UseFunctionInvocation()extension turns on automatic tool execution based on LLM decisions - Easy Tool Access: MCP tools work as built-in functions for the OpenAI model
- Response Processing: The system automatically adds tool results to the conversation flow
Real-Time chat implementation
The chat interface in Chat.razor demonstrates streaming responses and tool execution with advanced Blazor patterns:
private async Task AddUserMessageAsync(ChatMessage userMessage)
{
    CancelAnyCurrentResponse();

    // Add the user message to the conversation
    messages.Add(userMessage);
    chatSuggestions?.Clear();
    await chatInput!.FocusAsync();

    // Stream and display a new response from the IChatClient
    var responseText = new TextContent("");
    currentResponseMessage = new ChatMessage(ChatRole.Assistant, [responseText]);
    currentResponseCancellation = new();
    await foreach (var update in ChatClient.GetStreamingResponseAsync([.. messages], chatOptions, currentResponseCancellation.Token))
    {
        messages.AddMessages(update, filter: c => c is not TextContent);
        responseText.Text += update.Text;
        ChatMessageItem.NotifyChanged(currentResponseMessage);
    }

    // Store the final response in the conversation, and begin getting suggestions
    messages.Add(currentResponseMessage!);
    currentResponseMessage = null;
    chatSuggestions?.Update(messages);
}
Streaming implementation features:
- Real-Time Updates:
GetStreamingResponseAsync()sends response updates bit by bit - Tool Execution: The system processes function calls automatically during streaming
- UI Responsiveness:
ChatMessageItem.NotifyChanged()updates the UI in real-time - Cancellation Support: Users can cancel long-running operations
Advanced Blazor UI patterns
The implementation uses advanced UI patterns for real-time updates:
Memory-Safe event handling:
// ChatMessageItem.razor
private static readonly ConditionalWeakTable<ChatMessage, ChatMessageItem> SubscribersLookup = new();

public static void NotifyChanged(ChatMessage source)
{
    if (SubscribersLookup.TryGetValue(source, out var subscriber))
    {
        subscriber.StateHasChanged();
    }
}
Custom web components integration:
// ChatMessageList.razor.js
window.customElements.define('chat-messages', class ChatMessages extends HTMLElement {
    connectedCallback() {
        this._observer = new MutationObserver(mutations => this._scheduleAutoScroll(mutations));
        this._observer.observe(this, { childList: true, attributes: true });
    }

    _scheduleAutoScroll(mutations) {
        // Debounce the calls and handle smart auto-scrolling
        cancelAnimationFrame(this._nextAutoScroll);
        this._nextAutoScroll = requestAnimationFrame(() => {
            const addedUserMessage = mutations.some(m =>
                Array.from(m.addedNodes).some(n =>
                    n.parentElement === this && n.classList?.contains('user-message')));
            // Smart scrolling logic...
        });
    }
});
Advanced state management:
// Chat.razor
private void CancelAnyCurrentResponse()
{
    // If a response was cancelled while streaming, include it in the conversation so it's not lost
    if (currentResponseMessage is not null)
    {
        messages.Add(currentResponseMessage);
    }

    currentResponseCancellation?.Cancel();
    currentResponseMessage = null;
}
Blazor UI benefits:
- Hybrid Web Components: The system combines Blazor Server with custom elements for better performance
- Memory-Safe Event Handling: The system uses ConditionalWeakTable to prevent memory leaks
- Smart Auto-Scrolling: The system provides user-friendly chat behavior with debouncing
- Graceful Cancellation: The system saves partial work when users cancel operations
Request/response flow
Here's how a typical user interaction flows through the system:
- User Input: The user types a message like "Add 'Buy groceries' to my todo list"
- Message Processing: The system adds the message to the conversation history
- LLM Analysis: Azure OpenAI analyzes the request and decides which tools to use
- Tool Discovery: The model finds the right MCP tool (for example,
addTodo) - Tool Execution: The MCP client calls the server with the needed parameters
- Response Processing: The system adds the server response to the conversation
- UI Update: The system shows the result to the user in real-time
The following diagram shows how messages flow from user input through OpenAI to tool execution and back to the user interface:

Async Pattern Management
The application demonstrates sophisticated async patterns for background operations:
// ChatSuggestions.razor
public void Update(IReadOnlyList<ChatMessage> messages)
{
    // Runs in the background and handles its own cancellation/errors
    _ = UpdateSuggestionsAsync(messages);
}

private async Task UpdateSuggestionsAsync(IReadOnlyList<ChatMessage> messages)
{
    cancellation?.Cancel();
    cancellation = new CancellationTokenSource();

    try
    {
        var response = await ChatClient.GetResponseAsync<string[]>(
            [.. ReduceMessages(messages), new(ChatRole.User, Prompt)],
            cancellationToken: cancellation.Token);
        // Handle response...
    }
    catch (Exception ex) when (ex is not OperationCanceledException)
    {
        await DispatchExceptionAsync(ex);
    }
}
Background Task Benefits:
- Fire-and-Forget with Safety: The system uses
_ =pattern with proper exception handling - Smart Context Reduction: The system limits conversation history to prevent token overflow
- Smart Cancellation: The system properly cleans up competing operations
Error handling and resilience
The implementation includes several resilience patterns:
private void CancelAnyCurrentResponse()
{
    // If a response was cancelled while streaming, include it in the conversation so it's not lost
    if (currentResponseMessage is not null)
    {
        messages.Add(currentResponseMessage);
    }

    currentResponseCancellation?.Cancel();
    currentResponseMessage = null;
}
Resilience Features:
- Graceful Cancellation: The system saves in-progress responses when users cancel them
- Connection Recovery: The SSE transport handles connection drops automatically
- State Management: The UI state stays consistent during errors
- Logging Integration: The system provides complete logging for debugging and monitoring
Observability and health checks
The application includes sophisticated observability patterns:
Smart Health Check Configuration:
// Extensions.cs
public static WebApplication MapDefaultEndpoints(this WebApplication app)
{
    if (app.Environment.IsDevelopment())
    {
        // All health checks must pass for app to be considered ready
        app.MapHealthChecks(HealthEndpointPath);

        // Only health checks tagged with "live" must pass for app to be considered alive
        app.MapHealthChecks(AlivenessEndpointPath, new HealthCheckOptions
        {
            Predicate = r => r.Tags.Contains("live")
        });
    }
    return app;
}
OpenTelemetry with intelligent filtering:
// Extensions.cs
.AddAspNetCoreInstrumentation(tracing =>
    // Exclude health check requests from tracing
    tracing.Filter = context =>
        !context.Request.Path.StartsWithSegments(HealthEndpointPath)
        && !context.Request.Path.StartsWithSegments(AlivenessEndpointPath)
)
Observability Benefits:
- Environment-Aware Endpoints: Security-conscious health check exposure
- Liveness vs Readiness: Kubernetes-style health check patterns
- Telemetry Noise Reduction: Filtering out routine health checks from traces
Configuration and environment setup
The application supports multiple environments through configuration:
var openAIClient = Constants.GitHubModelEndpoints.Contains(endpoint.TrimEnd('/'))
                   ? new OpenAIClient(credential, openAIOptions)
                   : new AzureOpenAIClient(new Uri(endpoint), credential);
Configuration Options:
- Azure OpenAI: Production deployments typically use Azure OpenAI Service
- GitHub Models: Development scenarios can use GitHub Models
- Local Development: Support for local MCP server instances
- Container Deployment: Azure Container Apps for production hosting
Clean up resources
After you finish using the MCP agent, clean up the resources you created to avoid incurring unnecessary costs.
To clean up resources, follow these steps:
Delete the Azure resources created by the Azure Developer CLI by running the following command in the terminal at the bottom of the screen:
azd down --purge --force
Clean up GitHub Codespaces
Delete the GitHub Codespaces environment to maximize your free per-core hours.
Important
For more information about your GitHub account's free storage and core hours, see GitHub Codespaces monthly included storage and core hours.
Sign into the GitHub Codespaces dashboard.
Find your active Codespaces created from the
Azure-Samples/openai-mcp-agent-dotnetGitHub repository.Open the context menu for the codespace and select Delete.
Get help
Log your issue to the repository's Issues.