Note
Access to this page requires authorization. You can try signing in or changing directories.
Access to this page requires authorization. You can try changing directories.
By default, Azure Cosmos DB spreads provisioned throughput evenly across all physical partitions. However, if your workload is skewed—such as when certain partitions consistently need more throughput due to hot keys or uneven traffic—you can redistribute throughput to optimize performance. This feature is available for databases and containers using provisioned throughput (manual or autoscale), and can be managed using Azure Cosmos DB PowerShell or Azure CLI commands.
For example, if you partition data by StoreId in a retail application, some stores could have higher activity than others. If you notice frequent rate limiting (429 errors) for those busy stores, redistributing throughput allows you to allocate more resources to the hot partitions, improving performance without increasing overall throughput.
Note
Currently, by default, throughput offer policies are set to "Equal". After redistributing throughput using this feature, the policy will now be set to "Custom" which only lets you change your throughput offer via this API. Changing throughput via Azure Portal will be blocked, but customers can change the policy back to "Equal" (see below) to avoid this.
Prerequisites
- An existing Azure Cosmos DB account
Latest version of Azure CLI
cosmosdb-previewextension installedaz extension add --name cosmosdb-preview
Latest version of Azure PowerShell
Az.CosmosDBmodule with prerelease features enabled$parameters = @{ Name = "Az.CosmosDB" AllowPrerelease = $true Force = $true } Install-Module @parameters
Identify hot partitions using Azure Monitor metrics
To identify hot partitions in Azure Cosmos DB using Azure Monitor metrics, examine the normalized RU consumption for each physical partition to find the partitions with disproportionately high usage.
Sign in to the Azure portal (https://portal.azure.com).
Navigate to the Insights section for the Azure Cosmos DB account in the Azure portal.
Select Throughput.
Open Normalized RU Consumption (%) By PartitionKeyRangeID.
Filter to your specific database and container.
Review the chart for each
PartitionKeyRangeId, which maps to a physical partition.Identify any
PartitionKeyRangeIdthat consistently shows higher normalized RU consumption than others. For example, if one value is always at 100 percent and others are at 30 percent or less, this pattern indicates a hot partition.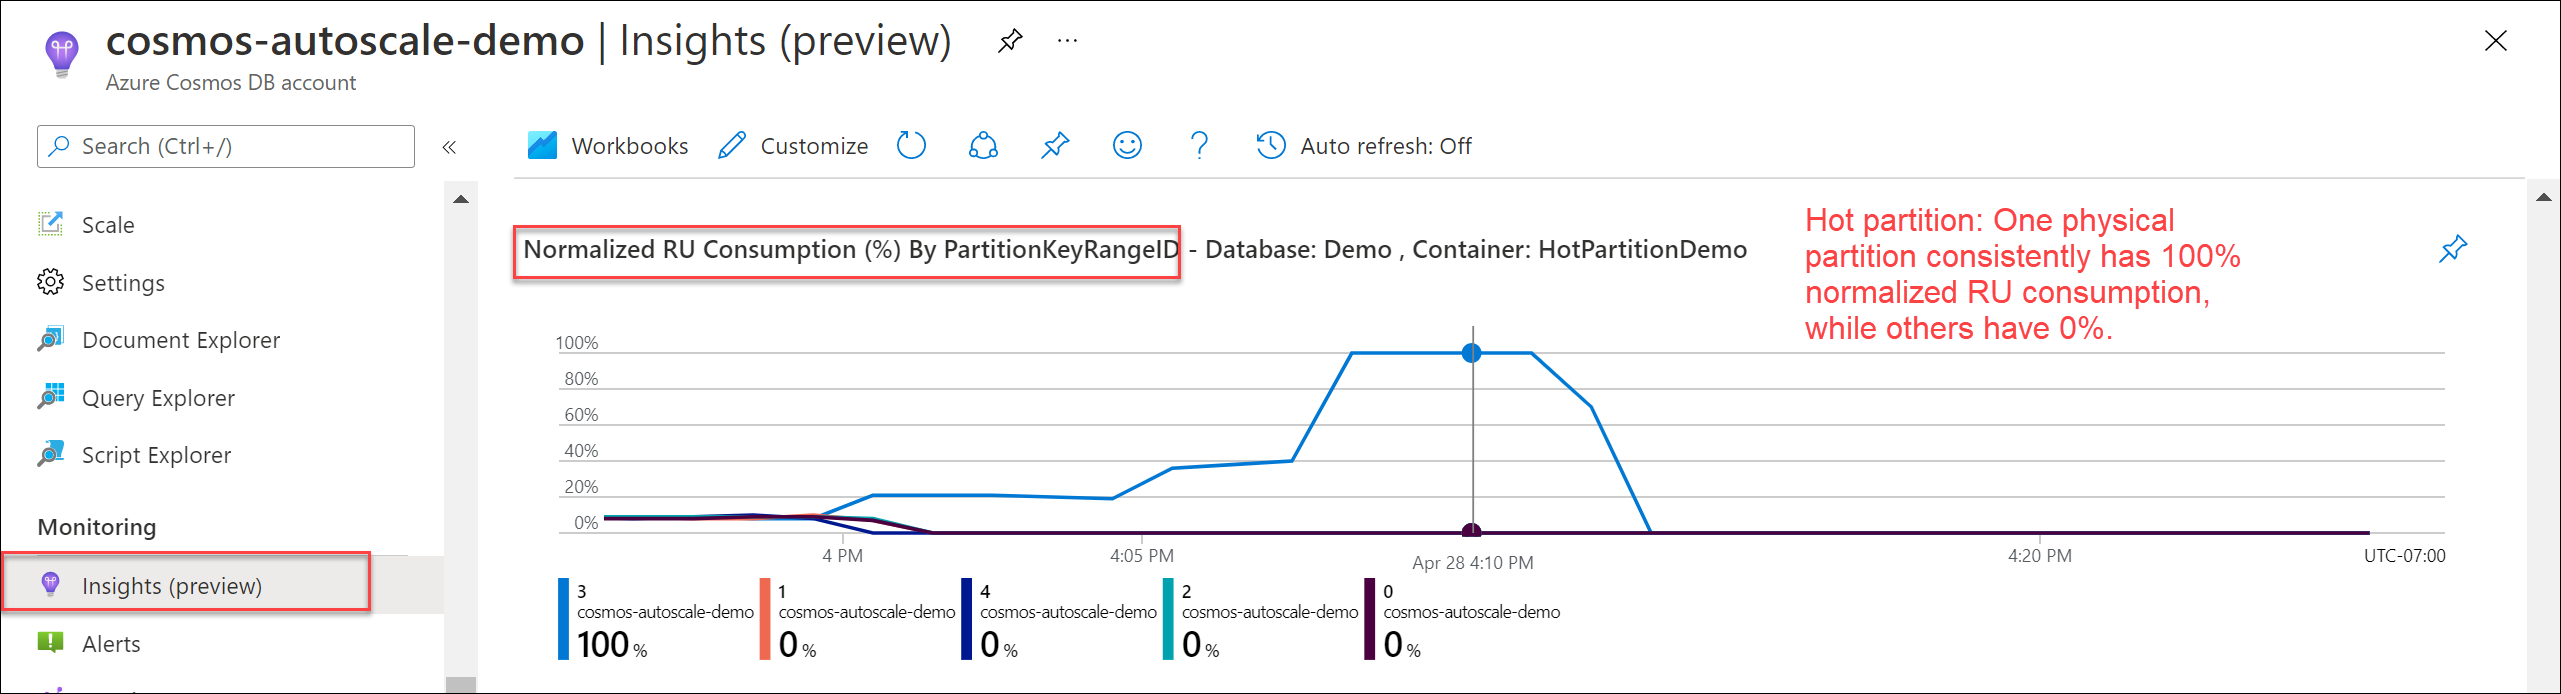
Identify hot partitions using diagnostic logs
Use the information from CDBPartitionKeyRUConsumption in the account's diagnostic logs to learn which logical partition keys and physical partitions consume the most RU/s at a second-level granularity.
Navigate to the Diagnostic Logs section for the Azure Cosmos DB account.
Find the physical partition (
PartitionKeyRangeId) that consumes the most RU/s over time using this query.CDBPartitionKeyRUConsumption | where TimeGenerated >= ago(24hr) | where DatabaseName == "MyDB" and CollectionName == "MyCollection" // Replace with your database and collection name | where isnotempty(PartitionKey) and isnotempty(PartitionKeyRangeId) | summarize sum(RequestCharge) by bin(TimeGenerated, 1s), PartitionKeyRangeId | render timechartFor a physical partition, find the top 10 logical partition keys that consume the most RU/s each hour using this query.
CDBPartitionKeyRUConsumption
| where TimeGenerated >= ago(24hour)
| where DatabaseName == "MyDB" and CollectionName == "MyCollection" // Replace with database and collection name
| where isnotempty(PartitionKey) and isnotempty(PartitionKeyRangeId)
| where PartitionKeyRangeId == 0 // Replace with your PartitionKeyRangeId
| summarize sum(RequestCharge) by bin(TimeGenerated, 1hour), PartitionKey
| order by sum_RequestCharge desc | take 10
Tip
These sample queries use 24 hours for illustration, but it's best to use at least seven days of history to see usage patterns.
Determine current throughput for each physical partition
To check the current RU/s for each physical partition, use the Azure Monitor metric PhysicalPartitionThroughput and split by PhysicalPartitionId. If throughput per partition was never changed, estimate the RU/s per partition by dividing the total RU/s by the number of physical partitions.
Read the current RU/s on each physical partition by using az cosmosdb sql container retrieve-partition-throughput.
// Container with dedicated RU/s - some partitions
az cosmosdb sql container retrieve-partition-throughput \
    --resource-group "<resource-group-name>" \
    --account-name "<cosmos-account-name>" \
    --database-name "<cosmos-database-name>" \
    --name "<cosmos-container-name>" \
    --physical-partition-ids "<space-separated-list-of-physical-partition-ids>"

// Container with dedicated RU/s - all partitions
az cosmosdb sql container retrieve-partition-throughput \
    --resource-group "<resource-group-name>" \
    --account-name "<cosmos-account-name>" \
    --database-name "<cosmos-database-name>" \
    --name "<cosmos-container-name>"
    --all-partitions
Use the Get-AzCosmosDBSqlContainerPerPartitionThroughput or Get-AzCosmosDBSqlDatabasePerPartitionThroughput command to read the current RU/s on each physical partition.
# Container with dedicated RU/s - some partitions
$containerParams = @{
    ResourceGroupName = "<resource-group-name>"
    AccountName = "<cosmos-account-name>"
    DatabaseName = "<cosmos-database-name>"
    Name = "<cosmos-container-name>"
    PhysicalPartitionIds = @("<PartitionId>", "<PartitionId>")
}
$somePartitionsDedicatedRUContainer = Get-AzCosmosDBSqlContainerPerPartitionThroughput @containerParams

# Container with dedicated RU/s - all partitions
$containerAllParams = @{
    ResourceGroupName = "<resource-group-name>"
    AccountName = "<cosmos-account-name>"
    DatabaseName = "<cosmos-database-name>"
    Name = "<cosmos-container-name>"
    AllPartitions = $true
}
$allPartitionsDedicatedRUContainer = Get-AzCosmosDBSqlContainerPerPartitionThroughput @containerAllParams

# Database with shared RU/s - some partitions
$databaseParams = @{
    ResourceGroupName = "<resource-group-name>"
    AccountName = "<cosmos-account-name>"
    DatabaseName = "<cosmos-database-name>"
    PhysicalPartitionIds = @("<PartitionId>", "<PartitionId>")
}
$somePartitionsSharedThroughputDatabase = Get-AzCosmosDBSqlDatabasePerPartitionThroughput @databaseParams

# Database with shared RU/s - all partitions
$databaseAllParams = @{
    ResourceGroupName = "<resource-group-name>"
    AccountName = "<cosmos-account-name>"
    DatabaseName = "<cosmos-database-name>"
    AllPartitions = $true
}
$allPartitionsSharedThroughputDatabase = Get-AzCosmosDBSqlDatabasePerPartitionThroughput @databaseAllParams
Note
For more information on finding the number of partitions, see best practices for scaling provisioned throughput (RU/s).
Calculate throughput for target partition
Next, let's decide how many RU/s to give to the hottest physical partition. Call this set the target partition.
Keep in mind the following points before setting throughput on your target partitions:
You can either decrease or increase the throughput on the partition.
Physical partitions can only contain up to 10,000 RU/s.
Users can set throughput of a target partition to a maximum value of 20,000 RU/s.
- Setting the partition to a throughput value greater than 10,000 RU/s results in the partition splitting, which could take some time.
If you set a partition's RU/s above 10,000, it first receives 10,000 RU/s. Then, Azure Cosmos DB automatically splits the partition and evenly distributes the specified throughput across the new partitions.
- If a physical partition is using 5,000 RU/s and you set its throughput to 15,000 RU/s, Azure Cosmos DB first assigns 10,000 RU/s to the original partition. Then, it automatically splits the partition into two, each with up to 7,500 RU/s.
If the final sum of throughput across all partitions isn't equal to the current total offer throughput, then this operation updates the offer throughput accordingly.
The right approach depends on your workload requirements. General approaches include:
Increase the RU/s by a percentage, measure the rate of 429 responses, and repeat until you reach the desired throughput.
If you aren't sure about the right percentage, start with 10% to be conservative.
If you know this physical partition needs most of the throughput, start by adjusting the RU/s. Double the RU/s or increase them to the maximum of 10,000 RU/s, whichever is lower.
Increase the RU/s to
Total consumed RU/s of the physical partition + (Number of 429 responses per second * Average RU charge per request to the partition).- This approach estimates what the "real" RU/s consumption would be if the requests weren't rate limited.
Programatically change the throughput across partitions
You can use the PowerShell command Update-AzCosmosDBSqlContainerPerPartitionThroughput to redistribute throughput. Let's look at an example with a container that has 6,000 RU/s total (either 6,000 manual RU/s or autoscale 6,000 RU/s) and three physical partitions. In this example, we want the following throughput distribution:
| Physical Partition | RU/s Assigned |
|---|---|
| 0 | 2,000 |
| 1 | 4,000 |
| 2 | 1,000 |
After the redistribution, the total offer throughput will be updated from 6,000 RU/s to 7,000 RU/s.
Update the RU/s on each physical partition by using az cosmosdb sql container redistribute-partition-throughput.
az cosmosdb sql container redistribute-partition-throughput \
    --resource-group "<resource-group-name>" \
    --account-name "<cosmos-account-name>" \
    --database-name "<cosmos-database-name>" \
    --name "<cosmos-container-name>" \
    --target-partition-info "<PartitionId3=Throughput PartitionId4=Throughput...>"
Use the Update-AzCosmosDBSqlContainerPerPartitionThroughput for containers with dedicated RU/s or the Update-AzCosmosDBSqlDatabasePerPartitionThroughput command for databases with shared RU/s to redistribute throughput across physical partitions. In shared throughput databases, a GUID string represents the unique identifiers of the physical partitions.
$TargetPhysicalPartitionObjects =  @()
$TargetPhysicalPartitionObjects += New-AzCosmosDBPhysicalPartitionThroughputObject -Id "0" -Throughput 2000
$TargetPhysicalPartitionObjects += New-AzCosmosDBPhysicalPartitionThroughputObject -Id "1" -Throughput 4000
$TargetPhysicalPartitionObjects += New-AzCosmosDBPhysicalPartitionThroughputObject -Id "2" -Throughput 1000

# Container with dedicated RU/s
$containerParams = @{
    ResourceGroupName = "<resource-group-name>"
    AccountName = "<cosmos-account-name>"
    DatabaseName = "<cosmos-database-name>"
    Name = "<cosmos-container-name>"
    TargetPhysicalPartitionThroughputObject = $TargetPhysicalPartitionObjects
}
Update-AzCosmosDBSqlContainerPerPartitionThroughput @containerParams
Check throughput after redistribution
After you finish redistributing throughput, check the PhysicalPartitionThroughput metric in Azure Monitor. Split by the PhysicalPartitionId dimension to see how many RU/s each physical partition has. If needed, reset the RU/s per physical partition to evenly distribute throughput across all physical partitions.
Important
After throughput has been redistributed, offers can only be changed with the same redistribute command. To evenly distribute throughput across all partitions, use the command below.
Update the RU/s on each physical partition by using az cosmosdb sql container redistribute-partition-throughput with the parameter --evenly-distribute.
az cosmosdb sql container redistribute-partition-throughput \
    --resource-group "<resource-group-name>" \
    --account-name "<cosmos-account-name>" \
    --database-name "<cosmos-database-name>" \
    --name "<cosmos-container-name>" \
    --evenly-distribute
Use the Update-AzCosmosDBSqlContainerPerPartitionThroughput command for containers with dedicated RU/s or the Update-AzCosmosDBSqlDatabasePerPartitionThroughput command for databases with shared RU/s with parameter -EqualDistributionPolicy to distribute RU/s evenly across all physical partitions.
# Container with dedicated RU/s
$containerParams = @{
    ResourceGroupName = "<resource-group-name>"
    AccountName = "<cosmos-account-name>"
    DatabaseName = "<cosmos-database-name>"
    Name = "<cosmos-container-name>"
    EqualDistributionPolicy = $true
}
$resetPartitionsDedicatedRUContainer = Update-AzCosmosDBSqlContainerPerPartitionThroughput @containerParams

# Database with dedicated RU/s
$databaseParams = @{
    ResourceGroupName = "<resource-group-name>"
    AccountName = "<cosmos-account-name>"
    DatabaseName = "<cosmos-database-name>"
    EqualDistributionPolicy = $true
}
$resetPartitionsSharedThroughputDatabase = Update-AzCosmosDBSqlDatabasePerPartitionThroughput @databaseParams
Verify and monitor throughput consumption
After you finish redistributing throughput, verify and monitor your RU/s consumption to ensure optimal performance. Follow these steps:
Navigate to the Metrics section of your Azure Cosmos DB account in the Azure portal.
Check the PhysicalPartitionThroughput metric in Azure Monitor. Split by the PhysicalPartitionId dimension to view RU/s assigned to each physical partition.
Monitor your overall rate of 429 responses and RU/s consumption.
Review the Normalized RU consumption for each partition.
Note
Higher normalized RU consumption is expected after redistribution, as RU/s are allocated closer to each partition's needs. For more information, see normalized RU consumption.
Confirm that the overall rate of 429 exceptions is decreased. Hot partitions should now have more RU/s, reducing rate limiting and improving performance.
Limitations
While this feature is in previe, your Azure Cosmos DB account must meet all the following criteria:
Your Azure Cosmos DB account uses API for NoSQL or API for MongoDB.
- If you're using API for MongoDB, the version must be greater than or equal to 3.6.
Your Azure Cosmos DB account uses provisioned throughput (manual or autoscale). Distribution of throughput across partitions doesn't apply to serverless accounts.