Note
Access to this page requires authorization. You can try signing in or changing directories.
Access to this page requires authorization. You can try changing directories.
In this quickstart, you deploy a basic Azure Cosmos DB for MongoDB application using Node.js. Azure Cosmos DB for MongoDB vCore is a schemaless data store allowing applications to store unstructured documents in the cloud with MongoDB libraries. You learn how to create documents and perform basic tasks within your Azure Cosmos DB resource using Node.js.
Library source code | Package (npm) | Azure Developer CLI
Prerequisites
Azure Developer CLI
Docker Desktop
An Azure subscription
- If you don't have an Azure subscription, create a free account before you begin.
- Node.js 22 or newer
Initialize the project
Use the Azure Developer CLI (azd) to create an Azure Cosmos DB for MongoDB vCore cluster and deploy a containerized sample application. The sample application uses the client library to manage, create, read, and query sample data.
Open a terminal in an empty directory.
If you're not already authenticated, authenticate to the Azure Developer CLI using
azd auth login. Follow the steps specified by the tool to authenticate to the CLI using your preferred Azure credentials.azd auth loginUse
azd initto initialize the project.azd init --template cosmos-db-mongodb-vcore-nodejs-quickstartDuring initialization, configure a unique environment name.
Deploy the cluster using
azd up. The Bicep templates also deploy a sample web application.azd upDuring the provisioning process, select your subscription, desired location, and target resource group. Wait for the provisioning process to complete. The process can take approximately ten minutes.
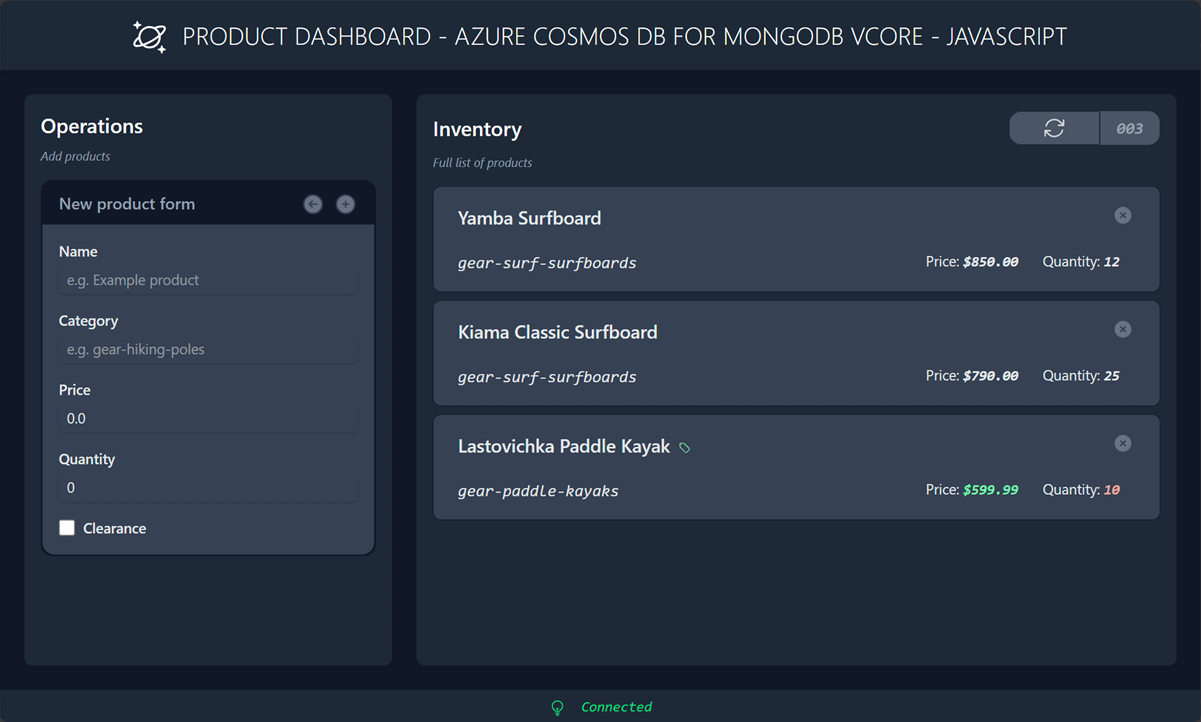
Once the provisioning of your Azure resources is done, a URL to the running web application is included in the output.
Deploying services (azd deploy)

  (✓) Done: Deploying service web
- Endpoint: <https://[container-app-sub-domain].azurecontainerapps.io>

SUCCESS: Your application was provisioned and deployed to Azure in 5 minutes 0 seconds.
Use the URL in the console to navigate to your web application in the browser. Observe the output of the running app.

Install the client library
The client library is available through npm, as the mongodb package.
Open a terminal and navigate to the
/src/tsfolder.cd ./src/tsIf not already installed, install the
mongodbpackage usingnpm install.npm install --save mongodbIf not already installed, install the
@azure/identitypackage usingnpm install.npm install --save @azure/identityOpen and review the src/ts/package.json file to validate that both package entries exist.
Open a terminal and navigate to the
/src/jsfolder.cd ./src/jsIf not already installed, install the
mongodbpackage usingnpm install.npm install --save mongodbIf not already installed, install the
@azure/identitypackage usingnpm install.npm install --save @azure/identityOpen and review the src/js/package.json file to validate that both package entries exist.
Import libraries
Import the following namespaces into your application code:
| Package | Source | |
|---|---|---|
TokenCredential |
@azure/identity |
Azure SDK for JavaScript |
DefaultAzureCredential |
@azure/identity |
Azure SDK for JavaScript |
MongoClient |
mongodb |
Official MongoDB driver for Node.js |
import { DefaultAzureCredential, TokenCredential } from '@azure/identity';

import { MongoClient } from 'mongodb';
Import all required types into your application code including, but not limited to:
| Package | Source | |
|---|---|---|
TokenCredential |
@azure/identity |
Azure SDK for JavaScript |
DefaultAzureCredential |
@azure/identity |
Azure SDK for JavaScript |
MongoClient |
mongodb |
Official MongoDB driver for Node.js |
import { AccessToken, DefaultAzureCredential, TokenCredential } from '@azure/identity';

import { Collection, Db, Filter, FindCursor, MongoClient, OIDCCallbackParams, OIDCResponse, UpdateFilter, UpdateOptions, UpdateResult, WithId } from 'mongodb';
Object model
| Name | Description |
|---|---|
| MongoClient | Type used to connect to MongoDB. |
Database |
Represents a database in the cluster. |
Collection |
Represents a collection within a database in the cluster. |
Code examples
- Authenticate the client
- Get a database
- Get a collection
- Create a document
- Get a document
- Query documents
The sample code in the template uses a database named cosmicworks and collection named products. The products collection contains details such as name, category, quantity, and a unique identifier for each product. The collection uses the /category property as a shard key.
Authenticate the client
While Microsoft Entra authentication for Azure Cosmos DB for MongoDB vCore can use well known TokenCredential types, you must implement a custom token handler. This sample implementation can be used to create a MongoClient with support for standard Microsoft Entra authentication of many identity types.
First, define a callback named
AzureIdentityTokenCallbackthat takes inOIDCCallbackParamsandTokenCredentialand then asynchronously returns aOIDCResponse.const AzureIdentityTokenCallback = async (params: OIDCCallbackParams, credential: TokenCredential): Promise<OIDCResponse> => { const tokenResponse: AccessToken | null = await credential.getToken(['https://ossrdbms-aad.database.windows.net/.default']); return { accessToken: tokenResponse?.token || '', expiresInSeconds: (tokenResponse?.expiresOnTimestamp || 0) - Math.floor(Date.now() / 1000) }; };Define variables for your cluster name and token credential.
const clusterName: string = '<azure-cosmos-db-mongodb-vcore-cluster-name>';

const credential: TokenCredential = new DefaultAzureCredential();
Build an instance of
MongoClientusing your cluster name, and the known best practice configuration options for Azure Cosmos DB for MongoDB vCore. Also, configure your custom authentication mechanism.const client = new MongoClient( `mongodb+srv://${clusterName}.global.mongocluster.cosmos.azure.com/`, { connectTimeoutMS: 120000, tls: true, retryWrites: true, authMechanism: 'MONGODB-OIDC', authMechanismProperties: { OIDC_CALLBACK: (params: OIDCCallbackParams) => AzureIdentityTokenCallback(params, credential), ALLOWED_HOSTS: ['*.azure.com'] } } );
First, define a callback named
azureIdentityTokenCallbackthat takes in parameters and a token credential and then asynchronously returns a response.const azureIdentityTokenCallback = async (_, credential) => { const tokenResponse = await credential.getToken(['https://ossrdbms-aad.database.windows.net/.default']); if (!tokenResponse || !tokenResponse.token) { throw new Error('Failed to retrieve a valid access token.'); } return { accessToken: tokenResponse.token, expiresInSeconds: Math.floor((tokenResponse.expiresOnTimestamp - Date.now()) / 1000), }; };Define variables for your cluster name and token credential.
const clusterName = '<azure-cosmos-db-mongodb-vcore-cluster-name>';

const credential = new DefaultAzureCredential();
Build an instance of
MongoClientusing your cluster name, and the known best practice configuration options for Azure Cosmos DB for MongoDB vCore. Also, configure your custom authentication mechanism.client = new MongoClient(`mongodb+srv://${clusterName}.global.mongocluster.cosmos.azure.com/`, { connectTimeoutMS: 120000, tls: true, retryWrites: true, authMechanism: 'MONGODB-OIDC', authMechanismProperties: { OIDC_CALLBACK: (params) => azureIdentityTokenCallback(params, credential), ALLOWED_HOSTS: ['*.azure.com'] } }); await client.connect();
Get a database
This sample creates an instance of the Db type using the db function of the MongoClient type.
const database: Db = client.db("<database-name>");
const database = client.db("<database-name>");
Get a collection
This sample creates an instance of the Collection type using the collection function of the Db type.
This function has a generic parameter that uses the Product type defined in an interface.
const collection: Collection<Product> = database.collection<Product>("<collection-name>");
export interface Product {
    _id: string;
    category: string;
    name: string;
    quantity: number;
    price: number;
    clearance: boolean;
}
const collection = database.collection("<collection-name>");
Create a document
Create a document in the collection using collection.updateOne. This method "upserts" the item effectively replacing the item if it already exists.
var document: Product = {
    _id: 'aaaaaaaa-0000-1111-2222-bbbbbbbbbbbb',
    category: 'gear-surf-surfboards',
    name: 'Yamba Surfboard',
    quantity: 12,
    price: 850.00,
    clearance: false
};

var query: Filter<Product> = {
    _id: 'aaaaaaaa-0000-1111-2222-bbbbbbbbbbbb',
    category: 'gear-surf-surfboards'
};
var payload: UpdateFilter<Product> = {
    $set: document
};
var options: UpdateOptions = {
    upsert: true
};
var response: UpdateResult<Product> = await collection.updateOne(query, payload, options);
var document = {
    _id: 'aaaaaaaa-0000-1111-2222-bbbbbbbbbbbb',
    category: 'gear-surf-surfboards',
    name: 'Yamba Surfboard',
    quantity: 12,
    price: 850.00,
    clearance: false
};

const query = {
    _id: 'aaaaaaaa-0000-1111-2222-bbbbbbbbbbbb',
    category: 'gear-surf-surfboards'
};
const payload = {
    $set: document
};
const options = {
    upsert: true,
    new: true
};
var response = await collection.updateOne(query, payload, options);
Read a document
Perform a point read operation by using both the unique identifier (id) and shard key fields. Use collection.findOne to efficiently retrieve the specific item.
var query: Filter<Product> = {
    _id: 'aaaaaaaa-0000-1111-2222-bbbbbbbbbbbb',
    category: 'gear-surf-surfboards'
};

var response: WithId<Product> | null = await collection.findOne(query);
var query = {
    _id: 'aaaaaaaa-0000-1111-2222-bbbbbbbbbbbb',
    category: 'gear-surf-surfboards'
};

var response = await collection.findOne(query);
Query documents
Perform a query over multiple items in a container using collection.find. This query finds all items within a specified category (shard key).
var query: Filter<Product> = {
    category: 'gear-surf-surfboards'
};

var response: FindCursor<WithId<Product>> = collection.find(query);
for await (const item of response) {
    // Do something with each item
}
var query = {
    category: 'gear-surf-surfboards'
};

var response = collection.find(query);
for await (const item of response) {
    // Do something with each item
}
Delete a document
Delete a document by sending a filter for the unique identifier of the document. Use collection.deleteOne<> to asynchronously remove the document from the collection.
var filter: Filter<Product> = {
    _id: 'aaaaaaaa-0000-1111-2222-bbbbbbbbbbbb'
};

await collection.deleteOne(filter);
const filter = {
    _id: 'aaaaaaaa-0000-1111-2222-bbbbbbbbbbbb'
};

await collection.deleteOne(filter);
Explore your data
Use the Visual Studio Code extension for Azure Cosmos DB to explore your MongoDB vCore data. You can perform core database operations including, but not limited to:
- Performing queries using a scrapbook or the query editor
- Modifying, updating, creating, and deleting documents
- Importing bulk data from other sources
- Managing databases and collections
For more information, see How-to use Visual Studio Code extension to explore Azure Cosmos DB for MongoDB vCore data.
Clean up resources
When you no longer need the sample application or resources, remove the corresponding deployment and all resources.
azd down --force