Note
Access to this page requires authorization. You can try signing in or changing directories.
Access to this page requires authorization. You can try changing directories.
In this article, you learn how to configure Microsoft Entra ID authentication for an Azure Cosmos DB for MongoDB vCore. The steps in this guide configure an existing Azure Cosmos DB for MongoDB vCore cluster to use Microsoft Entra ID authentication with your human identity (currently signed-in account) or a Microsoft Entra ID security principal such as managed identity. Microsoft Entra ID authentication enables secure and seamless access to your database by using your organization's existing identities. This guide goes through the steps to set up authentication, register users or service principals, and validate the configuration.
When you create an Azure Cosmos DB for MongoDB vCore cluster, cluster is configured to use native authentication by default. To enable authentication using Entra ID, turn on the Entra ID authentication method and add Entra ID users to the cluster.
Prerequisites
- An existing Azure Cosmos DB for MongoDB (vCore) cluster.
- If you don't have an Azure subscription, create an account for free.
- If you have an existing Azure subscription, create a new Azure Cosmos DB for MongoDB vCore cluster.
The latest version of the Azure CLI in Azure Cloud Shell.
- If you prefer to run CLI reference commands locally, sign in to the Azure CLI by using the
az logincommand.
- If you prefer to run CLI reference commands locally, sign in to the Azure CLI by using the
Get identity metadata
Get unique identifier for Entra ID user management
First, get the unique identifier used to manage Entra ID principals on the cluster.
Get the details for the currently logged-in account using
az ad signed-in-user.az ad signed-in-user showGet the details for another account using
az ad user show.az ad user show --id kai@adventure-works.comThe command outputs a JSON response containing various fields.
{
  "@odata.context": "<https://graph.microsoft.com/v1.0/$metadata#users/$entity>",
  "businessPhones": [],
  "displayName": "Kai Carter",
  "givenName": "Kai",
  "id": "aaaaaaaa-0000-1111-2222-bbbbbbbbbbbb",
  "jobTitle": "Senior Sales Representative",
  "mail": "<kai@adventure-works.com>",
  "mobilePhone": null,
  "officeLocation": "Redmond",
  "preferredLanguage": null,
  "surname": "Carter",
  "userPrincipalName": "<kai@adventure-works.com>"
}
Record the value of the
idproperty. This property is the unique identifier for your principal and is sometimes referred to as the principal ID. You use this value in the next series of steps.
Get friendly name using unique identifier
When you need to get a friendly name using unique identifier, follow these steps.
Get the details for another account using
az ad user show.az ad user show --id aaaaaaaa-0000-1111-2222-bbbbbbbbbbbbThe command outputs a JSON response containing various fields.
{
  "@odata.context": "<https://graph.microsoft.com/v1.0/$metadata#users/$entity>",
  "businessPhones": [],
  "displayName": "Kai Carter",
  "givenName": "Kai",
  "id": "aaaaaaaa-0000-1111-2222-bbbbbbbbbbbb",
  "jobTitle": "Senior Sales Representative",
  "mail": "<kai@adventure-works.com>",
  "mobilePhone": null,
  "officeLocation": "Redmond",
  "preferredLanguage": null,
  "surname": "Carter",
  "userPrincipalName": "<kai@adventure-works.com>"
}
Note the value of the
mailanddisplayNameproperties.
Get unique identifier for an Entra ID service principal
To use a managed identity in your application or to log in using Entra ID credentials in tools like the MongoDB shell or Compass, you need to retrieve the principalID and the clientID of the managed identity.
Get the details for the managed identity using a
GETREST API call. Replace variables that start with$sign with the actual values.az rest --method "GET" --url "https://management.azure.com/subscriptions/$subscription-id/resourcegroups/$resource-group-name/providers/microsoft.managedidentity/userassignedidentities/$managed-identity-name?api-version=2024-11-30"The command outputs a JSON response containing various fields.
{
  "location": "eastus",
  "name": "managed-identity-name",
  "properties": {
    "clientId": "aaaaaaaa-0000-1111-2222-bbbbbbbbbbbb",
    "isolationScope": "None",
    "principalId": "cccccccc-0000-1111-2222-bbbbbbbbbbbb",
    "tenantId": "dddddddd-0000-1111-2222-bbbbbbbbbbbb"
  },
  "tags": {},
  "type": "Microsoft.ManagedIdentity/userAssignedIdentities"
}
Note the
clientIDandprincipalIdvalues in the output.- Use
principalIdto add the managed identity to your cluster as an Entra ID entity. - Use
clientIDto connect to the cluster via MongoDB Shell or Compass or in your application code using Entra ID authentication.
- Use
Manage cluster authentication methods
Use the following steps to change authentication methods on your existing cluster. Then, add an Entra ID user mapped to your signed-in identity to the cluster. You can have the following authentication methods enabled on your cluster:
- Native DocumentDB authentication method only
- Native DocumentDB and Microsoft Entra ID authentication methods
- Microsoft Entra ID authentication method
Important
When cluster is created, you have to have native DocumentDB authentication method enabled and specify native administrative user credentials. You can disable native DocumentDB authentication method once new cluster finishes provisioning.
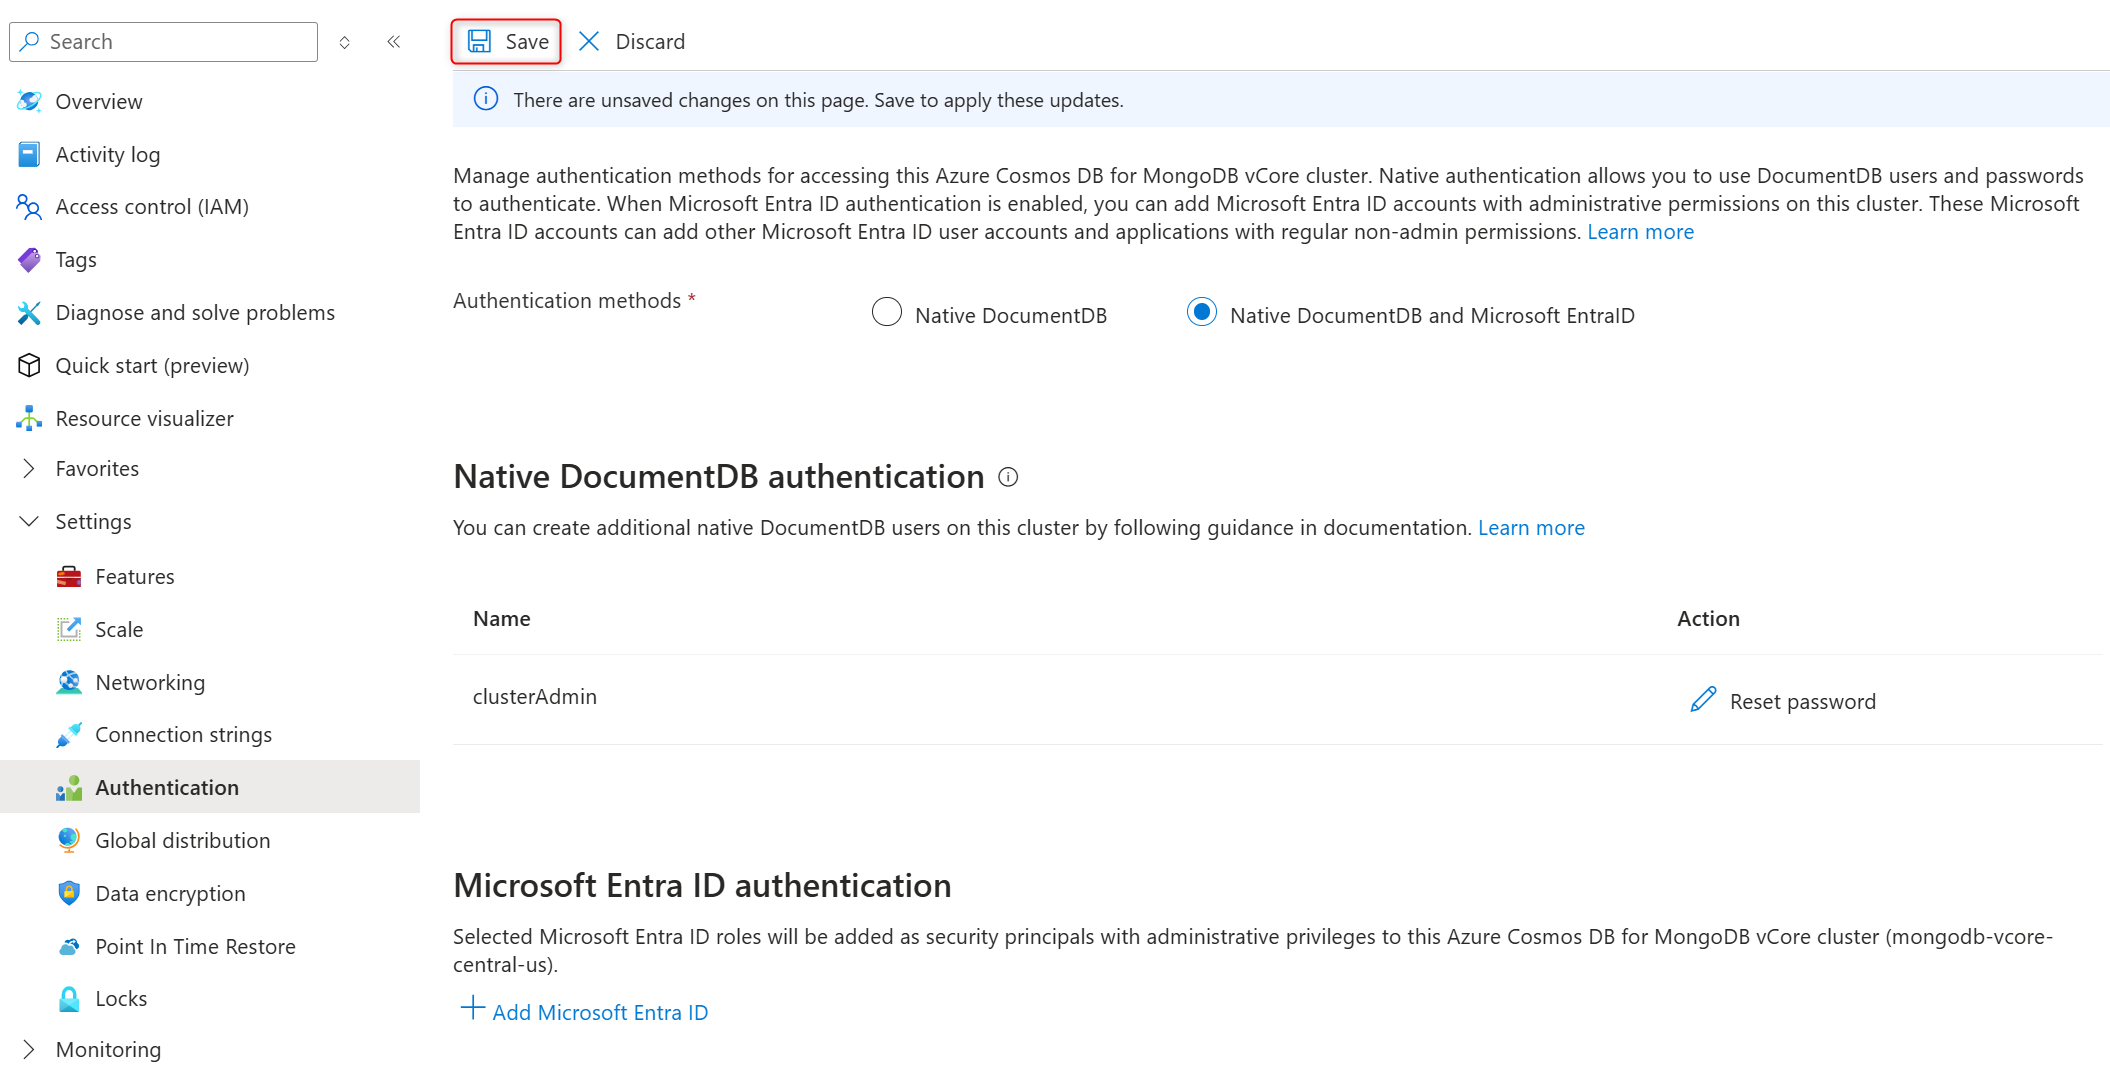
On the cluster sidebar, under Settings, select Authentication.
In Authentication methods section, select Native DocumentDB and Microsoft Entra ID to enable Microsoft Entra ID authentication.

Select Save to confirm the authentication method changes.


Note
If you need to disable native DocumentDB authentication method on your cluster, use Azure CLI or REST API calls.
View authentication methods enabled on the cluster
Follow these steps to see authentication methods currently enabled on the cluster.
On the cluster sidebar, under Settings, select Authentication.
In the Authentication methods section, check authentication methods currently enabled on the cluster.


Manage administrative Entra ID users on the cluster
Follow these steps to add administrative Entra ID users to cluster or remove administrative Entra ID users from it.
Select a cluster with Microsoft Entra ID authentication method enabled.
On the cluster sidebar, under Settings, select Authentication.
To add administrative Entra ID users:
In the Microsoft Entra ID authentication section, select +Add Microsoft Entra ID to open the side panel that allows to add Entra ID users and security principals to the cluster.

In the Select Microsoft Entra ID roles side panel, select one or more Entra ID users and confirm your choice by selecting Select.

Note
When administrative Microsoft Entra ID users are added to the cluster, their identifiers in
aaaaaaaa-0000-1111-2222-bbbbbbbbbbbbformat not human readable names such askai@adventure-works.comare added to the cluster.Select Save to confirm the authentication method changes.
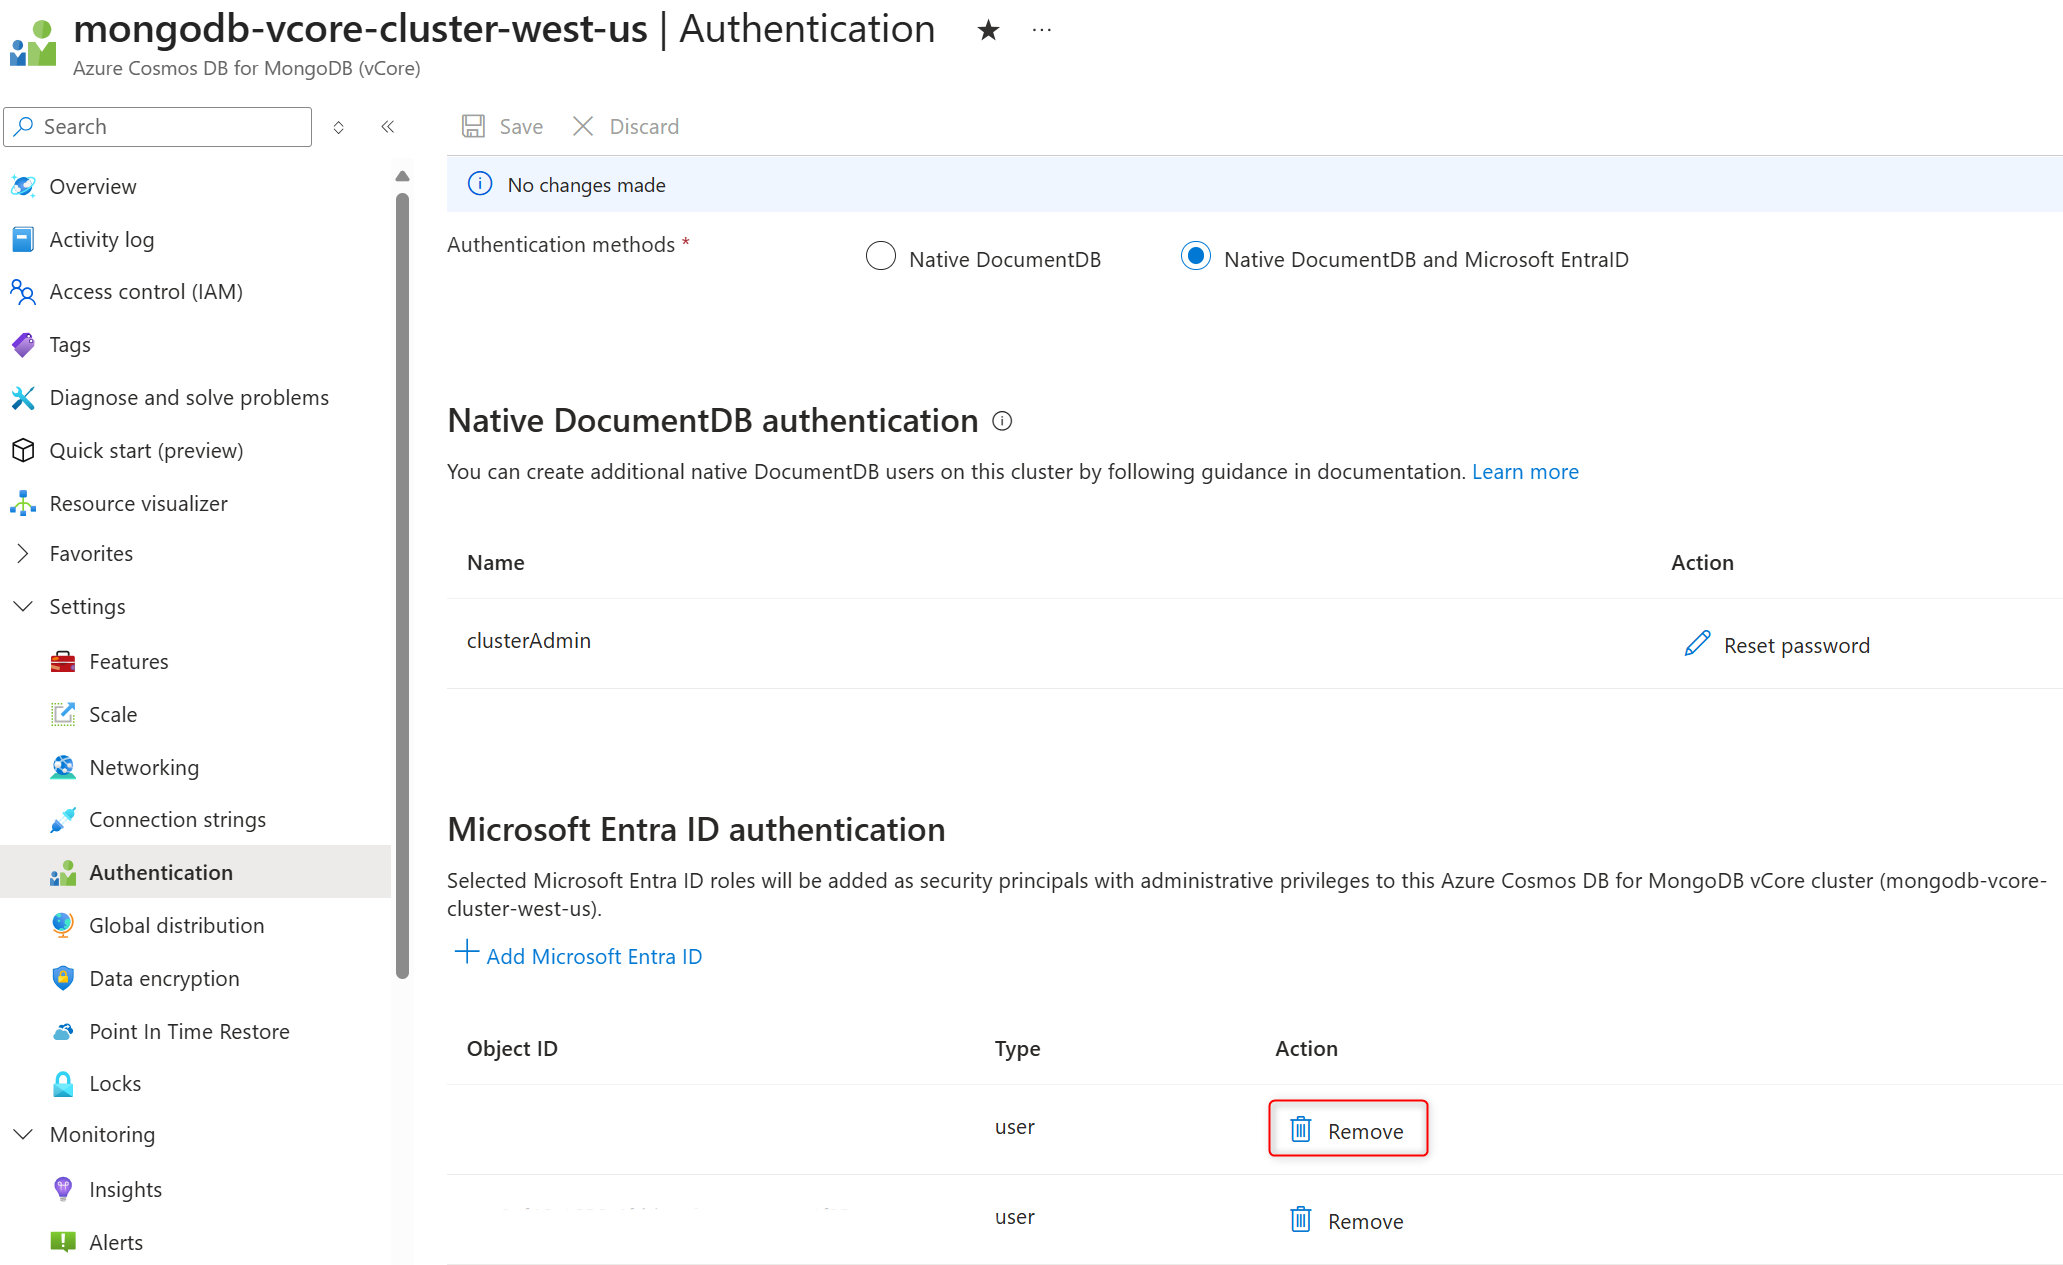
To remove administrative Entra ID users from the cluster:
Get Entra ID identifiers for the users to be removed from the cluster.
In the Microsoft Entra ID authentication section, select Remove next to the user's identifier to remove that user from the cluster.
Important
User is removed from the cluster right after Remove is selected.


View administrative Entra ID users on the cluster
When you view administrative users on a cluster, there's always one native built-in administrative user created during cluster provisioning and all administrative Entra ID users added to the cluster listed. All administrative Entra ID users are replicated to the database.
Non-administrative Entra ID users are created in the database. When you list non-administrative users in the database, the list contains all administrative and non-administrative Entra ID users and all secondary (non-administrative) native DocumentDB users.
Follow these steps to see all administrative Entra ID users added to cluster.
Select a cluster with Microsoft Entra ID authentication method enabled.
On the cluster sidebar, under Settings, select Authentication.
In the Microsoft Entra ID authentication section, find the list of object IDs (unique identifiers) for the administrative Entra ID users added to the cluster.

To get friendly names using a unique identifier, follow these steps.

Note
An Azure Cosmos DB for MongoDB vCore cluster is created with one built-in native DocumentDB user. You can add more native DocumentDB users after cluster provisioning is completed. Microsoft Entra ID users added to the cluster are going to be in addition to native DocumentDB users defined on the same cluster.
Manage non-administrative Entra ID users on the cluster
To perform management operations for non-administrative Entra ID security principals such as users, you need to log in to the cluster with an administrative Entra ID user. You can do it from your application code or from the tools like MongoDB shell and Compass.
All management commands for non-administrative users are supported for SecurityPrincipal and user principal types.
Log in to the cluster using an administrative Entra ID user in MongoDB shell or MongoDB Compass.
To add a non-administrative Entra ID user with read-write permissions on the cluster, use the following
createUsercommand:db.runCommand( { createUser:"user's-Entra-ID-identifier", roles : [ { role:"clusterAdmin",db:"admin" }, { role:"readWriteAnyDatabase", db:"admin" } ], customData:{"IdentityProvider":{"type":"MicrosoftEntraID", "properties":{"principalType":"user"}}} } )To add a non-administrative Entra ID user with read-only permissions on the cluster, use the following
createUsercommand:db.runCommand( { createUser:"user's-Entra-ID-identifier", roles : [ { role:"readAnyDatabase", db:"admin" } ], customData:{"IdentityProvider":{"type":"MicrosoftEntraID", "properties":{"principalType":"user"}}} } )To remove a non-administrative Entra ID user from the cluster, use
dropUsercommand:db.runCommand( { dropUser:"user's-Entra-ID-identifier" } )To list all Entra ID and native DocumentDB users on the cluster, use
userInfocommand:db.runCommand( { usersInfo:1 } )Note
All Entra ID and native DocumentDB administrative users are replicated to the database. Because of this replication, the list of users include all administrative and non-administrative Entra ID and native DocumentDB users on the cluster.
Connect to the cluster
You can connect to the cluster using either a connection URI or a custom settings object from the driver for your preferred language. In either option, the scheme must be set to mongodb+srv to connect to the cluster. The host is at either the *.global.mongocluster.cosmos.azure.com or *.mongocluster.cosmos.azure.com domain depending on whether you're using the current cluster or global read-write endpoint. The +srv scheme and the *.global.* host ensures that your client is dynamically connected to the appropriate writable cluster in a multi-cluster configuration even if a region swap operation occurs. In a single-cluster configuration, you can use either connection string indiscriminately.
The tls setting must also be enabled. The remaining recommended settings are best practice configuration settings.
| Option | Value |
|---|---|
| scheme | mongodb+srv |
| host | <cluster-name>.global.mongocluster.cosmos.azure.com or <cluster-name>.mongocluster.cosmos.azure.com |
tls |
true |
authMechanism |
MONGODB-OIDC |
retrywrites |
false |
maxIdleTimeMS |
120000 |
On the cluster properties page in the Azure portal, under Settings, open Connection strings. The Connection strings page contains connection strings for the authentication methods enabled on the cluster. Microsoft Entra ID connection strings are in the Microsoft Entra ID section.
Global
mongodb+srv://<cluster-name>.global.mongocluster.cosmos.azure.com/?tls=true&authMechanism=MONGODB-OIDC&retrywrites=false&maxIdleTimeMS=120000Cluster
mongodb+srv://<cluster-name>.mongocluster.cosmos.azure.com/?tls=true&authMechanism=MONGODB-OIDC&retrywrites=false&maxIdleTimeMS=120000
Use Entra ID with Visual Studio Code, MongoDB shell, and MongoDB Compass
You can use Entra ID authentication in various tools including Visual Studio Code with DocumentDB extension, MongoDB shell, and MongoDB Compass tools. In Visual Studio Code, you can authenticate to your cluster using the current user logged in to Visual Studio Code.
An Azure managed identity is used to login using Entra ID to MonogDB shell and Compass. Assign managed identity to an Azure virtual machine (VM) and log in to the cluster from that VM using MongoDB shell or Compass. One of the common tasks performed in the tools with Entra ID authentication is management of the secondary Entra ID users on the cluster. Administrative Entra ID user needs to be authenticated in MongoDB shell, Compass, or other MongoDB management tool in order to manage secondary Entra ID users on the cluster.
Connect to the cluster using Entra ID in Visual Studio Code
To connect to an Azure Cosmos DB for MongoDB vCore cluster using Visual Studio Code with DocumentDB extension and Entra ID authentication, follow this guidance.
Note
When you authenticate to an Azure Cosmos DB for MongoDB vCore cluster using Entra ID in Visual Studio Code with DocumentDB extension, shell functionality isn't supported. If you need to use MongoDB shell with Entra ID authentication, follow these steps.
Connect to the cluster using Entra ID in MongoDB shell
Create a user-assigned managed identity.
Add managed identity to the cluster as an Entra ID user using the managed identity metadata.
To connect to the cluster, use the following connection string in MongoDB shell on the VM:
mongosh "mongodb+srv://<client-id>@<cluster-name>.global.mongocluster.cosmos.azure.com/?tls=true&authMechanism=MONGODB-OIDC&authMechanismProperties=ENVIRONMENT:azure,TOKEN_RESOURCE:https://ossrdbms-aad.database.windows.net" --oidcTrustedEndpointwhere
clientIDis the managed identity's client ID.
Connect to the cluster using Entra ID in MongoDB Compass
Use the following steps to use Entra ID to authenticate to the cluster in MongoDB Compass.
Create a user-assigned managed identity.
Add managed identity to the cluster as an Entra ID user using the managed identity metadata.
Run MongoDB Compass on the VM.
Select
+sign on the left side next to Connections to add a new connection.Make sure Edit Connection String toggle is enabled in the New Connection window.
Paste the following connection string into the URI input box.
mongodb+srv://<client-id>@<cluster-name>.global.mongocluster.cosmos.azure.com/?tls=true&authMechanism=MONGODB-OIDC&authMechanismProperties=ENVIRONMENT:azure,TOKEN_RESOURCE:https://ossrdbms-aad.database.windows.netwhere
clientIDis the managed identity's client ID.Open Advanced Connection Options.
On the General tab, make sure
mongodb+srvis selected under Connection String Scheme.Go to the Authentication tab.
Make sure OIDC is selected.
Open OIDC Options.
Set Consider Target Endpoint Trusted option.
Select Save & Connect.
Related content
- Microsoft Entra ID authentication in Azure Cosmos DB for MongoDB vCore overview
- Check limitations of Microsoft Entra ID in Azure Cosmos DB for MongoDB vCore
- Connect using a console application