Note
Access to this page requires authorization. You can try signing in or changing directories.
Access to this page requires authorization. You can try changing directories.
Azure Functions applications can use the Azure SignalR Service bindings to add real-time capabilities. Client applications use client SDKs available in several languages to connect to Azure SignalR Service and receive real-time messages.
This article describes the concepts for developing and configuring an Azure Function app that is integrated with SignalR Service.
Important
Raw connection strings appear in this article for demonstration purposes only.
A connection string includes the authorization information required for your application to access Azure SignalR Service. The access key inside the connection string is similar to a root password for your service. In production environments, always protect your access keys. Use Azure Key Vault to manage and rotate your keys securely and secure your connection string using Microsoft Entra ID and authorize access with Microsoft Entra ID.
Avoid distributing access keys to other users, hard-coding them, or saving them anywhere in plain text that is accessible to others. Rotate your keys if you believe they may have been compromised.
SignalR Service configuration
Azure SignalR Service can be configured in different modes. When used with Azure Functions, the service must be configured in Serverless mode.
In the Azure portal, locate the Settings page of your SignalR Service resource. Set the Service mode to Serverless.

Azure Functions development
A serverless real-time application built with Azure Functions and Azure SignalR Service requires at least two Azure Functions:
- A
negotiatefunction that the client calls to obtain a valid SignalR Service access token and endpoint URL. - One or more functions that handle messages sent from SignalR Service to clients.
Negotiation function
A client application requires a valid access token to connect to Azure SignalR Service. An access token can be anonymous or authenticated to a user ID. Serverless SignalR Service applications require an HTTP endpoint named negotiate to obtain a token and other connection information, such as the SignalR Service endpoint URL.
Use an HTTP-triggered Azure Function and the SignalRConnectionInfo input binding to generate the connection information object. The function must have an HTTP route that ends in /negotiate.
With class-based model in C#, you don't need the SignalRConnectionInfo input binding and can add custom claims much more easily. For more information, see Negotiation experience in class-based model.
For more information about the negotiate function, see Azure Functions development.
To learn how to create an authenticated token, refer to Using App Service Authentication.
Handle messages sent from SignalR Service
Use the SignalRTrigger binding to handle messages sent from SignalR Service. You can get notified when clients send messages or clients get connected or disconnected.
For more information, see the SignalR Service trigger binding reference.
You also need to configure your function endpoint as an upstream endpoint so that service triggers the function when there's message from a client. For more information about how to configure upstream endpoints, see Upstream endpoints.
Note
SignalR Service doesn't support the StreamInvocation message from a client in Serverless Mode.
Sending messages and managing group membership
Use the SignalR output binding to send messages to clients connected to Azure SignalR Service. You can broadcast messages to all clients, or you can send them to a subset of clients. For example, only send messages to clients authenticated with a specific user ID, or only to a specific group.
Users can be added to one or more groups. You can also use the SignalR output binding to add or remove users to/from groups.
For more information, see the SignalR output binding reference.
SignalR Hubs
SignalR has a concept of hubs. Each client connection and each message sent from Azure Functions is scoped to a specific hub. You can use hubs as a way to separate your connections and messages into logical namespaces.
Class-based model
The class-based model is dedicated for C#.
The class-based model provides better programming experience, which can replace SignalR input and output bindings, with the following features:
- More flexible negotiation, sending messages and managing groups experience.
- More managing functionalities are supported, including closing connections, checking whether a connection, user, or group exists.
- Strongly typed hub
- Unified hub name and connection string setting in one place.
The following code demonstrates how to write SignalR bindings in class-based model:
Firstly, define your hub derived from a class ServerlessHub:
[SignalRConnection("AzureSignalRConnectionString")]
public class Functions : ServerlessHub
{
    private const string HubName = nameof(Functions); // Used by SignalR trigger only

    public Functions(IServiceProvider serviceProvider) : base(serviceProvider)
    {
    }

    [Function("negotiate")]
    public async Task<HttpResponseData> Negotiate([HttpTrigger(AuthorizationLevel.Anonymous, "post")] HttpRequestData req)
    {
        var negotiateResponse = await NegotiateAsync(new() { UserId = req.Headers.GetValues("userId").FirstOrDefault() });
        var response = req.CreateResponse();
        response.WriteBytes(negotiateResponse.ToArray());
        return response;
    }

    [Function("Broadcast")]
    public Task Broadcast(
    [SignalRTrigger(HubName, "messages", "broadcast", "message")] SignalRInvocationContext invocationContext, string message)
    {
        return Clients.All.SendAsync("newMessage", new NewMessage(invocationContext, message));
    }

    [Function("JoinGroup")]
    public Task JoinGroup([SignalRTrigger(HubName, "messages", "JoinGroup", "connectionId", "groupName")] SignalRInvocationContext invocationContext, string connectionId, string groupName)
    {
        return Groups.AddToGroupAsync(connectionId, groupName);
    }
}
In the Program.cs file, register your serverless hub:
var host = new HostBuilder()
    .ConfigureFunctionsWorkerDefaults(b => b.Services
        .AddServerlessHub<Functions>())
    .Build();
Negotiation experience in class-based model
Instead of using SignalR input binding [SignalRConnectionInfoInput], negotiation in class-based model can be more flexible. Base class ServerlessHub has a method NegotiateAsync, which allows users to customize negotiation options such as userId, claims, etc.
Task<BinaryData> NegotiateAsync(NegotiationOptions? options = null)
Sending messages and managing experience in class-based model
You could send messages, manage groups, or manage clients by accessing the members provided by base class ServerlessHub.
ServerlessHub.Clientsfor sending messages to clients.ServerlessHub.Groupsfor managing connections with groups, such as adding connections to groups, removing connections from groups.ServerlessHub.UserGroupsfor managing users with groups, such as adding users to groups, removing users from groups.ServerlessHub.ClientManagerfor checking connections existence, closing connections, etc.
Strongly typed Hub
Strongly typed hub allows you to use strongly typed methods when you send messages to clients. To use strongly typed hub in class based model, extract client methods into an interface T, and make your hub class derived from ServerlessHub<T>.
The following code is an interface sample for client methods.
public interface IChatClient
{
    Task newMessage(NewMessage message);
}
Then you can use the strongly typed methods as follows.
Raw connection strings appear in this article for demonstration purposes only. In production environments, always protect your access keys. Use Azure Key Vault to manage and rotate your keys securely and secure your connection string using Microsoft Entra ID and authorize access with Microsoft Entra ID.
[SignalRConnection("AzureSignalRConnectionString")]
public class Functions : ServerlessHub<IChatClient>
{
    private const string HubName = nameof(Functions);  // Used by SignalR trigger only

    public Functions(IServiceProvider serviceProvider) : base(serviceProvider)
    {
    }

    [Function("Broadcast")]
    public Task Broadcast(
    [SignalRTrigger(HubName, "messages", "broadcast", "message")] SignalRInvocationContext invocationContext, string message)
    {
        return Clients.All.newMessage(new NewMessage(invocationContext, message));
    }
}
Note
You can get a complete project sample from GitHub.
Unified hub name and connection string setting in one place
- The class name of the serverless hub is automatically used as
HubName. - You might have noticed the
SignalRConnectionattribute used on serverless hub classes as follows:
It allows you to customize where the connection string for serverless hub is. If it's absent, the default value[SignalRConnection("AzureSignalRConnectionString")] public class Functions : ServerlessHub<IChatClient>AzureSignalRConnectionStringis used.
Important
SignalR triggers and serverless hubs are independent. Therefore, the class name of serverless hub and SignalRConnection attribute doesn't change the settings of SignalR triggers, even though you use SignalR triggers inside the serverless hub.
Client development
SignalR client applications can use the SignalR client SDK in one of several languages to easily connect to and receive messages from Azure SignalR Service.
Configuring a client connection
To connect to SignalR Service, a client must complete a successful connection negotiation that consists of these steps:
- Make a request to the
negotiateHTTP endpoint discussed above to obtain valid connection information - Connect to SignalR Service using the service endpoint URL and access token obtained from the
negotiateendpoint
SignalR client SDKs already contain the logic required to perform the negotiation handshake. Pass the negotiation endpoint's URL, minus the negotiate segment, to the SDK's HubConnectionBuilder. Here's an example in JavaScript:
const connection = new signalR.HubConnectionBuilder()
  .withUrl("https://my-signalr-function-app.azurewebsites.net/api")
  .build();
By convention, the SDK automatically appends /negotiate to the URL and uses it to begin the negotiation.
Note
If you are using the JavaScript/TypeScript SDK in a browser, you need to enable cross-origin resource sharing (CORS) on your Function App.
For more information on how to use the SignalR client SDK, see the documentation for your language:
Sending messages from a client to the service
If you've upstream configured for your SignalR resource, you can send messages from a client to your Azure Functions using any SignalR client. Here's an example in JavaScript:
connection.send("method1", "arg1", "arg2");
Azure Functions configuration
Azure Function apps that integrate with Azure SignalR Service can be deployed like any typical Azure Function app, using techniques such as continuously deployment, zip deployment, and run from package.
However, there are a couple of special considerations for apps that use the SignalR Service bindings. If the client runs in a browser, CORS must be enabled. And if the app requires authentication, you can integrate the negotiation endpoint with App Service Authentication.
Enabling CORS
The JavaScript/TypeScript client makes HTTP request to the negotiation function to initiate the connection negotiation. When the client application is hosted on a different domain than the Azure Function app, cross-origin resource sharing (CORS) must be enabled on the function app, or the browser will block the requests.
Localhost
When running the Function app on your local computer, you can add a Host section to local.settings.json to enable CORS. In the Host section, add two properties:
CORS- enter the base URL that is the origin the client applicationCORSCredentials- set it totrueto allow "withCredentials" requests
Example:
{
  "IsEncrypted": false,
  "Values": {
    // values
  },
  "Host": {
    "CORS": "http://localhost:8080",
    "CORSCredentials": true
  }
}
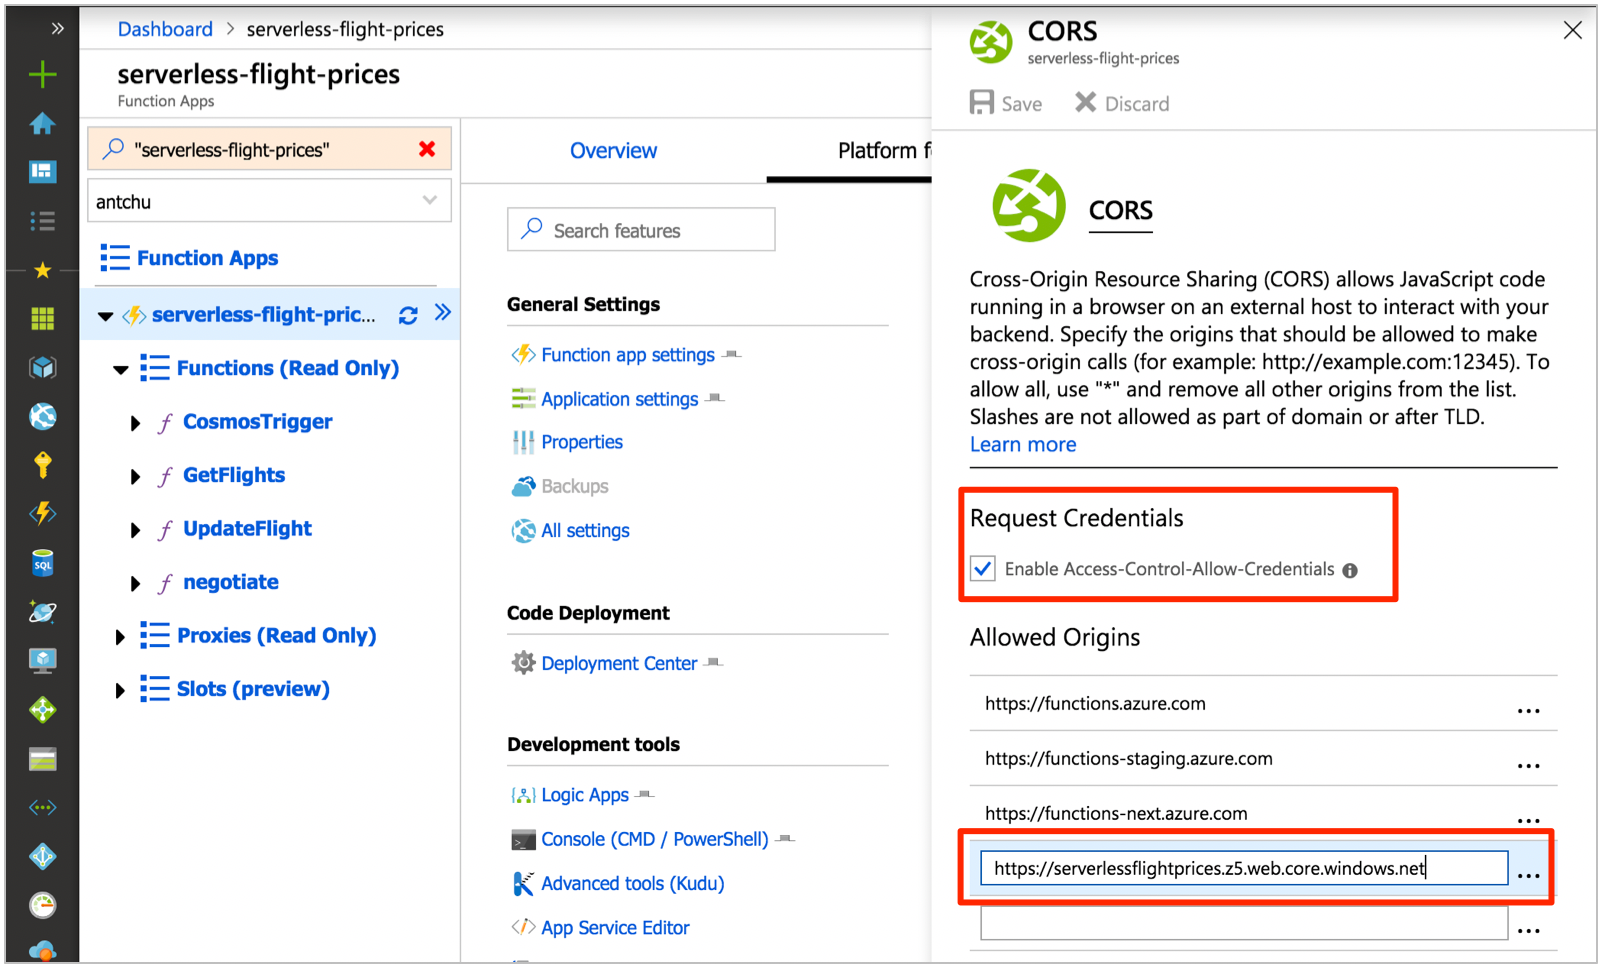
Cloud - Azure Functions CORS
To enable CORS on an Azure Function app, go to the CORS configuration screen under the Platform features tab of your Function app in the Azure portal.
Note
CORS configuration is not yet available in Azure Functions Linux Consumption plan. Use Azure API Management to enable CORS.
CORS with Access-Control-Allow-Credentials must be enabled for the SignalR client to call the negotiation function. To enable it, select the checkbox.
In the Allowed origins section, add an entry with the origin base URL of your web application.
Cloud - Azure API Management
Azure API Management provides an API gateway that adds capabilities to existing back-end services. You can use it to add CORS to your function app. It offers a consumption tier with pay-per-action pricing and a monthly free grant.
Refer to the API Management documentation for information on how to import an Azure Function app. Once imported, you can add an inbound policy to enable CORS with Access-Control-Allow-Credentials support.
<cors allow-credentials="true">
  <allowed-origins>
    <origin>https://azure-samples.github.io</origin>
  </allowed-origins>
  <allowed-methods>
    <method>GET</method>
    <method>POST</method>
  </allowed-methods>
  <allowed-headers>
    <header>*</header>
  </allowed-headers>
  <expose-headers>
    <header>*</header>
  </expose-headers>
</cors>
Configure your SignalR clients to use the API Management URL.
Using App Service Authentication
Azure Functions has built-in authentication, supporting popular providers such as Facebook, X, Microsoft Account, Google, and Microsoft Entra ID. This feature can be integrated with the SignalRConnectionInfo binding to create connections to Azure SignalR Service that is authenticated to a user ID. Your application can send messages using the SignalR output binding that are targeted to that user ID.
In the Azure portal, in your Function app's Platform features tab, open the Authentication/authorization settings window. Follow the documentation for App Service Authentication to configure authentication using an identity provider of your choice.
Once configured, authenticated HTTP requests include x-ms-client-principal-name and x-ms-client-principal-id headers containing the authenticated identity's username and user ID, respectively.
You can use these headers in your SignalRConnectionInfo binding configuration to create authenticated connections. Here's an example C# negotiation function that uses the x-ms-client-principal-id header.
[FunctionName("negotiate")]
public static SignalRConnectionInfo Negotiate(
    [HttpTrigger(AuthorizationLevel.Anonymous)]HttpRequest req,
    [SignalRConnectionInfo
        (HubName = "chat", UserId = "{headers.x-ms-client-principal-id}")]
        SignalRConnectionInfo connectionInfo)
{
    // connectionInfo contains an access key token with a name identifier claim set to the authenticated user
    return connectionInfo;
}
You can then send messages to that user by setting the UserId property of a SignalR message.
[FunctionName("SendMessage")]
public static Task SendMessage(
    [HttpTrigger(AuthorizationLevel.Anonymous, "post")]object message,
    [SignalR(HubName = "chat")]IAsyncCollector<SignalRMessage> signalRMessages)
{
    return signalRMessages.AddAsync(
        new SignalRMessage
        {
            // the message will only be sent to these user IDs
            UserId = "userId1",
            Target = "newMessage",
            Arguments = new [] { message }
        });
}
For information on other languages, see the Azure SignalR Service bindings for Azure Functions reference.
Next steps
In this article, you learn how to develop and configure serverless SignalR Service applications using Azure Functions. Try creating an application yourself using one of the quick starts or tutorials on the SignalR Service overview page.