Note
Access to this page requires authorization. You can try signing in or changing directories.
Access to this page requires authorization. You can try changing directories.
Applies to: Azure Local version 2510 and later
This article describes how to use an Azure Resource Manager (ARM) template in the Azure portal to deploy a rack aware cluster.
Important
This feature is currently in PREVIEW. See the Supplemental Terms of Use for Microsoft Azure Previews for legal terms that apply to Azure features that are in beta, preview, or otherwise not yet released into general availability.
Important
ARM template deployment of rack aware cluster is targeted for deployments-at-scale. The intended audience for this deployment is IT administrators who have experience deploying rack aware clusters. We recommend that you deploy a system via the Azure portal first, and then perform subsequent deployments via the ARM template.
Prerequisites
Completion of Register your machines with Azure Arc and assign deployment permissions. Make sure that:
- All machines are running the same version of OS.
- All the machines have the same network adapter configuration.
Make sure to select the create-cluster-rac-enabled template for deployment.
Step 1: Prepare Azure resources
Follow these steps to prepare the Azure resources you need for deployment:
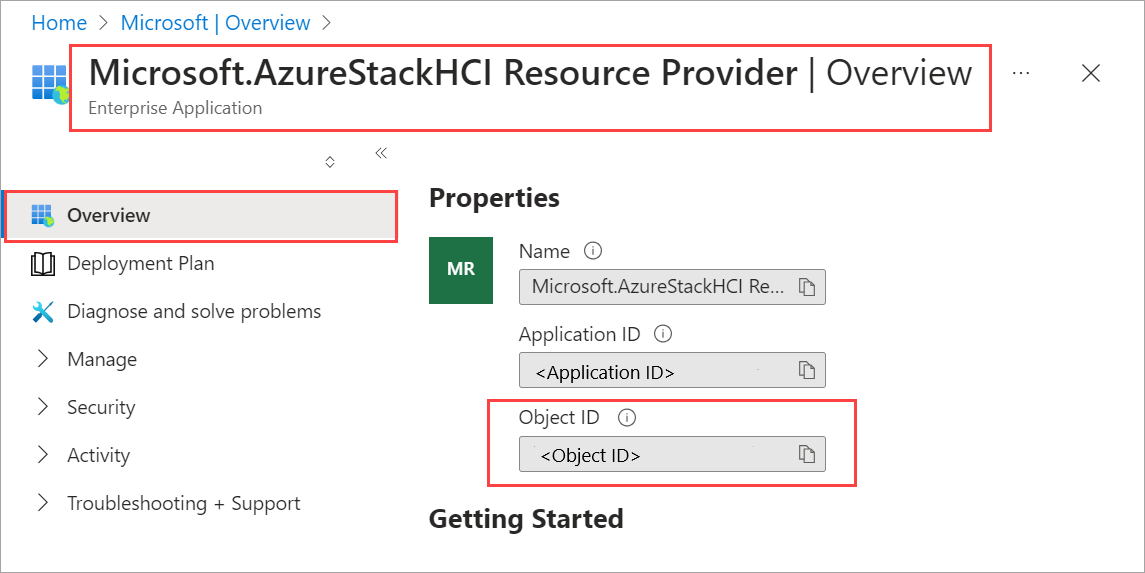
Get the object ID for Azure Local Resource Provider
This object ID for the Azure Local Resource Provider (RP) is unique per Azure tenant.
In the Azure portal, search for and go to Microsoft Entra ID.
Go to the Overview tab and search for Microsoft.AzureStackHCI Resource Provider.

Select the Service Principal Name that is listed and copy the Object ID.
Alternatively, you can use PowerShell to get the object ID of the Azure Local RP service principal. Run the following command in PowerShell:
Get-AzADServicePrincipal -DisplayName "Microsoft.AzureStackHCI Resource Provider"


Step 2: Deploy using ARM template
An ARM template is a JSON file where you define what you want to deploy to Azure. It creates and assigns all the resource permissions required for deployment.
Once all prerequisite and preparation steps are complete, you're ready to deploy using a validated ARM template and its corresponding parameters JSON file. This file contains all required values, including those generated previously.
ARM template deployment involves two modes:
- Validate: Confirms that all parameters are correctly configured and validates your system's readiness to deploy.
- Deploy: Performs the actual deployment after successful validation.
Step 2.1: Deploy the template in Validate mode
This step ensures that all parameters are configured correctly and validates your system's readiness to deploy.
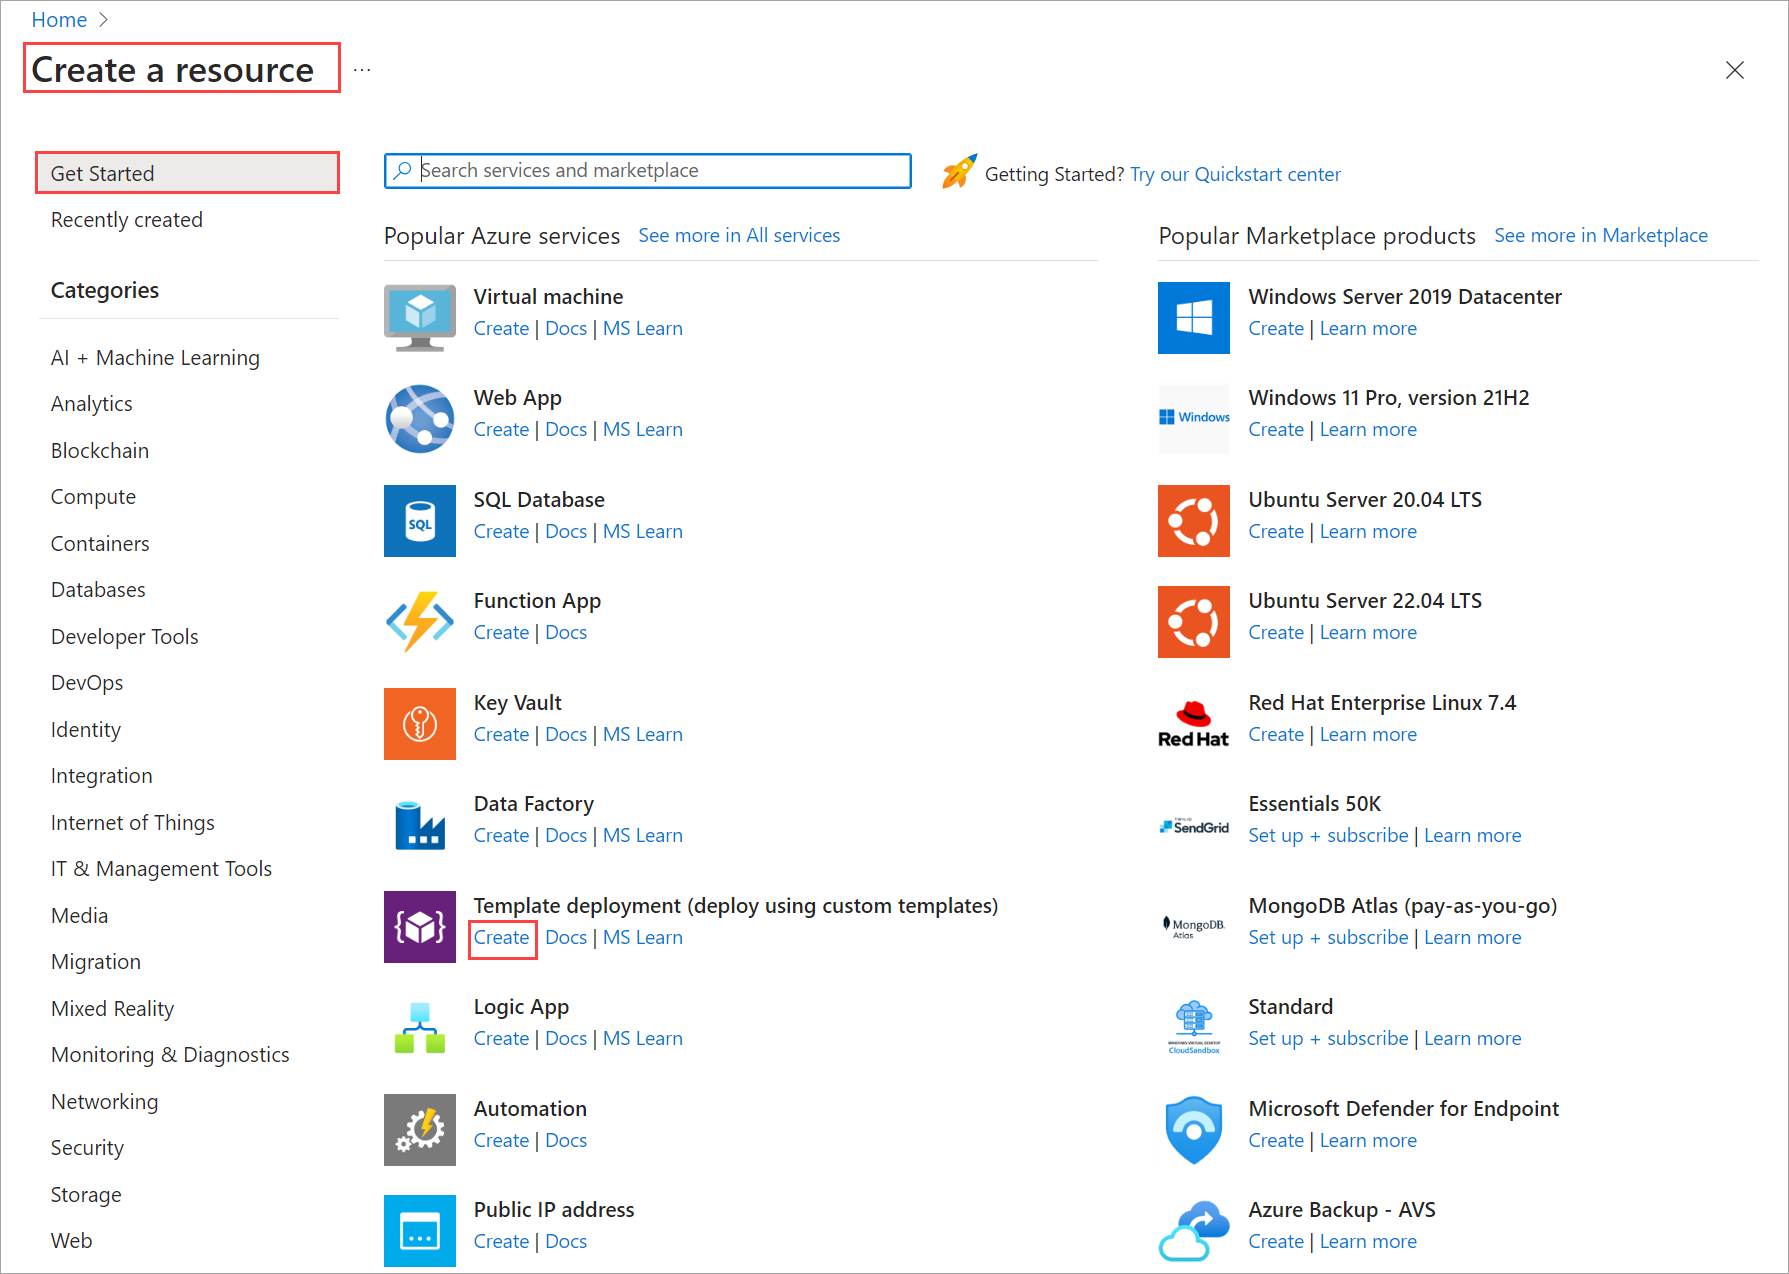
In the Azure portal, go to Home and then select + Create a resource.
Under Template deployment (deploy using custom templates), select Create.
On the Custom deployment page, proceed through the tabs described in the following sections.

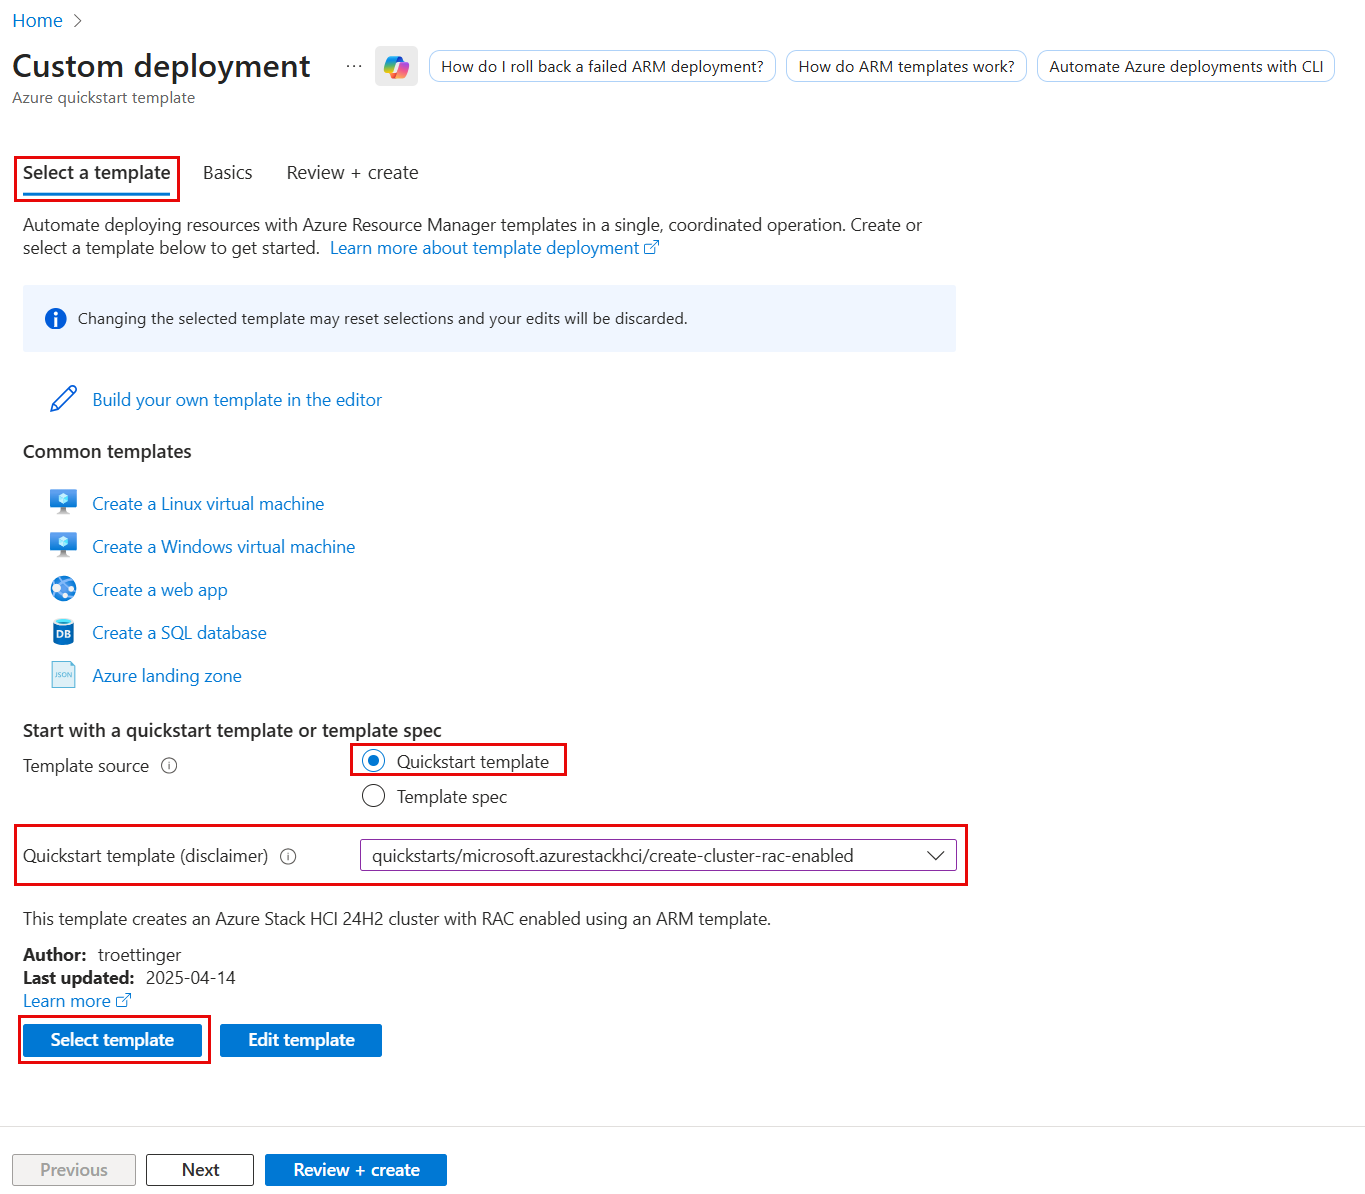
Select a template tab
Use the Select a template tab to choose the template for your deployment.
On the Select a template tab, under the Start with a quickstart template or template spec section, select the Quickstart template option.
From the Quickstart template (disclaimer) dropdown, select the create-cluster-rac-enabled template.
Select the Select template button to continue to the Basics tab.

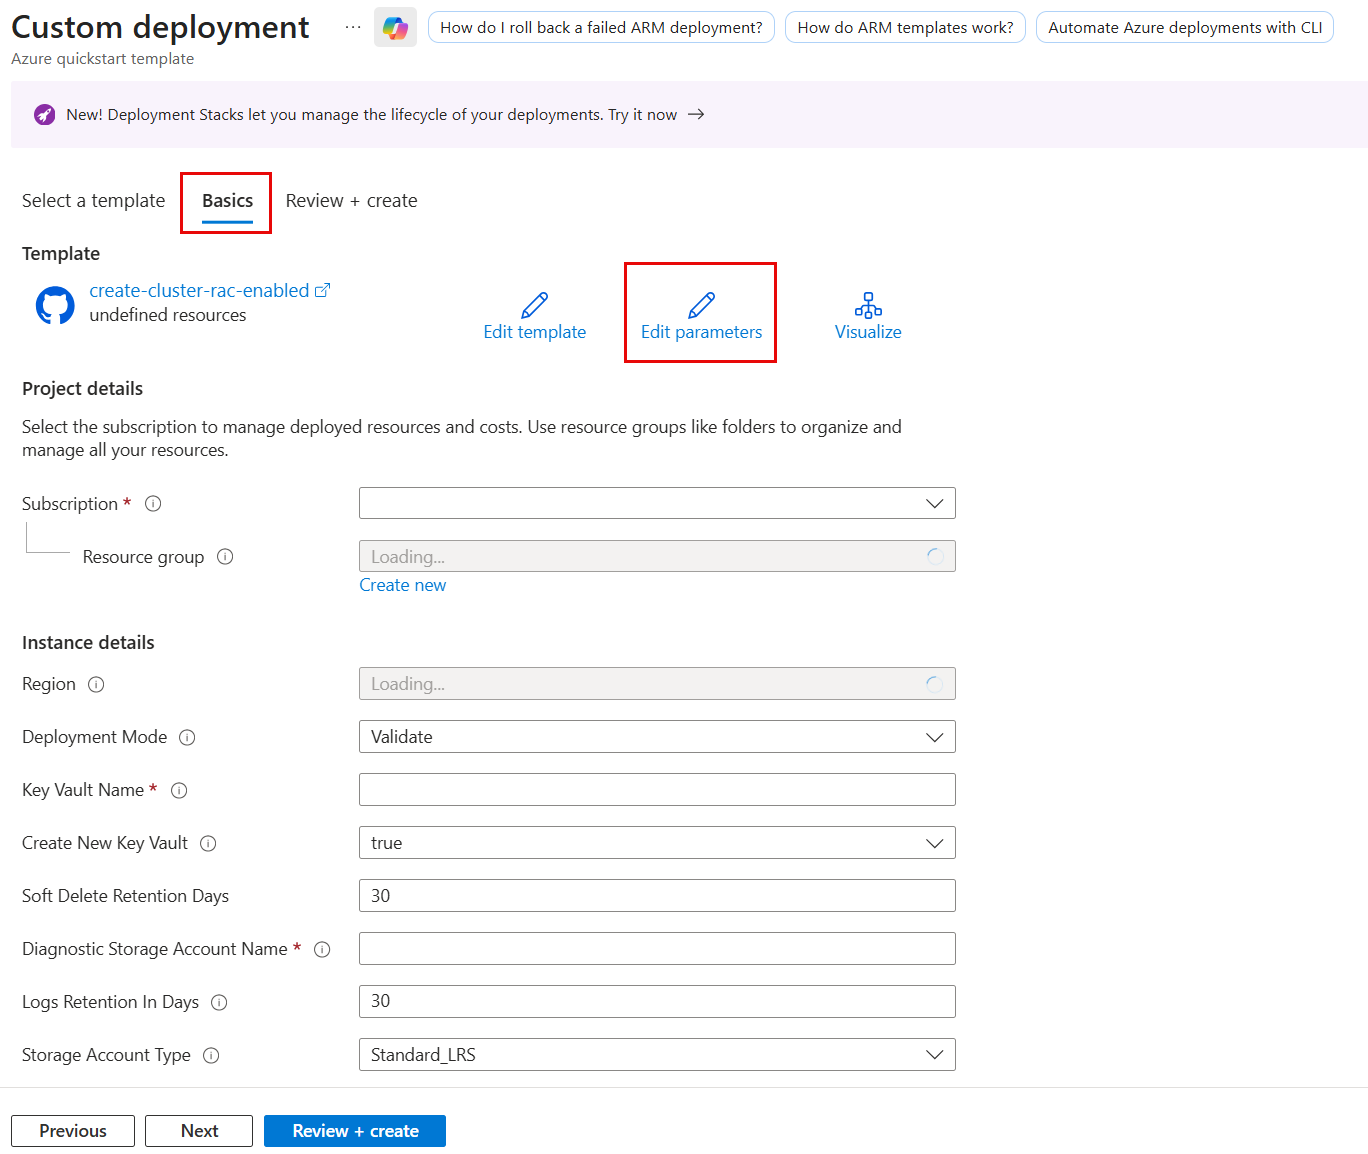
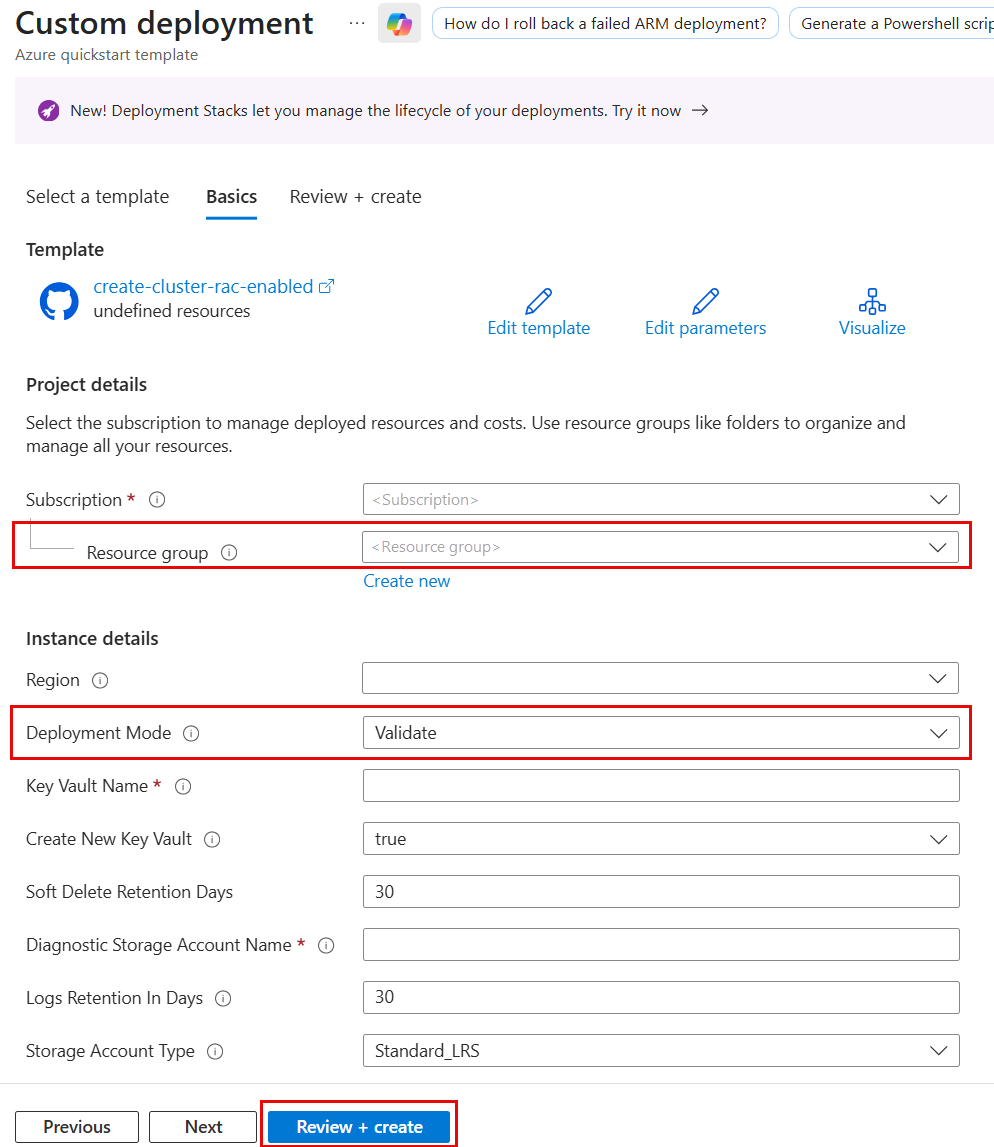
Basics tab
Use the Basics tab to provide the essential information to initiate the deployment.
This section describes how to configure the Basics tab using the following sample rack aware cluster configuration:
You deploy a rack aware cluster with four machines, two in each rack:
- node1 and node2 are physically located in the same rack (Zone1).
- node3 and node4 are located in a different rack (Zone2).
For an example of a parameter JSON file that shows the format of various inputs, such as ArcNodeResourceId, see azuredeploy.parameters.json. For detailed descriptions of the parameters defined in this file, see ARM template parameters reference.
Important
- Ensure that all parameters in the JSON file are filled out.
- Replace any placeholder values such as
[“”]with actual data. These placeholders indicate that the parameter expects an array structure. - If required values are missing or incorrectly formatted, the validation will fail.
On the Basics tab, select the required parameters from the dropdown list, or select Edit parameters to modify them manually.
Configure all required parameters. Configure the following extra parameters required for rack aware cluster deployment. You can use the sample JSON snippets to deploy the cluster described in the example configuration.
Arc node resource IDs.
"arcNodeResourceIds": {
"value": [
"/subscriptions/<SubscriptionID>/resourceGroups/<ResourceGroupName>/providers/Microsoft.HybridCompute/machines/node1",
"/subscriptions/<SubscriptionID>/resourceGroups/<ResourceGroupName>/providers/Microsoft.HybridCompute/machines/node2",
"/subscriptions/<SubscriptionID>/resourceGroups/<ResourceGroupName>/providers/Microsoft.HybridCompute/machines/node3",
"/subscriptions/<SubscriptionID>/resourceGroups/<ResourceGroupName>/providers/Microsoft.HybridCompute/machines/node4"
]
}
Cluster pattern and local availability zones. Verify that the
clusterPatternparameter is RackAware. Ensure that node1 and node2 are physically located in Zone1 (same rack), and node3 and node4 are in Zone2 (different rack)."clusterPattern": { "value": "RackAware" }, "localAvailabilityZones": { "value": [ { "localAvailabilityZoneName": "Zone1", "nodes": ["node1","node2"] }, { "localAvailabilityZoneName": "Zone2", "nodes": ["node3","node4"] } ] },Cloud witness configuration. Rack aware cluster requires cloud witness. Enter the name of the cloud witness, which is created during the deployment process.
"witnessType": {
    "value": "Cloud"
},
"clusterWitnessStorageAccountName": {
    "value": "yourcloudwitness"
},
Network intent configuration. The storage network intent must be a dedicated network intent. VLAN IDs 711 and 712 are defaults and can be customized for your environment.
"networkingType": {
    "value": "switchedMultiserverDeployment"
},
"networkingPattern": {
    "value" : "convergedManagementCompute"
},
"intentList" : {
    "value": [
        {
            "name": "ManagementCompute",
            "trafficType": [
                "Management",
                "Compute"
            ],
            "adapter": [
                "ethernet",
                "ethernet 2"
            ],
            "overridevirtualswitchConfiguration": false,
            "virtualswitchConfigurationoverrides": {
                "enableIov": "",
                "loadBalancingAlgorithm": ""
            },
            "overrideQosPolicy": false,
            "qosPolicyoverrides": {
            "priorityvalue8021Action_SMB": "",
            "priorityvalues8021Action_Cluster": "",
            "bandwidthPercentage_SMB": ""
            },
            "overrideAdapterProperty": false,
            "adapterPropertyoverrides": {
                "jumboPacket": "",
                "networkDirect": "",
                "networkDirectTechnology": ""
            }
        },
        "name": "Storage",
        "trafficType": [
                "Storage"
                ],
            "adapter": [
                "ethernet 3",
                "ethernet 4"
            ],
            "overridevirtualswitchConfiguration": false,
            "virtualswitchConfigurationoverrides": {
                "enableIov": "",
                "loadBalancingAlgorithm": ""
            },
            "overrideQosPolicy": false,
            "qosPolicyoverrides": {
            "priorityvalue8021Action_SMB": "",
            "priorityvalues8021Action_Cluster": "",
            "bandwidthPercentage_SMB": ""
            },
            "overrideAdapterProperty": false,
            "adapterPropertyoverrides": {
                "jumboPacket": "",
                "networkDirect": "",
                "networkDirectTechnology": ""
            }
        ]
},
"storageNetworkList": {
    "value": [
        {
            "name": "Storage1Network",
            "networkAdapterName": "ethernet 3",
            "vlanId": "711"
        },
        {
            "name": "Storage2Network",
            "networkAdapterName": "ethernet 4",
            "vlanId": "712"
        }
    ]
},
After configuring all parameters, select Save to save the parameters file.
Select the appropriate resource group for your environment.
Confirm that Deployment Mode is set to Validate.
Select Review + create to continue.


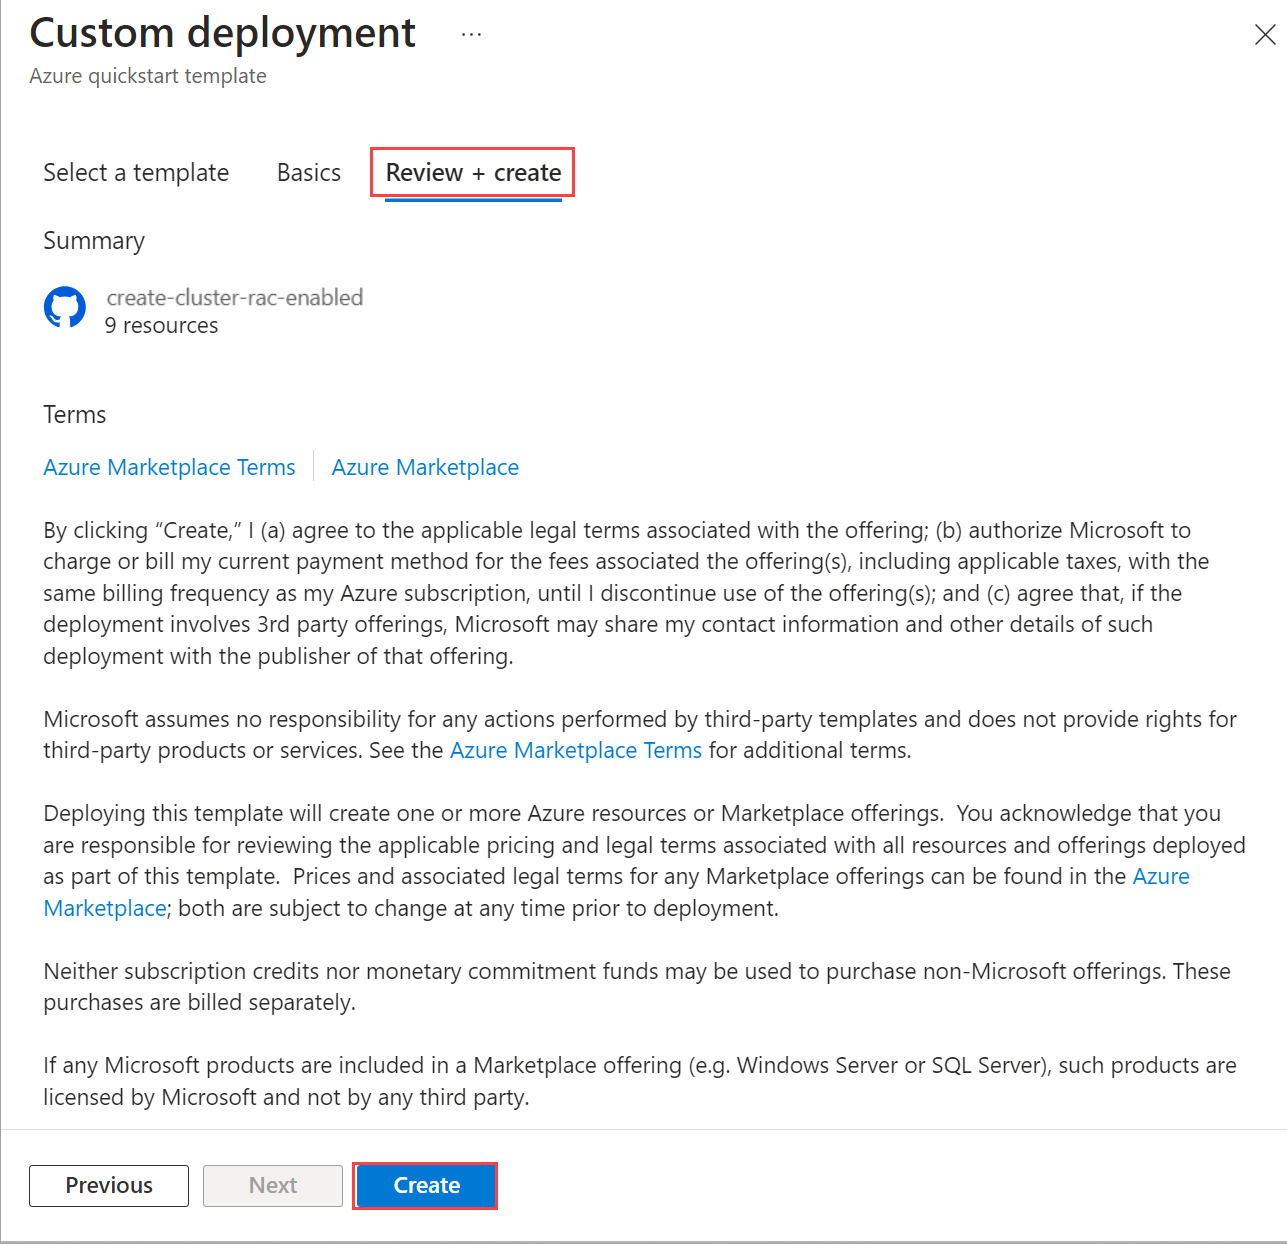
Review + create tab
Use the Review + create tab to review your deployment settings and accept the legal terms before creating the resources.
On the Review + Create tab, review the deployment summary and legal terms.
Select Create to begin validation. This action creates the remaining prerequisite resources and validates the deployment. Validation typically takes about 15 minutes to deploy one to two machines and longer for bigger deployments. Monitor the validation progress.
After validation completes, continue to the Deploy phase to provision the full environment.

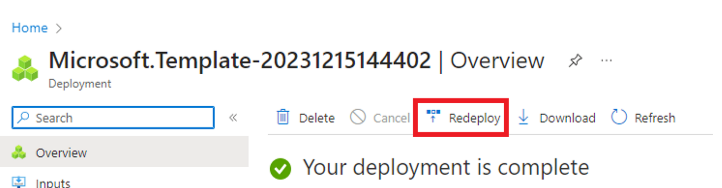
Step 2.2: Deploy the template in Deploy mode
After successful validation, you're ready to proceed with the actual deployment using the validated ARM template and its corresponding parameters JSON file.
Once validation is complete, select Redeploy.
On the Custom deployment screen, select Edit parameters. Load up the previously saved parameters and select Save.
Verify that all fields for the ARM template are filled in by the parameters JSON file.
Select the appropriate resource group for your environment.
Confirm that Deployment Mode is set to Deploy.

Select Review + create.
Select Create to begin deployment. The deployment uses the existing prerequisite resources created during the Deploy the template in Validate mode step.
The Deployment screen cycles on the cluster resource during deployment.
Once deployment initiates, there's a limited Environment Checker run, a full Environment Checker run, and cloud deployment starts.
After a few minutes, you can monitor deployment progress in the Azure portal.
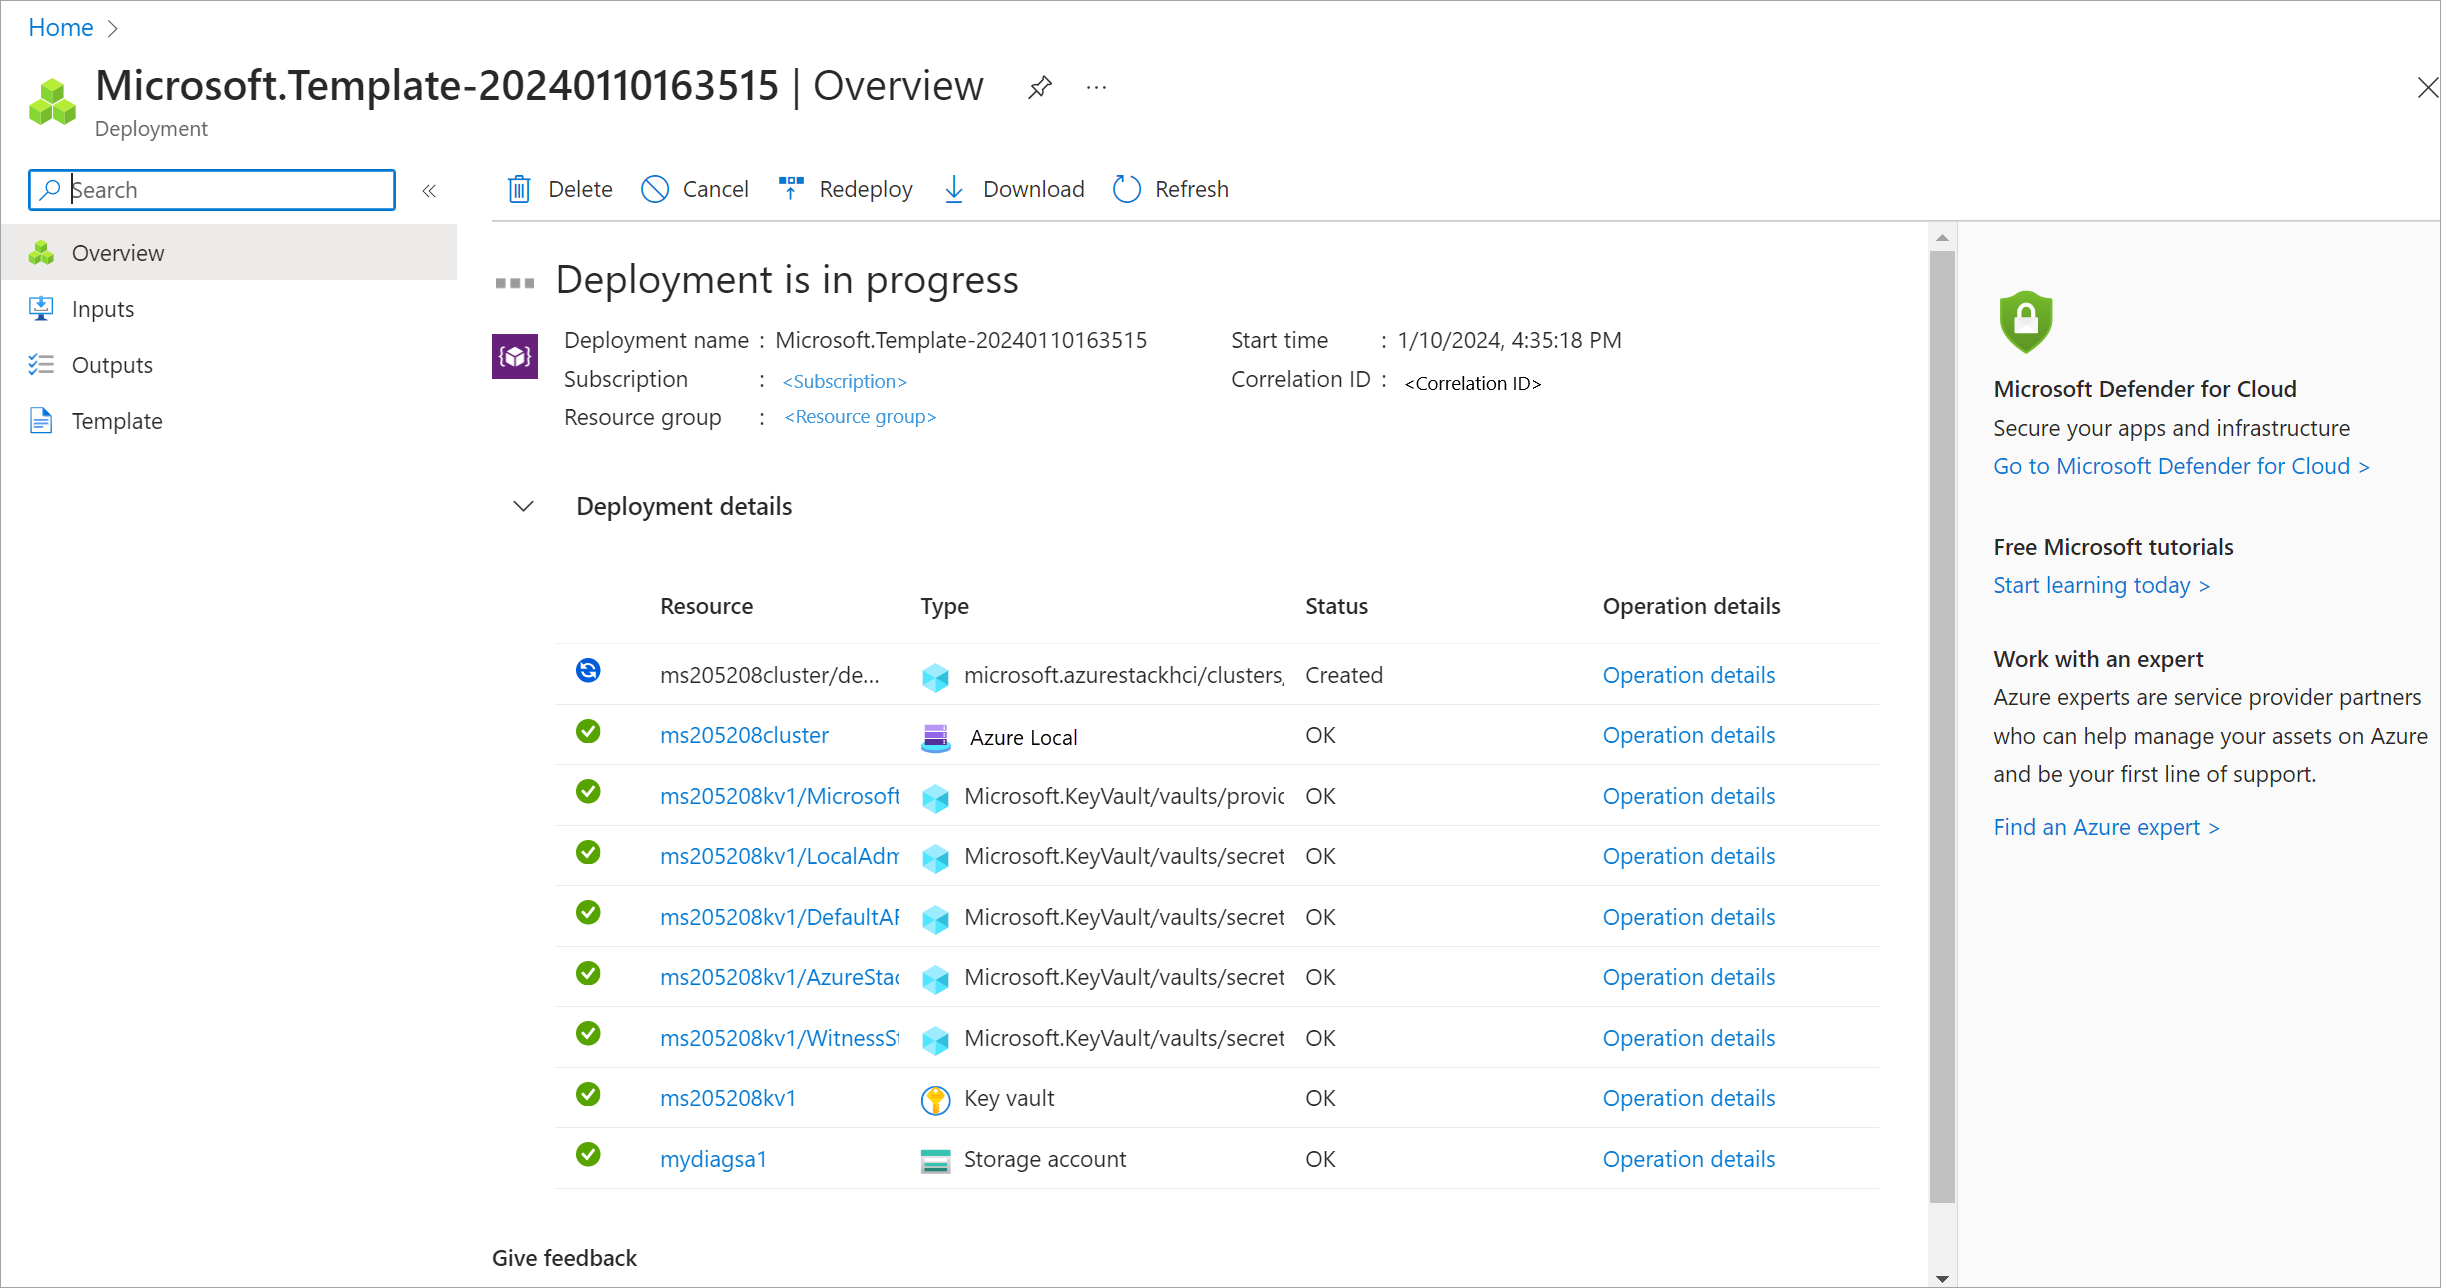


Monitor deployment
In a new browser window, navigate to the resource group for your environment. Select the cluster resource.
Select Deployments.
Refresh and watch the deployment progress from the first machine (also known as the seed machine and is the first machine where you deployed the cluster). Deployment takes between 2.5 and 3 hours. Several steps take 40-50 minutes or more.
The step in deployment that takes the longest is Deploy Moc and ARB Stack. This step takes 40-45 minutes.
Once complete, the task at the top updates with status and end time.
ARM template parameters reference
The following table describes the parameters that you define in the ARM template's parameters file:
| Parameter | Description |
|---|---|
| deploymentMode | Determines if the deployment process should only validate or proceed with full deployment: - Validate: Creates Azure resources for this system and validates your system's readiness to deploy. - Deploy: Performs the actual deployment after successful validation. |
| keyVaultName | Name of the Azure Key Vault to be used for storing secrets. For naming conventions, see Microsoft.KeyVault in the Naming rules and restrictions for Azure resources article. |
| softDeleteRetentionDays | Number of days that deleted items (such as secrets, keys, or certificates) are retained in an Azure Key Vault before they are permanently deleted. Specify a value between 7 and 90 days. You can’t change the retention period later. |
| diagnosticStorageAccountName | Name of the Azure Storage Account used to store key vault audit logs. This account is a locally redundant storage (LRS) account with a lock. For more information, see Azure Storage Account. For naming conventions, see Azure Storage account names. |
| logsRetentionInDays | Number of days that logs are retained. If you don't want to apply any retention policy and retain data forever, specify 0. |
| storageAccountType | Type of the Azure Storage Account to be used in the deployment. For example, Standard_LRS. |
| clusterName | Name of the Azure Local instance being deployed. This is the name that represents your cluster on cloud. It must be different from any of the node names. |
| location | Deployment location, typically derived from the resource group. For a list of supported Azure regions, see Azure requirements. |
| tenantId | Azure subscription tenant ID. For more information, see Find your Microsoft Entra tenant. |
| witnessType | Witness type for your Azure Local cluster. Witness type must be Cloud for a two-node cluster. It can be empty for other cluster sizes. For more information on cloud witness, see Deploy a quorum witness. |
| clusterWitnessStorageAccountName | Name of the storage account used for cluster witness. For more information, see Azure Storage Account. For naming conventions, see Azure Storage account names. |
| localAdminUserName | Username for the local administrator for all the machines in your system. The credentials are identical for all the machines in your system. For more information, see Review deployment prerequisites for Azure Local. |
| localAdminPassword | Password for the local administrator for all the machines in your system. The credentials are identical for all the machines in your system. For more information, see Review deployment prerequisites for Azure Local. |
| AzureStackLCMAdminUsername | Username for the LCM admin. For more information, see Review deployment prerequisites for Azure Local. |
| AzureStackLCMAdminPasssword | Password for the LCM admin. For more information, see Review deployment prerequisites for Azure Local. |
| hciResourceProviderObjectID | Object ID of the Azure Local Resource Provider. For more information, see Get the object ID for Azure Local Resource Provider. |
| arcNodeResourceIds | Array of resource IDs of the Azure Arc-enabled servers that are part of this Azure Local cluster. |
| domainFqdn | Fully qualified domain name (FQDN) for the Active Directory Domain Services prepared for deployment. |
| namingPrefix | Prefix used for all objects created for the Azure Local deployment. |
| adouPath | Path of the Organizational Unit (OU) created for this deployment. The OU can't be at the top level of the domain. For example: OU=Local001,DC=contoso,DC=com. |
| securityLevel | Security configuration profile to be applied to the Azure Local cluster during deployment. The default is Recommended. |
| driftControlEnforced | Drift control setting to reapply the security defaults regularly. For more information, see Security features for Azure Local. |
| credentialGuardEnforced | Credential Guard setting that uses virtualization-based security to isolate secrets from credential-theft attacks. For more information, see Manage security defaults for Azure Local. |
| smbSigningEnforced | Setting for signing SMB traffic between this Azure Local cluster and others to help prevent relay attacks. For more information, see Overview of Server Message Block signing. |
| smbClusterEncryption | SMB cluster traffic setting for encrypting traffic between servers in the cluster on your storage network. For more information, see SMB encryption. |
| bitlockerBootVolume | BitLocker encryption setting for encrypting OS volume on each server. For more information, see Manage BitLocker encryption on Azure Local. |
| bitlockerDataVolumes | BitLocker encryption setting for encrypting cluster shared volumes (CSVs) created on this system during deployment. For more information, see Manage BitLocker encryption on Azure Local. |
| wdacEnforced | Application Control setting to control which drivers and apps are allowed to run directly on each server. For more information, see Manage Application Control for Azure Local. |
| streamingDataClient | Specifies whether telemetry data streaming from the Azure Local cluster to Microsoft is enabled. |
| euLocation | Specifies whether to send and store telemetry and diagnostic data within the European Union (EU). |
| episodicDataUpload | Episodic diagnostic data setting to specify whether to collect log data and upload to Microsoft to assist with troubleshooting and support. For more information, see Crash dump collection. |
| configurationMode | Storage volume configuration mode. The supported values are: - Express: Creates one thinly provisioned volume and storage path per machine for workloads to use. This is in addition to the required one infrastructure volume per cluster. - InfraOnly: Creates only the required one infrastructure volume per cluster. You need to create workload volumes and storage paths later. - KeepStorage: Preserves existing data drives that contain a Storage Spaces pool and volumes. |
| subnetMask | The subnet mask for the management network used by the Azure Local deployment. |
| defaultGateway | The default gateway for deploying an Azure Local cluster. |
| startingIPAddress | The first IP address in a contiguous block of at least six static IP addresses on your management network's subnet, omitting addresses already used by the machines. These IPs are used by Azure Local and internal infrastructure (Arc Resource Bridge) that's required for Arc VM management and AKS Hybrid. |
| endingIPAddress | The last IP address in a contiguous block of at least six static IP addresses on your management network's subnet, omitting addresses already used by the machines. These IPs are used by Azure Local and internal infrastructure (Arc Resource Bridge) that's required for Arc VM management and AKS Hybrid. |
| dnsServers | List of DNS server IPs. |
| useDhcp | Indicates whether to use Dynamic Host Configuration Protocol (DHCP) for hosts and cluster IPs. If not declared, the deployment will default to static IPs. If TRUE, gateway and DNS servers are not required. |
| physicalNodesSettings | Array of physical nodes with their IP addresses. |
| networkingType | Type of networking. For example, switchedMultiServerDeployment. For more information, see Specify network settings. |
| networkingPattern | Pattern used for networking. For example, hyperConverged. |
| intentList | List of deployment intents. |
| storageNetworkList | List of storage networks. |
| storageConnectivitySwitchless | Specifies whether storage connectivity is configured without network switches. |
| enableStorageAutoIp | Specifies whether automatic IP assignment is enabled. |
| customLocation | Custom location for deployment. |
| sbeVersion | Version of the Solution Builder Extension (SBE) to be used during an Azure Local deployment. |
| sbeFamily | Family or category of the SBE package being applied during deployment. |
| sbePublisher | Publisher or vendor of the SBE. |
| sbeManifestSource | Source location of the SBE manifest file. |
| sbeManifestCreationDate | Creation date of the SBE manifest. |
| partnerProperties | List of partner-specific properties. |
| partnerCredentiallist | List of partner credentials. |
The following table describes parameters that are specific to a rack aware cluster:
| Parameter | Description |
|---|---|
| clusterPattern | Supported cluster type for the Azure Local cluster: - Standard - RackAware |
| localAvailabilityZones | Local availability zone information for the Azure Local rack aware cluster. |
Next steps
- After deployment is complete, continue to Complete post-deployment tasks for rack aware cluster.