Note
Access to this page requires authorization. You can try signing in or changing directories.
Access to this page requires authorization. You can try changing directories.
This article describes how to use local identity with Azure Key Vault for Azure Local deployment.
Important
This feature is currently in PREVIEW. See the Supplemental Terms of Use for Microsoft Azure Previews for legal terms that apply to Azure features that are in beta, preview, or otherwise not yet released into general availability.
Overview
In addition to Active Directory (AD) based deployment, Azure Local supports deployment through local identity with Azure Key Vault, previously known as AD-less deployment.
With local identity using a Local Administrator Account, the deployment process configures cluster-level integration with certificate-based authentication. This setup ensures secure communication during deployment and ongoing operations.
As part of this configuration, an Azure Key Vault in the Azure Cloud is provisioned during deployment to serve as a secure backup for Azure Local secrets, including BitLocker keys and other critical configuration data.
Benefits
Using local identity with Key Vault on Azure Local offers several benefits, particularly for environments that don't rely on AD. Here are some key benefits:
Minimal edge infrastructure. For environments that don't use AD, local identity with Key Vault provides a secure and efficient way to manage user identities and secrets.
Secret store. Key Vault securely manages and stores secrets, such as BitLocker keys, node passwords, and other sensitive information. This reduces the risk of unauthorized access and enhances the overall security posture.
Maintain simplified management. By integrating with Key Vault, organizations can streamline the management of secrets and credentials. This includes storing deployment and local identity secrets in a single vault, making it easier to manage and access these secrets.
Simplified deployment. During the system deployment via the Azure portal, you have the option to select a local identity provider integrated with Key Vault. This option streamlines the deployment process by ensuring all necessary secrets are securely stored within Key Vault. The deployment becomes more efficient by reducing dependencies on existing AD systems or other systems that run AD, which require ongoing maintenance. Additionally, this approach simplifies firewall configurations for Operational Technology networks, making it easier to manage and secure these environments.
Prerequisites
Satisfy the prerequisites and complete deployment checklist. Skip the AD-specific prerequisites.
Create a local user account with the same credentials across all nodes and add it to the local administrators group, instead of using the built-in administrator account.
Create a local administrator account with identical credentials on every node in the cluster. This requirement ensures that add and repair node operations can successfully authenticate and execute across all nodes. For instructions, see Add a node and Repair a node.
Download the Azure Local software. See Download operating system for Azure Local deployment.
The nodes require static IP addresses and don't support DHCP. After the OS is installed, use SConfig to set the static IP address, subnet, gateway, and DNS.
Have a DNS server with a properly configured zone. This setup is crucial for the network to function correctly. See Configure DNS server for Azure Local.
Configure DNS server for Azure Local
Follow these steps to configure DNS for Azure Local:
Create and configure DNS server.
Set up your DNS server if you don't already have one. This can be done using Windows Server DNS or another DNS solution.
Create DNS Host A records.
For each node in your Azure Local instance, create a DNS Host A record. This record maps the node's hostname to its IP address, allowing other devices on the network to locate and communicate with the node.
Additionally, create a DNS Host A record for the system itself. This record should use the first IP address from the network range you've allocated for the system.
Verify DNS records.
To verify that the DNS records for a specific machine are correctly set up, run the following command:
nslookup "machine name"Set up DNS forwarding.
Configure DNS forwarding on your DNS server to forward DNS queries to Azure DNS or another external DNS provider as needed.
Update network settings.
Update the network settings on your Azure Local nodes to use the DNS server you have configured. This can be done through the network adapter settings or using PowerShell commands.
Verify DNS configuration.
Test the DNS configuration to ensure that DNS queries are resolved correctly. You can use tools like
nslookupor dig to verify DNS resolution.Restart the operating system on local and remote machines using the following command:
Restart-Computer
Deploy Azure Local via the portal using local identity with Key Vault
During deployment via the Azure portal, you have the option to select a local identity provider integrated with Key Vault. This allows you to use a local identity with Key Vault to securely manage and store secrets instead of relying on AD for authentication.
The general deployment steps are the same as those outlined in Deploy an Azure Local system using the Azure portal. However, when using local identity with Key Vault, you need to perform specific steps on the Networking and Management tabs.
Networking tab
Provide a valid Zone name (domain) to establish a private, authoritative DNS namespace for the cluster. This domain must be resolvable either internally (for internal only hosts and workloads) or externally (for publicly available hosts and workloads) depending on your cluster's visibility requirements.
Provide the DNS server details configured in the Configure DNS for Azure Local section.


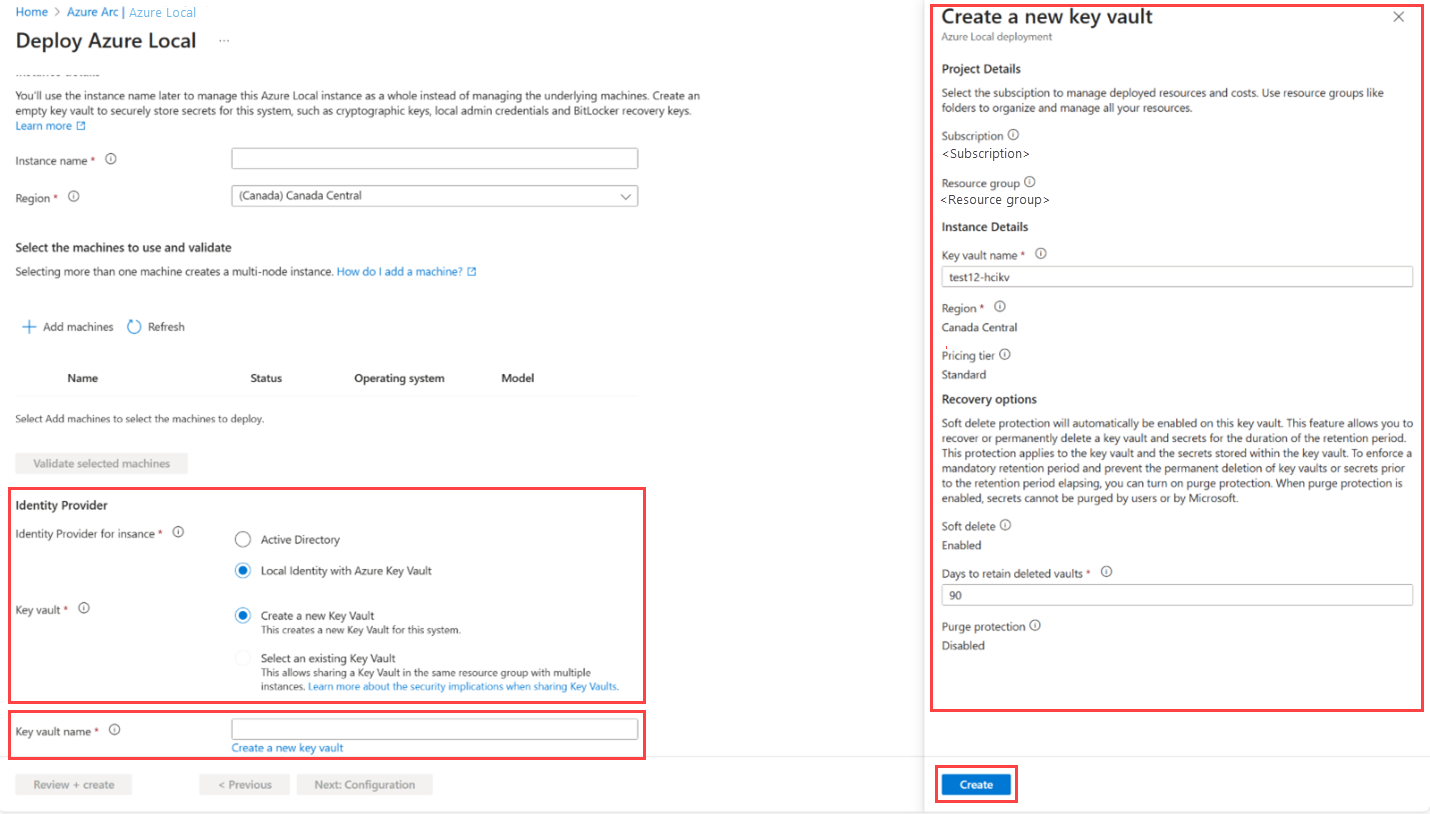
Management tab
Select the Local Identity with Azure Key Vault option.
To create a new Key Vault, select Create a new Key Vault. Enter the required details in the right context pane and then select Create.
In Key vault name, enter the new Key Vault name. You must create one Key Vault per cluster.

Post-deployment steps
After deploying the system, confirm the deployment was AD-less and verify that secrets are being backed up to Key Vault.
Confirm the system was deployed without Active Directory
After deploying the system, confirm the deployment was without AD (AD-less).
Confirm the node isn't joined to an AD domain by running the following command. If the output shows
WORKGROUP, the node isn't domain-joined.Get-WmiObject Win32_ComputerSystem.DomainHere's a sample output:
[host]: PS C:\Users\LocalAdmin\Documents> (Get-WmiObject Win32_ComputerSystem).Domain
WORKGROUP
Verify a cluster is a Workgroup cluster functional without AD. Run the following command and check the value of the
ADAwareparameter:Get-ClusterResource "Cluster Name" | Get-ClusterParameter ADAware Object Name Value Type ------ ---- ----- ---- ClusterName ADAware 2 UInt32 For ADAware property, 0 = None, 1 = AD, 2 = Local Identity
Verify secrets are getting backed up to Key Vault
BitLocker keys and recovery admin passwords are securely backed up to Azure and are rotated to ensure maximum security.
In scenarios where AD isn't available, you can utilize a dedicated recovery admin user to restore the system. The designated username for this purpose is RecoveryAdmin. The corresponding password can be securely retrieved from the Azure Key Vault, ensuring that you have the necessary credentials to perform system recovery operations effectively.
This ensures that all critical information is stored safely and can be easily retrieved when needed, providing an additional layer of security and reliability for our infrastructure.

Alerts for Key Vault extension in Azure Local
Azure Local uses the Key Vault extension to securely store and manage secrets. To ensure reliability and security, the system continuously monitors the health of the Key Vault integration. If any issues are detected, alerts are automatically generated and surfaced through Azure Monitor for visibility and response.
Alerts are sent through the Azure Alerts gateway and can be viewed in the Azure portal under Monitor > Alerts. You can configure action groups to receive notifications via email, SMS, or webhook. For more information, see What are Azure Monitor alerts?
The following table describes the available alerts, their impact, and recommended action to resolve.
| Alerts | Description | Impact | Recommended action |
|---|---|---|---|
| KeyVaultDoesNotExist | The specified Key Vault does not exist. | A Key Vault is required to back up and store secrets securely. Without it, secret backup operations will fail. | - Verify that the Key Vault resource exists in your Azure subscription. - Ensure the Key Vault name and resource group match the configuration in your deployment. - If the Key Vault was deleted, recreate it and update the configuration. |
| KeyVaultAccess | One or more cluster nodes were unable to access the Key Vault. | If nodes cannot access the Key Vault, operations that require secret retrieval or backup may fail. | - Check network connectivity between the cluster nodes and the Key Vault endpoint. - Verify that the Key Vault firewall and access policies allow the cluster nodes to connect. - Ensure that the managed identity or service principal used by the cluster has the required permissions (such as Get, List, and Backup). Additionally, the managed identity associated with the nodes (Arc for Server resources) must be assigned the Key Vault Secrets Officer role on the Key Vault. |
Update Key Vault on Azure Local
Follow these steps to update the backup configuration to use a new Key Vault:
Create a new Key Vault in the Azure portal. Configure it to store backup secrets.
Set up access controls for the new Key Vault. This includes granting necessary permissions to the node identity. Ensure your Key Vault is assigned the Key Vaults Secret Officer role. For instructions, see Provide access to Key Vault keys, certificates, and secrets with an Azure role-based access control.

Update the system configuration. Use a POST request to update the cluster configuration with the new Key Vault details. You must have the Azure Stack HCI Administrator role assigned to run the POST API. For more information, see Use Role-based Access Control to manage Azure Local VMs enabled by Azure Arc.
Run the following command to sign in to your Azure subscription:
Connect-AzAccountRun the following command to verify your subscription context:
Get-AzContextOnce authenticated, use the
Invoke-AzRestMethodcmdlet to send the POST request. This updates the cluster with the new Key Vault location.
Here's a sample output:
Invoke-AzRestMethod -Path "/subscriptions/<subscriptionId>/resourceGroups/<resourceGroupName>/providers/Microsoft.AzureStackHCI/clusters/<clusterName>/updateSecretsLocations" -Method POST -Payload
{
"properties": {
    "secretsType": "BackupSecrets",
    "secretsLocation": "https://hcikeyvaulttestingnew.vault.azure.net/"
              }
} # Response: 200 OK
Validate configuration. In the Azure portal, open the system resource and verify that Resource JSON includes the updated Key Vault details.
Here's a sample screenshot of Resource JSON where you can update the Key Vault:
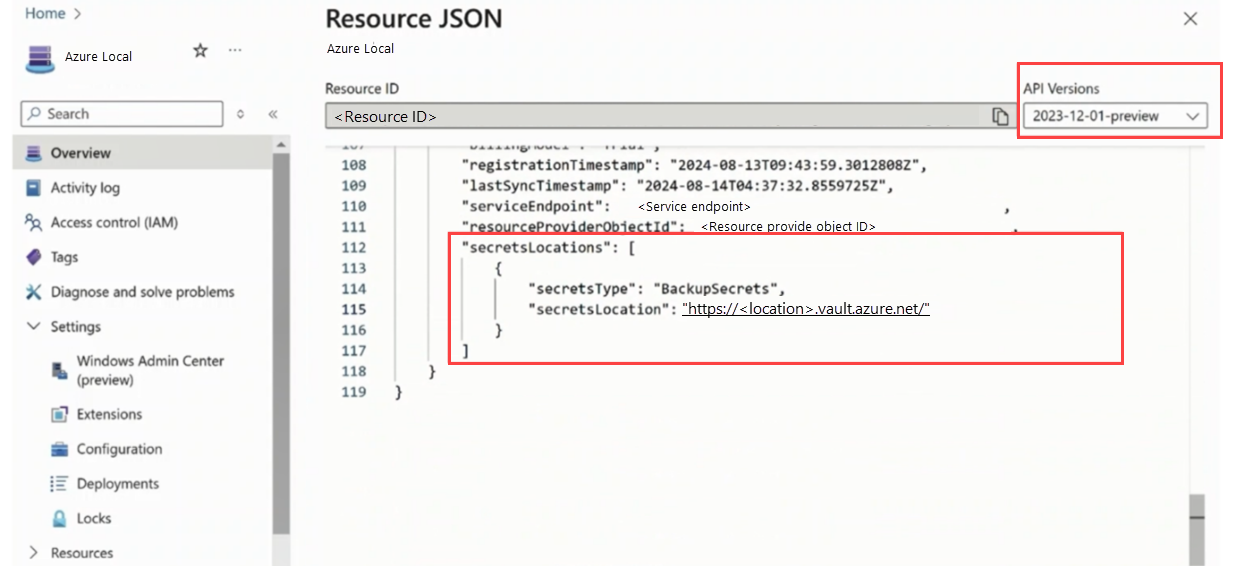
Check secrets in the new Key Vault. Confirm that all backup secrets are properly stored in the new Key Vault.
Clean up the old Key Vault. The old Key Vault and its secrets aren't deleted automatically. After verifying the new Key Vault is configured correctly, you can delete the old Key Vault if necessary.


Recover a deleted Key Vault and resume backup
When you delete and subsequently recover a Key Vault, the managed identity that previously had access to the Key Vault is affected in the following ways:
- Revocation of managed identity access. During the deletion process, the managed identity's access permissions to the Key Vault are revoked. This means the identity no longer has authorization to access the Key Vault.
- Failure of extension operations. The backup key vault extension responsible for managing secret backups relies on the managed identity for access. With the access permissions revoked, the extension is unable to perform backup operations.
- Extension status in the Azure portal. In the Azure portal, the status of the extension displays as Failed indicating the extension can't backup secrets due to the loss of necessary permissions.
To address and resolve the issue of the failed extension and restore normal backup operations, perform the following steps:
Reassign managed identity access.
- Determine the managed identity that requires access to the Key Vault.
- Reassign the Key Vault Secret Officer role to the managed identity.
Verify extension functionality.
- After reassignment, monitor the extension status in the Azure portal to ensure it changes from Failed to Succeeded. This indicates the extension has regained the necessary permissions and is now functioning properly.
- Test the backup operations to ensure that secrets are being backed up correctly and that the backup process is functioning as expected.
Tool compatibility in Azure Local environments configured with Azure Key Vault
Tooling support in Azure Local environments configured with Azure Key Vault for identity management varies across the ecosystem. Use the following guidance to plan and operate effectively in these configurations.
Supported tools
PowerShell. Fully supported for both AD and Azure Key Vault-based identity environments. PowerShell is the primary interface for managing and automating Azure Local clusters across identity configurations.
Azure Monitor. Supported for monitoring the health and performance of hosts and virtual machines. Integration with Azure Monitor enables visibility into system health, alerts, and telemetry.
Azure portal. Supported for managing Azure Local clusters.
Unsupported or limited support tools
- Windows Admin Center. Not supported in Azure Key Vault-based identity environments. You should use PowerShell or other supported tools for administrative tasks.
- System Center Virtual Machine Manager (SCVMM). Expected to have limited or no support in Azure Key Vault-based identity environments. Validate specific use cases before relying on SCVMM.
Mixed compatibility
- Microsoft Management Consoles (MMCs). Compatibility varies. Tools such as Hyper-V Manager and Failover Cluster Manager may not be functional in all scenarios. Test critical workflows before relying on MMCs for production use.
FAQ
This section provides answers to some frequently asked questions about using local identity with Key Vault.
What to do if the Azure Key Vault Backup Secrets extension wasn't installed during deployment
If the extension wasn't installed during deployment, you can manually install it on Arc-enabled servers by following these steps:
Create a new Azure Key Vault if you don’t already have one. For instructions, see Quickstart: Create a key vault using the Azure portal.
In the Key Vault page, navigate to Access control (IAM) > Add role assignment.
- Under the Role tab, select Key Vault Secrets Officer.
- Under the Members tab, select Managed identity and add the Azure Local cluster as a member.
- Select Review + assign to complete the role assignment.
Verify that the role assignment appears under the Role assignments tab.
Go to your Azure Local cluster and note the Arc machine names.
Run the following PowerShell script to install the extension on Arc machines:
# Login to Azure
Connect-AzAccount
$ResourceGroup = "<Resource Group>"
$ResourceLocation = "<Location>"
$KeyVaultUri = "<URL of Azure Key Vault>"
$ArcMachines = @("v-host1", "v-host2", "v-host3", "v-host4")
foreach ($MachineName in $ArcMachines) {
New-AzConnectedMachineExtension `
-Name AzureEdgeAKVBackupForWindows `
-ResourceGroupName $ResourceGroup `
-Location $ResourceLocation `
-MachineName $MachineName `
-Publisher Microsoft.Edge.Backup `
-ExtensionType AKVBackupForWindows `
-Setting @{KeyVaultUrl = $KeyVaultUri; UseClusterIdentity = $true}
}
Confirm the extension status in the Azure portal to ensure it was installed successfully.
Next steps
- If you didn't create workload volumes during deployment, create workload volumes and storage paths for each volume. For details, see Create volumes on Azure Local and Windows Server clusters and Create storage path for Azure Local.
- Get support for Azure Local deployment issues
This feature is available only in Azure Local 2411 or later.