Note
Access to this page requires authorization. You can try signing in or changing directories.
Access to this page requires authorization. You can try changing directories.
-
2025-09-22
Note
An alternate hub project quickstart is available: Quickstart: Get started with Azure AI Foundry (Hub projects).
In this quickstart, you use Azure AI Foundry to:
- Create a project
- Deploy a model
- Run a chat completion
- Create and run an agent
- Upload files to the agent
The Azure AI Foundry SDK is available in multiple languages, including Python, Java, TypeScript, and C#. This quickstart provides instructions for each of these languages.
Tip
The rest of this article shows how to create and use a Azure AI Foundry project. Select hub-based project at the top of this article if you want to use a hub-based project instead. Which type of project do I need?
Prerequisites
- An Azure account with an active subscription. If you don't have one, create a free Azure account, which includes a free trial subscription.
- You must be Owner of the subscription to receive the appropriate access control needed to use your project.
Important
Items marked (preview) in this article are currently in public preview. This preview is provided without a service-level agreement, and we don't recommend it for production workloads. Certain features might not be supported or might have constrained capabilities. For more information, see Supplemental Terms of Use for Microsoft Azure Previews.
First run experience
Use this fast path when you don't have any projects yet.
In the portal, you can explore a rich catalog of cutting-edge models from Microsoft, OpenAI, DeepSeek, Hugging Face, Meta, and more. For this tutorial, search and then select the gpt-4o model.
Sign in to the Azure AI Foundry portal.
From the overview page or Model catalog, select gpt-4o (or gpt-4o-mini).
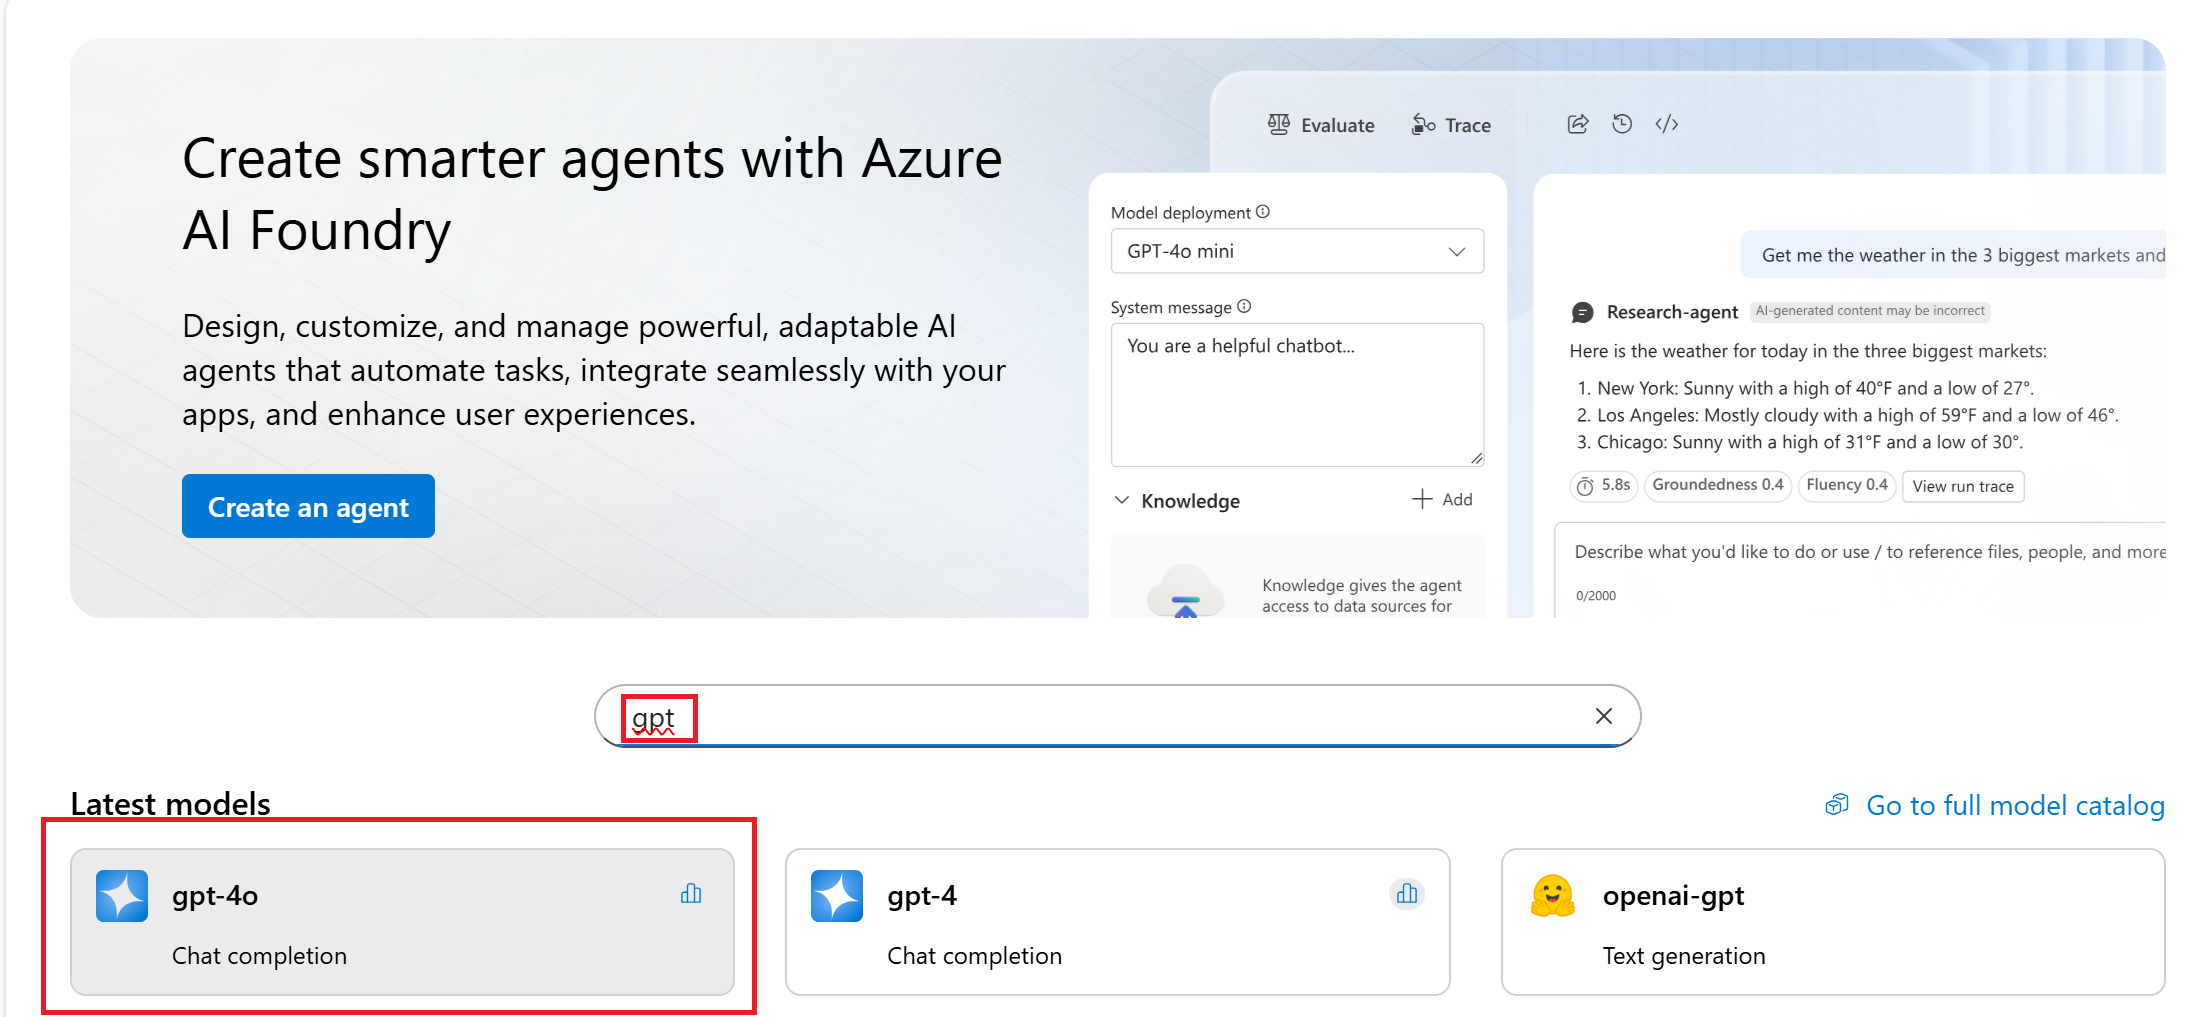
Select Use this model. When prompted, enter a project name and select Create.
Review the deployment name and select Create.
Then select Connect and deploy after selecting a deployment type.
Select Open in playground from the deployment page after it's deployed.
You land in the Chat playground with the model pre-deployed and ready to use.
If you're building an agent, you can instead start with Create an agent. The steps are similar, but in a different order. Once the project is created, you arrive at the Agent playground instead of the Chat playground.
Set up your environment
No installation is necessary to use the Azure AI Foundry portal.
Install these packages:
pip install openai azure-ai-projects azure-identity-
Azure AI Foundry Models allows customers to consume the most powerful models from flagship model providers using a single endpoint and credentials. This means that you can switch between models and consume them from your application without changing a single line of code.
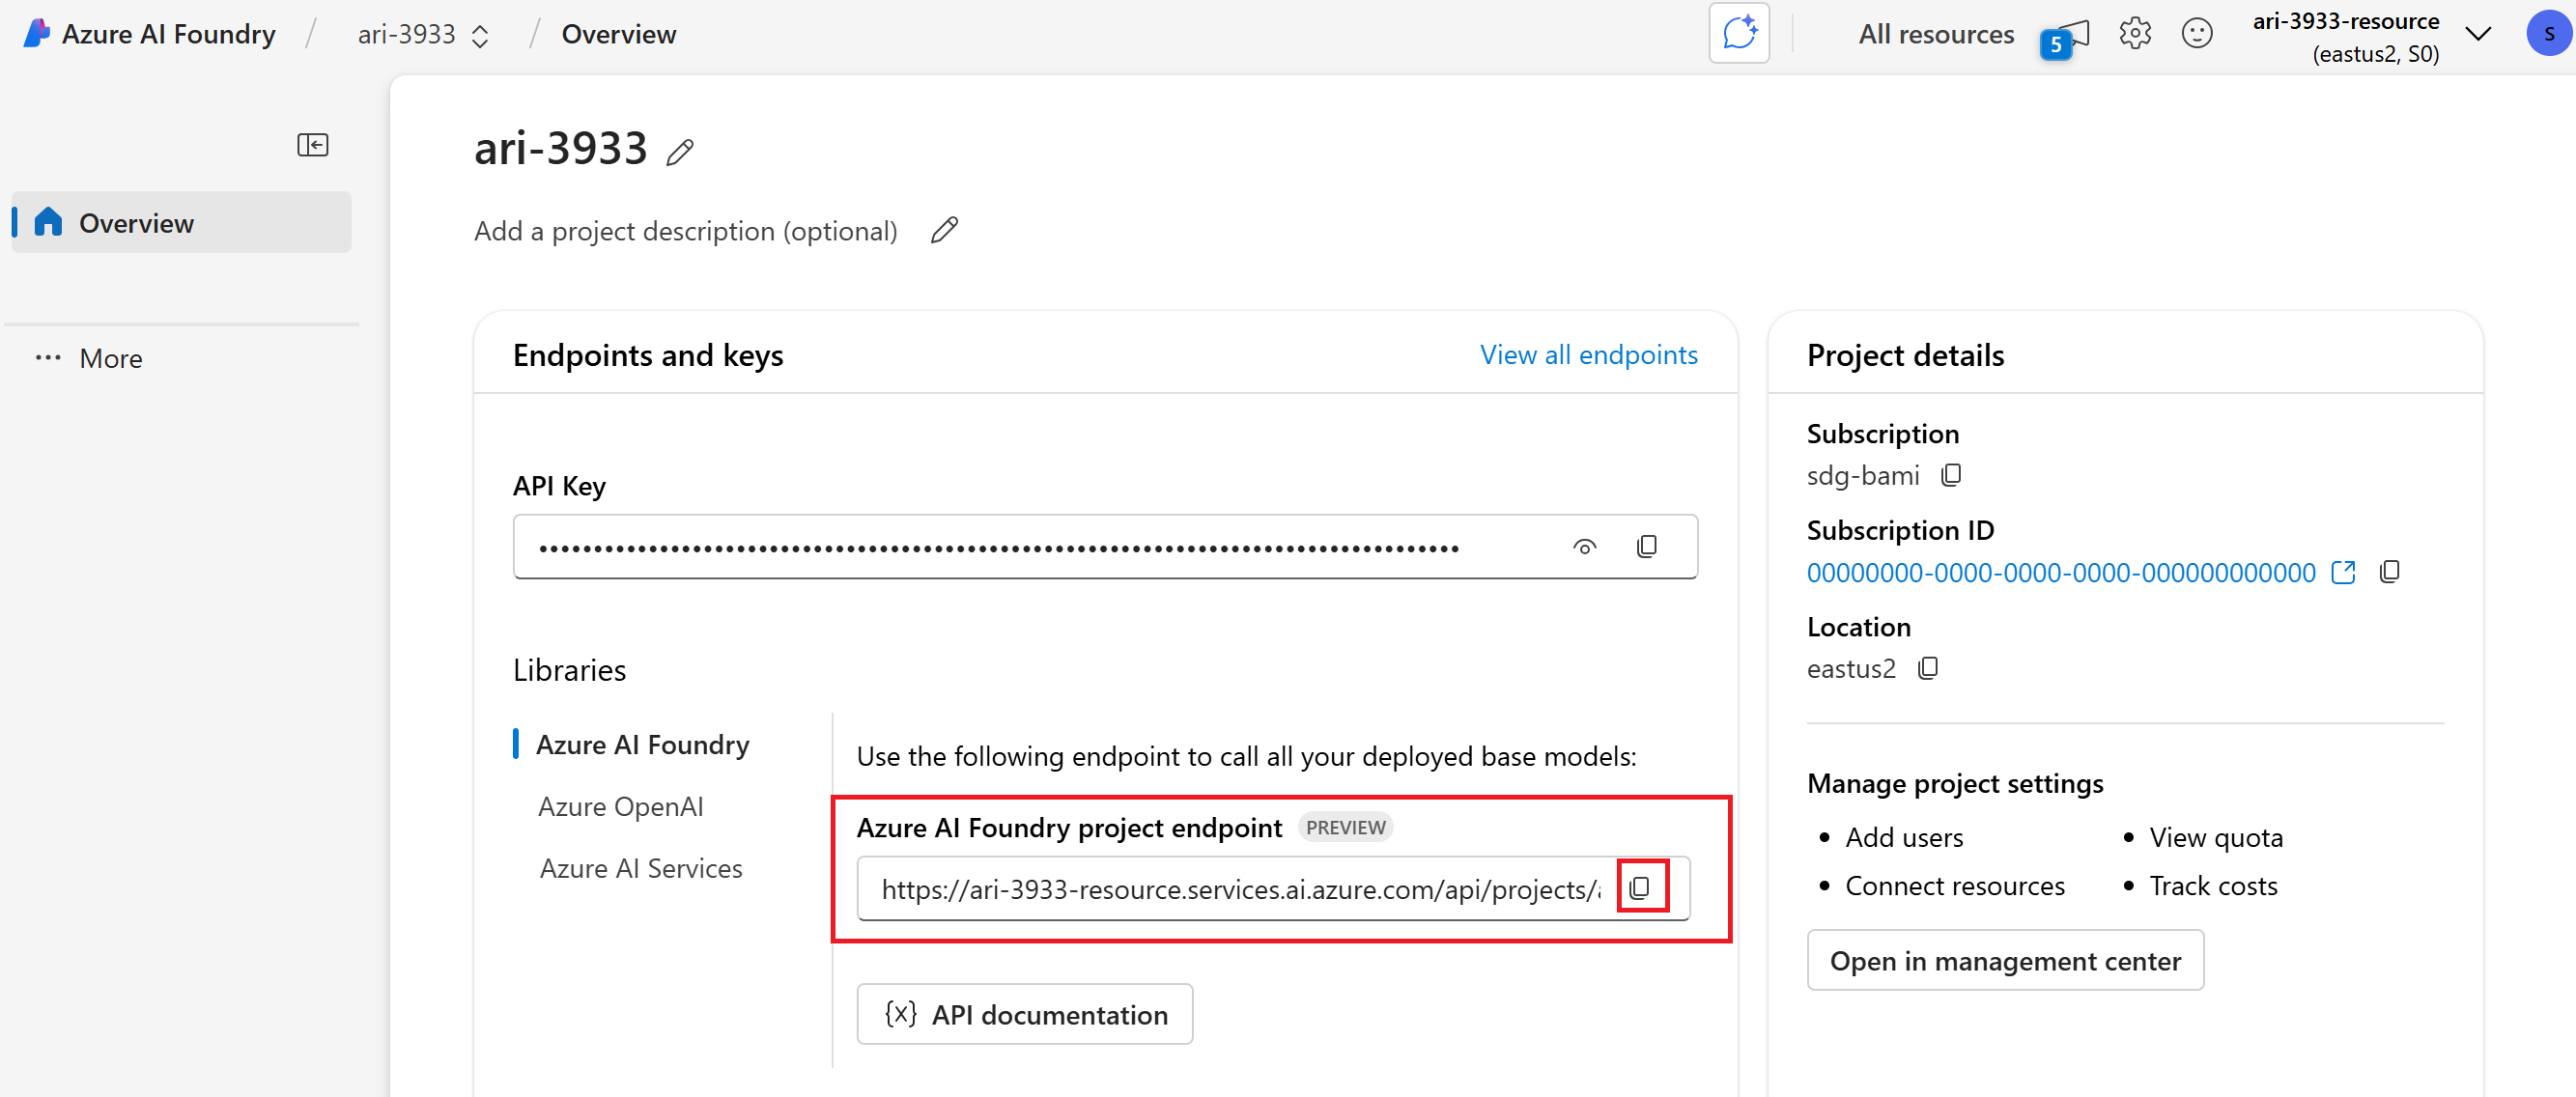
Copy the Azure AI Foundry project endpoint in the Overview section of your project. You'll use it in a moment.
Tip
If you don't see the Azure AI Foundry project endpoint, you're using a hub-based project. (See Types of projects). Switch to a Azure AI Foundry project, or use the preceding steps to create one.
Make sure to sign in using the CLI
az login(oraz login --use-device-code) command to authenticate before running your Python scripts.
Note
All the code in this article is at GitHub Quickstart.
Install packages:
To work with Azure AI services in your .NET project, you'll need to install several NuGet packages. Add NuGet packages using the .NET CLI in the integrated terminal:
# Add Azure AI SDK packages dotnet add package Azure.Identity dotnet add package Azure.AI.Projects dotnet add package Azure.AI.Agents.Persistent dotnet add package Azure.AI.Inference-
Azure AI Foundry Models allows customers to consume the most powerful models from flagship model providers using a single endpoint and credentials. This means that you can switch between models and consume them from your application without changing a single line of code.
Copy the Azure AI Foundry project endpoint in the Overview section of your project. You'll use it in a moment.
Tip
If you don't see the Azure AI Foundry project endpoint, you're using a hub-based project. (See Types of projects). Switch to a Azure AI Foundry project, or use the preceding steps to create one.
Set these environment variables to use in your scripts. The
AZURE_AI_ENDPOINTis the project endpoint you copied earlier. Remove everything after.com/in that endpoint to formAZURE_AI_INFERENCE.AZURE_AI_ENDPOINT=https://your.services.ai.azure.com/api/projects/project AZURE_AI_INFERENCE=https://your.services.ai.azure.com/ AZURE_AI_MODEL=your_model_nameTip
The agent samples require the
AZURE_AI_MODELenvironment variable to be set to an OpenAI-compatible model, e.g.gpt-4.1, as not all models are supported for agent use cases, including tooling.Make sure to sign in using the CLI
az login(oraz login --use-device-code) command to authenticate before running your C# scripts.
Note
All the code in this article is at GitHub Quickstart.
Make sure to sign in using the CLI
az login(oraz login --use-device-code) command to authenticate before running your TypeScript scripts.Download package.json.
Install packages with
npm install-
Azure AI Foundry Models allows customers to consume the most powerful models from flagship model providers using a single endpoint and credentials. This means that you can switch between models and consume them from your application without changing a single line of code.
Copy the Azure AI Foundry project endpoint in the Overview section of your project. You'll use it in a moment.
Tip
If you don't see the Azure AI Foundry project endpoint, you're using a hub-based project. (See Types of projects). Switch to a Azure AI Foundry project, or use the preceding steps to create one.
Set these environment variables to use in your scripts:
MODEL_DEPLOYMENT_NAME=gpt-4o
PROJECT_ENDPOINT=https://<your-foundry-resource-name>.services.ai.azure.com/api/projects/<your-foundry-project-name>
Note
All the code in this article is at GitHub Quickstart.
-
Azure AI Foundry Models allows customers to consume the most powerful models from flagship model providers using a single endpoint and credentials. This means that you can switch between models and consume them from your application without changing a single line of code.
Copy the Azure AI Foundry project endpoint in the Overview section of your project. You'll use it in a moment.
Tip
If you don't see the Azure AI Foundry project endpoint, you're using a hub-based project. (See Types of projects). Switch to a Azure AI Foundry project, or use the preceding steps to create one.
Set these environment variables to use in your scripts:
MODEL_DEPLOYMENT_NAME=gpt-4o
PROJECT_ENDPOINT=https://<your-foundry-resource-name>.services.ai.azure.com/api/projects/<your-foundry-project-name>
Make sure to sign in using the CLI
az login(oraz login --use-device-code) command to authenticate before running your Java scripts.Download POM.XML to your Java IDE.
Note
All the code in this article is at GitHub Quickstart.
Make sure to sign in using the CLI
az login(oraz login --use-device-code) command to authenticate before running the next command.Get a temporary access token. It will expire in 60-90 minutes, you'll need to refresh after that.
az account get-access-token --scope https://ai.azure.com/.defaultSave the results as the environment variable
AZURE_AI_AUTH_TOKEN.
Note
All the code in this article is at GitHub Quickstart.
Run a chat completion
Chat completions are the basic building block of AI applications. Using chat completions you can send a list of messages and get a response from the model.
- In the chat playground, fill in the prompt and select the Send button.
- The model returns a response in the Response pane.
Substitute your endpoint for the endpoint in this code:
from azure.ai.projects import AIProjectClient
from azure.identity import DefaultAzureCredential

project = AIProjectClient(
    endpoint="https://your-foundry-resource-name.ai.azure.com/api/projects/project-name",
    credential=DefaultAzureCredential(),
)

models = project.get_openai_client(api_version="2024-10-21")
response = models.chat.completions.create(
    model="gpt-4o",
    messages=[
        {"role": "system", "content": "You are a helpful writing assistant"},
        {"role": "user", "content": "Write me a poem about flowers"},
    ],
)

print(response.choices[0].message.content)
using System.ClientModel.Primitives;
using Azure.Identity;
using OpenAI;
using OpenAI.Chat;

#pragma warning disable OPENAI001

string projectEndpoint = System.Environment.GetEnvironmentVariable("AZURE_AI_INFERENCE")!;
string modelDeploymentName = System.Environment.GetEnvironmentVariable("AZURE_AI_MODEL")!;

BearerTokenPolicy tokenPolicy = new(
    new DefaultAzureCredential(),
    "https://ai.azure.com/.default");
OpenAIClient openAIClient = new(
    authenticationPolicy: tokenPolicy,
    options: new OpenAIClientOptions()
    {
        Endpoint = new($"{projectEndpoint}/openai/v1"),
    });
ChatClient chatClient = openAIClient.GetChatClient(modelDeploymentName);

ChatCompletion completion = await chatClient.CompleteChatAsync(
    [
        new SystemChatMessage("You are a helpful assistant."),
                    new UserChatMessage("How many feet are in a mile?")
    ]);

Console.WriteLine(completion.Content[0].Text);
// Get the Azure AI endpoint and deployment name from environment variables
const endpoint = process.env.PROJECT_ENDPOINT as string;
const deployment = process.env.MODEL_DEPLOYMENT_NAME || 'gpt-4o';

// Create an Azure OpenAI Client
const project = new AIProjectClient(endpoint, new DefaultAzureCredential());
const client = await project.getAzureOpenAIClient({
    // The API version should match the version of the Azure OpenAI resource
    apiVersion: "2024-12-01-preview"
});

// Create a chat completion
const chatCompletion = await client.chat.completions.create({
    model: deployment,
    messages: [
        { role: "system", content: "You are a helpful writing assistant" },
        { role: "user", content: "Write me a poem about flowers" },
    ],
});
console.log(`\n==================== 🌷 COMPLETIONS POEM ====================\n`);
console.log(chatCompletion.choices[0].message.content);
package com.azure.ai.foundry.samples;

import com.azure.ai.inference.ChatCompletionsClient;
import com.azure.ai.inference.ChatCompletionsClientBuilder;
import com.azure.ai.inference.models.ChatCompletions;
import com.azure.core.credential.AzureKeyCredential;
import com.azure.core.credential.TokenCredential;
import com.azure.core.exception.HttpResponseException;
import com.azure.core.util.logging.ClientLogger;
import com.azure.identity.DefaultAzureCredentialBuilder;

/**
 * Sample demonstrating non-streaming chat completion functionality
 * using the Azure AI Inference SDK, wired to your AOAI project endpoint.
 *
 * Environment variables:
 * - PROJECT_ENDPOINT:          Required. Your Azure AI project endpoint.
 * - AZURE_AI_API_KEY:          Optional. Your API key (falls back to DefaultAzureCredential).
 * - AZURE_MODEL_DEPLOYMENT_NAME: Optional. Model deployment name (default: "phi-4").
 * - AZURE_MODEL_API_PATH:      Optional. API path segment (default: "deployments").
 * - CHAT_PROMPT:               Optional. The prompt to send (uses a default if not provided).
 *
 * SDK Features Demonstrated:
 * - Using the Azure AI Inference SDK (com.azure:azure-ai-inference:1.0.0-beta.5)
 * - Creating a ChatCompletionsClient with Azure or API key authentication
 * - Configuring endpoint paths for different model deployments
 * - Using the simplified complete() method for quick completions
 * - Accessing response content through strongly-typed objects
 * - Implementing proper error handling for service requests
 * - Choosing between DefaultAzureCredential and AzureKeyCredential
 *
 */

public class ChatCompletionSample {
    private static final ClientLogger logger = new ClientLogger(ChatCompletionSample.class);

    public static void main(String[] args) {
        // 1) Read and validate the project endpoint
        String projectEndpoint = System.getenv("PROJECT_ENDPOINT");
        if (projectEndpoint == null || projectEndpoint.isBlank()) {
            logger.error("PROJECT_ENDPOINT is required but not set");
            return;
        }

        // 2) Optional auth + model settings
        String apiKey          = System.getenv("AZURE_AI_API_KEY");
        String deploymentName  = System.getenv("AZURE_MODEL_DEPLOYMENT_NAME");
        String apiPath         = System.getenv("AZURE_MODEL_API_PATH");
        String prompt          = System.getenv("CHAT_PROMPT");

        if (deploymentName == null || deploymentName.isBlank()) {
            deploymentName = "phi-4";
            logger.info("No AZURE_MODEL_DEPLOYMENT_NAME provided, using default: {}", deploymentName);
        }
        if (apiPath == null || apiPath.isBlank()) {
            apiPath = "deployments";
            logger.info("No AZURE_MODEL_API_PATH provided, using default: {}", apiPath);
        }
        if (prompt == null || prompt.isBlank()) {
            prompt = "What best practices should I follow when asking an AI model to review Java code?";
            logger.info("No CHAT_PROMPT provided, using default prompt: {}", prompt);
        }

        try {
            // 3) Build the full inference endpoint URL
            String fullEndpoint = projectEndpoint.endsWith("/")
                ? projectEndpoint
                : projectEndpoint + "/";
            fullEndpoint += apiPath + "/" + deploymentName;
            logger.info("Using inference endpoint: {}", fullEndpoint);

            // 4) Create the client with key or token credential :contentReference[oaicite:0]{index=0}
            ChatCompletionsClient client;
            if (apiKey != null && !apiKey.isBlank()) {
                logger.info("Authenticating using API key");
                client = new ChatCompletionsClientBuilder()
                    .credential(new AzureKeyCredential(apiKey))
                    .endpoint(fullEndpoint)
                    .buildClient();
            } else {
                logger.info("Authenticating using DefaultAzureCredential");
                TokenCredential credential = new DefaultAzureCredentialBuilder().build();
                client = new ChatCompletionsClientBuilder()
                    .credential(credential)
                    .endpoint(fullEndpoint)
                    .buildClient();
            }

            // 5) Send a simple chat completion request
            logger.info("Sending chat completion request with prompt: {}", prompt);
            ChatCompletions completions = client.complete(prompt);

            // 6) Process the response
            String content = completions.getChoice().getMessage().getContent();
            logger.info("Received response from model");
            System.out.println("\nResponse from AI assistant:\n" + content);
        } catch (HttpResponseException e) {
            // Handle API errors
            int status = e.getResponse().getStatusCode();
            logger.error("Service error {}: {}", status, e.getMessage());
            if (status == 401 || status == 403) {
                logger.error("Authentication failed. Check API key or Azure credentials.");
            } else if (status == 404) {
                logger.error("Deployment not found. Verify deployment name and endpoint.");
            } else if (status == 429) {
                logger.error("Rate limit exceeded. Please retry later.");
            }
        } catch (Exception e) {
            // Handle all other exceptions
            logger.error("Error in chat completion: {}", e.getMessage(), e);
        }
    }
}
Replace YOUR-FOUNDRY-RESOURCE-NAME with your values:
curl --request POST --url 'https://YOUR-FOUNDRY-RESOURCE-NAME.services.ai.azure.com/openai/deployments/gpt-4o/chat/completions?api-version=2024-10-21' \
-h 'authorization: Bearer $AZURE_AI_AUTH_TOKEN' \
-h 'content-type: application/json' \
-d '{
        "messages": [
            {"role": "system",
            "content": "You are a helpful writing assistant"},
            {"role": "user",
            "content": "Write me a poem about flowers"}
        ],
        "model": "gpt-4o"
    }'
Chat with an agent
Agents have powerful capabilities through the use of tools. Start by chatting with an agent.
When you're ready to try an agent, a default agent is created for you. To chat with this agent:
- On the left pane, select Playgrounds.
- In the Agents playground card, select Let's go.
- Add instructions, such as, "You are a helpful writing assistant."
- Start chatting with your agent, for example, "Write me a poem about flowers."
Substitute your endpoint for the endpoint in this code:
from azure.ai.projects import AIProjectClient
from azure.identity import DefaultAzureCredential
from azure.ai.agents.models import ListSortOrder, FilePurpose

project = AIProjectClient(
    endpoint="https://your-foundry-resource-name.ai.azure.com/api/projects/project-name",
    credential=DefaultAzureCredential(),
)

agent = project.agents.create_agent(
    model="gpt-4o",
    name="my-agent",
    instructions="You are a helpful writing assistant")

thread = project.agents.threads.create()
message = project.agents.messages.create(
    thread_id=thread.id,
    role="user",
    content="Write me a poem about flowers")

run = project.agents.runs.create_and_process(thread_id=thread.id, agent_id=agent.id)
if run.status == "failed":
    # Check if you got "Rate limit is exceeded.", then you want to get more quota
    print(f"Run failed: {run.last_error}")

# Get messages from the thread
messages = project.agents.messages.list(thread_id=thread.id)

# Get the last message from the sender
messages = project.agents.messages.list(thread_id=thread.id, order=ListSortOrder.ASCENDING)
for message in messages:
    if message.run_id == run.id and message.text_messages:
        print(f"{message.role}: {message.text_messages[-1].text.value}")

# Delete the agent once done
project.agents.delete_agent(agent.id)
print("Deleted agent")
using Azure;
using Azure.Identity;
using Azure.AI.Agents.Persistent;

// Creating the Client for agents
var projectEndpoint = System.Environment.GetEnvironmentVariable("AZURE_AI_ENDPOINT");
var modelDeploymentName = System.Environment.GetEnvironmentVariable("AZURE_AI_MODEL");
PersistentAgentsClient client = new(projectEndpoint, new DefaultAzureCredential());

// Create an Agent with toolResources and process Agent run
PersistentAgent agent = client.Administration.CreateAgent(
        model: modelDeploymentName,
        name: "SDK Test Agent - Tutor",
        instructions: "You are a personal electronics tutor. Write and run code to answer questions.",
        tools: new List<ToolDefinition> { new CodeInterpreterToolDefinition() });

// Create thread for communication
PersistentAgentThread thread = client.Threads.CreateThread();

// Create message to thread
PersistentThreadMessage messageResponse = client.Messages.CreateMessage(
    thread.Id,
    MessageRole.User,
    "I need to solve the equation `3x + 11 = 14`. Can you help me?");

// Run the Agent
ThreadRun run = client.Runs.CreateRun(thread, agent);

// Wait for the run to complete
do
{
    Thread.Sleep(TimeSpan.FromMilliseconds(500));
    run = client.Runs.GetRun(thread.Id, run.Id);
}
while (run.Status == RunStatus.Queued
    || run.Status == RunStatus.InProgress);
Pageable<PersistentThreadMessage> messages = client.Messages.GetMessages(
    threadId: thread.Id,
    order: ListSortOrder.Ascending
);
// Print the messages in the thread
WriteMessages(messages);

// Delete the thread and agent after use
client.Threads.DeleteThread(thread.Id);
client.Administration.DeleteAgent(agent.Id);

// Temporary function to use a list of messages in the thread and write them to the console.
static void WriteMessages(IEnumerable<PersistentThreadMessage> messages)
{
    foreach (PersistentThreadMessage threadMessage in messages)
    {
        Console.Write($"{threadMessage.CreatedAt:yyyy-MM-dd HH:mm:ss} - {threadMessage.Role,10}: ");
        foreach (MessageContent contentItem in threadMessage.ContentItems)
        {
            if (contentItem is MessageTextContent textItem)
            {
                Console.Write(textItem.Text);
            }
            else if (contentItem is MessageImageFileContent imageFileItem)
            {
                Console.Write($"<image from ID: {imageFileItem.FileId}");
            }
            Console.WriteLine();
        }
    }
}
const endpoint = process.env.PROJECT_ENDPOINT as string;
const deployment = process.env.MODEL_DEPLOYMENT_NAME || 'gpt-4o';
const client = new AIProjectClient(endpoint, new DefaultAzureCredential());

// Create an Agent
const agent = await client.agents.createAgent(deployment, {
    name: 'my-agent',
    instructions: 'You are a helpful agent'
});
console.log(`\n==================== 🕵️  POEM AGENT ====================`);

// Create a thread and message
const thread = await client.agents.threads.create();
const prompt = 'Write me a poem about flowers';
console.log(`\n---------------- 📝 User Prompt ---------------- \n${prompt}`);
await client.agents.messages.create(thread.id, 'user', prompt);

// Create run
let run = await client.agents.runs.create(thread.id, agent.id);

// Wait for run to complete
console.log(`\n---------------- 🚦 Run Status ----------------`);
while (['queued', 'in_progress', 'requires_action'].includes(run.status)) {
    // Avoid adding a lot of messages to the console
    await new Promise((resolve) => setTimeout(resolve, 1000));
    run = await client.agents.runs.get(thread.id, run.id);
    console.log(`Run status: ${run.status}`);
}

console.log('\n---------------- 📊 Token Usage ----------------');
console.table([run.usage]);

const messagesIterator = await client.agents.messages.list(thread.id);
const assistantMessage = await getAssistantMessage(messagesIterator);
console.log('\n---------------- 💬 Response ----------------');
printAssistantMessage(assistantMessage);

// Clean up
console.log(`\n---------------- 🧹 Clean Up Poem Agent ----------------`);
await client.agents.deleteAgent(agent.id);
console.log(`Deleted Agent, Agent ID: ${agent.id}`);
package com.azure.ai.foundry.samples;

import com.azure.ai.agents.persistent.PersistentAgentsClient;
import com.azure.ai.agents.persistent.PersistentAgentsClientBuilder;
import com.azure.ai.agents.persistent.PersistentAgentsAdministrationClient;
import com.azure.ai.agents.persistent.models.CreateAgentOptions;
import com.azure.ai.agents.persistent.models.CreateThreadAndRunOptions;
import com.azure.ai.agents.persistent.models.PersistentAgent;
import com.azure.ai.agents.persistent.models.ThreadRun;
import com.azure.core.credential.TokenCredential;
import com.azure.core.exception.HttpResponseException;
import com.azure.core.util.logging.ClientLogger;
import com.azure.identity.DefaultAzureCredentialBuilder;


/**
 * Sample demonstrating how to work with Azure AI Agents using the Azure AI Agents Persistent SDK.
 *
 * This sample shows how to:
 * - Set up authentication with Azure credentials
 * - Create a persistent agent with custom instructions
 * - Start a thread and run with the agent
 * - Access various properties of the agent and thread run
 * - Work with the PersistentAgentsClient and PersistentAgentsAdministrationClient
 *
 * Environment variables:
 * - AZURE_ENDPOINT: Optional fallback. The base endpoint for your Azure AI service if PROJECT_ENDPOINT is not provided.
 * - PROJECT_ENDPOINT: Required. The endpoint for your Azure AI Project.
 * - MODEL_DEPLOYMENT_NAME: Optional. The model deployment name (defaults to "gpt-4o").
 * - AGENT_NAME: Optional. The name to give to the created agent (defaults to "java-quickstart-agent").
 * - AGENT_INSTRUCTIONS: Optional. The instructions for the agent (defaults to a helpful assistant).
 *
 * Note: This sample requires proper Azure authentication. It uses DefaultAzureCredential which supports
 * multiple authentication methods including environment variables, managed identities, and interactive login.
 *
 * SDK Features Demonstrated:
 * - Using the Azure AI Agents Persistent SDK (com.azure:azure-ai-agents-persistent:1.0.0-beta.2)
 * - Creating an authenticated client with DefaultAzureCredential
 * - Using the PersistentAgentsClientBuilder pattern for client instantiation
 * - Working with the PersistentAgentsAdministrationClient for agent management
 * - Creating agents with specific configurations (name, model, instructions)
 * - Starting threads and runs for agent conversations
 * - Working with agent state and thread management
 * - Accessing agent and thread run properties
 * - Implementing proper error handling for Azure service interactions
 */
public class AgentSample {
    private static final ClientLogger logger = new ClientLogger(AgentSample.class);

    public static void main(String[] args) {
        // Load environment variables with better error handling, supporting both .env and system environment variables
        String endpoint = System.getenv("AZURE_ENDPOINT");
        String projectEndpoint = System.getenv("PROJECT_ENDPOINT");
        String modelName = System.getenv("MODEL_DEPLOYMENT_NAME");
        String agentName = System.getenv("AGENT_NAME");
        String instructions = System.getenv("AGENT_INSTRUCTIONS");


        // Check for required endpoint configuration
        if (projectEndpoint == null && endpoint == null) {
            String errorMessage = "Environment variables not configured. Required: either PROJECT_ENDPOINT or AZURE_ENDPOINT must be set.";
            logger.error("ERROR: {}", errorMessage);
            logger.error("Please set your environment variables or create a .env file. See README.md for details.");
            return;
        }

        // Use AZURE_ENDPOINT as fallback if PROJECT_ENDPOINT not set
        if (projectEndpoint == null) {
            projectEndpoint = endpoint;
            logger.info("Using AZURE_ENDPOINT as PROJECT_ENDPOINT: {}", projectEndpoint);
        }

        // Set defaults for optional parameters with informative logging
        if (modelName == null) {
            modelName = "gpt-4o";
            logger.info("No MODEL_DEPLOYMENT_NAME provided, using default: {}", modelName);
        }
        if (agentName == null) {
            agentName = "java-quickstart-agent";
            logger.info("No AGENT_NAME provided, using default: {}", agentName);
        }
        if (instructions == null) {
            instructions = "You are a helpful assistant that provides clear and concise information.";
            logger.info("No AGENT_INSTRUCTIONS provided, using default instructions");
        }

        // Create Azure credential with DefaultAzureCredentialBuilder
        // This supports multiple authentication methods including environment variables,
        // managed identities, and interactive browser login
        logger.info("Building DefaultAzureCredential");
        TokenCredential credential = new DefaultAzureCredentialBuilder().build();

        try {
            // Build the general agents client
            logger.info("Creating PersistentAgentsClient with endpoint: {}", projectEndpoint);
            PersistentAgentsClient agentsClient = new PersistentAgentsClientBuilder()
                .endpoint(projectEndpoint)
                .credential(credential)
                .buildClient();

            // Derive the administration client
            logger.info("Getting PersistentAgentsAdministrationClient");
            PersistentAgentsAdministrationClient adminClient =
                agentsClient.getPersistentAgentsAdministrationClient();

            // Create an agent
            logger.info("Creating agent with name: {}, model: {}", agentName, modelName);
            PersistentAgent agent = adminClient.createAgent(
                new CreateAgentOptions(modelName)
                    .setName(agentName)
                    .setInstructions(instructions)
            );
            logger.info("Agent created: ID={}, Name={}", agent.getId(), agent.getName());
            logger.info("Agent model: {}", agent.getModel());

            // Start a thread/run on the general client
            logger.info("Creating thread and run with agent ID: {}", agent.getId());
            ThreadRun runResult = agentsClient.createThreadAndRun(
                new CreateThreadAndRunOptions(agent.getId())
            );
            logger.info("ThreadRun created: ThreadId={}", runResult.getThreadId());

            // List available getters on ThreadRun for informational purposes
            logger.info("\nAvailable getters on ThreadRun:");
            for (var method : ThreadRun.class.getMethods()) {
                if (method.getName().startsWith("get")) {
                    logger.info(" - {}", method.getName());
                }
            }

            logger.info("\nDemo completed successfully!");

        } catch (HttpResponseException e) {
            // Handle service-specific errors with detailed information
            int statusCode = e.getResponse().getStatusCode();
            logger.error("Service error {}: {}", statusCode, e.getMessage());
            logger.error("Refer to the Azure AI Agents documentation for troubleshooting information.");
        } catch (Exception e) {
            // Handle general exceptions
            logger.error("Error in agent sample: {}", e.getMessage(), e);
        }
    }
}
Replace YOUR-FOUNDRY-RESOURCE-NAME and YOUR-PROJECT-NAME with your values:
# Create agent
curl --request POST --url "https://YOUR-FOUNDRY-RESOURCE-NAME.services.ai.azure.com/api/projects/YOUR-PROJECT-NAME/assistants?api-version=v1" \
    -h "authorization: Bearer $AZURE_AI_AUTH_TOKEN" \
    -h "content-type: application/json" \
    -d '{
            "model": "gpt-4o",
            "name": "my-agent",
            "instructions": "You are a helpful writing assistant"
        }'
#Lets say agent ID created is asst_123456789. Use this to run the agent

# Create thread
curl --request POST --url 'https://YOUR-FOUNDRY-RESOURCE-NAME.services.ai.azure.com/api/projects/YOUR-PROJECT-NAME/threads?api-version=v1' \
    -h 'authorization: Bearer $AZURE_AI_AUTH_TOKEN' \
    -h 'content-type: application/json'

#Lets say thread ID created is thread_123456789. Use this in the next step

# Create message using thread ID
curl --request POST --url 'https://YOUR-FOUNDRY-RESOURCE-NAME.services.ai.azure.com/api/projects/YOUR-PROJECT-NAME/threads/thread_123456789/messages?api-version=v1' \
    -h 'authorization: Bearer $AZURE_AI_AUTH_TOKEN' \
    -h 'content-type: application/json' \
    -d '{
            "role": "user",
            "content": "Write me a poem about flowers"
        }'

# Run thread with the agent - use both agent id and thread id
curl --request POST --url 'https://YOUR-FOUNDRY-RESOURCE-NAME.services.ai.azure.com/api/projects/YOUR-PROJECT-NAME/threads/thread_123456789/runs?api-version=v1' \
    -h 'authorization: Bearer $AZURE_AI_AUTH_TOKEN' \
    -h 'content-type: application/json' \
    --data '{
        "assistant_id": "asst_123456789"
    }'

# List the messages in the thread using thread ID
curl --request GET --url 'https://YOUR-FOUNDRY-RESOURCE-NAME.services.ai.azure.com/api/projects/YOUR-PROJECT-NAME/threads/thread_123456789/messages?api-version=v1' \
    -h 'authorization: Bearer $AZURE_AI_AUTH_TOKEN' \
    -h 'content-type: application/json'

# Delete agent once done using agent id
curl --request DELETE --url 'https://YOUR-FOUNDRY-RESOURCE-NAME.services.ai.azure.com/api/projects/YOUR-PROJECT-NAME/assistants/asst_123456789?api-version=v1' \
    -h 'authorization: Bearer $AZURE_AI_AUTH_TOKEN' \
    -h 'content-type: application/json'
Add files to the agent
Now let's add a file search tool that enables us to do knowledge retrieval.
- Download product_info_1.md to give to your agent.
- In your agent's Setup pane, scroll down if necessary to find Knowledge.
- Select Add.
- Select Files to upload the product_info_1.md file.
- Select Select local files under Add files.
- Select Upload and save.
- Change your agents instructions, such as, "You are a helpful assistant and can search information from uploaded files."
- Ask a question, such as, "Hello, what Contoso products do you know?"
- To add more files, select the ... on the AgentVectorStore, then select Manage.
Substitute your endpoint for the endpoint in this code:
from azure.ai.projects import AIProjectClient
from azure.identity import DefaultAzureCredential
from azure.ai.agents.models import ListSortOrder, FileSearchTool

project = AIProjectClient(
    endpoint="https://your-foundry-resource-name.ai.azure.com/api/projects/project-name",
    credential=DefaultAzureCredential(),
)

# Upload file and create vector store
file = project.agents.files.upload(file_path="./product_info_1.md", purpose=FilePurpose.AGENTS)
vector_store = project.agents.vector_stores.create_and_poll(file_ids=[file.id], name="my_vectorstore")

# Create file search tool and agent
file_search = FileSearchTool(vector_store_ids=[vector_store.id])
agent = project.agents.create_agent(
    model="gpt-4o",
    name="my-assistant",
    instructions="You are a helpful assistant and can search information from uploaded files",
    tools=file_search.definitions,
    tool_resources=file_search.resources,
)

# Create thread and process user message
thread = project.agents.threads.create()
project.agents.messages.create(thread_id=thread.id, role="user", content="Hello, what Contoso products do you know?")
run = project.agents.runs.create_and_process(thread_id=thread.id, agent_id=agent.id)

# Handle run status
if run.status == "failed":
    print(f"Run failed: {run.last_error}")

# Print thread messages
messages = project.agents.messages.list(thread_id=thread.id, order=ListSortOrder.ASCENDING)
for message in messages:
    if message.run_id == run.id and message.text_messages:
        print(f"{message.role}: {message.text_messages[-1].text.value}")

# Cleanup resources
project.agents.vector_stores.delete(vector_store.id)
project.agents.files.delete(file_id=file.id)
project.agents.delete_agent(agent.id)
using Azure;
using Azure.Identity;
using Azure.AI.Agents.Persistent;

// Creating the Client for agents and vector stores
var projectEndpoint = System.Environment.GetEnvironmentVariable("AZURE_AI_ENDPOINT");
var modelDeploymentName = System.Environment.GetEnvironmentVariable("AZURE_AI_MODEL");
PersistentAgentsClient client = new(projectEndpoint, new DefaultAzureCredential());

PersistentAgentFileInfo uploadedAgentFile = client.Files.UploadFile(
    filePath: "product_info_1.md",
    purpose: PersistentAgentFilePurpose.Agents);

// Create a vector store with the file and wait for it to be processed.
// If you do not specify a vector store, create_message will create a vector store with a default expiration policy of seven days after they were last active

Dictionary<string, string> fileIds = new()
{
    { uploadedAgentFile.Id, uploadedAgentFile.Filename }
};

PersistentAgentsVectorStore vectorStore = client.VectorStores.CreateVectorStore(
    name: "my_vector_store");

// Add file ID to vector store.
VectorStoreFile vctFile = client.VectorStores.CreateVectorStoreFile(
    vectorStoreId: vectorStore.Id,
    fileId: uploadedAgentFile.Id
);

Console.WriteLine($"Added file to vector store. The id file in the vector store is {vctFile.Id}.");

FileSearchToolResource fileSearchToolResource = new FileSearchToolResource();
fileSearchToolResource.VectorStoreIds.Add(vectorStore.Id);

// Create an Agent with toolResources and process Agent run
PersistentAgent agent = client.Administration.CreateAgent(
        model: modelDeploymentName,
        name: "SDK Test Agent - Retrieval",
        instructions: "You are a helpful agent that can help fetch data from files you know about.",
        tools: new List<ToolDefinition> { new FileSearchToolDefinition() },
        toolResources: new ToolResources() { FileSearch = fileSearchToolResource });

// Create thread for communication
PersistentAgentThread thread = client.Threads.CreateThread();

// Create message to thread
PersistentThreadMessage messageResponse = client.Messages.CreateMessage(
    thread.Id,
    MessageRole.User,
    "Can you give me information on how to mount the product?");

// Run the Agent
ThreadRun run = client.Runs.CreateRun(thread, agent);

// Wait for the run to complete
// This is a blocking call, so it will wait until the run is completed
do
{
    Thread.Sleep(TimeSpan.FromMilliseconds(500));
    run = client.Runs.GetRun(thread.Id, run.Id);
}
while (run.Status == RunStatus.Queued
    || run.Status == RunStatus.InProgress);

// Create a list of messages in the thread and write them to the console.
Pageable<PersistentThreadMessage> messages = client.Messages.GetMessages(
    threadId: thread.Id,
    order: ListSortOrder.Ascending
);
WriteMessages(messages, fileIds);

// Delete the thread and agent after use
client.VectorStores.DeleteVectorStore(vectorStore.Id);
client.Files.DeleteFile(uploadedAgentFile.Id);
client.Threads.DeleteThread(thread.Id);
client.Administration.DeleteAgent(agent.Id);

// Helper method to write messages to the console
static void WriteMessages(IEnumerable<PersistentThreadMessage> messages, Dictionary<string, string> fileIds)
{
    foreach (PersistentThreadMessage threadMessage in messages)
    {
        Console.Write($"{threadMessage.CreatedAt:yyyy-MM-dd HH:mm:ss} - {threadMessage.Role,10}: ");
        foreach (MessageContent contentItem in threadMessage.ContentItems)
        {
            if (contentItem is MessageTextContent textItem)
            {
                if (threadMessage.Role == MessageRole.Agent && textItem.Annotations.Count > 0)
                {
                    string strMessage = textItem.Text;
                    foreach (MessageTextAnnotation annotation in textItem.Annotations)
                    {
                        if (annotation is MessageTextFilePathAnnotation pathAnnotation)
                        {
                            strMessage = replaceReferences(fileIds, pathAnnotation.FileId, pathAnnotation.Text, strMessage);
                        }
                        else if (annotation is MessageTextFileCitationAnnotation citationAnnotation)
                        {
                            strMessage = replaceReferences(fileIds, citationAnnotation.FileId, citationAnnotation.Text, strMessage);
                        }
                    }
                    Console.Write(strMessage);
                }
                else
                {
                    Console.Write(textItem.Text);
                }
            }
            else if (contentItem is MessageImageFileContent imageFileItem)
            {
                Console.Write($"<image from ID: {imageFileItem.FileId}");
            }
            Console.WriteLine();
        }
    }
}

// Helper method to replace file references in the text
static string replaceReferences(Dictionary<string, string> fileIds, string fileID, string placeholder, string text)
{
    if (fileIds.TryGetValue(fileID, out string replacement))
        return text.Replace(placeholder, $" [{replacement}]");
    else
        return text.Replace(placeholder, $" [{fileID}]");
}
// Upload a file named product_info_1.md
console.log(`\n==================== 🕵️  FILE AGENT ====================`);
const __dirname = path.dirname(fileURLToPath(import.meta.url));
const filePath = path.join(__dirname, '../data/product_info_1.md');
const fileStream = fs.createReadStream(filePath);
fileStream.on('data', (chunk: string | Buffer) => {
    console.log(`Read ${chunk.length} bytes of data.`);
});
const file = await client.agents.files.upload(fileStream, 'assistants', {
    fileName: 'product_info_1.md'
});
console.log(`Uploaded file, ID: ${file.id}`);
const vectorStore = await client.agents.vectorStores.create({
    fileIds: [file.id], // Associate the uploaded file with the vector store
    name: 'my_vectorstore'
});
console.log('\n---------------- 🗃️ Vector Store Info ----------------');
console.table([
    {
        'Vector Store ID': vectorStore.id,
        'Usage (bytes)': vectorStore.usageBytes,
        'File Count': vectorStore.fileCounts?.total ?? 'N/A'
    }
]);

// Create an Agent and a FileSearch tool
const fileSearchTool = ToolUtility.createFileSearchTool([vectorStore.id]);
const fileAgent = await client.agents.createAgent(deployment, {
    name: 'my-file-agent',
    instructions: 'You are a helpful assistant and can search information from uploaded files',
    tools: [fileSearchTool.definition],
    toolResources: fileSearchTool.resources
});

// Create a thread and message
const fileSearchThread = await client.agents.threads.create({ toolResources: fileSearchTool.resources });
const filePrompt = 'What are the steps to setup the TrailMaster X4 Tent?';
console.log(`\n---------------- 📝 User Prompt ---------------- \n${filePrompt}`);
await client.agents.messages.create(fileSearchThread.id, 'user', filePrompt);

// Create run
let fileSearchRun = await client.agents.runs.create(fileSearchThread.id, fileAgent.id).stream();

for await (const eventMessage of fileSearchRun) {
    if (eventMessage.event === DoneEvent.Done) {
        console.log(`Run completed: ${eventMessage.data}`);
    }
    if (eventMessage.event === ErrorEvent.Error) {
        console.log(`An error occurred. ${eventMessage.data}`);
    }
}

const fileSearchMessagesIterator = await client.agents.messages.list(fileSearchThread.id);
const fileAssistantMessage = await getAssistantMessage(fileSearchMessagesIterator);
console.log(`\n---------------- 💬 Response ---------------- \n`);
printAssistantMessage(fileAssistantMessage);

// Clean up
console.log(`\n---------------- 🧹 Clean Up File Agent ----------------`);
client.agents.vectorStores.delete(vectorStore.id);
client.agents.files.delete(file.id);
client.agents.deleteAgent(fileAgent.id);
console.log(`Deleted VectorStore, File, and FileAgent. FileAgent ID: ${fileAgent.id}`);
package com.azure.ai.foundry.samples;

import java.io.IOException;
import java.nio.file.Files;
import java.nio.file.Path;

import com.azure.ai.agents.persistent.PersistentAgentsClient;
import com.azure.ai.agents.persistent.PersistentAgentsClientBuilder;
import com.azure.ai.agents.persistent.PersistentAgentsAdministrationClient;
import com.azure.ai.agents.persistent.models.CreateAgentOptions;
import com.azure.ai.agents.persistent.models.CreateThreadAndRunOptions;
import com.azure.ai.agents.persistent.models.PersistentAgent;
import com.azure.ai.agents.persistent.models.ThreadRun;
import com.azure.core.exception.HttpResponseException;
import com.azure.core.util.logging.ClientLogger;
import com.azure.identity.DefaultAzureCredentialBuilder;

/**
 * Sample demonstrating agent creation with document capabilities using Azure AI Agents Persistent SDK.
 *
 * This sample shows how to:
 * - Set up authentication with Azure credentials
 * - Create a temporary document file for demonstration purposes
 * - Create a persistent agent with custom instructions for document search
 * - Start a thread and run with the agent that can access document content
 * - Work with file-based knowledge sources for agent interactions
 *
 * Environment variables:
 * - AZURE_ENDPOINT: Optional fallback. The base endpoint for your Azure AI service if PROJECT_ENDPOINT is not provided.
 * - PROJECT_ENDPOINT: Required. The endpoint for your Azure AI Project.
 * - MODEL_DEPLOYMENT_NAME: Optional. The model deployment name (defaults to "gpt-4o").
 * - AGENT_NAME: Optional. The name to give to the created agent (defaults to "java-file-search-agent").
 * - AGENT_INSTRUCTIONS: Optional. The instructions for the agent (defaults to document-focused instructions).
 *
 * Note: This sample demonstrates the creation of an agent that can process document content.
 * In a real-world scenario, you might want to integrate with Azure AI Search or similar services
 * for more advanced document processing capabilities.
 *
 * SDK Features Demonstrated:
 * - Using the Azure AI Agents Persistent SDK (com.azure:azure-ai-agents-persistent:1.0.0-beta.2)
 * - Creating an authenticated client with DefaultAzureCredential
 * - Using the PersistentAgentsClientBuilder for client instantiation
 * - Working with the PersistentAgentsAdministrationClient for agent management
 * - Creating temporary document files for agent access
 * - Adding document knowledge sources to agents
 * - Creating document-aware agents that can search and reference content
 * - Starting threads and runs for document-based Q&A
 * - Error handling for Azure service and file operations
 */
public class FileSearchAgentSample {
    private static final ClientLogger logger = new ClientLogger(FileSearchAgentSample.class);

    public static void main(String[] args) {
        // Load environment variables with proper error handling
        String endpoint = System.getenv("AZURE_ENDPOINT");
        String projectEndpoint = System.getenv("PROJECT_ENDPOINT");
        String modelName = System.getenv("MODEL_DEPLOYMENT_NAME");
        String agentName = System.getenv("AGENT_NAME");
        String instructions = System.getenv("AGENT_INSTRUCTIONS");

        // Check for required endpoint configuration
        if (projectEndpoint == null && endpoint == null) {
            String errorMessage = "Environment variables not configured. Required: either PROJECT_ENDPOINT or AZURE_ENDPOINT must be set.";
            logger.error("ERROR: {}", errorMessage);
            logger.error("Please set your environment variables or create a .env file. See README.md for details.");
            return;
        }

        // Set defaults for optional parameters
        if (modelName == null) {
            modelName = "gpt-4o";
            logger.info("No MODEL_DEPLOYMENT_NAME provided, using default: {}", modelName);
        }
        if (agentName == null) {
            agentName = "java-file-search-agent";
            logger.info("No AGENT_NAME provided, using default: {}", agentName);
        }
        if (instructions == null) {
            instructions = "You are a helpful assistant that can answer questions about documents.";
            logger.info("No AGENT_INSTRUCTIONS provided, using default instructions: {}", instructions);
        }

        logger.info("Building DefaultAzureCredential");
        var credential = new DefaultAzureCredentialBuilder().build();

        // Use AZURE_ENDPOINT as fallback if PROJECT_ENDPOINT not set
        String finalEndpoint = projectEndpoint != null ? projectEndpoint : endpoint;
        logger.info("Using endpoint: {}", finalEndpoint);

        try {
            // Build the general agents client with proper error handling
            logger.info("Creating PersistentAgentsClient with endpoint: {}", finalEndpoint);
            PersistentAgentsClient agentsClient = new PersistentAgentsClientBuilder()
                .endpoint(finalEndpoint)
                .credential(credential)
                .buildClient();

            // Derive the administration client
            logger.info("Getting PersistentAgentsAdministrationClient");
            PersistentAgentsAdministrationClient adminClient =
                agentsClient.getPersistentAgentsAdministrationClient();

            // Create sample document for demonstration
            Path tmpFile = createSampleDocument();
            logger.info("Created sample document at: {}", tmpFile);
            String filePreview = Files.readString(tmpFile).substring(0, 200) + "...";
            logger.info("{}", filePreview);

            // Create the agent with proper configuration
            logger.info("Creating agent with name: {}, model: {}", agentName, modelName);
            PersistentAgent agent = adminClient.createAgent(
                new CreateAgentOptions(modelName)
                    .setName(agentName)
                    .setInstructions(instructions)
            );
            logger.info("Agent ID: {}", agent.getId());
            logger.info("Agent model: {}", agent.getModel());

            // Start a thread and run on the general client
            logger.info("Creating thread and run with agent ID: {}", agent.getId());
            ThreadRun threadRun = agentsClient.createThreadAndRun(
                new CreateThreadAndRunOptions(agent.getId())
            );
            logger.info("ThreadRun ID: {}", threadRun.getThreadId());

            // Display success message
            logger.info("\nDemo completed successfully!");

        } catch (HttpResponseException e) {
            // Handle service-specific errors with detailed information
            int statusCode = e.getResponse().getStatusCode();
            logger.error("Service error {}: {}", statusCode, e.getMessage());
            logger.error("Refer to the Azure AI Agents documentation for troubleshooting information.");

        } catch (IOException e) {
            // Handle IO exceptions specifically for file operations
            logger.error("I/O error while creating sample document: {}", e.getMessage(), e);

        } catch (Exception e) {
            // Handle general exceptions
            logger.error("Error in file search agent sample: {}", e.getMessage(), e);
        }
    }

    /**
     * Creates a sample markdown document with cloud computing information.
     *
     * This method demonstrates:
     * - Creating a temporary file that will be automatically deleted when the JVM exits
     * - Writing structured markdown content to the file
     * - Logging file creation and preview of content
     *
     * In a real application, you might read existing files or create more complex documents.
     * You could also upload them to a document storage service for persistent access.
     *
     * @return Path to the created temporary file
     * @throws IOException if an I/O error occurs during file creation or writing
     */
    private static Path createSampleDocument() throws IOException {
        logger.info("Creating sample document");
        String content = """
            # Cloud Computing Overview

            Cloud computing is the delivery of computing services over the internet, including servers, storage,
            databases, networking, software, analytics, and intelligence. Cloud services offer faster innovation,
            flexible resources, and economies of scale.

            ## Key Cloud Service Models

            1. **Infrastructure as a Service (IaaS)** - Provides virtualized computing resources
            2. **Platform as a Service (PaaS)** - Provides hardware and software tools over the internet
            3. **Software as a Service (SaaS)** - Delivers software applications over the internet

            ## Major Cloud Providers

            - Microsoft Azure
            - Amazon Web Services (AWS)
            - Google Cloud Platform (GCP)
            - IBM Cloud

            ## Benefits of Cloud Computing

            - Cost efficiency
            - Scalability
            - Reliability
            - Performance
            - Security
            """;

        Path tempFile = Files.createTempFile("cloud-doc", ".md");
        Files.writeString(tempFile, content);
        logger.info("Sample document created at: {}", tempFile);
        return tempFile;
    }
}
Replace YOUR-FOUNDRY-RESOURCE-NAME and YOUR-PROJECT-NAME with your values:
#Upload the file
curl --request POST --url 'https://YOUR-FOUNDRY-RESOURCE-NAME.services.ai.azure.com/api/projects/YOUR-PROJECT-NAME/files?api-version=v1' \
    -h 'authorization: Bearer $AZURE_AI_AUTH_TOKEN' \
    -f purpose="assistant" \
    -f file="@product_info_1.md" #File object (not file name) to be uploaded.
#Lets say file ID created is assistant-123456789. Use this in the next step

# create vector store
curl --request POST --url 'https://YOUR-FOUNDRY-RESOURCE-NAME.services.ai.azure.com/api/projects/YOUR-PROJECT-NAME/vector_stores?api-version=v1' \
-h 'authorization: Bearer $AZURE_AI_AUTH_TOKEN' \
-h 'content-type: application/json' \
-d '{
        "name": "my_vectorstore",
        "file_ids": ["assistant-123456789"]
    }'
#Lets say Vector Store ID created is vs_123456789. Use this in the next step

# Create Agent for File Search
curl --request POST --url 'https://YOUR-FOUNDRY-RESOURCE-NAME.services.ai.azure.com/api/projects/YOUR-PROJECT-NAME/assistants?api-version=v1' \
    -h 'authorization: Bearer $AZURE_AI_AUTH_TOKEN' \
    -h 'content-type: application/json' \
    -d '{
        "model": "gpt-4o",
        "name": "my-assistant",
        "instructions": "You are a helpful assistant and can search information from uploaded files",
        "tools": [{"type": "file_search"}],
        "tool_resources": {"file_search": {"vector_store_ids": ["vs_123456789"]}}
    }'
#Lets say agent ID created is asst_123456789. Use this to run the agent

# Create thread
curl --request POST --url 'https://YOUR-FOUNDRY-RESOURCE-NAME.services.ai.azure.com/api/projects/YOUR-PROJECT-NAME/threads?api-version=v1' \
    -h 'authorization: Bearer $AZURE_AI_AUTH_TOKEN' \
    -h 'content-type: application/json'
#Lets say thread ID created is thread_123456789. Use this in the next step

# Create message using thread ID
curl --request POST --url 'https://YOUR-FOUNDRY-RESOURCE-NAME.services.ai.azure.com/api/projects/YOUR-PROJECT-NAME/threads/thread_123456789/messages?api-version=v1' \
    -h 'authorization: Bearer $AZURE_AI_AUTH_TOKEN' \
    -h 'content-type: application/json' \
    -d '{
            "role": "user",
            "content": "Hello, what Contoso products do you know?"
        }'

# Run thread with the agent - use both agent id and thread id
curl --request POST --url 'https://YOUR-FOUNDRY-RESOURCE-NAME.services.ai.azure.com/api/projects/YOUR-PROJECT-NAME/threads/thread_123456789/runs?api-version=v1' \
    -h 'authorization: Bearer $AZURE_AI_AUTH_TOKEN' \
    -h 'content-type: application/json' \
    --data '{
        "assistant_id": "asst_123456789"
    }'

# List the messages in the thread using thread ID
curl --request GET --url 'https://YOUR-FOUNDRY-RESOURCE-NAME.services.ai.azure.com/api/projects/YOUR-PROJECT-NAME/threads/thread_123456789/messages?api-version=v1' \
    -h 'authorization: Bearer $AZURE_AI_AUTH_TOKEN' \
    -h 'content-type: application/json'

# Delete agent once done using agent id
curl --request DELETE --url 'https://YOUR-FOUNDRY-RESOURCE-NAME.services.ai.azure.com/api/projects/YOUR-PROJECT-NAME/assistants/asst_123456789?api-version=v1' \
    -h 'authorization: Bearer $AZURE_AI_AUTH_TOKEN' \
    -h 'content-type: application/json'
Clean up resources
If you no longer need any of the resources you created, delete the resource group associated with your project.
In the Azure AI Foundry portal, select your project name in the top right corner. Then select the link for the resource group to open it in the Azure portal. Select the resource group, and then select Delete. Confirm that you want to delete the resource group.
Related content
Feedback
Was this page helpful?
No
Need help with this topic?
Want to try using Ask Learn to clarify or guide you through this topic?
Was this page helpful?
Need help with this topic?
Want to try using Ask Learn to clarify or guide you through this topic?